

How To Get Real-Time Visibility Of Work Orders by Workstation
Use this guide to track the real-time status of work orders on your shop floor.
In this article, you will learn:
- How to track the status of a work order across multiple stations
- How to drill down into data around an individual work order
- How to combine apps, tables and analytics
Note: This topic is featured in the "Build a Production Visibility App" section of Tulip University.
What if you could have a “Food Delivery Tracker” for work orders on your shop floor?
You know, like the real-time visualization that a restaurant or food delivery service shares when you want to see the progress of your pizza delivery.
Similarly, let’s imagine that a work order must pass through 4 workstations on your shop floor before it is completed. And, there are 20 active work orders on your floor at any given time.
Do you know the real-time status of each work order, and its progress towards completion?
In this walkthrough, you will learn how to track the live status of work orders and allow any operator or engineer to instantly check order status via a shop floor dashboard or a visualization that is running on a touch screen on your floor.
By default, Tulip tracks the amount of time it takes to complete every app But, you need to use Tables to track work orders across multiple stations.
To accomplish this, you will need to build two types of apps:
- Apps that will run at each station on your floor
- A shop floor dashboard app that will display data on a touch screen that is connected to the internet
Here is the general flow of data:
- At the first station, operator scans or enters a barcode, which will create a record in a Table
- Every time the work order passes through a subsequent station, the table record will be updated with the latest station.
- Every time the work order passes through a subsequent station, the visualization of all work orders on your floor will be updated with the latest data.
- When the work order passes through the last station, it will be added to a separate visualization that just includes completed work orders.
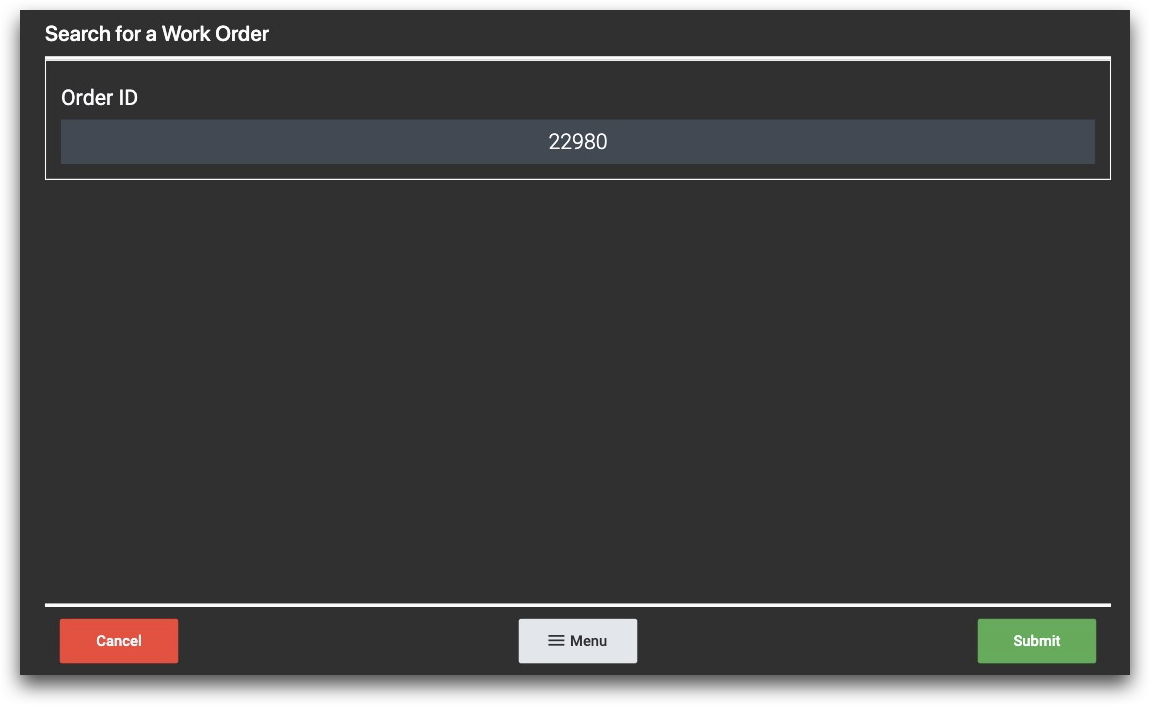
- If an operator or engineer is curious about an individual work order, they can enter the work order number on the shop floor dashboard and get a breakdown of cycle times across each station and any remaining progress.
In order to build these apps, you will use these Tulip features:
Here's what the final product might look like for the shop floor dashboard:
This shows the number of workstations that each work order has passed through. You can select other lines via the buttons at the top to see live views of those other lines.
Before you use this tutorial, make sure you have completed Tulip Basics to understand the basics of app building
Here’s how to track cycle time data by workstation for every individual work order.
Add the Work Order To a Table
First, you need to create a “Work Orders” table to store cycle time data for each individual work order.
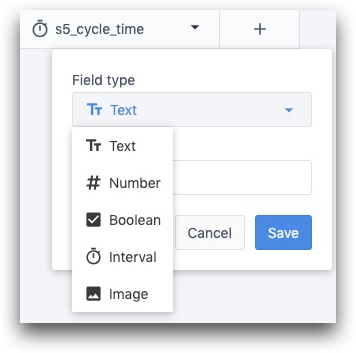
Here are some of the fields you may need in your table:
- ID- this is required, and will be the work order number that is stored when a work order is scanned at the first station. (string)
- target_cycle_time- the cycle time goal for the entire work order in minutes (number)
- stations_required- the total number of stations that the work order must pass through (number)
- stations_passed- the total number of stations that have completed their work on the work order (number)
- latest_station- The last station that a work order has passed through (text)
- Time Entered Queue- the time that work was completed at the previous station before it entered the queue (datetime)
Here’s what that might look like:

To build it, first create a Table called “Work Orders”.
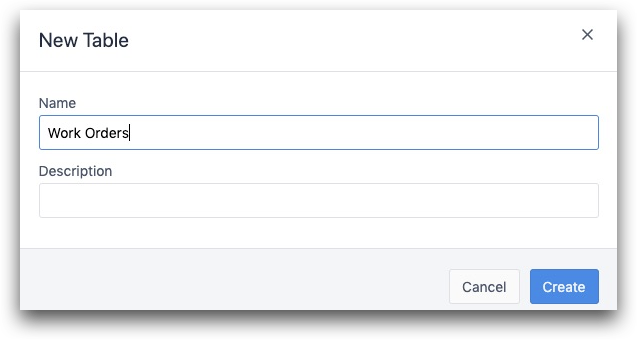
Then, add each individual field to the table using the “+” button.
After you have added all fields, head over to the App Editor and create a new app. You should create a new app for each station in the process.
Adding Work Orders to the Table
We will start by covering the first station, where we will need to create a new table record for the work order based on the work order ID.
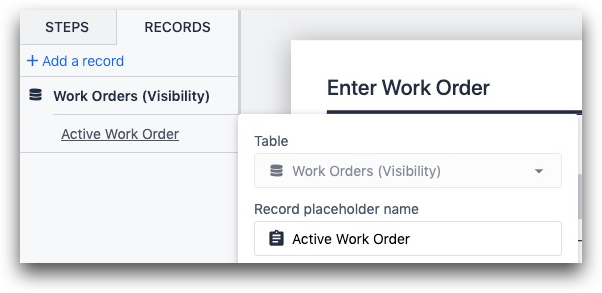
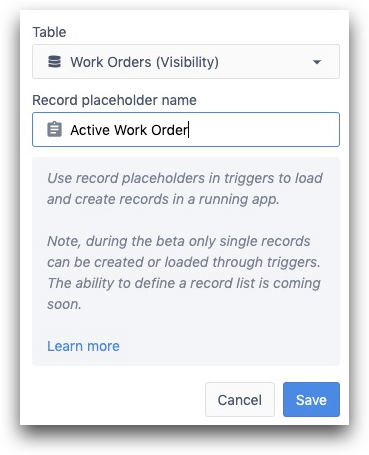
First, in the new app, you will need to create a record placeholder. Click the Records tab, then choose “Add a record.”
Name the placeholder “Active Work Order” or something similar so you know that you are creating a new record.
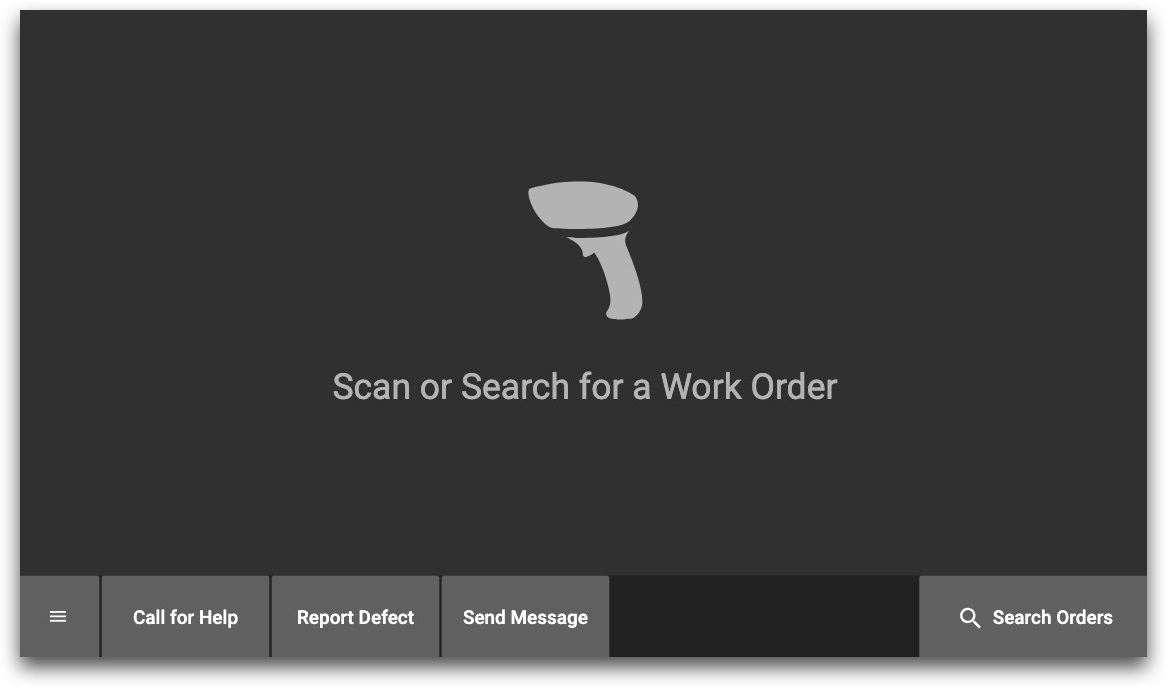
Then, on the first step in the app, you will want to prompt the operator to scan a barcode. This is what the step looks like in the Tulip Terminal:
Or, you can create a Form Step that has a single text input:
You will need to create a trigger that will add a new record to the “Work Orders” database.
It might look like this:
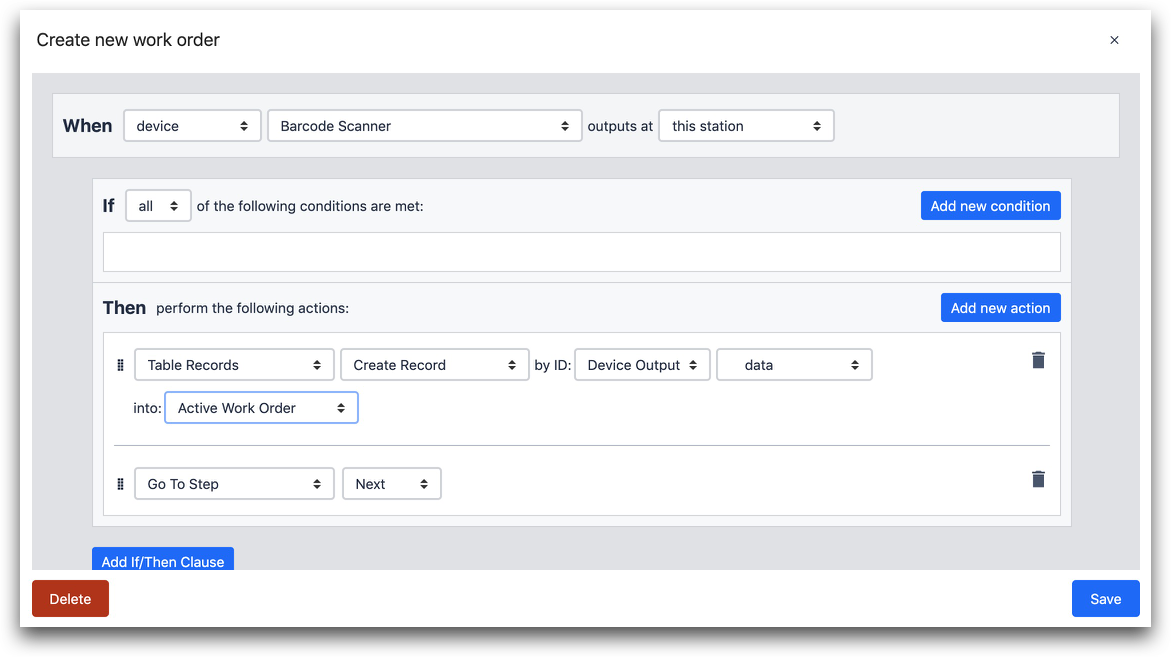
- “When” “Barcode Scanner” outputs at “This Station”
- “Table Records” “Create Record” by ID: “Device Output” “data” into “Active Work Order”
- “Go To Step” “Next”
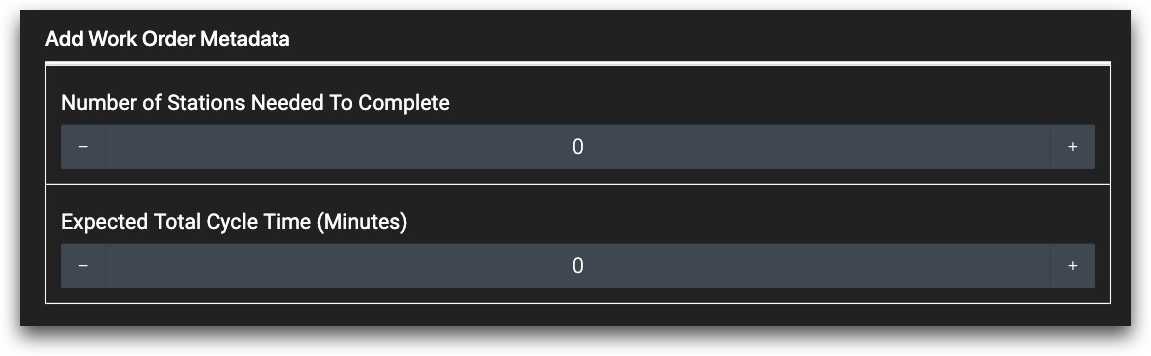
Finally, you need to add a Form Step following this step so the operator can confirm the number of stations that the work order must pass through, and the expected total cycle time.
It would have two fields:
- A number field for total stations needed to complete the work order
- A number field for the expected total cycle time (in minutes)
It might look like this:
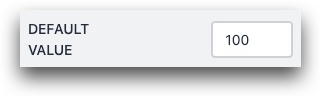
In each case, you will need to create a variable in the side pane to store the value in the field.
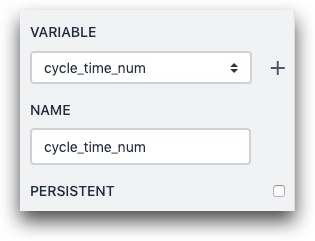
You can also add a default value in the side pane so that operators will not need to manually add a value every time.
Next, you need to set the Submit Button to “Custom Action”, and add a trigger that will store these two numbers in the “Active Work Order” record placeholder and then complete the app to save the data.
Here’s what the Trigger might look like:
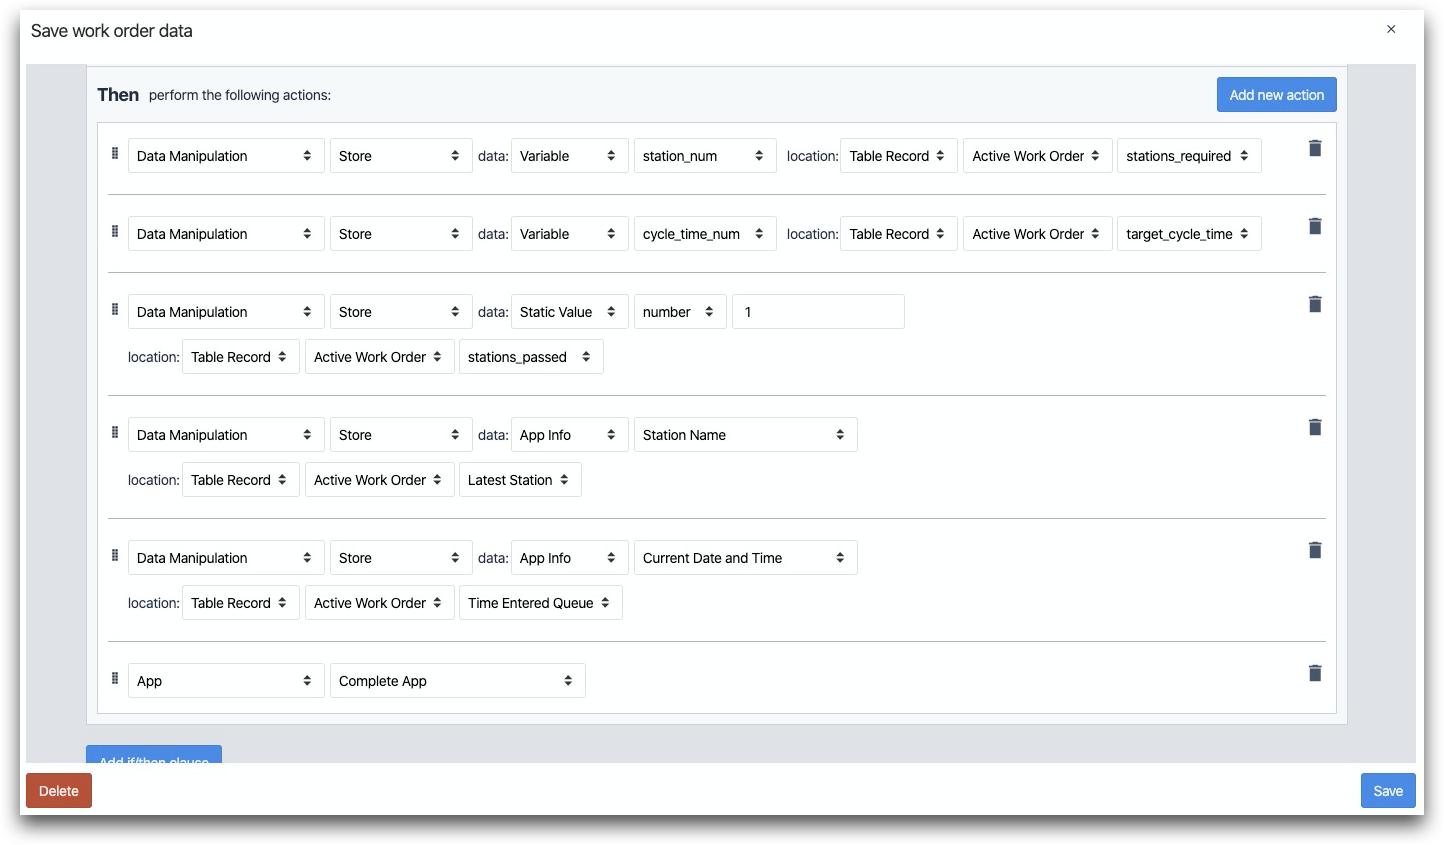
- “Data Manipulation” “Store” data: “Variable” “station_num” location: “Table Record” “Active Work Order” “stations_required”
- “Data Manipulation” “Store” data: “Variable” “cycle_time_num” location: “Table Record” “Active Work Order” “target_cycle_time”
- “Data Manipulation” “Store” data: “App Info” “Station Name” location: “Table Record” “Active Work Order” “Latest Station”
- “Data Manipulation” “Store” data: “App Info” “Current Date and Time” location: “Table Record” “Active Work Order” “Time Entered Queue”
- “Data Manipulation” “Store” data: “Static Value” “number” “1” location: “Table Record” “Active Work Order” “stations_passed”
- “App” “Complete App”
Now, you are ready to create the other 4 apps that cover each step of the manufacturing process.
Update the Table Record After Each Station
So far, we have created an app for the first station on your production line that will:
- Create a new work order when a barcode is scanned
- Update that record to show that it has passed through one station
Now, we need to add 2 triggers to each of the other 4 apps on the production line that will update this same record.
- Load the table record related to a specific work order in each app
- Update the "Latest Station" field every time the work order moves.
So, let’s say that an operator at the 2nd station on the line opens an app when they are ready to continue the work order.
First, you need a record placeholder called “Active Work Order” so you can update it.
Then, you must load up the appropriate record. You can add a trigger around a barcode scan just like the first step:
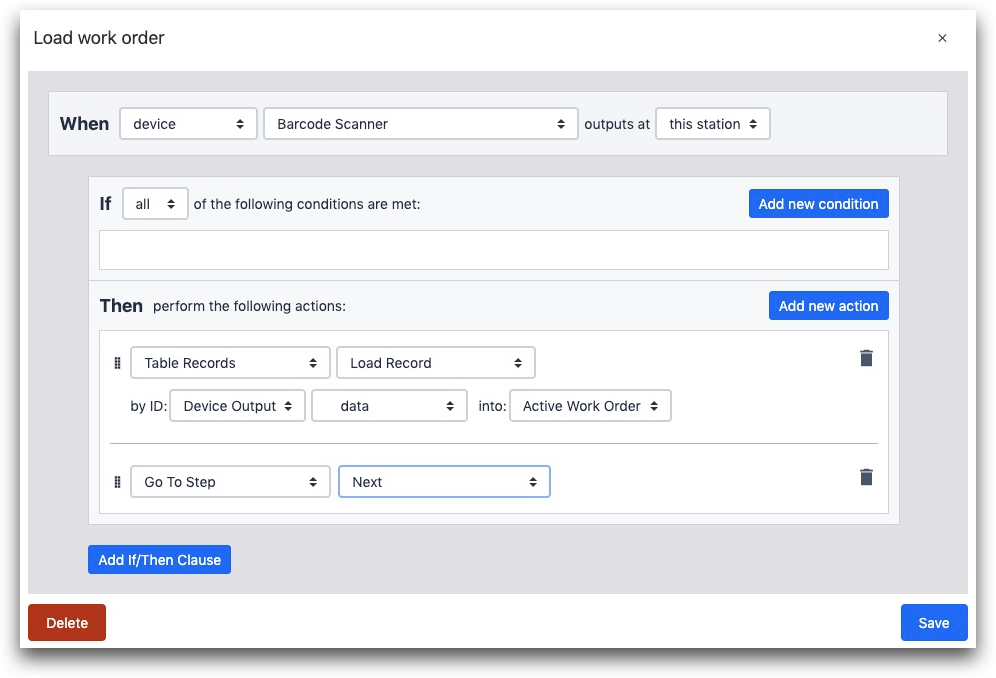
- “When” “device” “Barcode Scanner” outputs at “This Station”
- “Table Records” “Load Record” by ID: “Device Output” “data” into “Active Work Order”
- “Go To Step” “Next”
After the operator at the 2nd station completes their work, you will want to update the record upon app completion. Here’s the trigger that you would want to add to the “Complete” button.
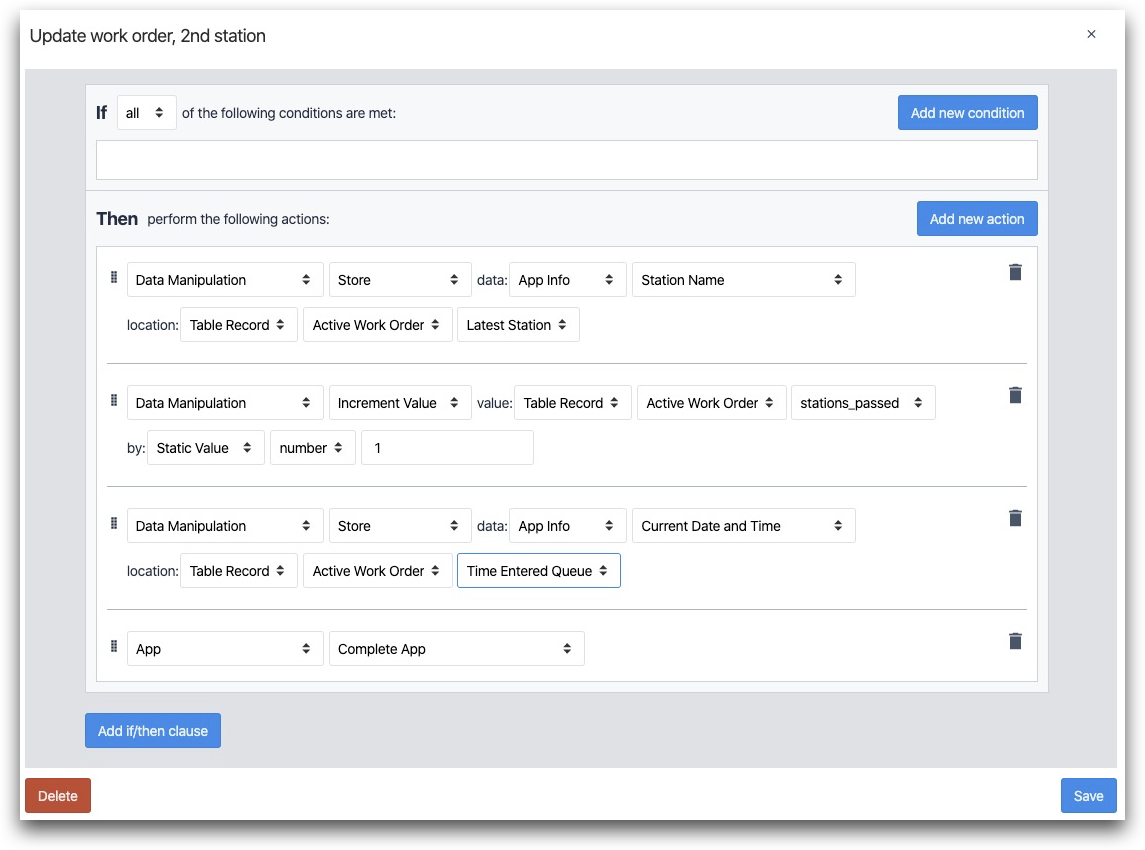
- “Data Manipulation” “Store” data: “App Info” “Station Name” location: “Table Record” “Active Work Order” “Latest Station”
- “Data Manipulation” “Increment Value” value: “Table Record” “Active Work Order” “stations_passed” by: “Static Value” “number” “1”
- “Data Manipulation” “Store” data: “App Info” “Current Date and Time” location: “Table Record” “Active Work Order” “Time Entered Queue”
- “App” “Complete App”
For stations 3-5, you can recreate both the barcode scan trigger and time storage trigger at the beginning and end of each app. You just need to update the field from the table where you will be storing the time for app completion.
Create A Shop Floor Dashboard App
Create one more app called “Work Order Dashboard” to investigate individual work orders. A supervisor might run this app on their tablet or phone. Or, you can display it on the floor on a smart TV.
You have a couple options for how to display the work orders on your floor:
- Display one long list, sorted by progress of work orders
- Display one long list, sorted based on due date, with overdue orders at the top
- Display multiple lists, based on the queue of the work order
In this case, we will show how to do number 3, but these techniques can be applied to all 3.
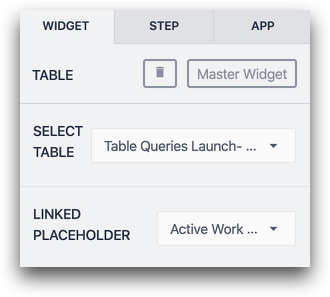
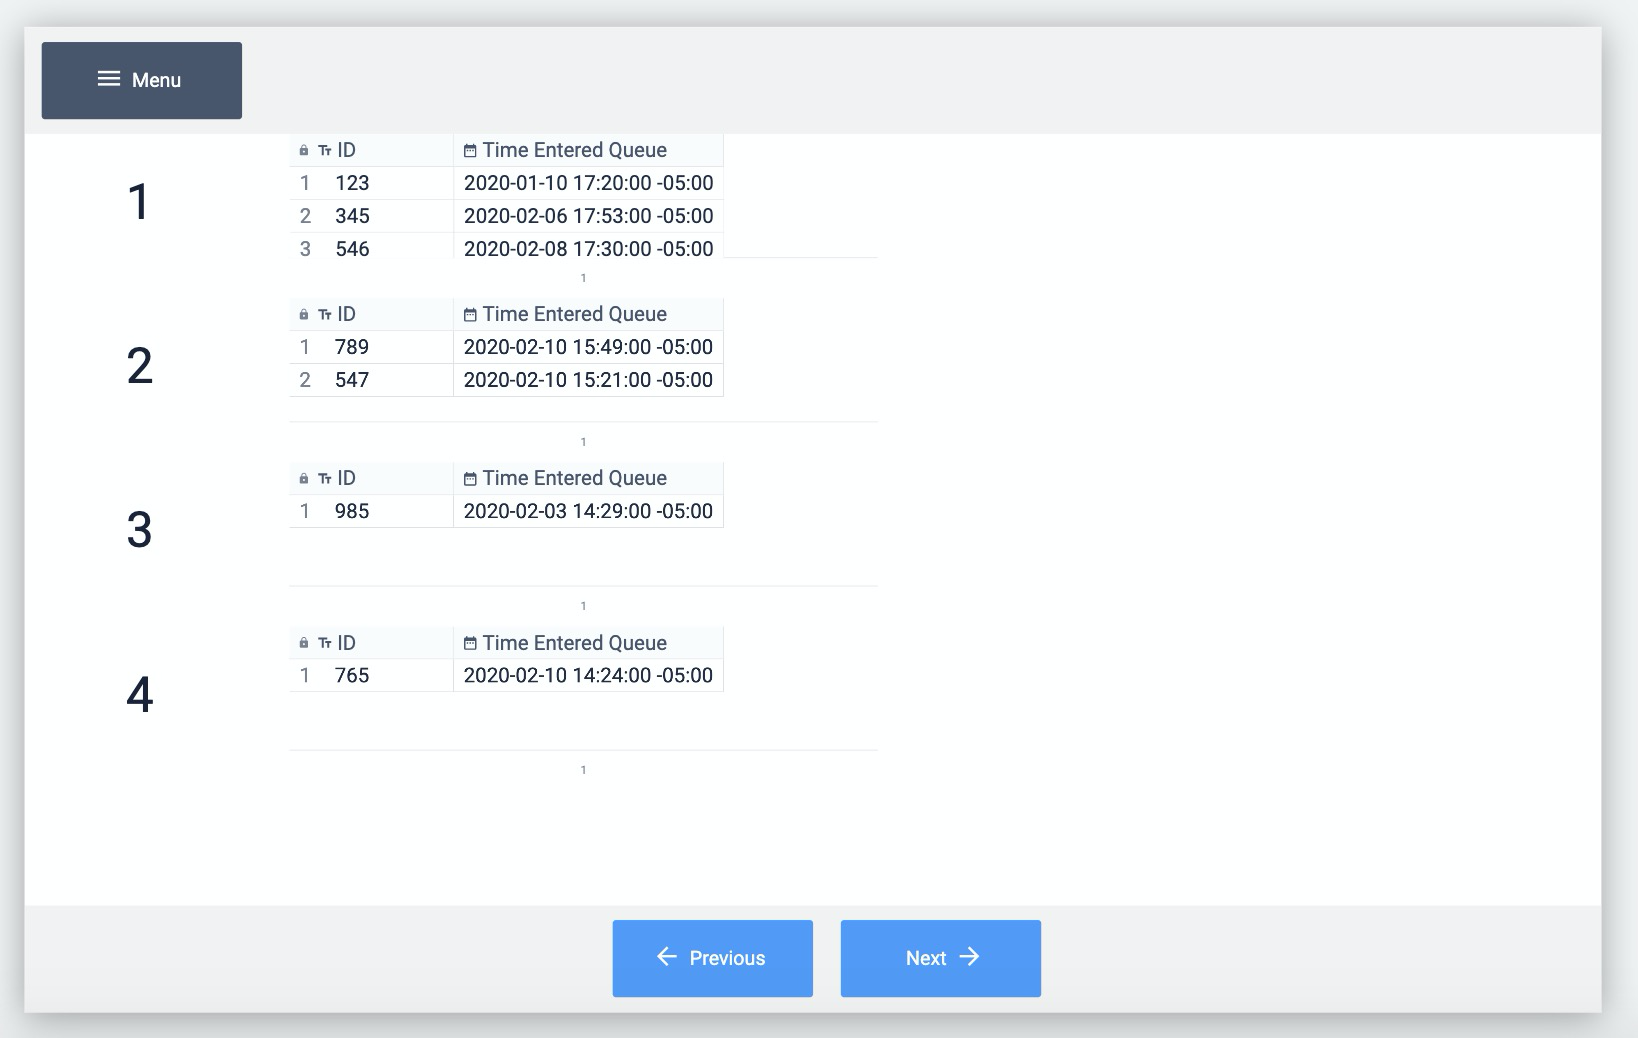
In your new shop floor dashboard app, create a record placeholder called "Active Work Order", which will come in use later.

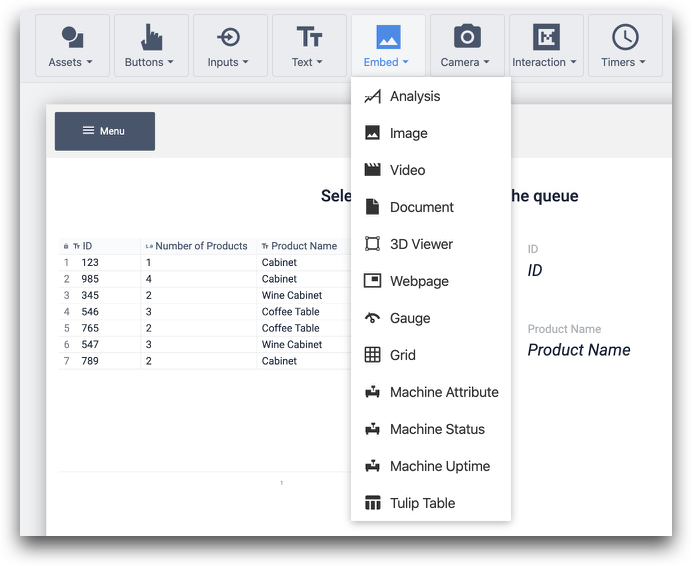
Then, add an Embedded Table using the Widget Bar.
Specify the Record Placeholder in the side pane.
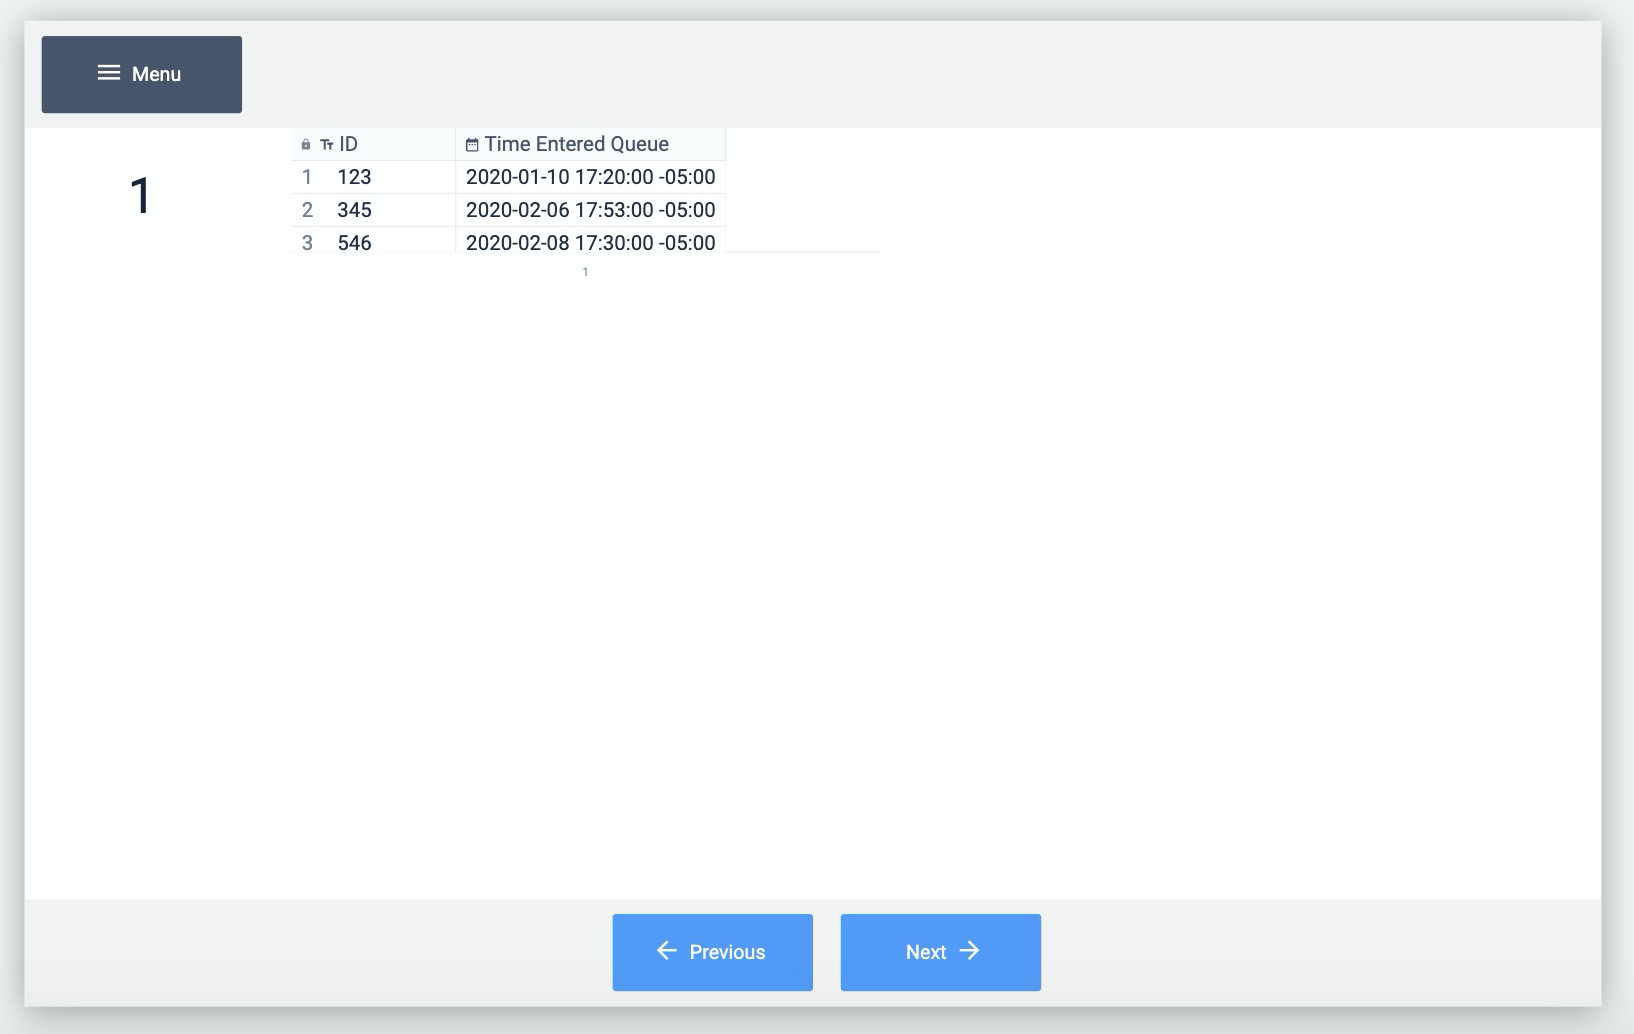
Then, choose 2 columns in the side pane:
- ID (work order number)
- Time Entered Queue (Datetime)

Next, add a filter and choose the name of the first station.

Finally, add a number or name in a text widget next to the embedded table. Your step should look like this at this point:
Now, duplicate the embedded table as many times as you need, and change the filter on each copy as well as the label. It should look like this:
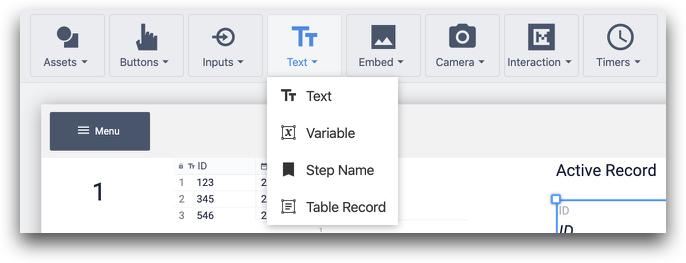
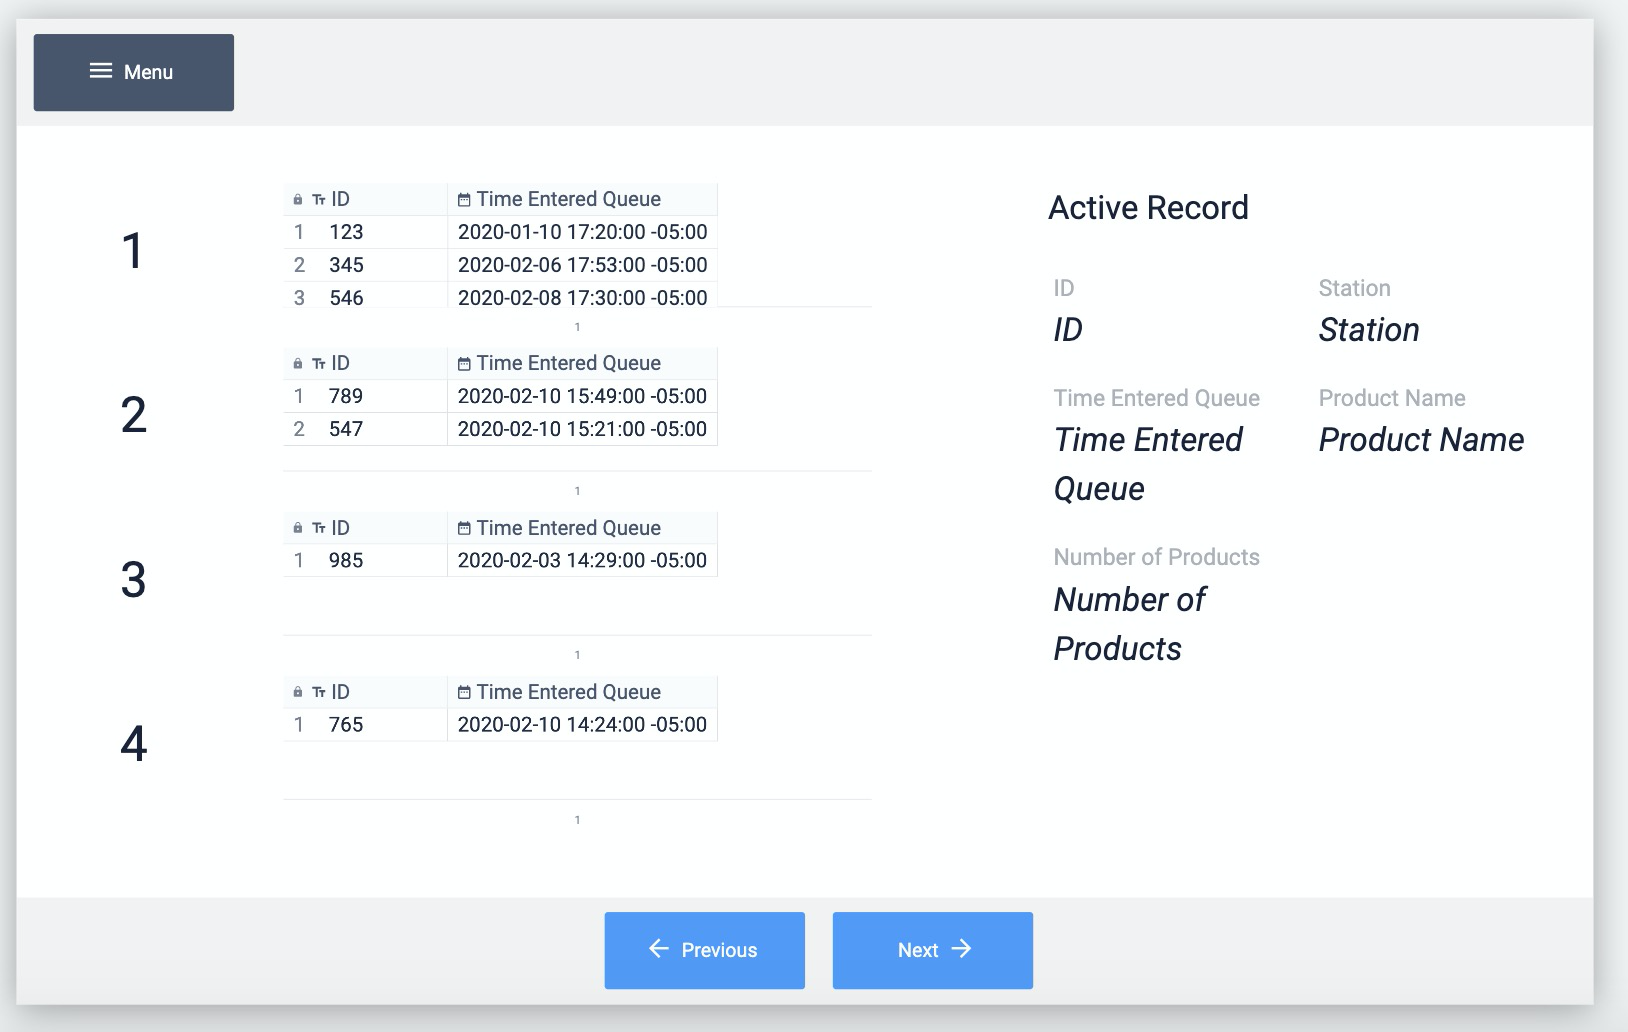
Finally, let's add some Table Record text so that anyone can see the full details of the work order when it is selected in the Player.
Here's where to add Table Record text:
Here's what the final design might look like:
Further Reading
- How to build a shop floor dashboard
- Another way to view real-time cycle data
- How to build your first Table
- Displaying Lists of Table Records in Apps
Did you find what you were looking for?
You can also head to community.tulip.co to post your question or see if others have faced a similar question!