Learn how to use Tulip Tags in Node-RED to natively send data from Edge Devices to Tulip Machines
Beginning with OS 50.1, Tulip natively supports using Tulip Edge Devices as Machine Data Sources.
Using Node RED, you can create arbitrary "tags" with the new tulip-tag node and send data to those tags. These tags will automatically appear under the specific Edge Device as a data source when mapping machine attributes.
It is recommended to use Tulip Tags over the Machine API in new flows. Tulip Tags allow you to report machine data using reusable flows that can be shared across devices without any device-specific modifications and eliminates the need to copy-paste machine attribute info into the Machine API nodes.
Overview
This article will describe how to send data from Node-RED to Tulip Machines using the new Tulip Tag node that comes preinstalled on Tulip Edge Devices.
This guide will walk through the following steps:
- Requirements to use Tulip Tags as a Machine Data Source
- User Guide
- Example: Managing Machine State and Part Counts in Node-RED
Requirements
To create Tulip Tags, you must have a Tulip Edge Device that:
- supports Node-RED (Edge MC or Edge IO)
- has Node-RED enabled
- is on firmware version >= OS50
User Guide
This guide will walk through the workflow in Node-RED to create a tag, send data to it, and then demonstrate how to map that tag to a Machine Attribute in Tulip. We will also describe how to write to multiple tags simultaneously (OS 51 and later only).
Creating Tags in Node-RED
-
Open Node-RED on your Tulip Edge Device and log in.
- *For reference on accessing Node-RED: Using Node-RED on Edge IO
-
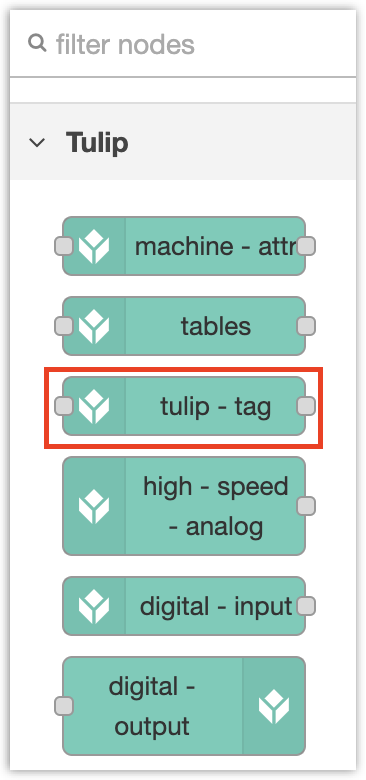
If you are on OS50 or later, you will see the Tulip Tag node in the left sidebar of the Node-RED editor.
- Drag and drop the
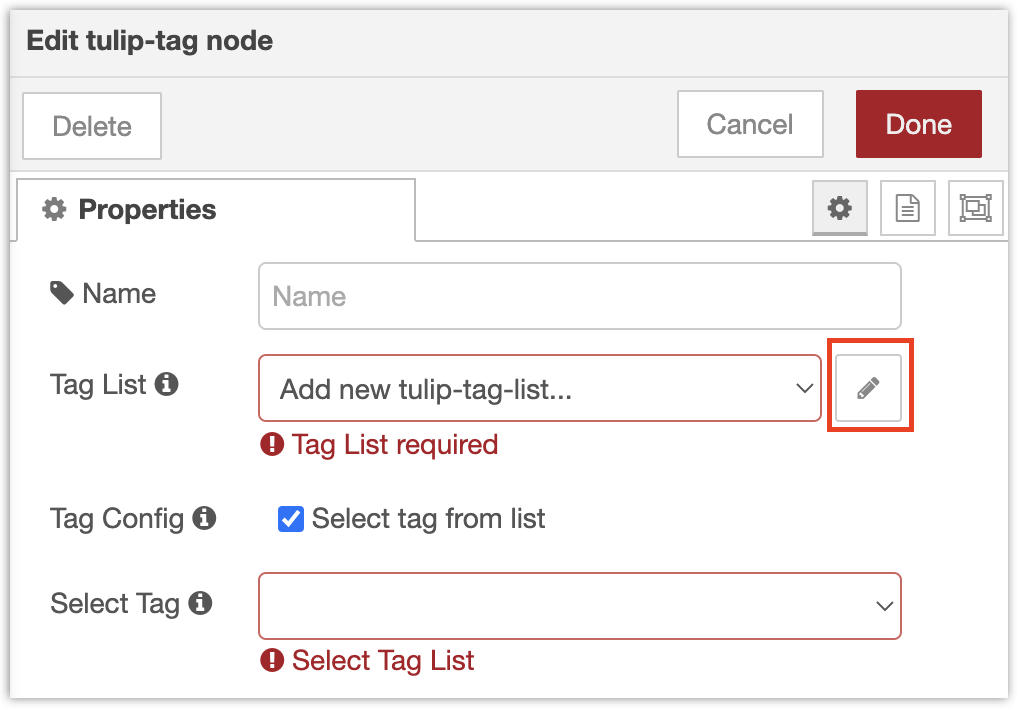
tulip-tagnode into the editor, and double click on it to open the node editor. You should see the property "Tag List" that is required - you will need to create a tag list, which contains all of the tags for this Edge Device. You should only create one Tag List per Edge Device. Click Edit to create the new Tag List, highlighted below.
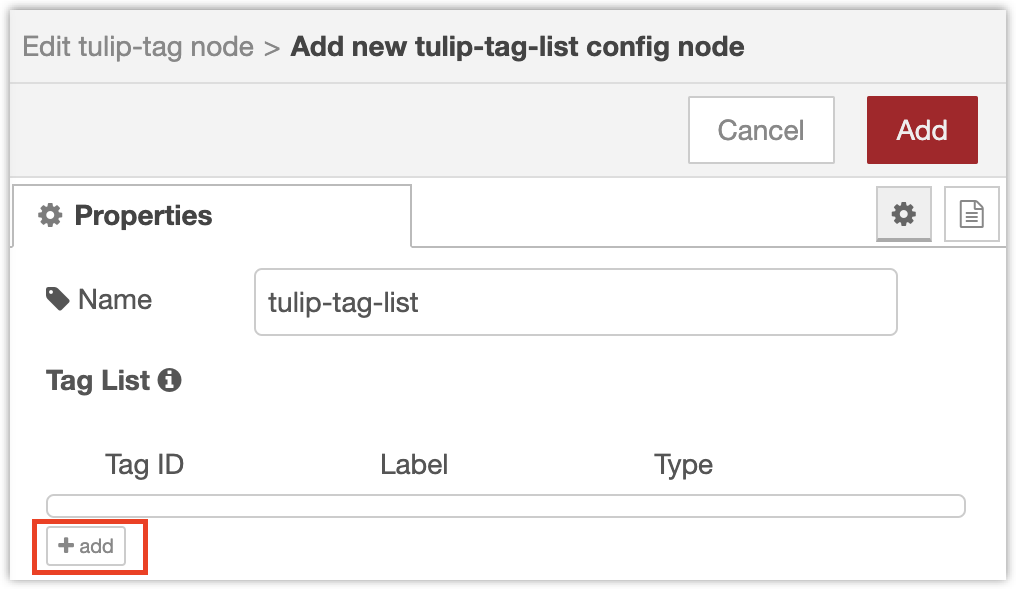
- In the Tag List node, you will be able to create as many tags as you like. Click +add to create a tag.
-
Each tag has three parts: an ID, label, and type.
- Tag ID: This is a code-like identifier that identifies the tag. Once created, it should not change. Valid characters are letters, digits (cannot start with a digit), and underscores. Examples:
part_count,myState1. - Tag Label: This is the human-readable label that you can assign to the tag. To rename the tag, simply update the label (not the ID). Example: "Part Count".
- Type: The data type - String, Integer, Float, or Boolean. Must match the type of the mapped machine attribute.
- Tag ID: This is a code-like identifier that identifies the tag. Once created, it should not change. Valid characters are letters, digits (cannot start with a digit), and underscores. Examples:
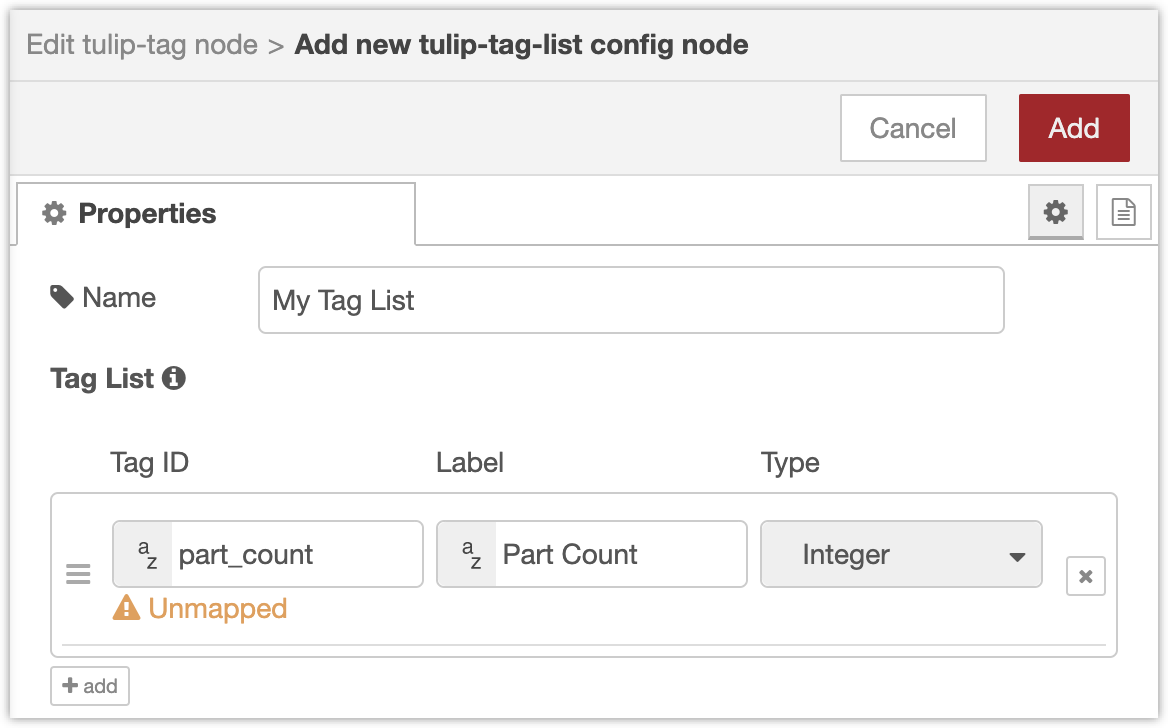
- Once you are done adding tags, click Add to confirm the changes and return to the previous node editor. Make sure there are no errors before saving.
"Unmapped" is not an error, just a warning that you have not yet mapped the tag to a machine attribute in Tulip.
Sending Data to Tags in Node-RED
Once you create a tag list, the Select Tag dropdown automatically populates with all of the tags (by the human-readable labels).
- Select the tag for this node.
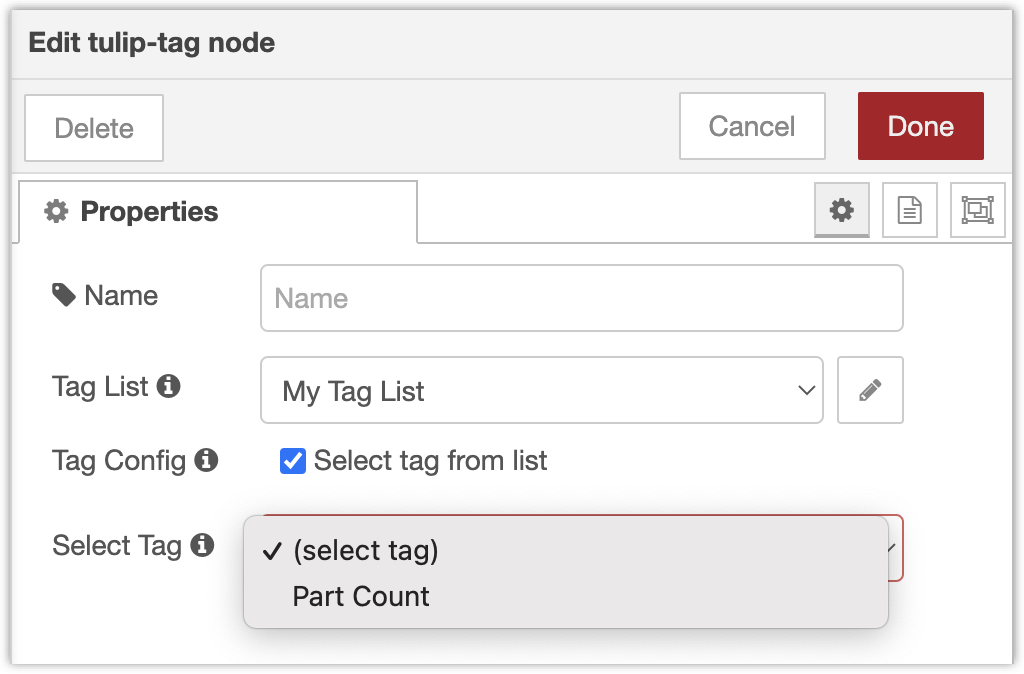
- To write data to this tag, you will now need to send messages to this
tulip-tagnode. The payload of any message sent to the node (iemsg.payload) will be written to the tag.
For example, below, we have linked an Inject node with msg.payload=0 that will write the integer 0 to the tag Part Count.

Mapping Tags to Machine Attributes
Lastly, to view the data in Tulip, you must visit your Tulip site and map the tag to a Machine Attribute.
- Navigate to your machines page, select the Machine to send data to, and open the Configuration tab. You should see a list of Machine Attributes; click on an attribute to map it. You should see the Edge Device (by serial number) as a data source. You do not need to create this data source, it will automatically be created when you deploy a flow with a tag list.
- Click on the edge device in the right sidebar and expand the Node-RED folder. You should see all attributes of the same type as the attribute. Click the link button next to the relevant attribute to map it.
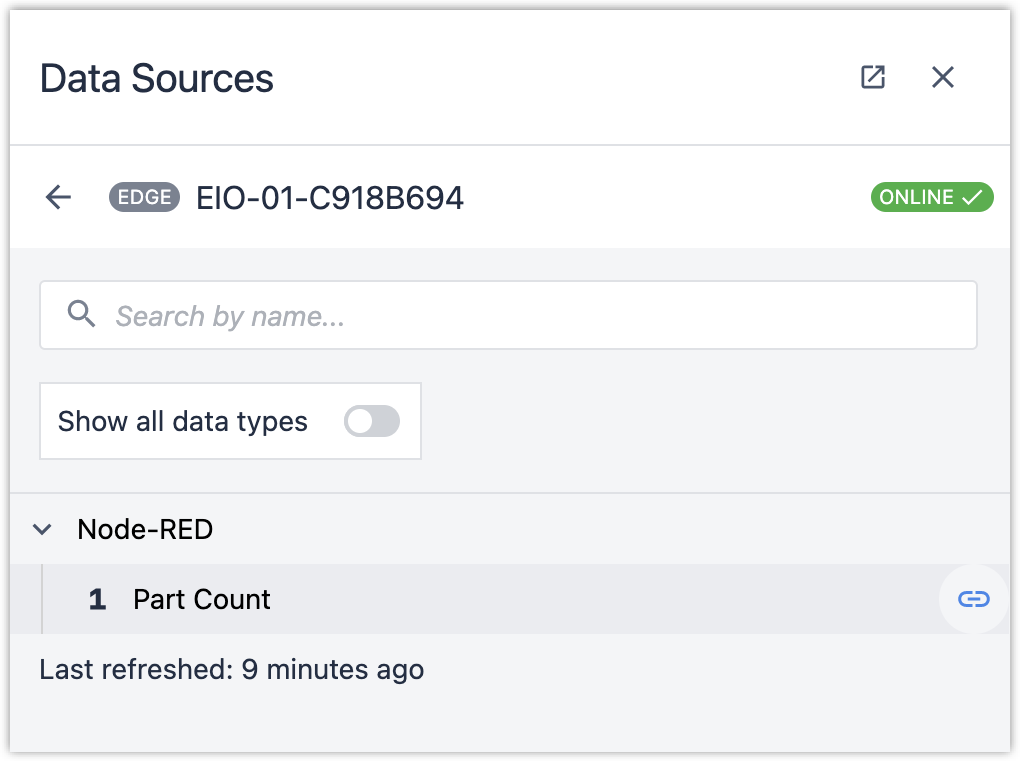
- The attribute now displays as mapped, with the Tag Label of the mapped tag as the Signal.
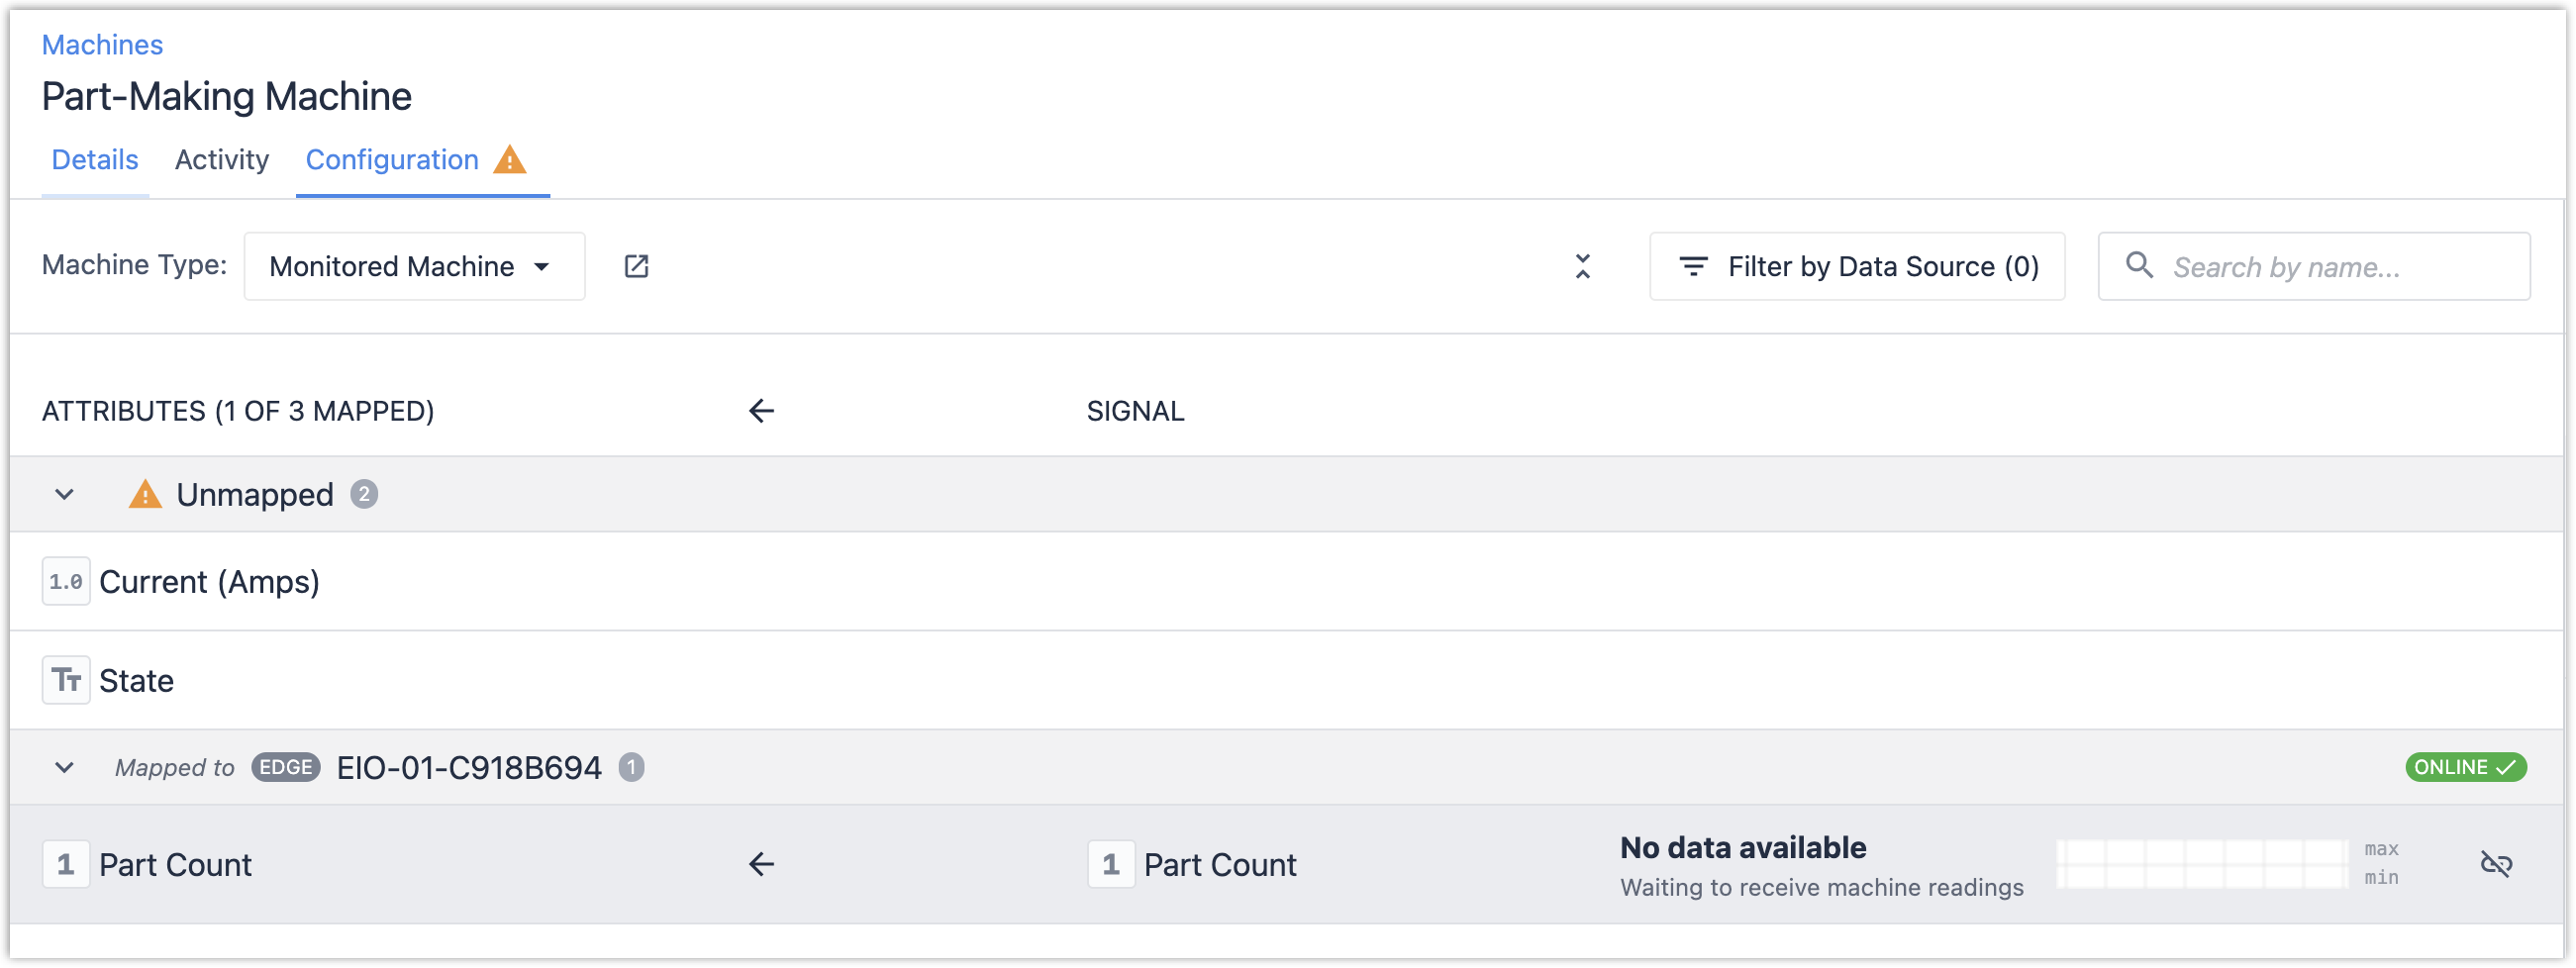
- Additionally, in Node-RED, the status of the Tulip Tag node should have changed from "Unmapped" to "Connected".

- Writing data to the tag (i.e. by clicking the "Inject" node in this example), now causes data to appear for the mapped attribute.

Sending Data to Multiple Tags (Advanced)
This feature is only available on OS51 and later.
It is possible to batch writes to multiple tags at once.
- In Node-RED, create a Tulip Tag node, and uncheck the option Select Tag from List.
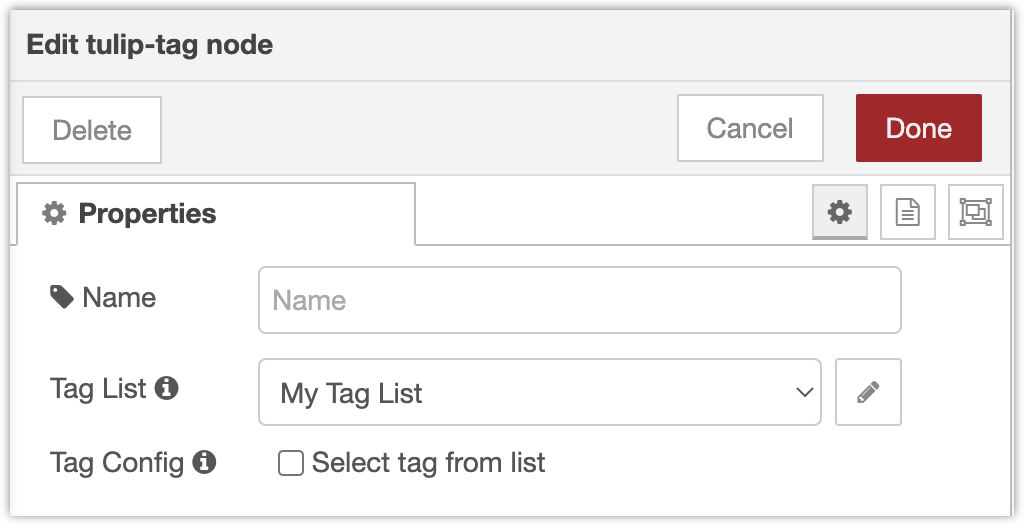
- The payload of the input message to this node should now contain a map of Tag IDs to the values to write.
For example, if you would like to write a part count of 0 to the integer tag with idpart_count, and a state of"Running"to a string tag with idstate, your message should be:
msg.payload = {
  "part_count": 0,
  "state": "Running"
}
Example: Managing Machine State and Part Counts with Edge IO and Node-RED
This example is an updated version of the Node RED library flow described in this article, which you should refer to for hardware setup: Managing Machine States and Part Counts with Edge IO and Node-RED.
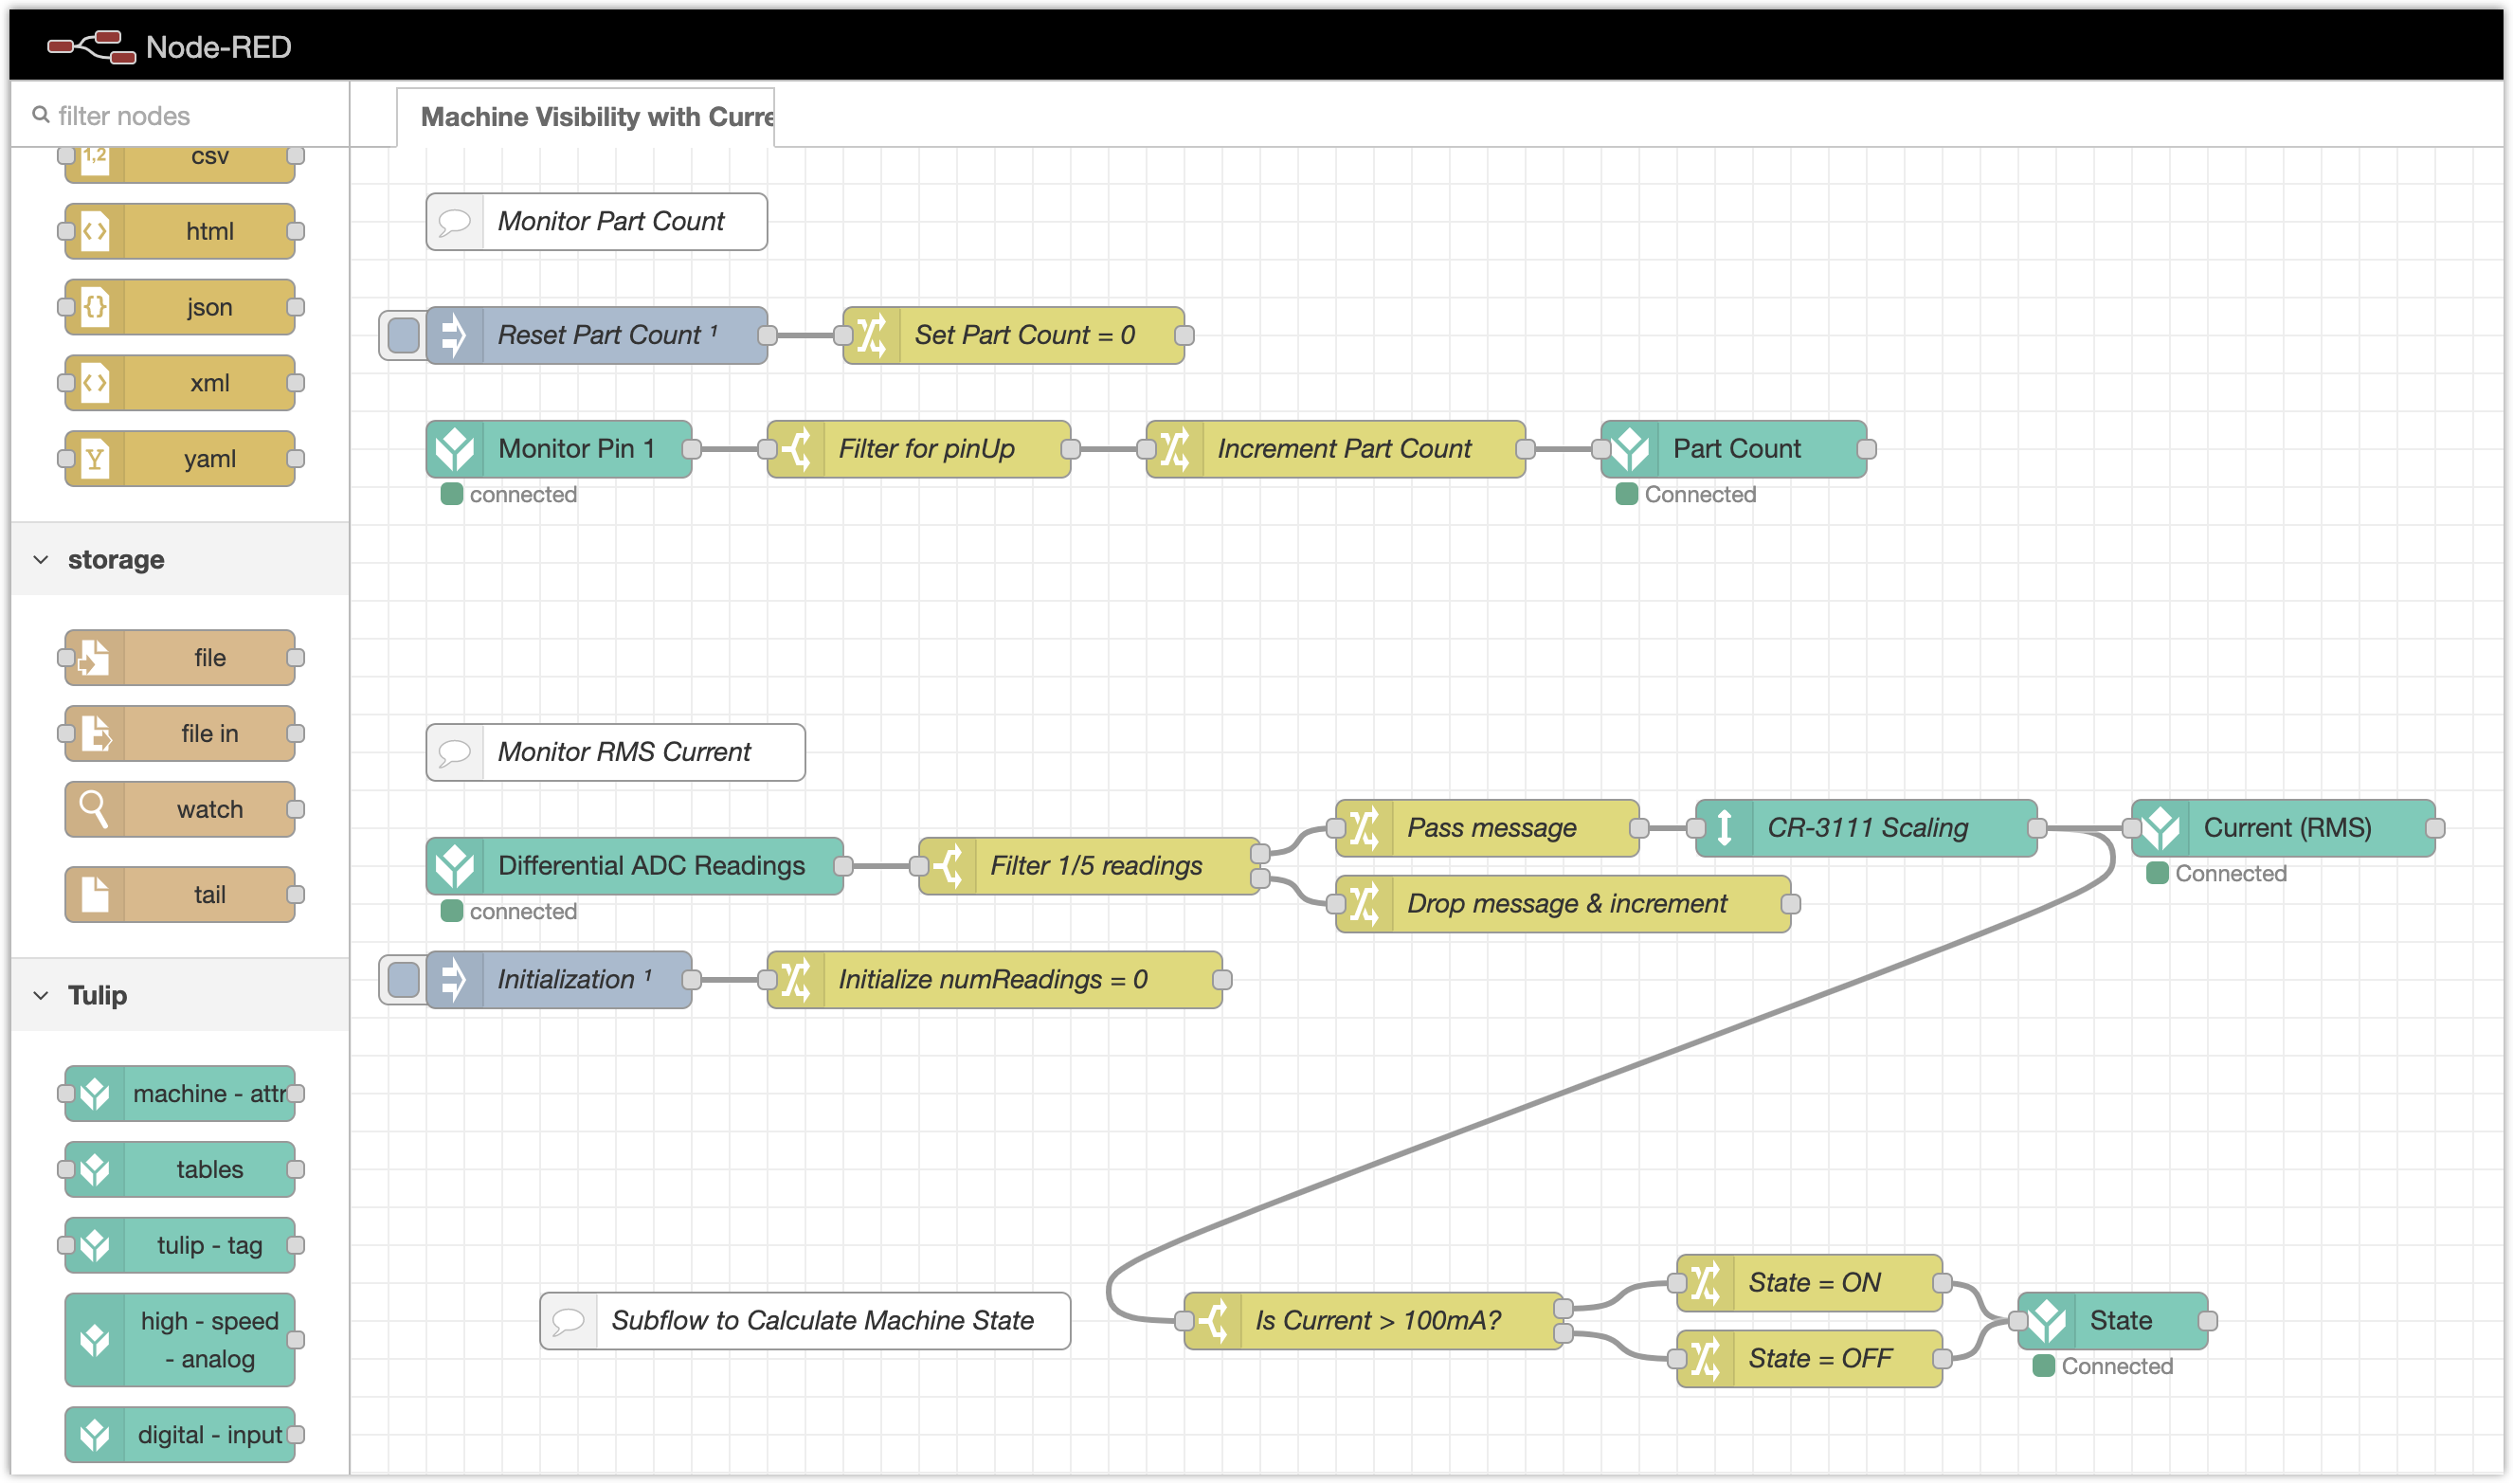
The flow has been updated below to use the Tulip Tag node instead of the Machine Attribute node. This flow can be deployed to many Edge Devices without modification.
- In Node-RED, import and deploy the following flow:
[{"id":"85d16074.518e2","type":"subflow","name":"Scale ADC to Sensor Value (2)","info":"Scales the reading of an Edge IO ADC to the reading of sensor that is plugged into the ADC front-end.\n\nThe property to rescale should be given by the configured property 'prop'. msg.prop must be a numeric value or an array of numeric values.\n\nThe scale and offset are applied to msg.prop (to every element, if an array) as follows:\n\nmsg.prop = msg.prop * scale + offset\n","category":"Tulip","in":[{"x":40,"y":60,"wires":[{"id":"d99ec5b3.e9dfb8"}]}],"out":[{"x":460,"y":60,"wires":[{"id":"d99ec5b3.e9dfb8","port":0}]}],"env":[{"name":"PROPERTY","type":"str","value":"payload","ui":{"label":{"en-US":"property"},"type":"input","opts":{"types":["str","env"]}}},{"name":"SCALE","type":"num","value":"","ui":{"label":{"en-US":"scale"},"type":"input","opts":{"types":["num","env"]}}},{"name":"OFFSET","type":"num","value":"","ui":{"label":{"en-US":"offset"},"type":"input","opts":{"types":["num","env"]}}}],"color":"

##65CCB8","icon":"font-awesome/fa-arrows-v"},{"id":"d99ec5b3.e9dfb8","type":"function","z":"85d16074.518e2","name":"Convert values with scale/offset","func":"const scale = env.get('SCALE');\nconst offset = env.get('OFFSET');\nconst prop = env.get('PROPERTY');\nif (Array.isArray(msg[prop])) {\n    msg[prop] = msg[prop].map((x) => (scale * x + offset));\n} else {\n    msg[prop] = scale * msg[prop] + offset;\n}\nreturn msg;","outputs":1,"noerr":0,"initialize":"","finalize":"","x":250,"y":60,"wires":[[]]},{"id":"71c9f8f2.7adf08","type":"tab","label":"Machine Visibility with Current Clamp and Breakbeam","disabled":false,"info":"This library flow is a basic machine monitoring application to gain visibility into the machine's state and part count using a current clamp and breakbeam. It tracks the following two Edge IO inputs:\n\n * **Part Count**: Starts at 0 and counts up whenever GPIO Pin 1 is toggled high, for example when a breakbeam is triggered. Can be reset to 0 by the 'Reset Part Count' node. Sends the current part count to a Tulip Machine Attribute whenever the part count changes. \n \n * **Machine Status**: Sends the RMS current of a machine being monitored by a CR-3111 current clamp into the Edge IO differential ADC. The RMS reading is given for a 1s buffer of data taken at 1kHz, sampled once every 5s. A threshold can be set either in Node-RED or in Tulip to determine the on/off state of the machine. "},{"id":"256235b9.3bb72a","type":"subflow:85d16074.518e2","z":"71c9f8f2.7adf08","name":"CR-3111 Scaling","env":[{"name":"PROPERTY","value":"data","type":"str"},{"name":"SCALE","value":"3000","type":"num"},{"name":"OFFSET","value":"0","type":"num"}],"x":800,"y":360,"wires":[["88390763.49ad58","b594a80b.7f3f18"]]},{"id":"daf59f31.d1ec8","type":"tulip-high-speed-analog","z":"71c9f8f2.7adf08","name":"Differential ADC Readings","analogConfig":"71b68226.a6568c","dataTypeIdx":"2","inputs":0,"mode":"continuous","dataMsgProperty":"data","refreshRate":"1","refreshFrames":"all","x":150,"y":380,"wires":[["96ef65ab.afba78"]]},{"id":"82a0d2e1.62cec","type":"inject","z":"71c9f8f2.7adf08","name":"Reset Part Count","props":[],"repeat":"","crontab":"","once":true,"onceDelay":0.1,"topic":"","x":130,"y":100,"wires":[["25bb1de8.b3e502"]]},{"id":"579dcfa3.596ad","type":"tulip-digital-input","z":"71c9f8f2.7adf08","name":"Monitor Pin 1","runMode":"continuous","configMode":"static","outputMode":"object","refreshRate":1,"enabledPins":[true,false,false,false,false,false,false,false],"x":110,"y":160,"wires":[["27e78fe6.8e08c"]]},{"id":"27e78fe6.8e08c","type":"switch","z":"71c9f8f2.7adf08","name":"Filter for pinUp","property":"payload","propertyType":"msg","rules":[{"t":"true"}],"checkall":"true","repair":false,"outputs":1,"x":300,"y":160,"wires":[["f1b02903.a2f2b8"]]},{"id":"f1b02903.a2f2b8","type":"change","z":"71c9f8f2.7adf08","name":"Increment Part Count","rules":[{"t":"set","p":"partCount","pt":"flow","to":"$flowContext('partCount') + 1","tot":"jsonata"},{"t":"set","p":"payload","pt":"msg","to":"partCount","tot":"flow"}],"action":"","property":"","from":"","to":"","reg":false,"x":520,"y":160,"wires":[["eed4e051.7bc12"]]},{"id":"25bb1de8.b3e502","type":"change","z":"71c9f8f2.7adf08","name":"Set Part Count = 0","rules":[{"t":"set","p":"partCount","pt":"flow","to":"0","tot":"num"}],"action":"","property":"","from":"","to":"","reg":false,"x":350,"y":100,"wires":[[]]},{"id":"dcb54611.9f7ca8","type":"comment","z":"71c9f8f2.7adf08","name":"Monitor Part Count","info":"Starts with Part Count = 0 and counts up whenever GPIO Pin 1 is toggled high. Part Count can be reset to 0 by clicking the 'Reset Part Count' node. Sends the current part count to the configured Tulip Machine Attribute whenever the part count changes. ","x":130,"y":40,"wires":[]},{"id":"9ff956ce.4ee9b8","type":"comment","z":"71c9f8f2.7adf08","name":"Monitor RMS Current","info":"Sends the RMS current of a machine being monitored by a CR-3111 current clamp into the Edge IO differential ADC. The RMS reading is given for a 1s buffer of data taken at 1kHz, sampled once every 5s. A threshold can be set either in Node-RED or in Tulip to determine the on/off state of the machine. ","x":140,"y":320,"wires":[]},{"id":"96ef65ab.afba78","type":"switch","z":"71c9f8f2.7adf08","name":"Filter 1/5 readings","property":"numReadings","propertyType":"flow","rules":[{"t":"eq","v":"4","vt":"num"},{"t":"else"}],"checkall":"true","repair":false,"outputs":2,"x":390,"y":380,"wires":[["41bac391.9beffc"],["78eb2b71.a4c2c4"]]},{"id":"41bac391.9beffc","type":"change","z":"71c9f8f2.7adf08","name":"Pass message","rules":[{"t":"set","p":"numReadings","pt":"flow","to":"0","tot":"num"}],"action":"","property":"","from":"","to":"","reg":false,"x":600,"y":360,"wires":[["256235b9.3bb72a"]]},{"id":"78eb2b71.a4c2c4","type":"change","z":"71c9f8f2.7adf08","name":"Drop message & increment","rules":[{"t":"set","p":"numReadings","pt":"flow","to":"$flowContext('numReadings') + 1","tot":"jsonata"}],"action":"","property":"","from":"","to":"","reg":false,"x":640,"y":400,"wires":[[]]},{"id":"88390763.49ad58","type":"switch","z":"71c9f8f2.7adf08","name":"Is Current > 100mA?","property":"data","propertyType":"msg","rules":[{"t":"gt","v":"0.1","vt":"num"},{"t":"else"}],"checkall":"true","repair":false,"outputs":2,"x":540,"y":620,"wires":[["b0fc9af.9e90c68"],["b271da6d.f05098"]]},{"id":"53f44746.f831e8","type":"comment","z":"71c9f8f2.7adf08","name":"Subflow to Calculate Machine State","info":"This subflow can be enabled to calculate whether the machine is ON or OFF based on the configured threshold value.\n\nThe calculated state is sent as a string to a machine attribute. This machine attribute needs to be configured in Tulip to be a text attribute, and the attribute deviceInfo should be copy-pasted into the Tulip Machine Attribute node.","x":240,"y":620,"wires":[]},{"id":"b0fc9af.9e90c68","type":"change","z":"71c9f8f2.7adf08","name":"State = ON","rules":[{"t":"set","p":"payload","pt":"msg","to":"ON","tot":"str"}],"action":"","property":"","from":"","to":"","reg":false,"x":770,"y":600,"wires":[["a197e7f6.0d6c58"]]},{"id":"b271da6d.f05098","type":"change","z":"71c9f8f2.7adf08","name":"State = OFF","rules":[{"t":"set","p":"payload","pt":"msg","to":"OFF","tot":"str"}],"action":"","property":"","from":"","to":"","reg":false,"x":770,"y":640,"wires":[["a197e7f6.0d6c58"]]},{"id":"eed4e051.7bc12","type":"tulip-tag","z":"71c9f8f2.7adf08","name":"","tagList":"58dfe1ff.615b","staticTag":true,"tagId":"part_count","x":730,"y":160,"wires":[[]]},{"id":"b594a80b.7f3f18","type":"tulip-tag","z":"71c9f8f2.7adf08","name":"","tagList":"58dfe1ff.615b","staticTag":true,"tagId":"current","x":1020,"y":360,"wires":[[]]},{"id":"a197e7f6.0d6c58","type":"tulip-tag","z":"71c9f8f2.7adf08","name":"","tagList":"58dfe1ff.615b","staticTag":true,"tagId":"state","x":930,"y":620,"wires":[[]]},{"id":"80b0c03.326c84","type":"inject","z":"71c9f8f2.7adf08","name":"Initialization","props":[],"repeat":"","crontab":"","once":true,"onceDelay":0.1,"topic":"","x":110,"y":440,"wires":[["81df5e3e.f5126"]]},{"id":"81df5e3e.f5126","type":"change","z":"71c9f8f2.7adf08","name":"Initialize numReadings = 0","rules":[{"t":"set","p":"numReadings","pt":"flow","to":"0","tot":"num"}],"action":"","property":"","from":"","to":"","reg":false,"x":340,"y":440,"wires":[[]]},{"id":"71b68226.a6568c","type":"tulip-high-speed-analog-config","name":"Differential ADC RMS @ 1kHZ","bufferSize":"1000","frequency":"1000","adcId":"0","diffAdcResistor":"200","enableTime":false,"enableFreq":false,"enableRMS":true,"enablePowerSpec":false},{"id":"58dfe1ff.615b","type":"tulip-tag-list","name":"Part-Making Machine Tags","tags":[{"id":"part_count","label":"Part Count","type":"integer"},{"id":"current","label":"Current (RMS)","type":"float"},{"id":"state","label":"State","type":"string"}]}]
- The flow appears as follows:
The flow also has the following Tulip Tag list:
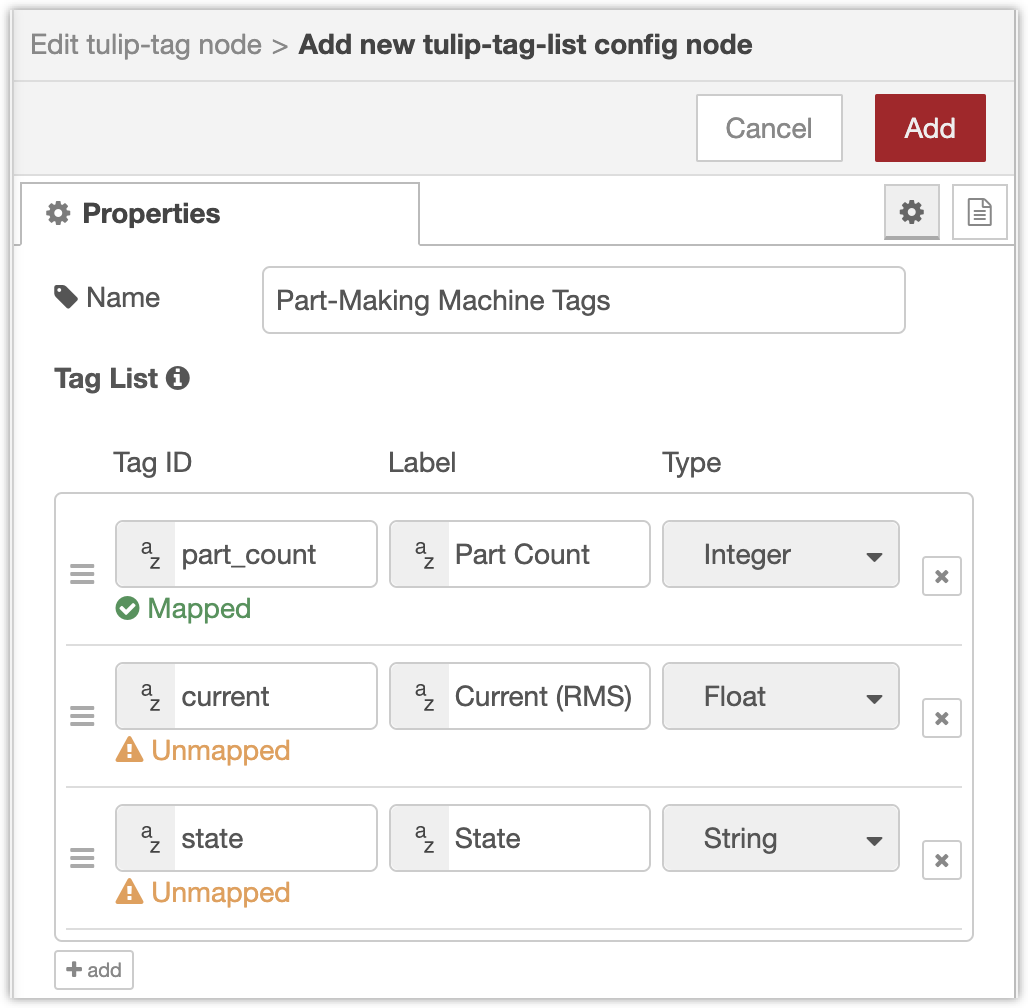
-
This Edge Device appears in Tulip as a data source with three tags:
- Part Count: Incremented whenever GPIO input pin 1 toggles high. Assumes a break beam is plugged into that pin.
- Current (RMS): Writes the RMS current reading (in Amps) every 5 seconds of the CR3111-3000. Assumes that this current sensor is plugged into the differential ADC.
- State: Reports "ON" if the current is >100mA, and "OFF" if the current is <=100mA.You can map these tags to the corresponding machine attributes in Tulip:
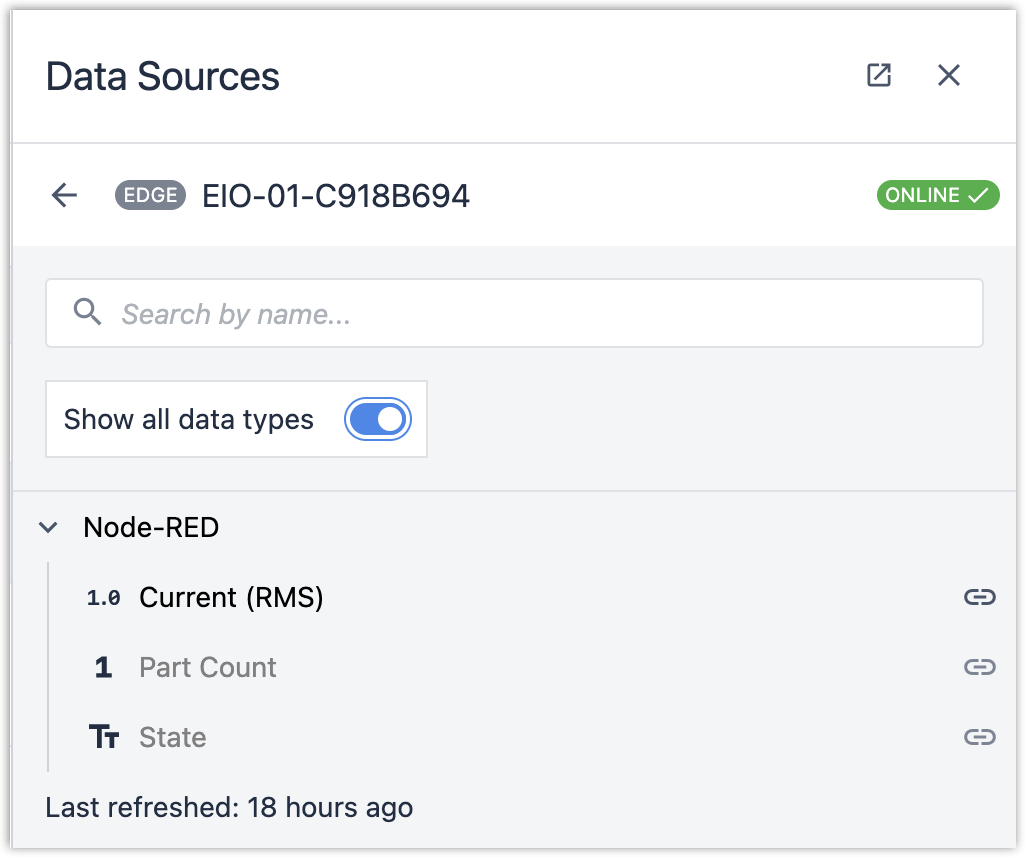
- You will see data appear when the break beam toggles, or when the current readings are updated every 5 seconds:

Did you find what you were looking for?
You can also head to community.tulip.co to post your question or see if others have faced a similar question!

