

How To Build Your First MQTT Connector
Use this guide to learn how to bring MQTT Topics into Tulip
In this guide, you will learn:
- How to set up a MQTT Data source in Tulip
If you have a functioning MQTT broker that you would like to connect to Tulip, then you are ready to set up an MQTT data source and create your first machine monitoring app.
Setting Up A MQTT Connection
MQTT connectors can be created from the connectors page, or machine data source page. The setup process doesn't differ, and a connection created in one place will show up in the other.
More details on the creation of connectors can be found here: How to Configure a Connector
Setup as a machine data source
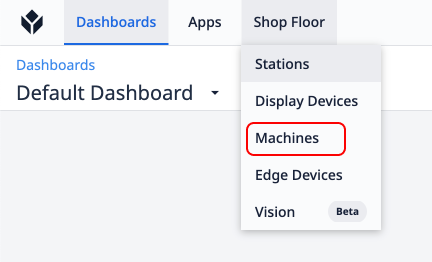
- Click into the Machines option under the Shop Floor tab on the Menu Bar.
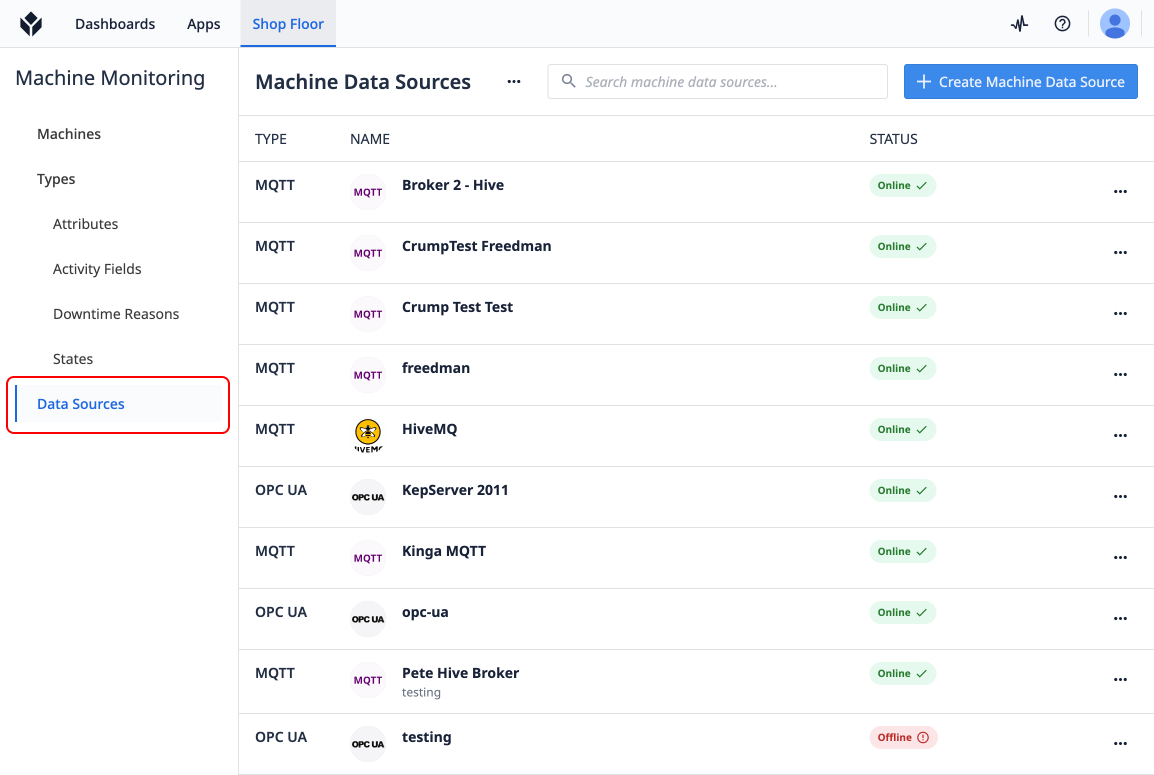
- Then, click Machine Data Sources from the left side drawer.
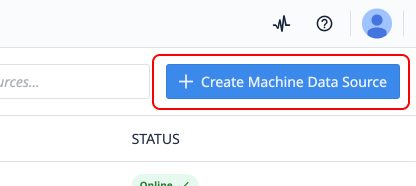
- Then, click Create Machine Data Source from the Machine Data Sources page.
- Name your data source, select a Connector Host, select MQTT, and your desired MQTT version.
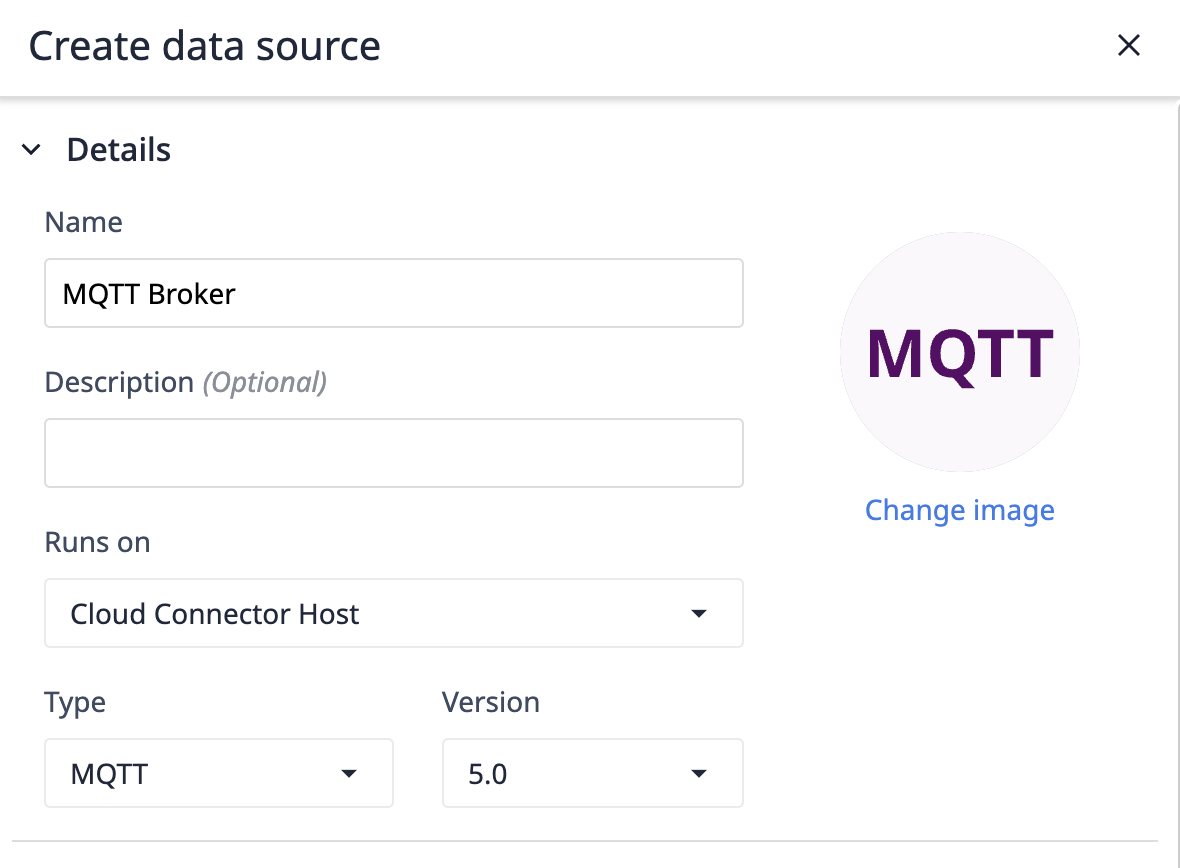
- Add the connection details to connect to your broker.
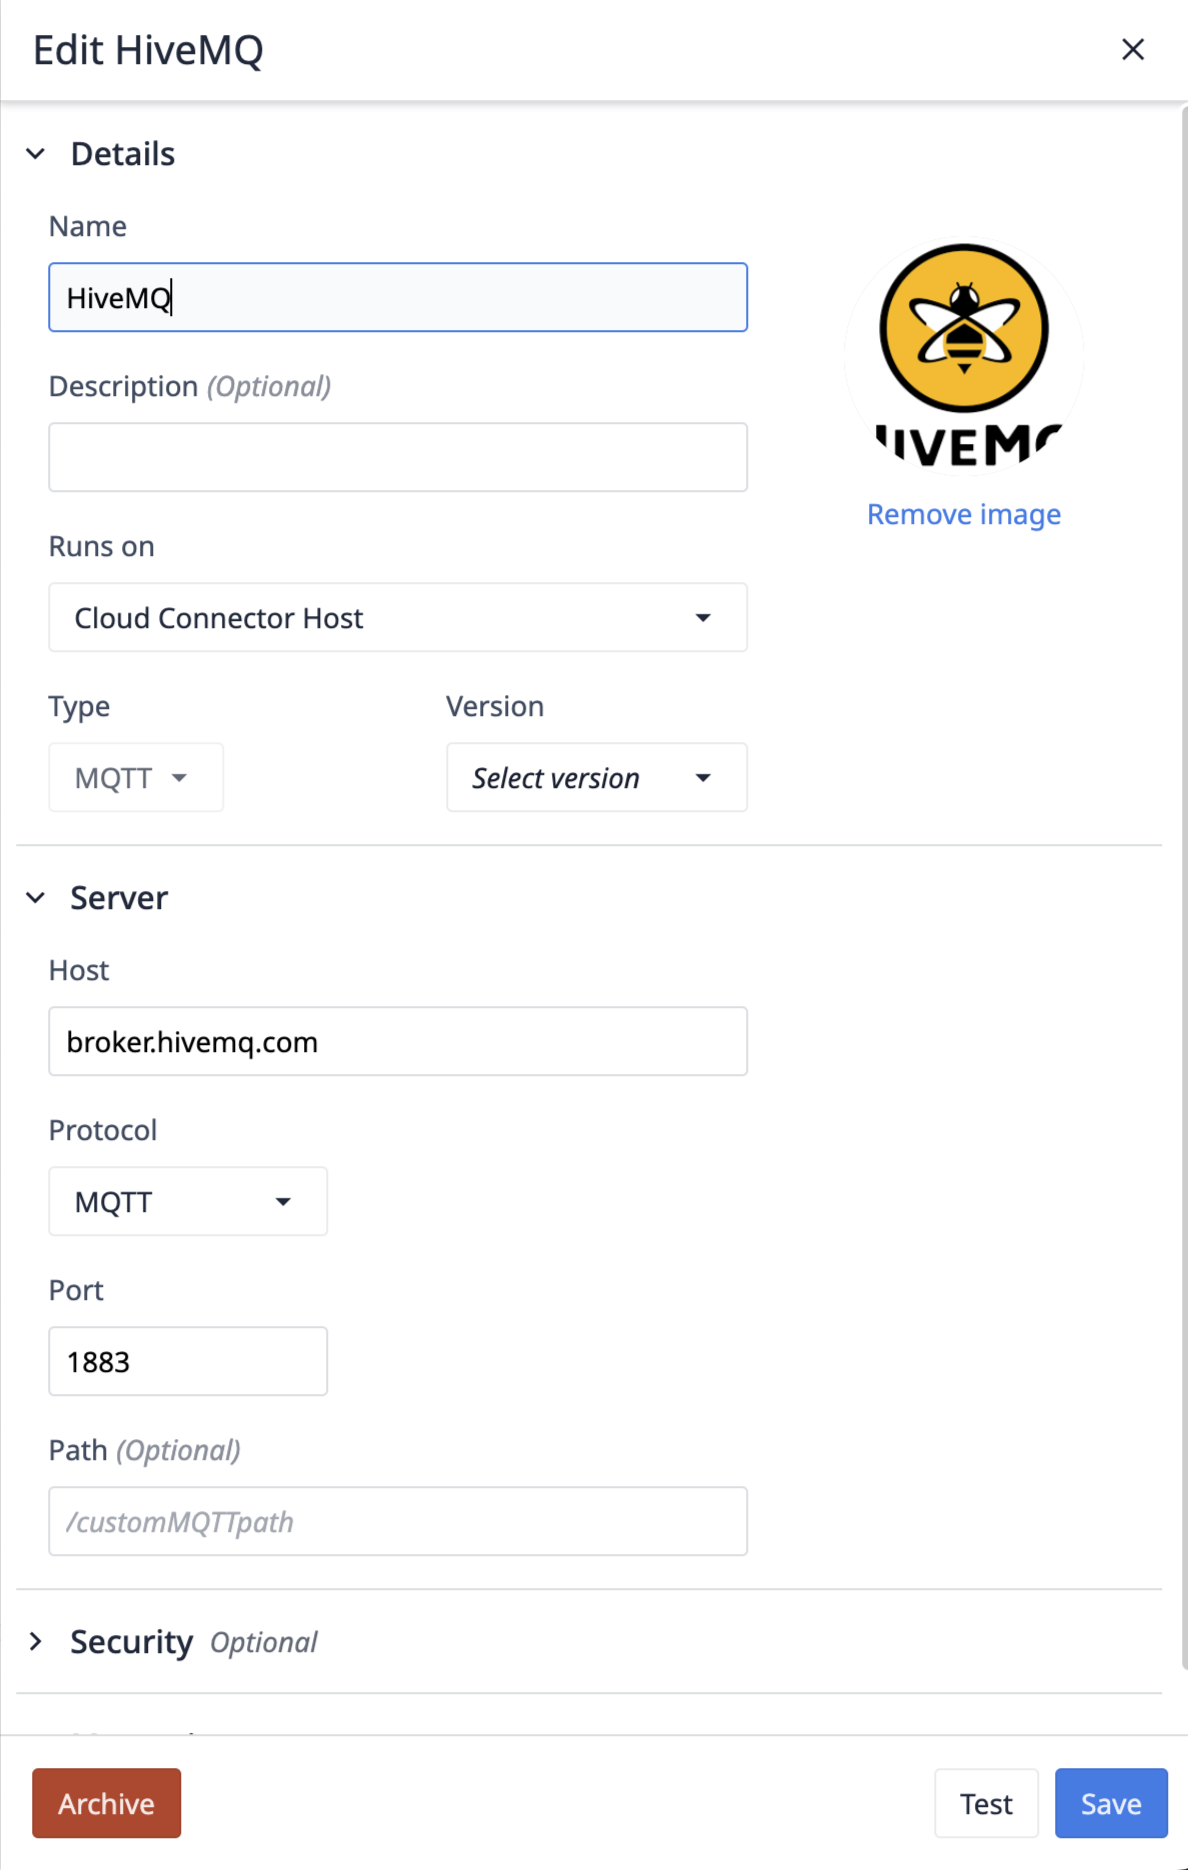
Configuring the MQTT Connection
Runs On
Runs on represents the Connector Host that will be responsible for handling the connection to your broker. If your broker is not accessible to the wider internet, an On-Prem Connector Host will be required to access your MQTT broker. Please review the folllowing version requirements prior to testing the Connector Host.
Only On Prem Connector Hosts of version 261 (LTS11) or higher support MQTT data sources.
Only Edge Devices on OS56 or higher Support MQTT data sources.
MQTT vs. MQTTs
MQTTs is simply MQTT, with an added layer of security. When MQTTs is selected, SSL/TLS wll be used for communication from the client to the broker. Additionally, MQTTs supports Private Keys, Certificates, and or Trusted CA tokens. With just MQTT selected, only authentication through username and password, or username by client ID are available.
Client ID
Client ID is how the Tulip client will identify itself to your MQTT broker. At the simplest level, this is often used for authentication and access control. This can be set to a static value, or set to a random value with the "Auto-generate" flag flipped.
Keep Alive
The keep alive is the maximum time, in seconds, that the client would like to keep communication open with the broker. If no messages have been passed from broker to client in that duration, the client will send a message to the broker indicating it is still alive.
Clean Session
The MQTT Clean Session flag, determines the lifespan of the session. If checked, a new session starts, and all session data (subscriptions, queued messages) is discarded upon disconnection. If unchecked, the broker tries to resume a previous session, preserving subscriptions and messages for the client if it reconnects.
Quality of Service Levels
The Quality of Service (QoS) setting determines the reliability of message delivery between the sender and the receiver. This can be configured from the connector level and overridden by the connector function configuration. It offers three levels:
- QoS 0 (At most once): Messages are sent without confirmation. This is the fastest but least reliable option, with no guarantee of delivery.
- QoS 1 (At least once): The message is guaranteed to be delivered, but it may be duplicated if the sender does not receive an acknowledgment.
- QoS 2 (Exactly once): The most reliable option, ensuring that each message is delivered exactly one time. This involves more overhead and is the slowest of the three.
MQTTs Cert Information
Private Key
Updates the key property in the Node.js authentication configuration.
Private keys in PEM format. PEM allows the option of private keys being encrypted. Encrypted keys will be decrypted with options.passphrase. Multiple keys using different algorithms can be provided either as an array of unencrypted key strings or buffers, or an array of objects in the form. The object form can only occur in an array. object.passphrase is optional. Encrypted keys will be decrypted with object.passphrase if provided, or options.passphrase if it is not.
Certificate
Updates the cert property in the Node.js authentication configuration.
Cert chains in PEM format. One cert chain should be provided per private key. Each cert chain should consist of the PEM formatted certificate for a provided private key, followed by the PEM formatted intermediate certificates (if any), in order, and not including the root CA (the root CA must be pre-known to the peer, see ca). When providing multiple cert chains, they do not have to be in the same order as their private keys in key. If the intermediate certificates are not provided, the peer will not be able to validate the certificate, and the handshake will fail.
Trusted CA
Updates the ca property in the Node.js authentication configuration.
Optionally override the trusted CA certificates. Default is to trust the well-known CAs curated by Mozilla. Mozilla's CAs are completely replaced when CAs are explicitly specified using this option. The value can be a string or Buffer, or an Array of strings and/or Buffers. Any string or Buffer can contain multiple PEM CAs concatenated together. The peer's certificate must be chainable to a CA trusted by the server for the connection to be authenticated. When using certificates that are not chainable to a well-known CA, the certificate's CA must be explicitly specified as a trusted or the connection will fail to authenticate. If the peer uses a certificate that doesn't match or chain to one of the default CAs, use the ca option to provide a CA certificate that the peer's certificate can match or chain to. For self-signed certificates, the certificate is its own CA, and must be provided. For PEM encoded certificates, supported types are "TRUSTED CERTIFICATE", "X509 CERTIFICATE", and "CERTIFICATE". See also tls.rootCertificates.
Testing your Connection
Hit Test to see if you can successfully connect to the broker.
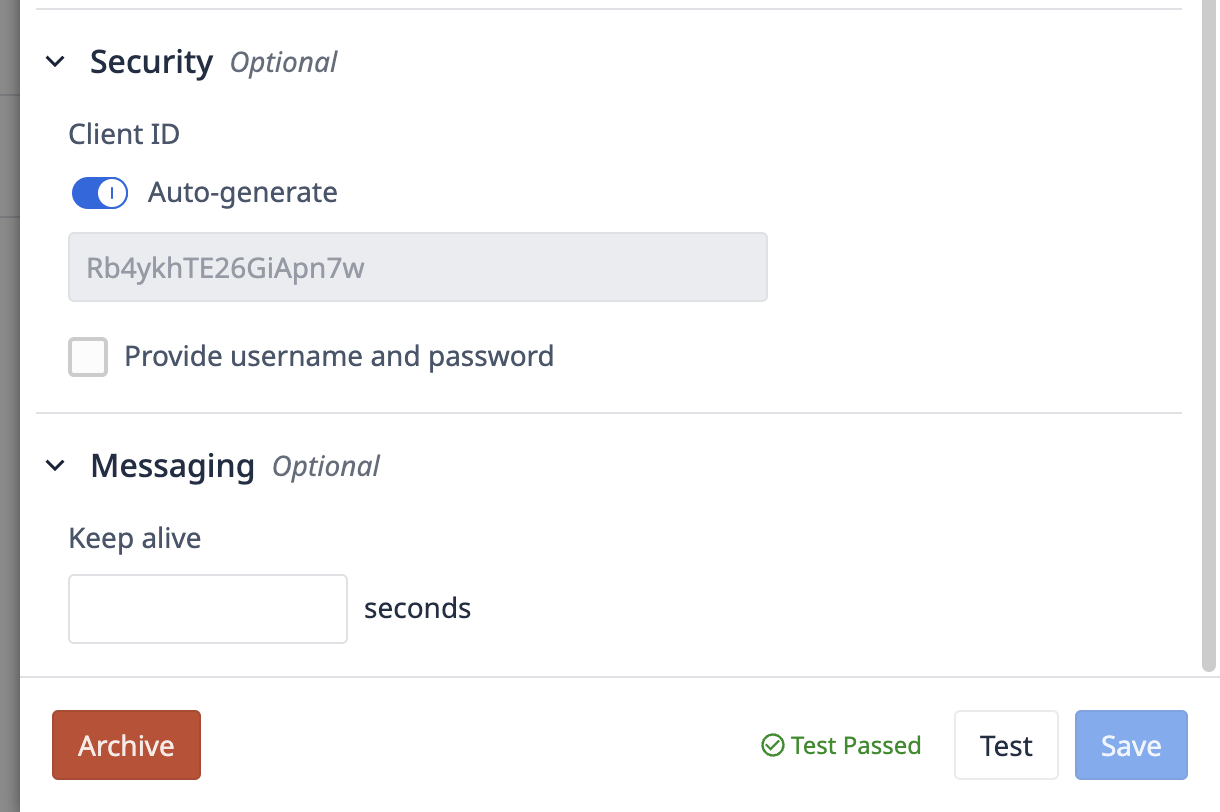
If the test is successful, then you are ready to set up a machine. Click Save, and then go to the Machine Types page to set up your first category of machines.
Did you find what you were looking for?
You can also head to community.tulip.co to post your question or see if others have faced a similar question!