How to create a trigger that fires at a fixed time Interval to do things like, update a dashboard, or check a device value.
Purpose
Time-based Triggers are useful when there is a need to repeat an action within a step at regular intervals of time.
A time-based trigger is a Step Level Triggers, which means that they can only be accessed on triggers associated with a Step (and not a button). Time based triggers increment a counter at regular intervals or Trigger an IoT device such as a pick-to-light which lights different bins over time within a step.
How to Make Timer Triggers
The following guide will help you create a time-based trigger on Tulip:
1- Ensure that you are on the desired Step where you want to add the Trigger.
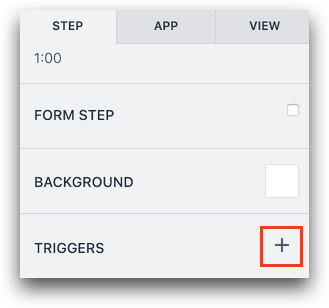
2- Add the trigger by clicking on the plus icon next to Triggers in the Side Pane.

3- Name the trigger by filling out the title at the top of the Trigger Editor that opens.
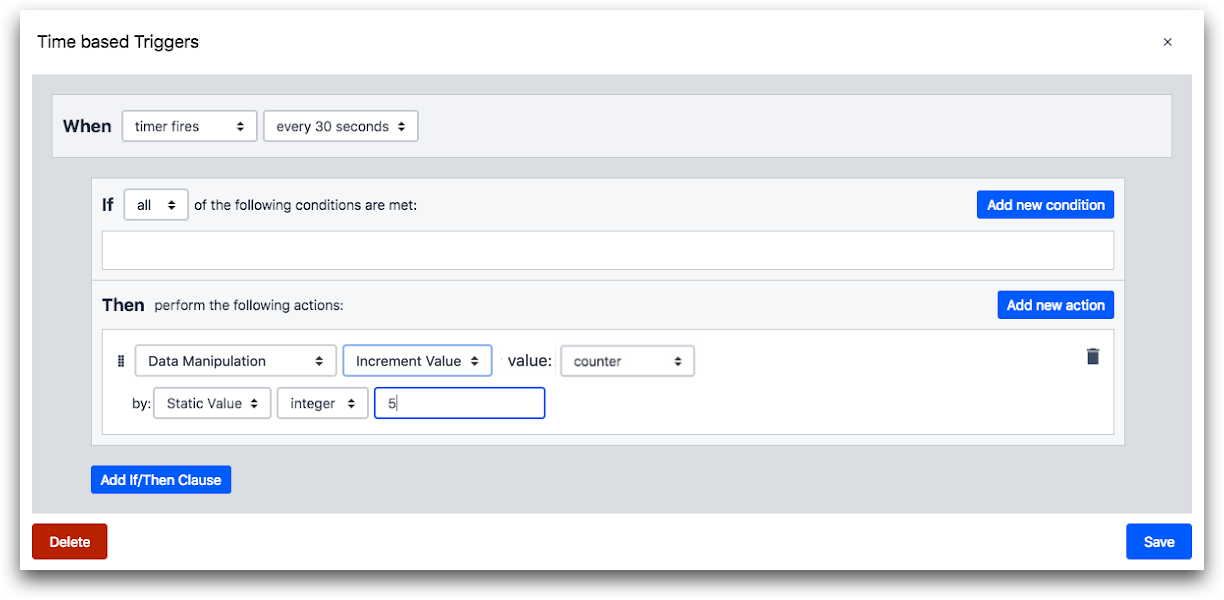
Set the Event:
- Select timer fires in the drop-down menu
- Select the time interval at which an action is to be triggered in the second drop-down menu. Eg. every 30 seconds.

Set an Action:
- Click the "Add New Action" button on the right side of the window in the Then section.
- Select the desired action you want to execute. In this example, the aim to create a counter that increments by 5 every second. So, select Data Manipulation in the drop-down menu.
- Select "Increment Value" in the second drop-down menu
- Select "counter" in the following drop-down, which is the variable you will be modifying
- Select "Static Value", integer and 5 in the drop-down menus associated with "by"
- "Save" the Trigger once you are done

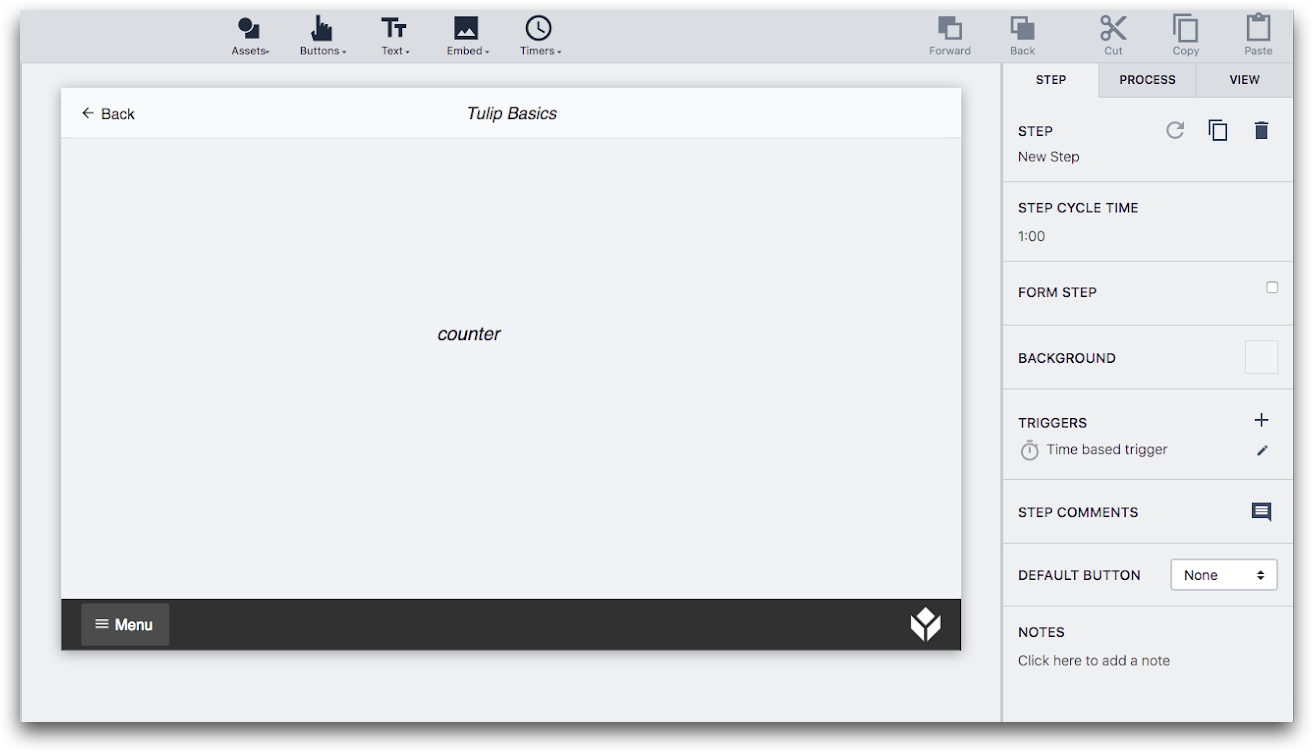
In order to view the value of the Variable that is being changed in this example, add the variable counter to the Step as shown and run the app in the Tulip Player.

If you have any questions about the role of Variables in your Tulip app, we recommend checking out, "What are Variables and How to Use Them".
Did you find what you were looking for?
You can also head to community.tulip.co to post your question or see if others have faced a similar question!
Interval
Interval is a Tulip Datatype. Intervals represent pieces of time, represented in seconds. Intervals can be added or subtracted from Datetime variables.
Trigger
Triggers are groups of logic that are tied to an app event, such as step open, timer, widget interaction, etc. App builders can add triggers to widgets, machines, devices, apps, and steps.
Triggers can contain actions, transitions, and conditions.
Step-Level Trigger
A step-level trigger is a trigger configured with each app step. Step-level triggers can be triggered based on 4 actions:
- Step Opened
- Every X seconds (Timer)
- Machine/Device outputs data
- Step Exited
Step
A view your users will see within an application. Steps can be viewed chronologically or in whatever order best fits your process.
Steps can be grouped into Step Groups to manage and organize your app Steps.
Trigger
Triggers are groups of logic that are tied to an app event, such as step open, timer, widget interaction, etc. App builders can add triggers to widgets, machines, devices, apps, and steps.
Triggers can contain actions, transitions, and conditions.
Side Pane (Context Pane)
The Side Pane is the configuration pane on the right side of the App Editor where steps, apps, and widgets can be configured. Triggers can be added to adjust widget behavior.
Action
Actions are different operations that can be executed in Triggers. Actions cannot move users to other apps, or other steps.
Many Actions can be added to a single Trigger.
ex. Store the value of variable x to table field y, Print app step, Adjust Edge device GPIO pin.
Variable
Variables are a location to store app information. Variables have a specific type that must match the contents they can store.
Variables are only accessible within a single application and are cleared when the app is restarted or completed.
Tulip Player
Tulip Player is the Windows/Mac executable program where users can run Tulip apps. Tulip player allows you to create a more seamless user experience by removing the need for a web browser and allows increased IT controls.
Variables
Variables are a location to store app information. Variables have a specific type that must match the contents they can store.
Variables are only accessible within a single application and are cleared when the app is restarted or completed.


