
Connecting a 4-20 mA Sensor with Edge IO and Node-RED
Learn how to use the 4-20 mA Node-RED flow with your Edge IO
This article covers the workflow to connect a 2-wire 4-20 mA sensor to an Edge IO and send data to Tulip via a Node-RED library flow.
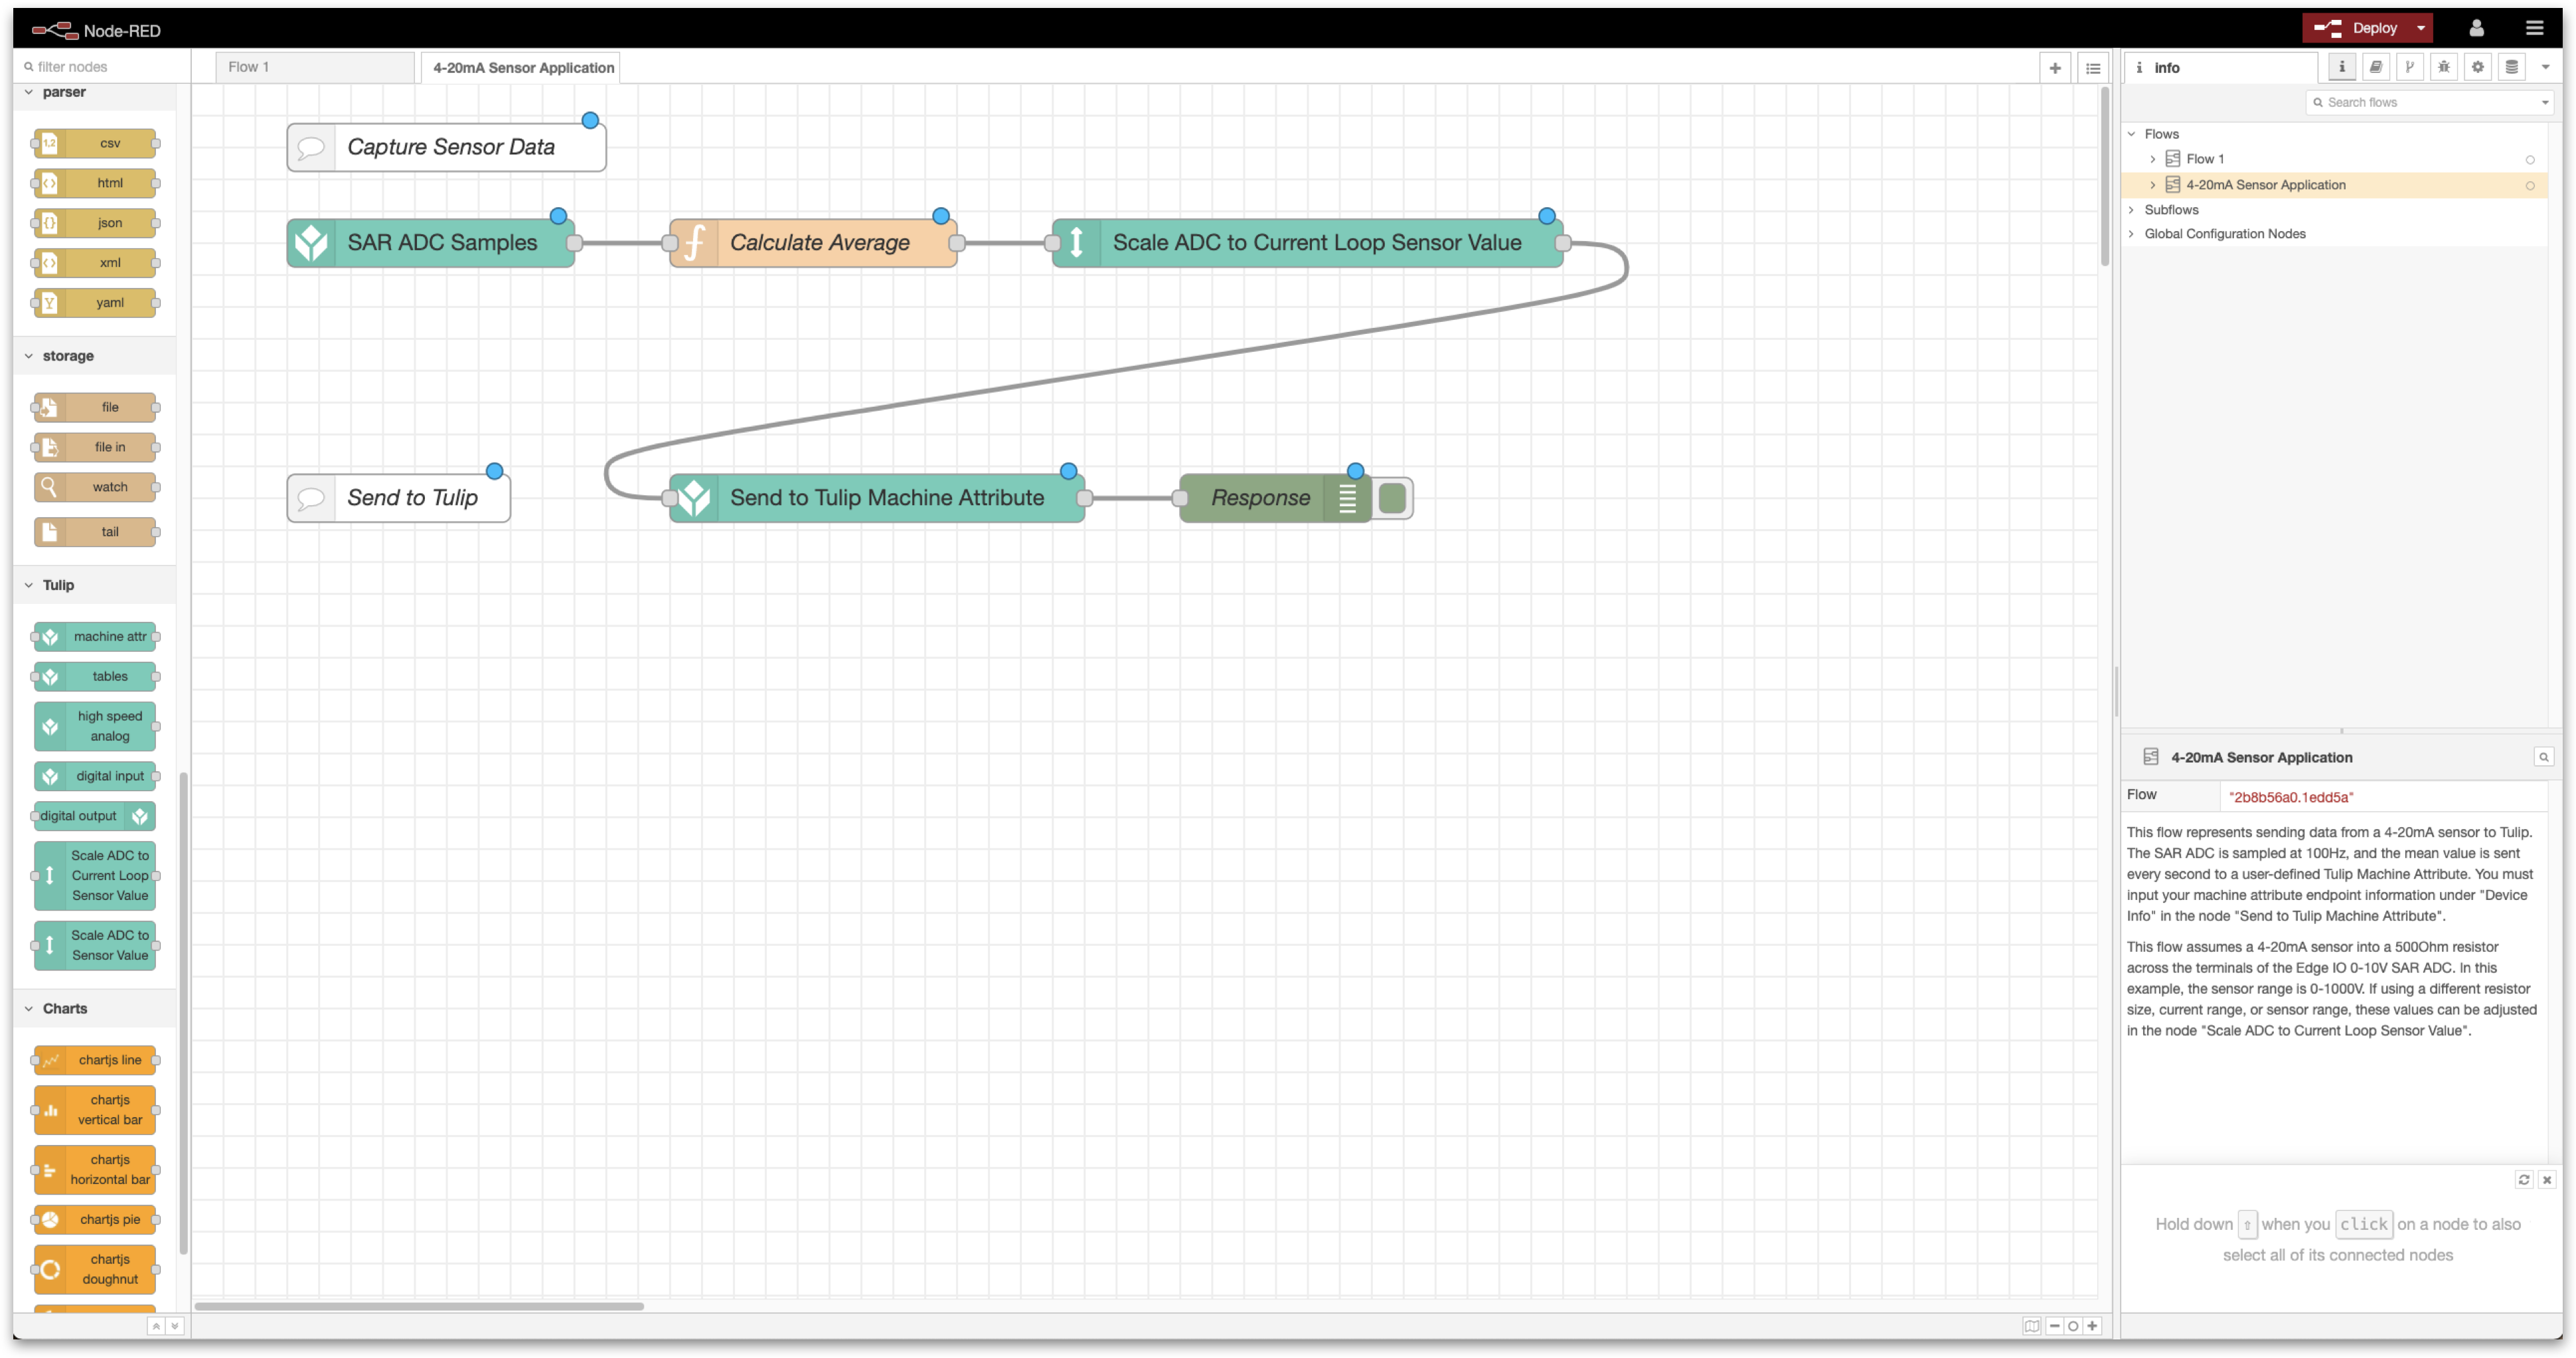
By the end of this article, you will have the following flow within Node-RED to send current data from your sensor to a Machine within Tulip.
You will complete the following steps:
- Hardware Setup: Wire the Edge IO
- Machine Setup: Create a Machine in Tulip
- Node-RED Setup: Import, edit, and deploy a Node-RED flow from the Tulip Library
What you will need is:
- An Edge IO registered to your Tulip account
- 4-20mA current-loop sensor: 2-wire configuration, compatible with 24V power
- 500 Ohm resistor
- 3.5mm flat-head screwdriver
1. Hardware Setup - Wire the Edge IO
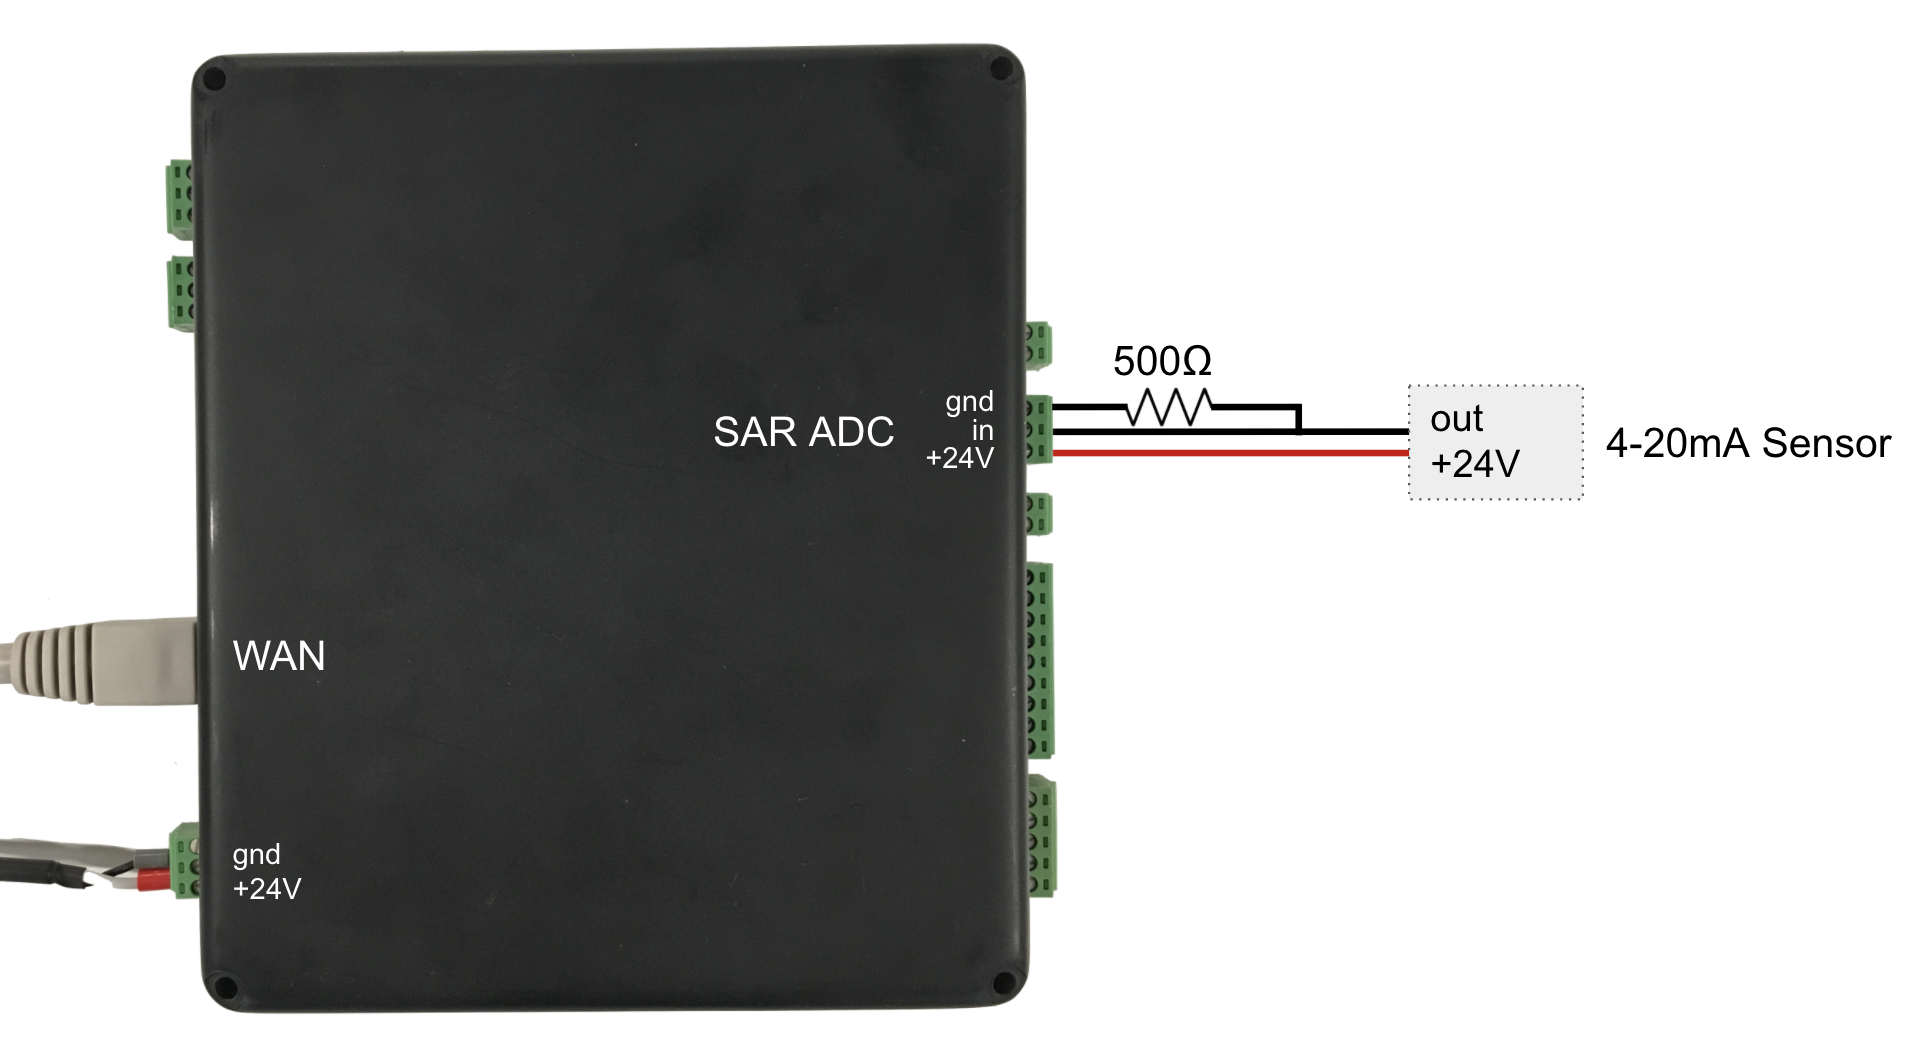
This workflow assumes that you’ve selected a 4-20mA sensor for your application of your choosing and an external 500-Ohm resistor to convert the sensor output current to voltage into the ADC.
Wire the sensor and resistor to your Edge IO as follows:
-
4-20mA Sensor
- Power terminal wired to the SAR ADC [+24V] terminal
- Output terminal wired to the SAR ADC [in] terminal
-
500-Ohm resistor
- One end to the SAR ADC [in] terminal
- One end to the SAR ADC [gnd] terminal
Additionally, ensure that you’ve powered the device and connected the device to your network by plugging an ethernet cable into the WAN port.
2. Machine Setup - Create a Machine in Tulip
To send data from the 4-20 mA sensor to Tulip, let’s first set up a Machine using the Tulip API as its data source. Refer to the Setting up a new Machine section How to Use the Machine Attributes API article for an in-depth overview.
In this example, we’ve created a Machine to represent a welder with a single float attribute called welder current.
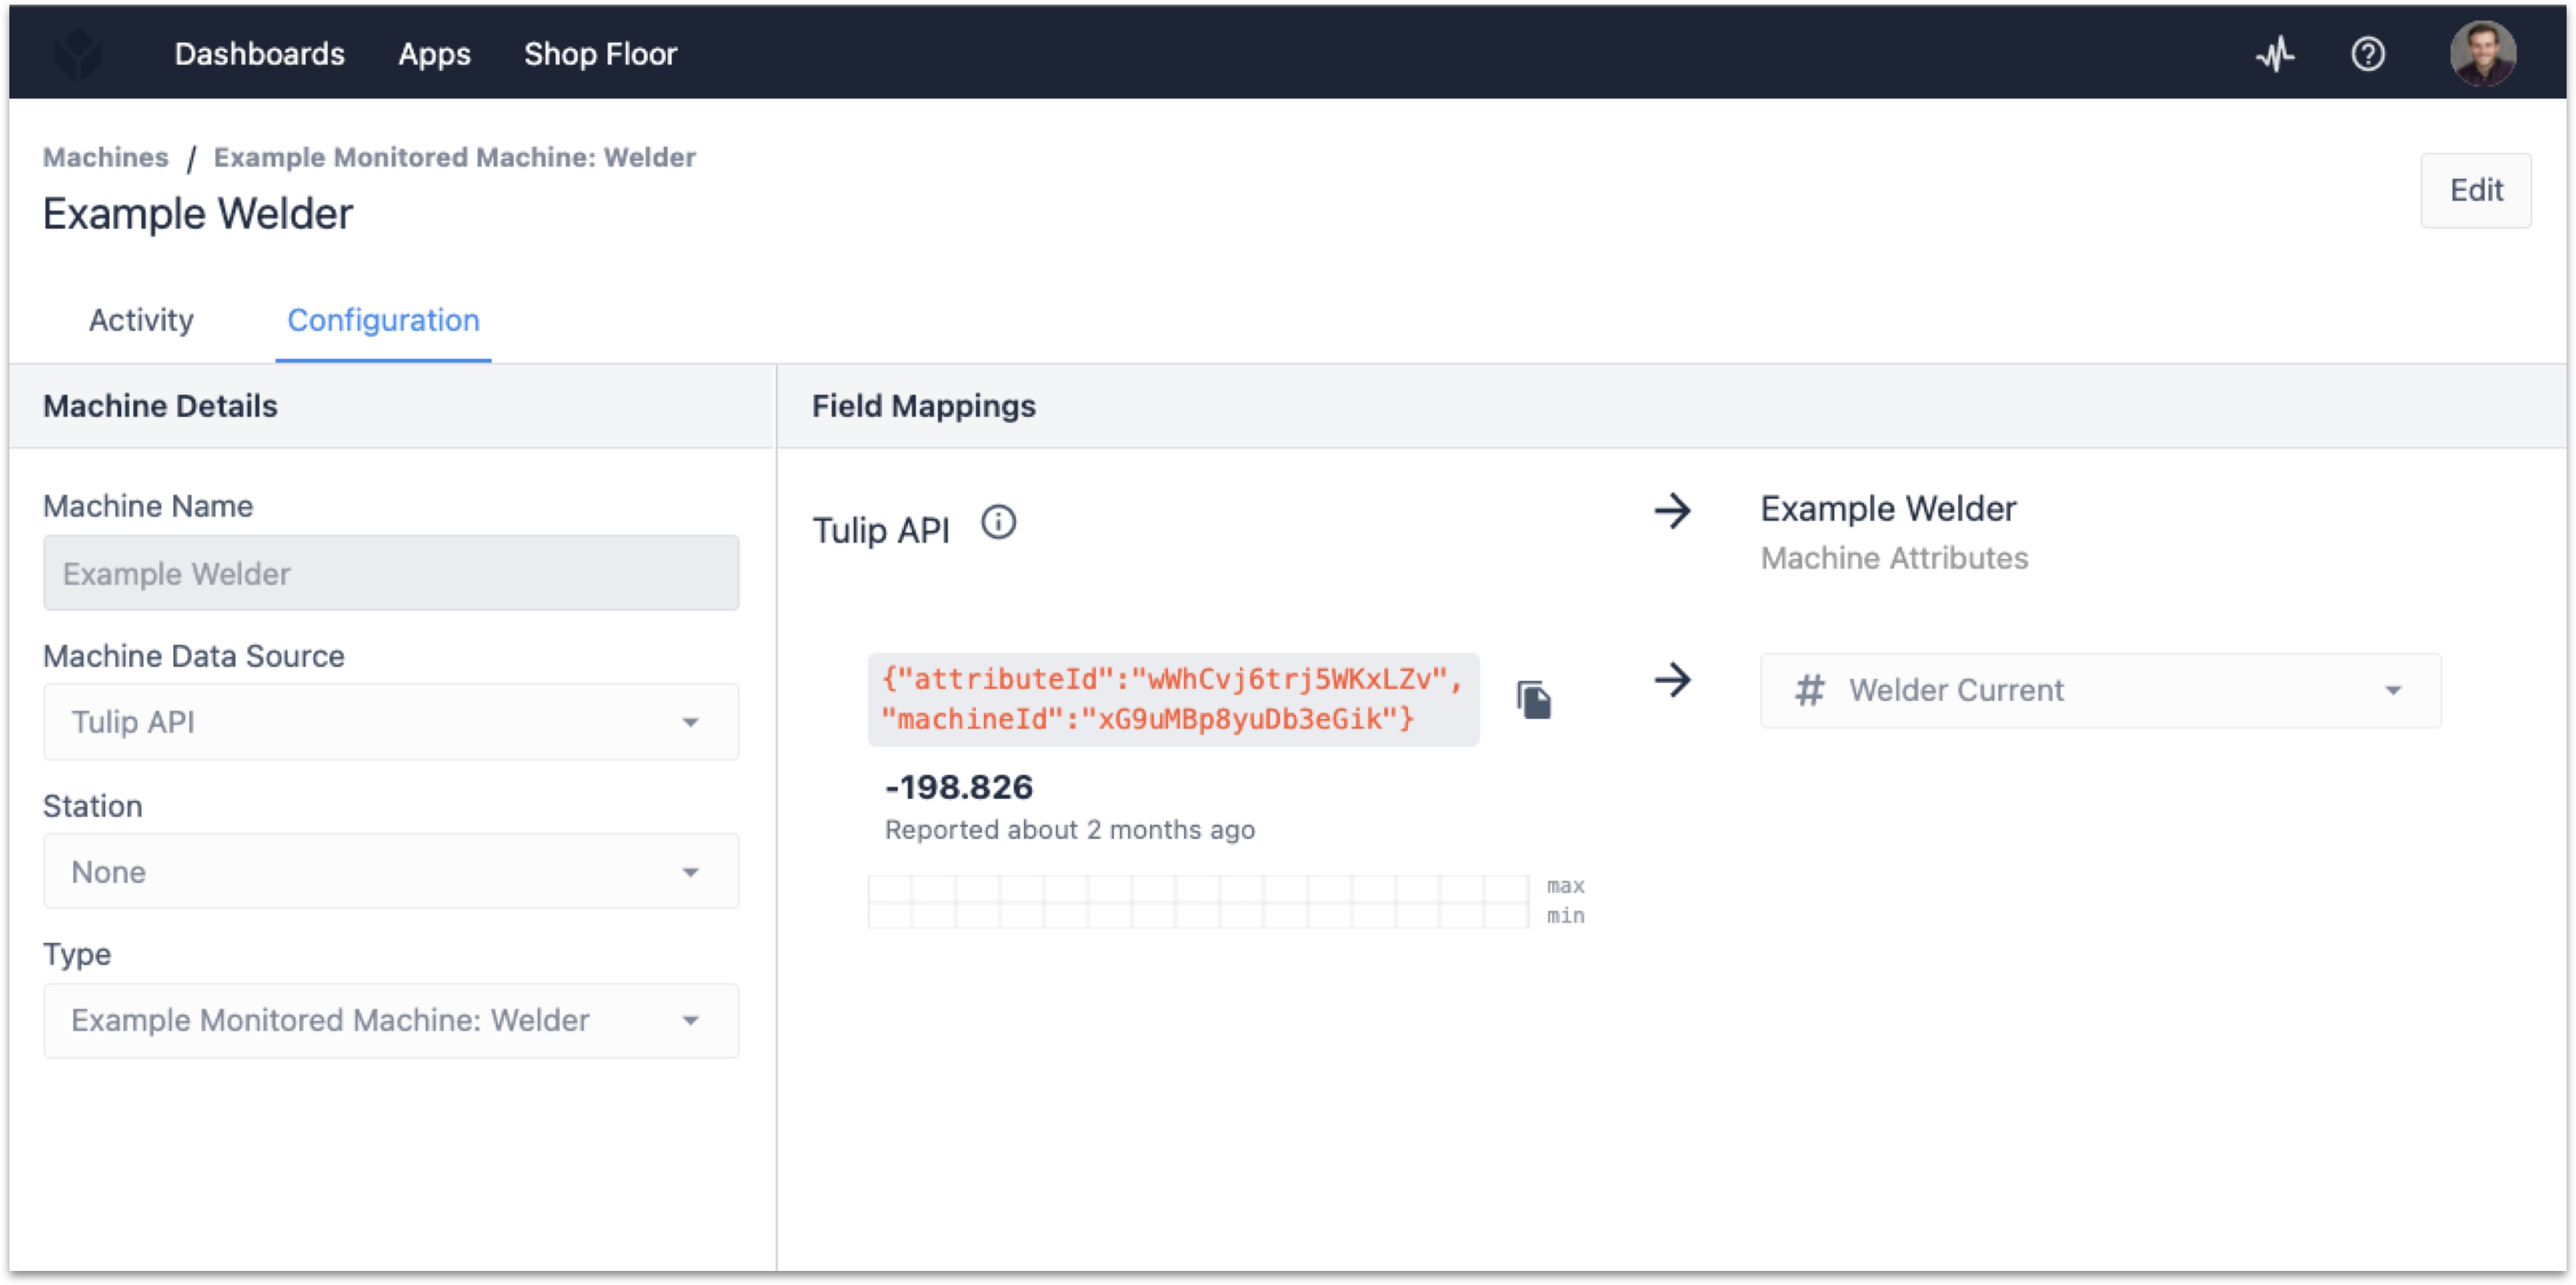
You’ll want to note your attributeIdand machineId values to pass into the Node-RED flow.
You can also set up a Machine Type to assign to the Machine if you plan to use the current sensor to change aspects such as the state of the machine or perform any counts based on the sensor outputs. Refer to How to Set Up Machine Types if this is of interest.
3. Node-RED Setup
Open the Edge Device Portal on the Edge IO connected to the 4-20 mA sensor. Launch the Node-RED Editor using the following credentials:
- Username: admin
- Password: Your Edge IO password
See more information here to get started with Node-RED on Edge IO.
3a. Import Library Flow
To import the library flow, follow the steps in our Importing Tulip Node-RED Flows document. The flow to import is 4_to_20_mA_sensor.json and importing creates the 4-20mA Sensor Application tab in the editor.
3b. Overview of the Flow
The Node-RED flow is comprised of five functional nodes. Following the flow we have:
-
SAR ADC Samples
- Purpose: Samples the 0-10V SAR ADC at a rate of 100 samples/second.
-
Calculate Average
- Purpose: Takes an average once per second of the 100 samples from the SAR ADC Samples node.
-
Scale ADC to Current Loop Sensor Value
- Purpose: Scales the average ADC values to the actual current loop sensor value.
-
Send to Tulip Machine Attribute
- Purpose: Sends the current loop sensor value to the Tulip event API to send to the Machine.
-
Response
- Purpose: Return the appropriate HTTP status code of the Tulip event API call.
3c. Edit the Flow
To finish setting up this flow, the device info for the Send to Tulip Machine Attributenode must be included with the attributeIdand machineIdfields from the machine set up earlier.
You should also edit the properties within the Scale ADC to Current Loop Sensor Value node based on the manufacturer’s specifications of your current sensor.
For example, if the sensor input range measured 0-100 Amps and outputs 4-20mA, and you are using a 500-Ohm external resistor, then you will set the following parameters:
- Resistor Value (Ohms) - 500
- Min Input - 0
- Max Input - 100
- Min Output (mA) - 4
- Max Output (mA) - 20
3d. Deploy the Flow
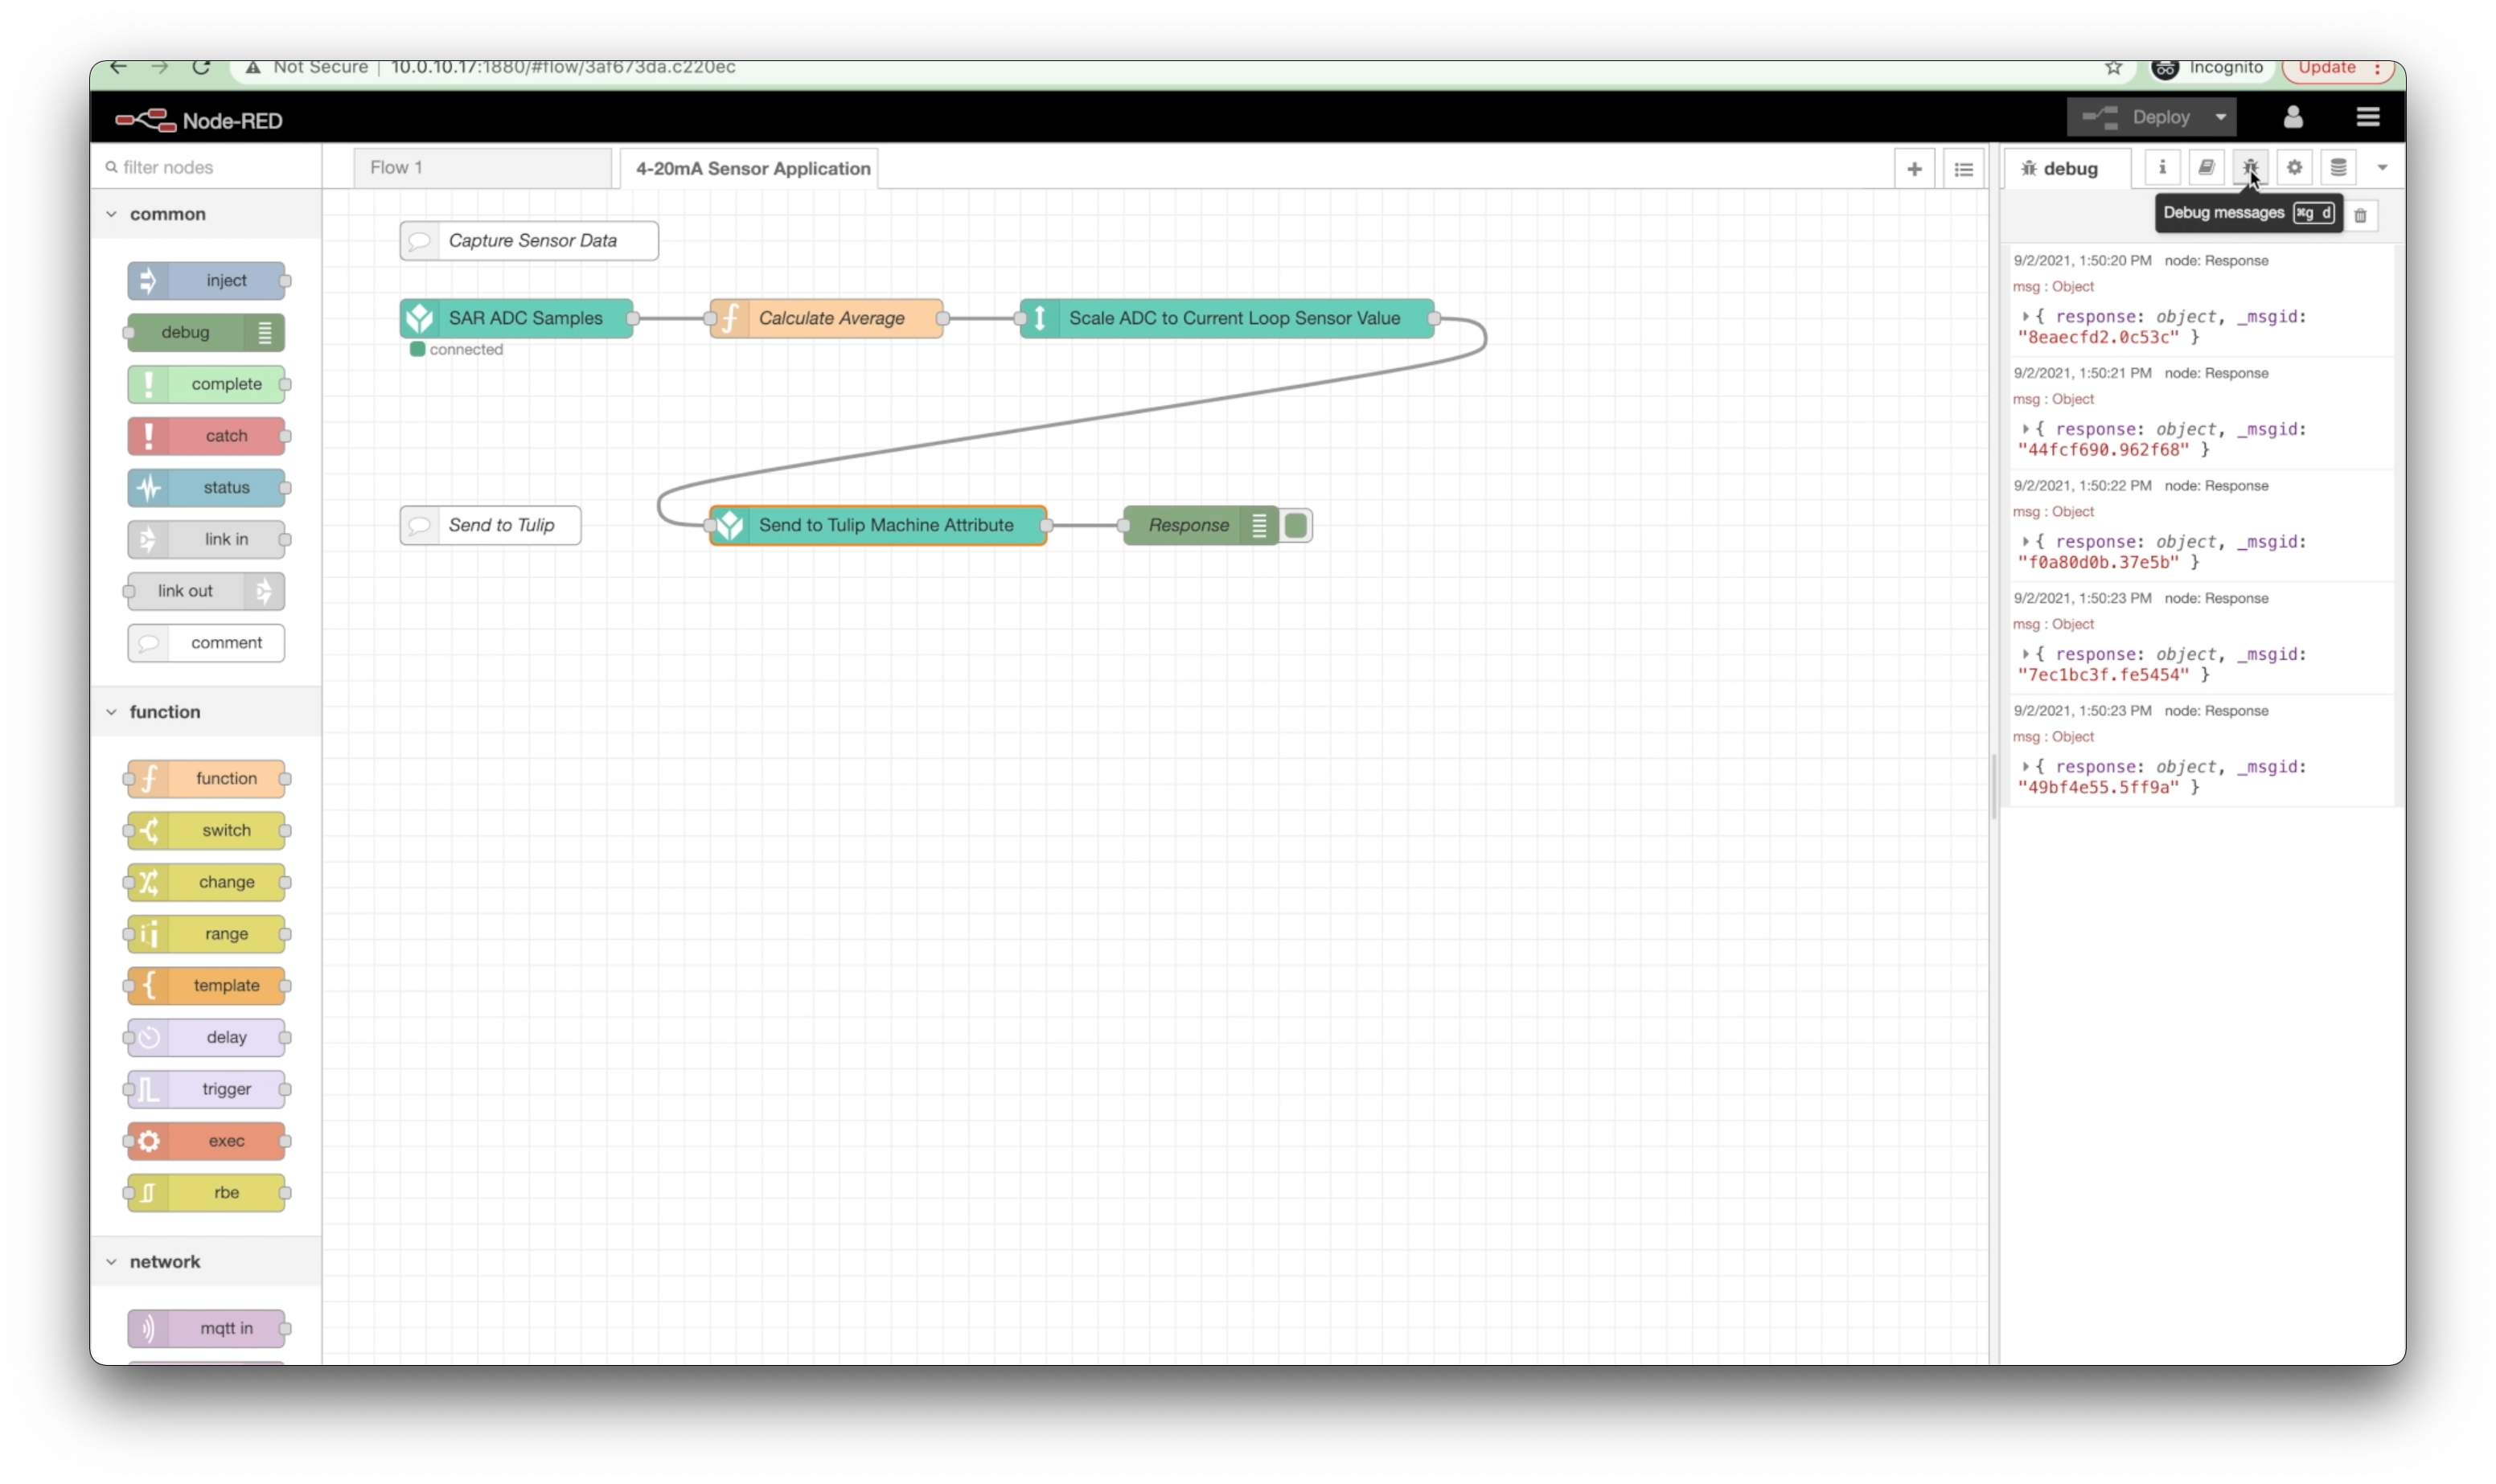
With the Node-RED flow built and the necessary parameters added, you can Deploy your flow from the top right and begin to see the data from your 4-20 mA sensor output to Tulip.

By selecting the Debug message option on the right side of the Node-RED Editor, you should be able to see responses and corresponding status codes from the Tulip API.
Technical Details of the Node-RED Flow
Below is a detailed summary of the nodes and their default configuration parameters imported with the 4_to_20_mA_sensor.json file.
-
SAR ADC Samples
-
Purpose: Samples the 0-10V SAR ADC at a rate of 100 samples/second.
-
Node type: High speed analog
-
Default properties:
-
Analog Config -
SAR ADC: RMS @ 100Hz- Select ADC to Configure -
SAR ADC - Enabled Outputs -
RMS - Buffer Size -
100 - Sampling Frequency (Hz) -
100
- Select ADC to Configure -
-
Data Type -
RMS -
Output Mode -
Continuous -
Refresh Rate (seconds) -
1
-
-
-
Calculate Average
-
Purpose: Takes an average once per second of the 100 samples from the SAR ADC Samples node.
-
Node type: Function
-
Default properties:
- Function:
1 const average = (array) => array.reduce((a, b) => a + b) / array.length;
2 msg.payload = average(msg.data);
3 return msg;
-
-
Scale ADC to Current Loop Sensor Value
-
Purpose: Scales the average ADC values to the actual current loop sensor value.
-
Node type: Subflow
-
Default properties:
- Input Property -
payload - Resistor Value (Ohms) -
500 - Min Input -
0 - Max Input -
800 - Min Output (mA) -
4 - Max Output (mA) -
20
- Input Property -
-
-
Send to Tulip Machine Attribute
-
Purpose: Sends the current loop sensor value to the Tulip event API to send to the Machine.
-
Node type: Machine attribute
-
Default properties:
- Device Info -
{"attributeId":"", "machineId":""}
- Device Info -
-
-
Response
-
Purpose: Return the appropriate HTTP status code of the Tulip event API call.
-
Node type: Debug
-
Default properties:
- Output -
complete msg object - To -
debug window
- Output -
-
Further Reading
- Node-RED's documentation
- Managing Machine States and Part Counts with Edge IO and Node-RED
- Connecting an Analog Oscilloscope with Edge IO and Node-RED
Did you find what you were looking for?
You can also head to community.tulip.co to post your question or see if others have faced a similar question!