Purpose
This guide walks through step by step how to integrate Tulip with Rockwell Automation's FactoryTalk Optix HMI Visualization software.
Tulip apps can be fully integrated into FactoryTalk Optix HMIs, meaning a Tulip app can run directly in FactoryTalk Optix and bidirectional communication between the software platforms is possible. This allows for the operator to have access to Tulip directly in their HMI, while allowing Tulip access to all the relevant data from the machine and HMI.
Use Case
We have a demonstration of this integration featured in our Tulip Experience Center (TEC) for a Bioreactor eBR use-case. In this example, the live machine data, open alarms, and the current Optix screen are being sent from the FTOptix HMI to Tulip using OPC UA. These all appear in Tulip as a Tulip Machine, which can then be used in Apps, in Automations, or with Machine Triggers to provide logic based on that data. Tulip Connectors are used to send setpoint values back to the machine, as well as controlling which screen is displayed in the Optix HMI.
How To
Run Tulip in FactoryTalk Optix
Tulip apps can be run directly in FactoryTalk Optix using iframe functionality. Optix allows user to embed a web browser directly into their HMI, which is then used to run Tulip.
-
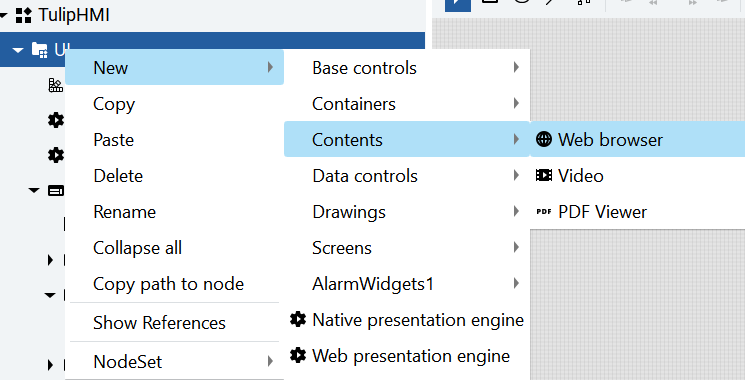
Add a Web Browser into your Optix HMI by right clicking UI > New > Contents > Web Browser.
-
Select the Web Browser and view the Properties tab on the right side of the screen.
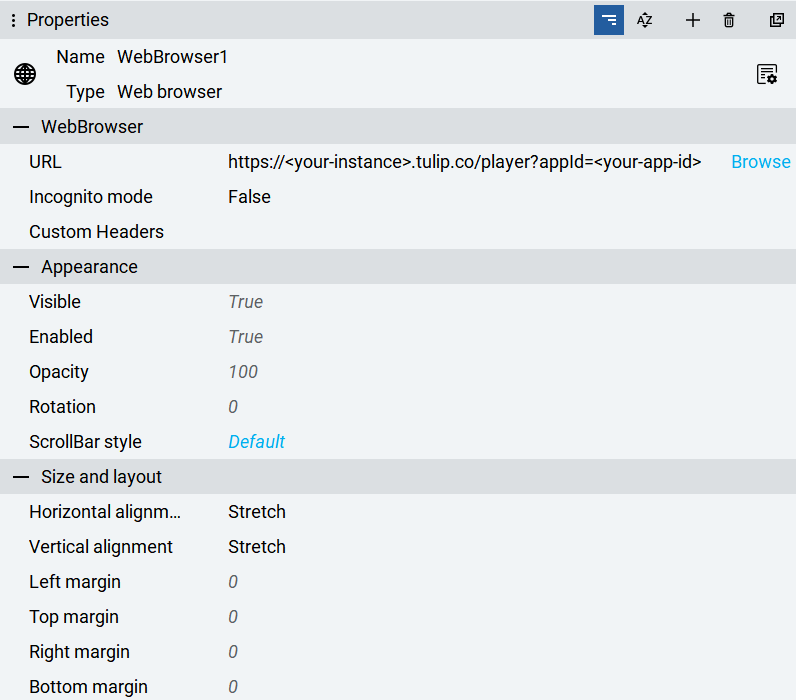
- Set the URL to be
https://<your-instance>.tulip.co/player?appId=<your-app-id>.
The app ID can be found by opening the desired app in your Tulip instance then viewing the URL displayed in your browser. The URL will follow the format https://<your-instance>.tulip.co/w/<your-app-id>/process/....
If you do not want to launch to a specific app, you can set the URL to be https://<your-instance>.tulip.co/player.
Send data from Optix to Tulip
There are several protocols that may be used to send data between Tulip and Optix.
Data can be sent to Tulip from Optix using OPC UA. Optix hosts and OPC UA Server, while Tulip can utilize it's OPC-UA Client functionality to receive that data into a Tulip Machine. If you are not familiar with how to create and edit a Tulip Machine, please refer to ....
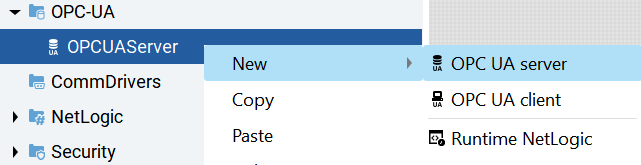
- Right-Click the OPC-UA folder in Optix then select New > OPC UA server.
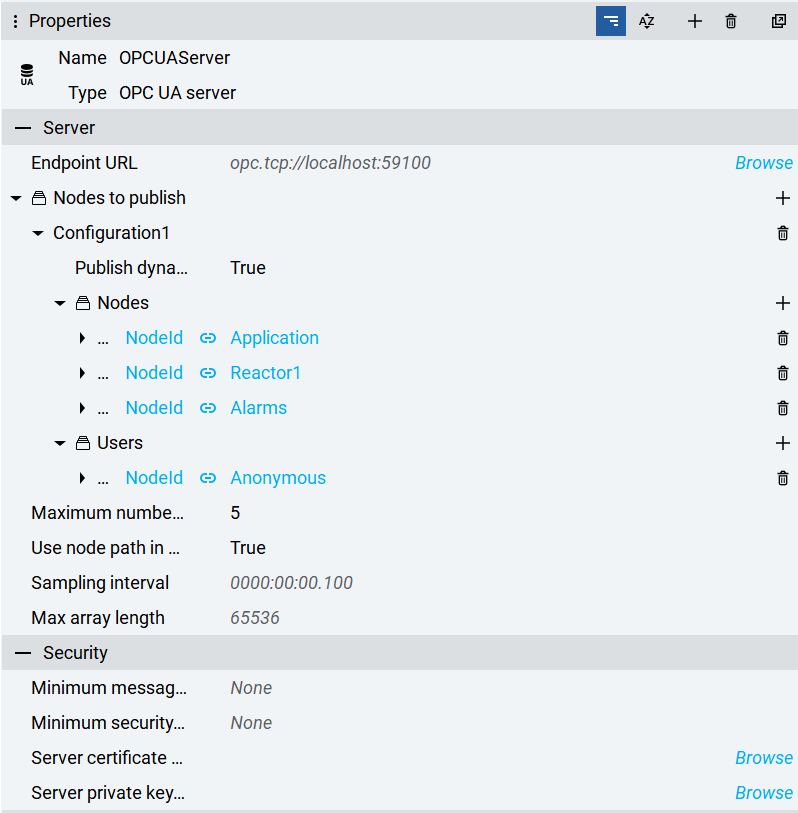
- Select the OPC UA server and view the Properties tab on the right side of the screen.
- Input the Endpoint URL to be
opc.tcp://localhost:59100then configure your desired nodes, users, and security. Refer to the FTOptix Help Center if you need assistance with the configuration.
Method 1: Using an Edge Device Connector Host
-
Setup your Tulip Edge Device and connect it to the same network as the HMI.
-
Navigate to
https://<your-instance>.tulip.co/machine_data_sources. This page can also be found by navigating to Shop Floor > Machines then selecting Data Sources from the left side panel. -
Select the 'Create machine data source' button. Fill in the following:
Name:<desired name of data source>
Runs on:<your Edge Device>
Type: OPC UA
Agent URL:<IP Address of the HMI> -
Fill in the Security options to match those from the OPC UA Server in Optix.
-
Select 'Test' to verify the connection then 'Save' it.
-
Refer to How to Add and Configure Machines to connect the Optix data source to a machine in Tulip.
Method 2: Using an On-Prem Connector Host (OPCH)
-
Setup an OPCH on the HMI. Refer to Overview of On-Premise Connector Hosts for instructions on setting up an On-Prem Connector Host (OPCH).
-
Navigate to
https://<your-instance>.tulip.co/machine_data_sources. This page can also be found by navigating to Shop Floor > Machines then selecting Data Sources from the left side panel. -
Select the 'Create machine data source' button. Fill in the following:
Name:<desired name of data source>
Runs on:<your OPCH>
Type: OPC UA
Agent URL:<IP Address of the HMI> -
Fill in the Security options to match those from the OPC UA Server in Optix.
-
Select 'Test' to verify the connection then 'Save' it.
-
Refer to How to Add and Configure Machines to connect the Optix data source to a machine in Tulip.
Send data from Tulip to Optix
- Right click the NetLogic folder, then select New > Runtime NetLogic. Use the below script to host the HTTP REST Server.
- Alter Lines 869-1000 for your use case. Currently, it is setup to receive PUT calls at the paths
/targetValuesand/screen. The received values are stored intoref_<variable-name>, for exampleref_TargetPressure.
The below code is used to receive the PUT calls and pass them to aliases in Optix.
Lines 924 - 955:
case "PUT":
                    switch (e.Path)
                    {
                        case "screen":  // http://localhost:8081/screen
                            byte[] payloadraw = (byte[])e.Data;
                            string payload = System.Text.Encoding.UTF8.GetString(payloadraw, 0, payloadraw.Length);
                            string screen = JObject.Parse(payload)["screen"].ToString();

                            ((IUAVariable)LogicObject.GetAlias("refScreenToShow")).Value = screen;

                            res = 1;
                            break;
                        case "targetValues": // http://localhost:8081/targetValues
                            payloadraw = (byte[])e.Data;
                            payload = System.Text.Encoding.UTF8.GetString(payloadraw, 0, payloadraw.Length);
                            Log.Warning(payload);
                            int targetPressure = int.Parse(JObject.Parse(payload)["targetPressure"].ToString());
                            int targetTemperature = int.Parse(JObject.Parse(payload)["targetTemperature"].ToString());
                            float targetpH = float.Parse(JObject.Parse(payload)["targetpH"].ToString());
                            int targetDO = int.Parse(JObject.Parse(payload)["targetDO"].ToString());

                            ((IUAVariable)LogicObject.GetAlias("ref_TargetPressure")).Value = targetPressure;
                            ((IUAVariable)LogicObject.GetAlias("ref_TargetTemperature")).Value = targetTemperature;
                            ((IUAVariable)LogicObject.GetAlias("ref_TargetpH")).Value = targetpH;
                            ((IUAVariable)LogicObject.GetAlias("ref_TargetDO")).Value = targetDO;

                            res = 1;
                            break;
                        default:
                            break;
                    }
                    break;
-
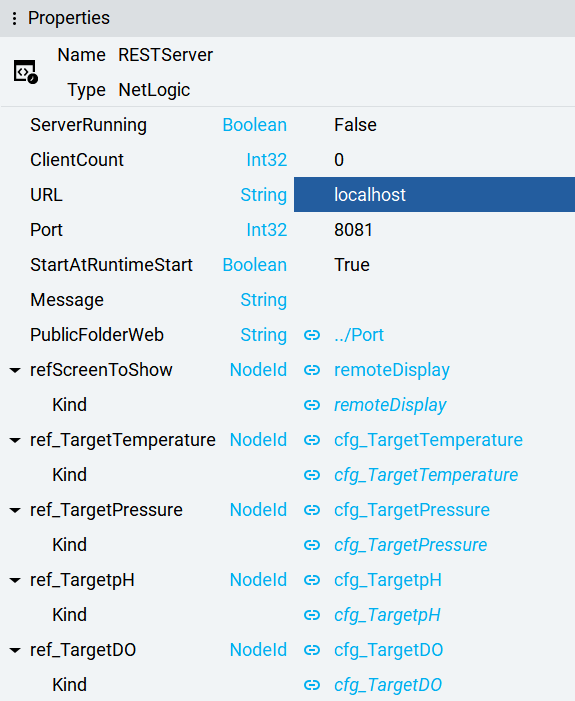
In Optix, select the REST Server Netlogic, then view the Properties panel on the right side. The aliases assigned in the code for the REST Server can be assigned to variables in Optix. For example, in the below image
ref_TargetTemperatureis being assigned to the Optix variablecfg_TargetTemperature.
-
In your Tulip instance, navigate to Apps > Connectors.
-
Select the 'Create Connector' button.
-
Create a Custom Connector with type HTTP.
-
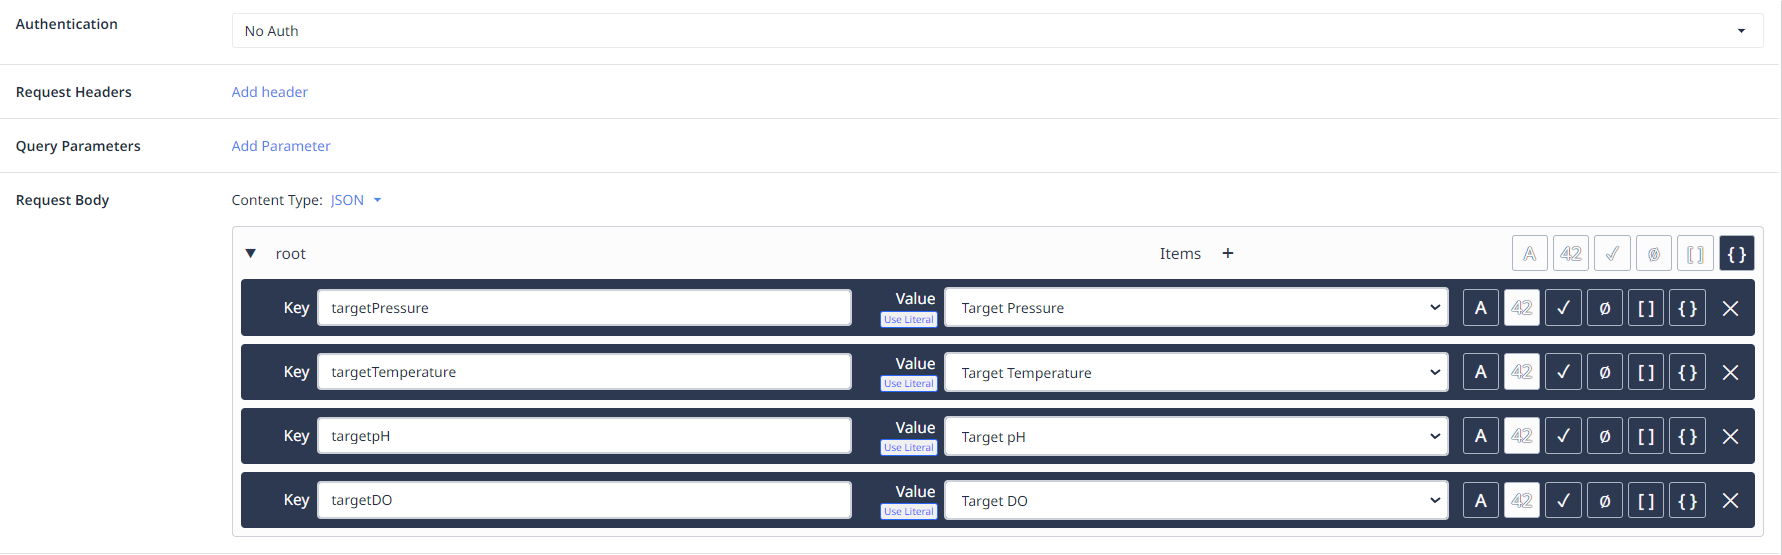
The Connection Details should match the following:
Running on:<your edge device or OPCH>
Host:<IP Address of the HMI>
Port:<port assigned to REST server in Optix>- In the image above we are using port 8081 -
Select 'Test' to verify the connection then 'Save'.
-
Create a Function and set the following:
Type: PUT
Path: This should match what you set in the code as your path. Following the previous example, it is set to be/targetValuesor/screen. -
Add in all relevant parameters to the Request Body:
If you need assistance with creating connector functions in Tulip, please refer to How to Configure a Connector.
Summary
Bidirectional communication has now been setup between your Tulip app and Optix HMI, allowing you to send data freely between them. In our demonstration of this integration, we use OPC UA to send the live machine data, any open alarms, and the current Optix screen to Tulip. We use the REST Server to send target values for the machine along with which screen we want to switch the Optix app to. This enables us to monitor and control the machine, as well as the Optix app itself using triggers in our Tulip app.
If you are interested in controlling the Optix screen from Tulip, refer to the below Runtime NetLogic code. It should be placed directly in the MainWindow (type) and will need to be altered to fit the names of your Panel Loader and screens.