To download the app, visit: Library
Purpose
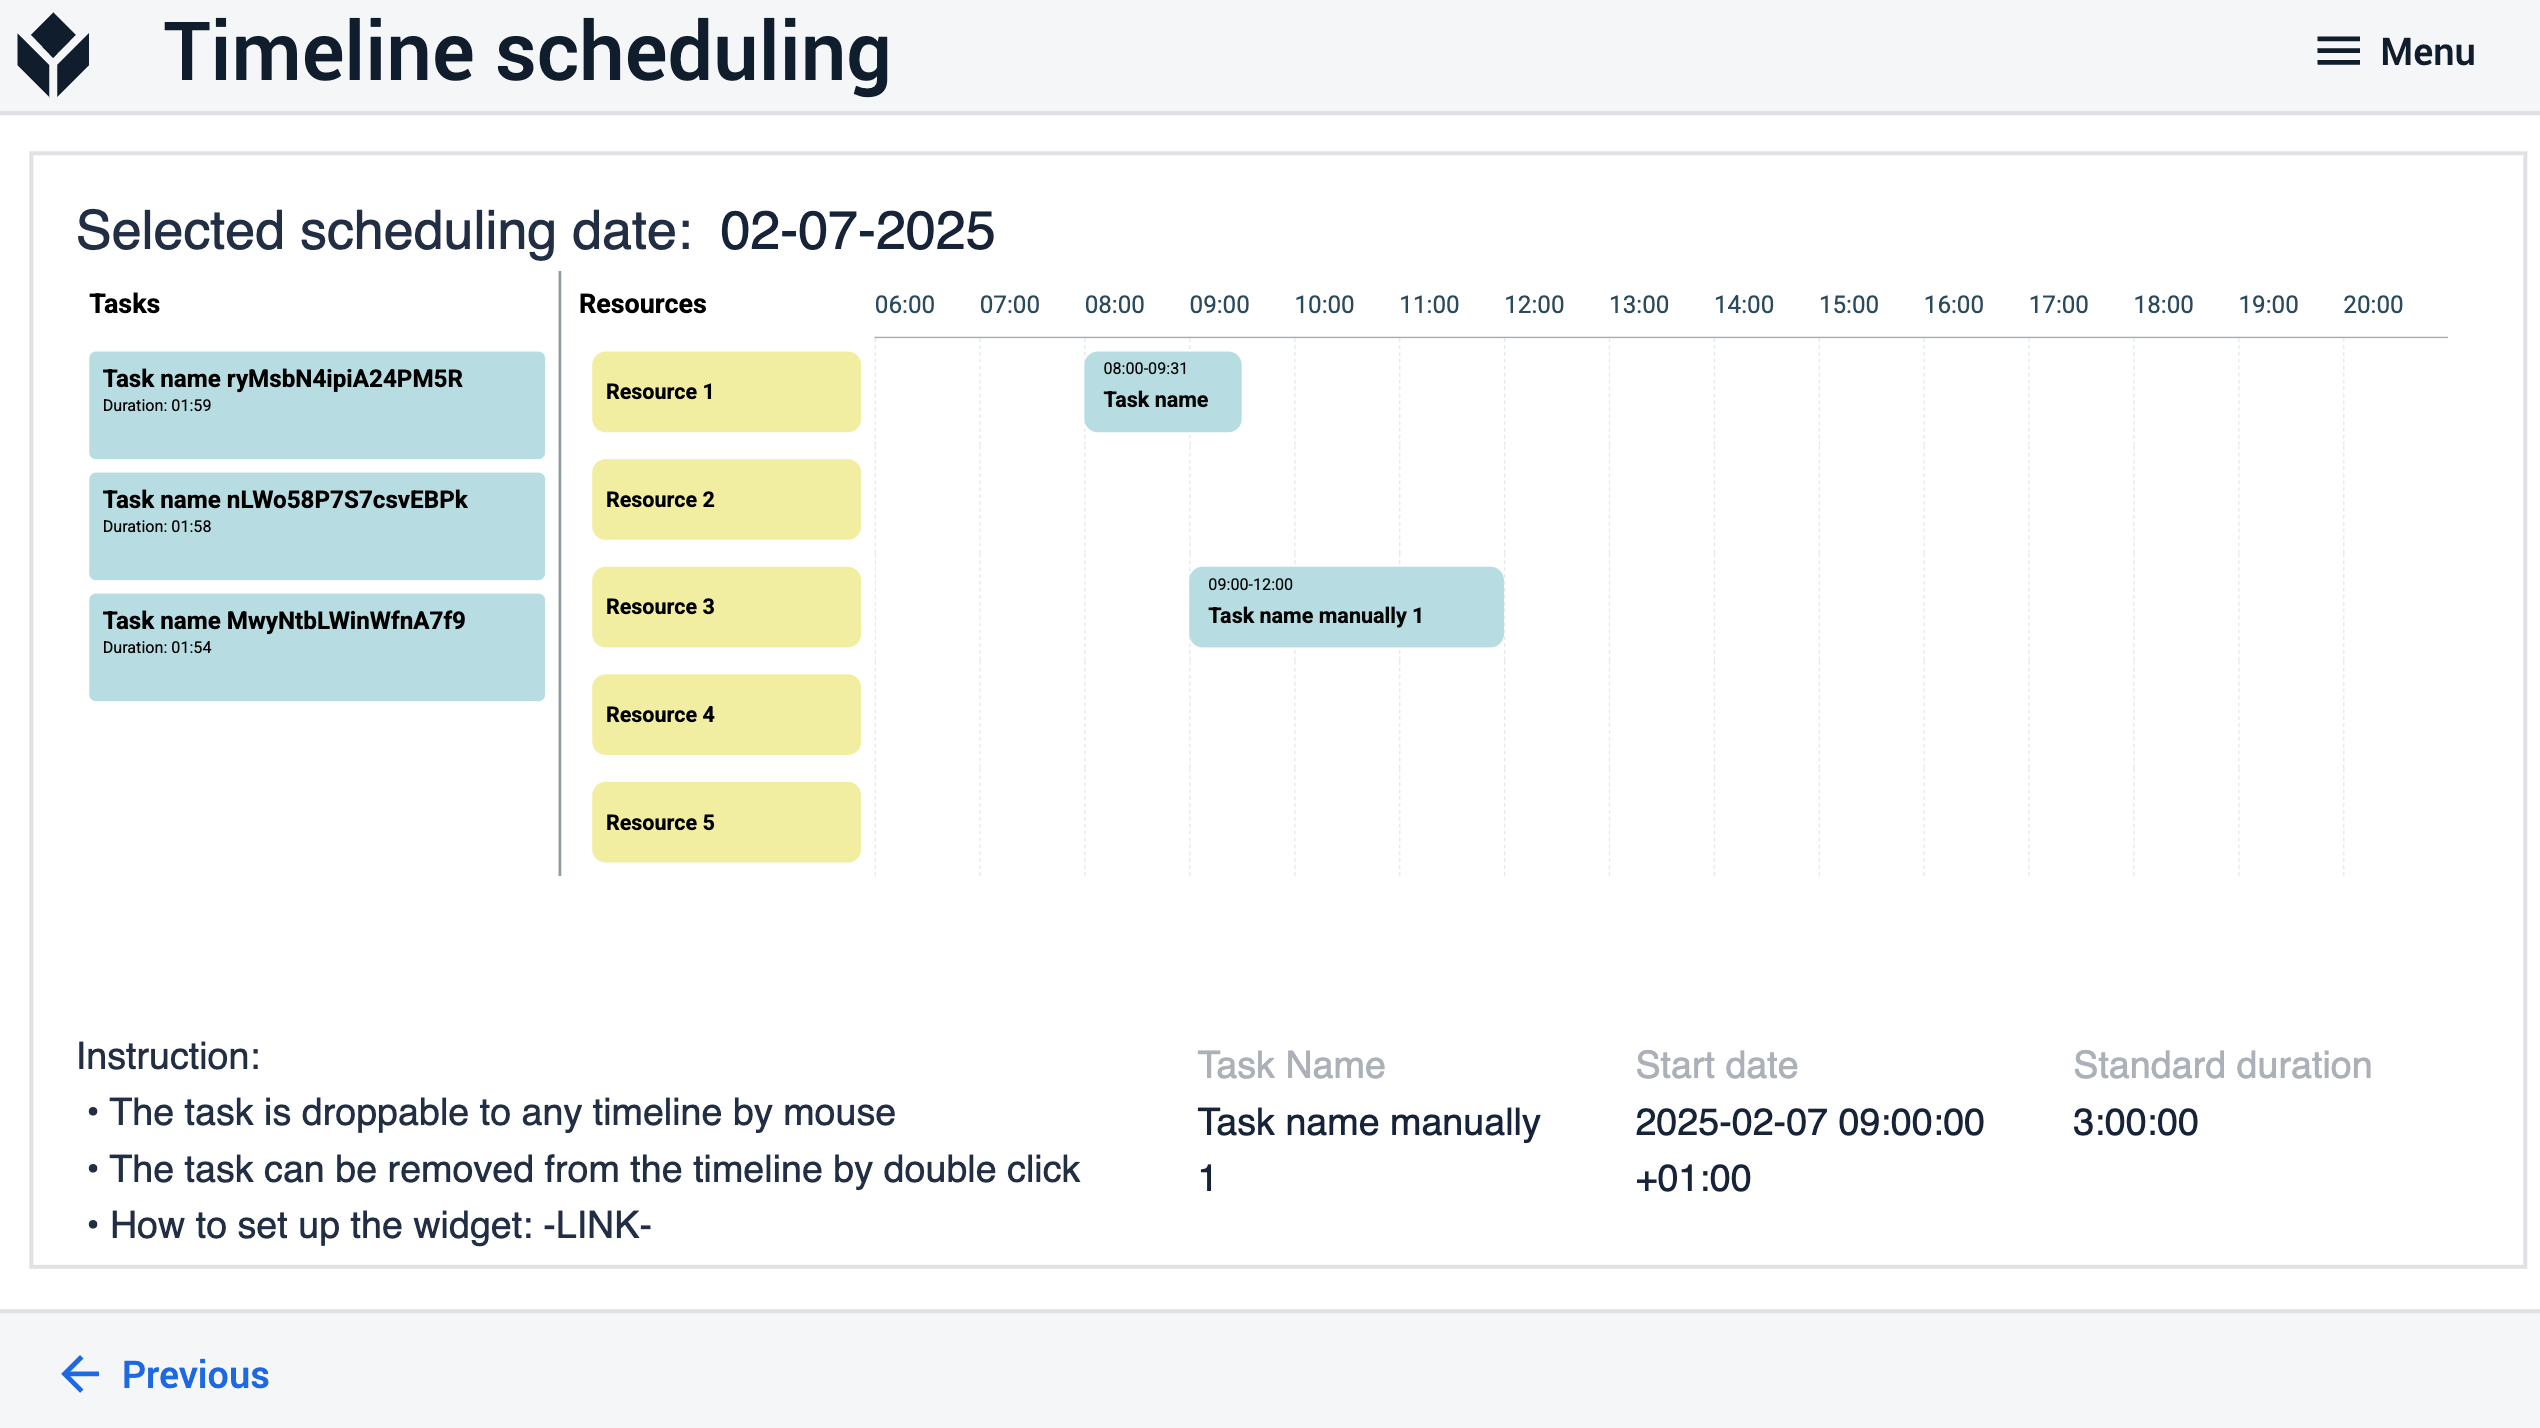
The scheduling custom widget serves as an innovative solution for task management. This Scheduling widget is designed to be used inside Tulip apps to fetch tasks or jobs from a database, each with its own unique duration.
Displayed on the left side of the widget, the tasks appear in a vertically arranged list. By dragging and dropping tasks onto one of the resources located on the right side of the Scheduling widget, tasks or jobs can be scheduled onto a timeline. This allocation links the task or job to a specific resource, indicating when the resource will address it.
In essence, this custom widget streamlines the process of task allocation by facilitating a visual association between tasks and resources through an intuitive drag-and-drop functionality, thereby ensuring effective management and scheduling within the Tulip interface.
Setup
When configuring the widget, certain parameters are mandatory, while others are optional with default values.
To establish connection with the client's system, the widget requires the following:
- The client's instance URL
- Authentication token for access instead of login credentials
- If the client does not use the DEFAULT Workspace, the Workspace ID should also be provided.
After successful authentication, the Scheduling widget needs to access Resources, which are retrieved from a list. Resources can be sourced from variables or a table query.
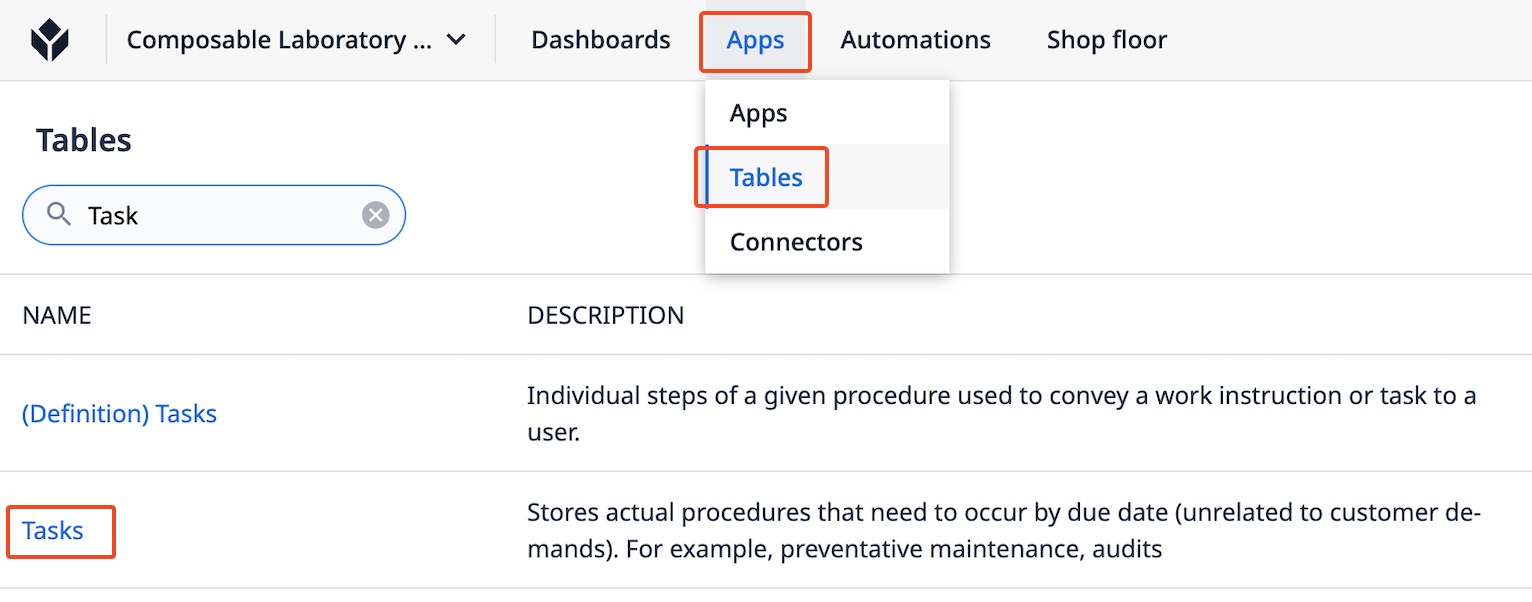
Tasks for the Scheduling widget are obtained from the Tulip table based on the table ID and its fields. Since these are customizable, the Scheduling widget offers added flexibility if a different table is being utilized.
The Scheduling widget has the following parameters to set:
Mandatory parameters
Resources: it is a textlist, it can come from a table but in this case it managed as app variable.
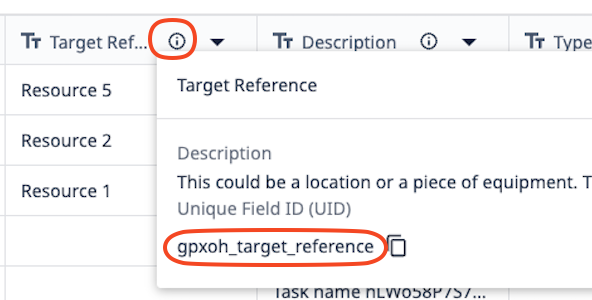
Column names: the field IDs can be found at Task table level, please add it one by one.
The Task table can be found on the following way:
The field ID can be found on the following way:
- Task ID
- Task Name
- Status column name
- Start column name
- End column name
- Duration column name
- Resource column name
Basic Auth token: click on your profile at the top right corner, select the Account settings, click on the API Tokens on the left panel and follow the instructions to get this token.
Account URL: eg: your-account.tulip.co
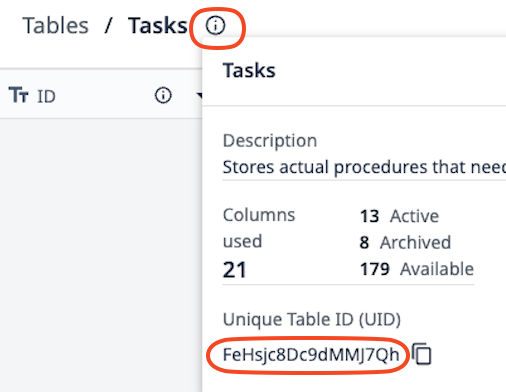
Task Table ID: the table ID can be found at table level
Scheduling date: Which day would you like to plan for? This is a datetime field.
Optional parameters
Day start: beginning of the timeline. Default value is 06:00
Day end: end of the timeline. Default value is 21:00
Time unit within hour: the default value is 10 (in minutes), it means when you are moving a task on the timeline, you can select eg 07:10 or 07:20....., each step is 10 mins. If you change it by 30 then you can select 07:00, 07:30..... each step is 30 mins
Unit width: one step width in px, by this parameter you can set up the widget's width. Default value is 13
Resource name width: Resource column's width in px. Default value is 220
Overlap: the widget is supporting the task overlapping. Default value is false.
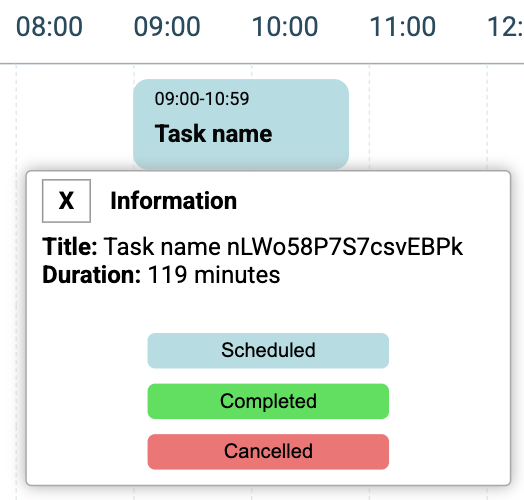
Infobox: this is a popup window to see the task name if it cropped. Default value is false
Statuses (this option is available if the Infobox is activated):
The Scheduling widget operates with two fixed statuses: "Scheduled" and "Unscheduled." Additionally, it provides the capability to define additional statuses such as "Completed" or "Cancelled." For custom statuses a color can be specified and also can be setup a default behaveiaur (ShowByDefault).
Based on the ShowByDefault parameter, the widget automatically hide the tasks if the ShowByDefault is "no" or display tasks in case of "yes".
The custom statuses can be found in the infobox.
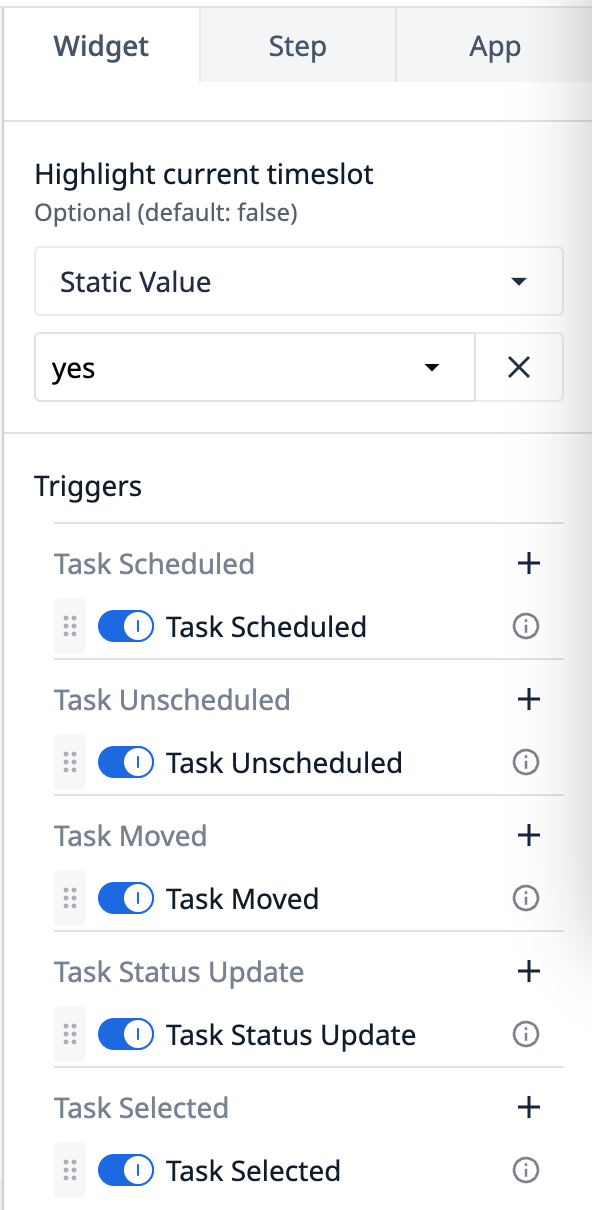
Highlight current timeslot: Displaying a vertical line indicating real-time progress, showing our current position on the timeline. Default value is false.
Triggers
The following events are available on the Scheduling widget:
Task Scheduled: a task dropped to the timeline
Task Unscheduled: a task removed from the timeline
Task Moved: a task just re-scheduled
Task Status Update: In case of using custom statuses
Task Selected: clicked on a scheduled task
Every triggers have the following results except the Task selected and Task Status Update:
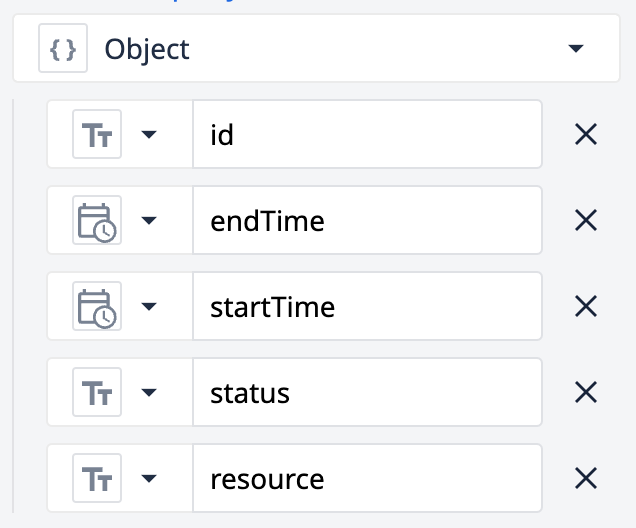
The result of the "Task selected" is the ID of the task. It can be used for example loading record.
How it works
It retrieves tasks via an API call from the task table in a database, while Resources are obtained from the widget's parameters.
Tasks are displayed on the left side, while Resources are listed vertically on the right side of the Scheduling widget.
Each Resource has a daily timeline where tasks can be placed. Previously assigned tasks reappear automatically on the timeline upon reloading the widget.
When a task is linked to a Resource, it receives Start and End times for the planned day and will only be visible on the Scheduling widget's timeline on that particular day.
The Scheduling widget interacts with the CDM Task table in the database to record new schedules, task movements in time or between Resources, and the removal of tasks from a resource's timeline via double-click (placing them in an unscheduled state). These background processes operate using the built-in fireEvent function. Further information regarding the fireEvent function can be found HERE.
Additional features:
- Support for task overlaps by setting the "Overlap" parameter to true, useful for handling concurrent tasks on the same Resource.
- Activation of an Infobox by setting the "Infobox" parameter to true, displaying a small window with the full task name upon clicking, as sometimes the name may not fit on the timeline.
How to create an API token
Here you can find detailed information about API token creation.
Further Reading
If you would like to know more about custom widgets please visit the site below:
Custom Widgets Overview