


Overview
Welcome to an exploration of OAuth2.0, a powerful yet often misunderstood authentication protocol within the Tulip-verse. In this article, we will unravel the fundamentals, guide you through Tulip's supported authentication flows, demystify the configuration of your initial connector, and share quick tips for a seamless start.
For Tulip's handling of refresh tokens, scope and audience management, and custom connector configurations, see the Technical details section.
Authentication types
Tulip supports three OAuth2.0 authentication types: OAuth2.0 (Service Account), OAuth2.0 (User Credentials), and OAuth2.0 (Client Credentials). The key distinction lies in how credentials are shared across users and the flow that is executed against the OAuth spec. A complete list and description of the unique OAuth flows is available here: https://frontegg.com/blog/oauth-flows.
In older Tulip versions, OAuth2.0 (Service Account) was called OAuth2 (Admin), and OAuth2.0 (User Credentials) was called OAuth2 (Operator).
Authorization Code Flow:
- OAuth2.0 (Service Account): Uses credentials provided during connector testing for all users in the Tulip Player. Ideal for shared credentials across your organization. Admin reauthentication is required if credentials expire.
- OAuth2.0 (User Credentials): Segments authentication based on the user logged into Tulip Player. If a user hasn't authenticated or authentication expires, the user undergoes the OAuth flow within the Tulip Player.
Client Credentials Flow:
- OAuth2.0 (Client Credentials): This grant type is used by Tulip to obtain an access token by authenticating with the authorization server using the client’s credentials (client ID and client secret), typically for accessing resources on behalf of themselves rather than on behalf of a user.
Before delving into the specifics, we suggest acquainting yourself with Environments and gaining an overview of Connector Hosts and their functions.
OAuth2.0 serves as a mechanism for Tulip (the client) to establish its identity with your business systems.
Authorization code flow
To complete the user authentication process, your browser needs to allow pop-ups. If your connector is configured with multiple environments, each environment will open a separate pop-up window during authentication.
Check if pop-ups are enabled in Chrome:
- Open Chrome and click the three-dot menu in the top-right corner of the window.
- Select Settings from the drop-down menu.
- Scroll down and click on Privacy and security.
- Under the "Privacy and security" section, click on Site Settings.
- Scroll down and click on Pop-ups and redirects.
- Ensure that the toggle is set to allow pop-ups, or manually add the website to the list of sites allowed to show pop-ups.
If pop-ups are blocked, Chrome will display a small icon in the address bar whenever a pop-up is blocked. You can click on this icon to quickly allow pop-ups from Tulip.
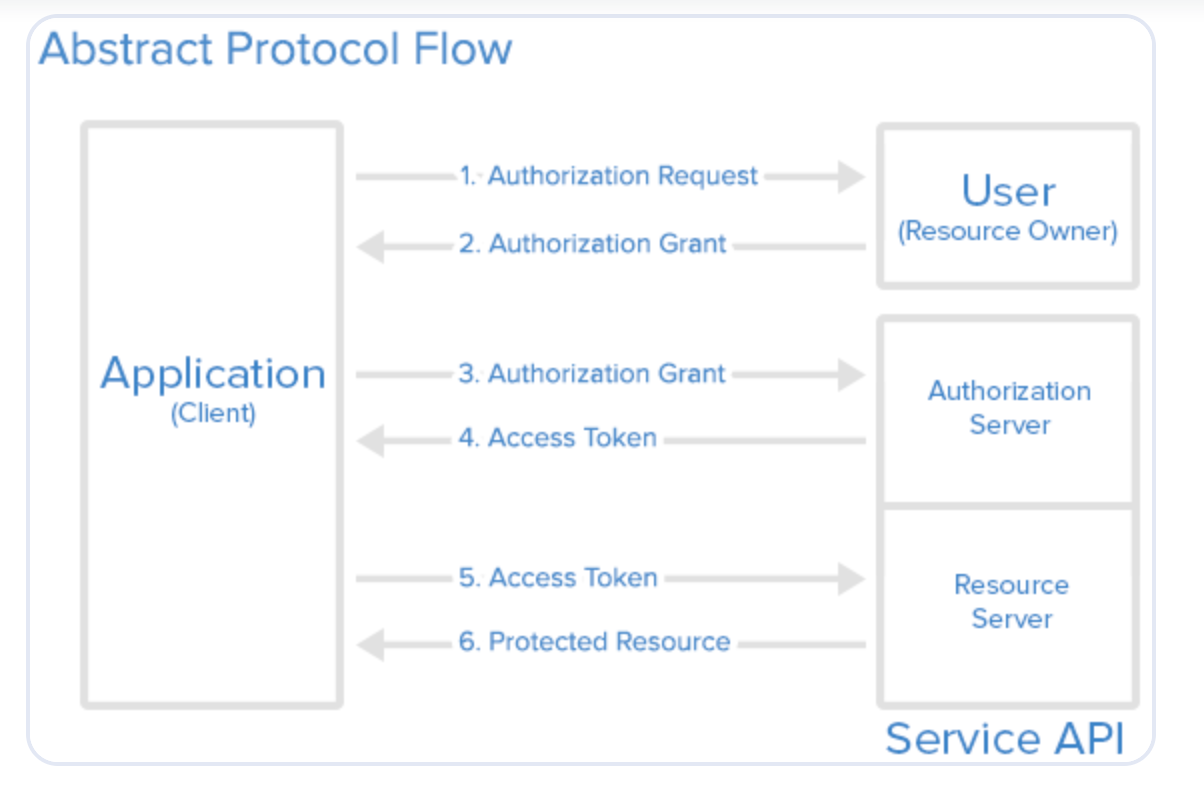
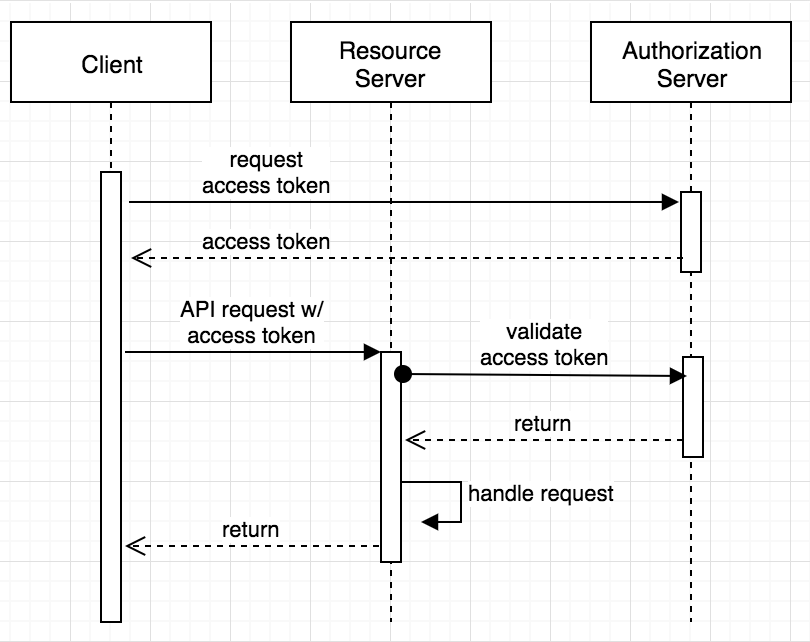
Access is granted through a handshake, and Tulip primarily supports the Authorization Code Flow, the most common OAuth flow. Here's a condensed overview of how this flow unfolds:
- User initiates the flow by clicking the Test button before saving a Connector.
- Tulip communicates with the authorization server from your OAuth provider, sharing specific parameters such as client identity, scopes (what you're attempting to access), and other relevant details.
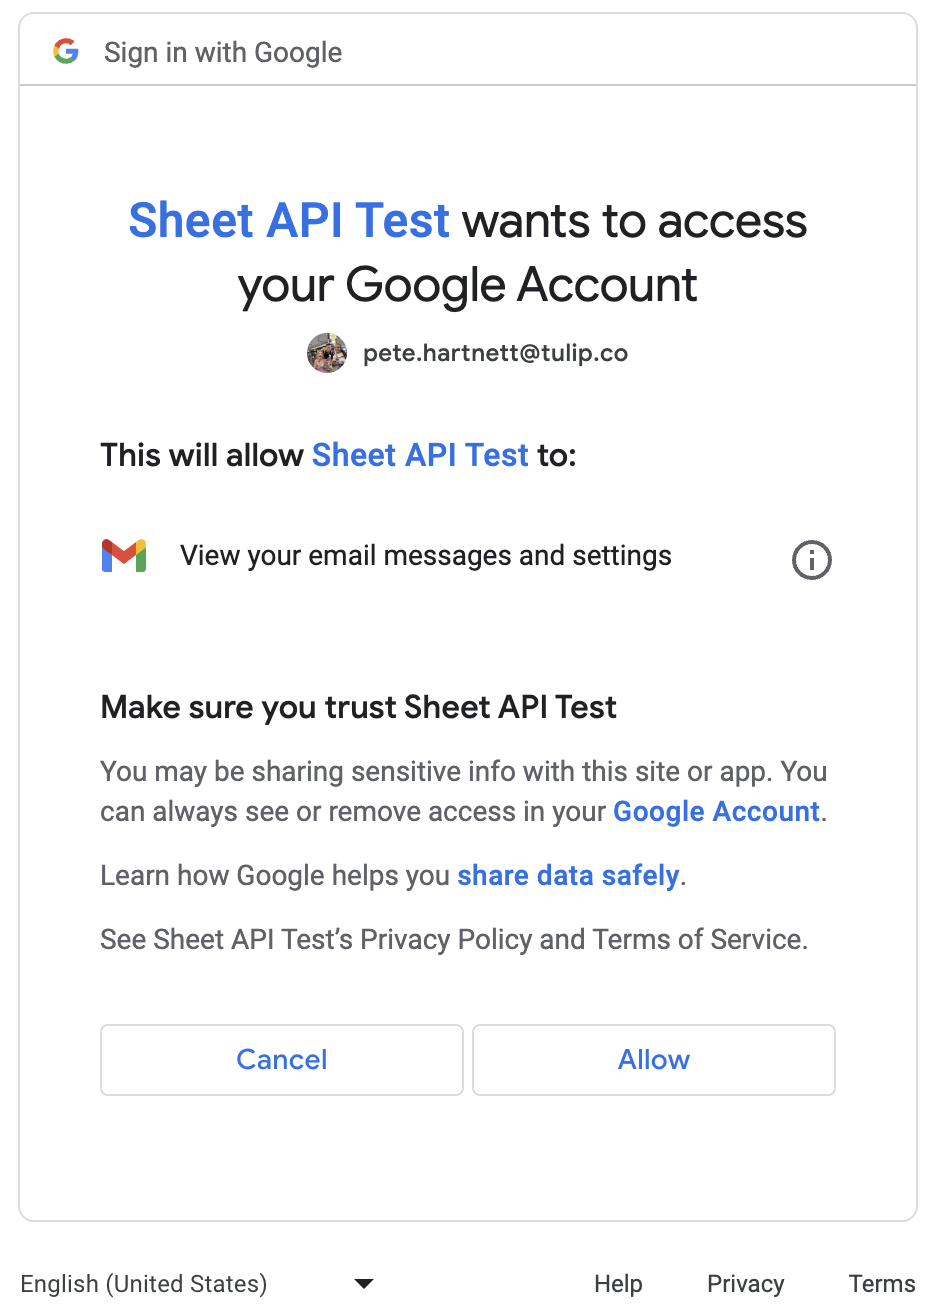
- The authorization server prompts the user to grant access, exemplified below:
- Upon user consent, the authorization server generates an authorization code and concludes the authentication window.
- Armed with an authorization code, Tulip securely requests a token by reaching out to the token endpoint, providing the authorization code, client ID, client secret, and additional properties.
- After validating the authorization code, the server responds with a token, and optionally, a refresh token. This token serves for user-authorized requests.
- Tulip can now execute requests on behalf of users, with the provided token for authorization.
See the diagrams below to understand the path of execution:

Client Credentials Flow
The client credential flow is primarily used for two business systems to interact. This flow is configured once, then shared by all users.
- User initiates the flow by clicking the Test button before saving a Connector.
- Tulip communicates with the authorization server from your OAuth provider, sharing specific parameters such as client identity, scopes (what you're attempting to access), and other relevant details.
- The authorization server returns an access token, assuming the Client ID and Client Secret are accurate. Optionally, a refresh token can also be returned. This token serves for user-authorized requests.
- Tulip can now execute requests on behalf of users, with the provided token for authorization.
Configure OAuth
The Authorize and Token endpoints must be accessible to the cloud for Tulip to execute authentication for connectors.
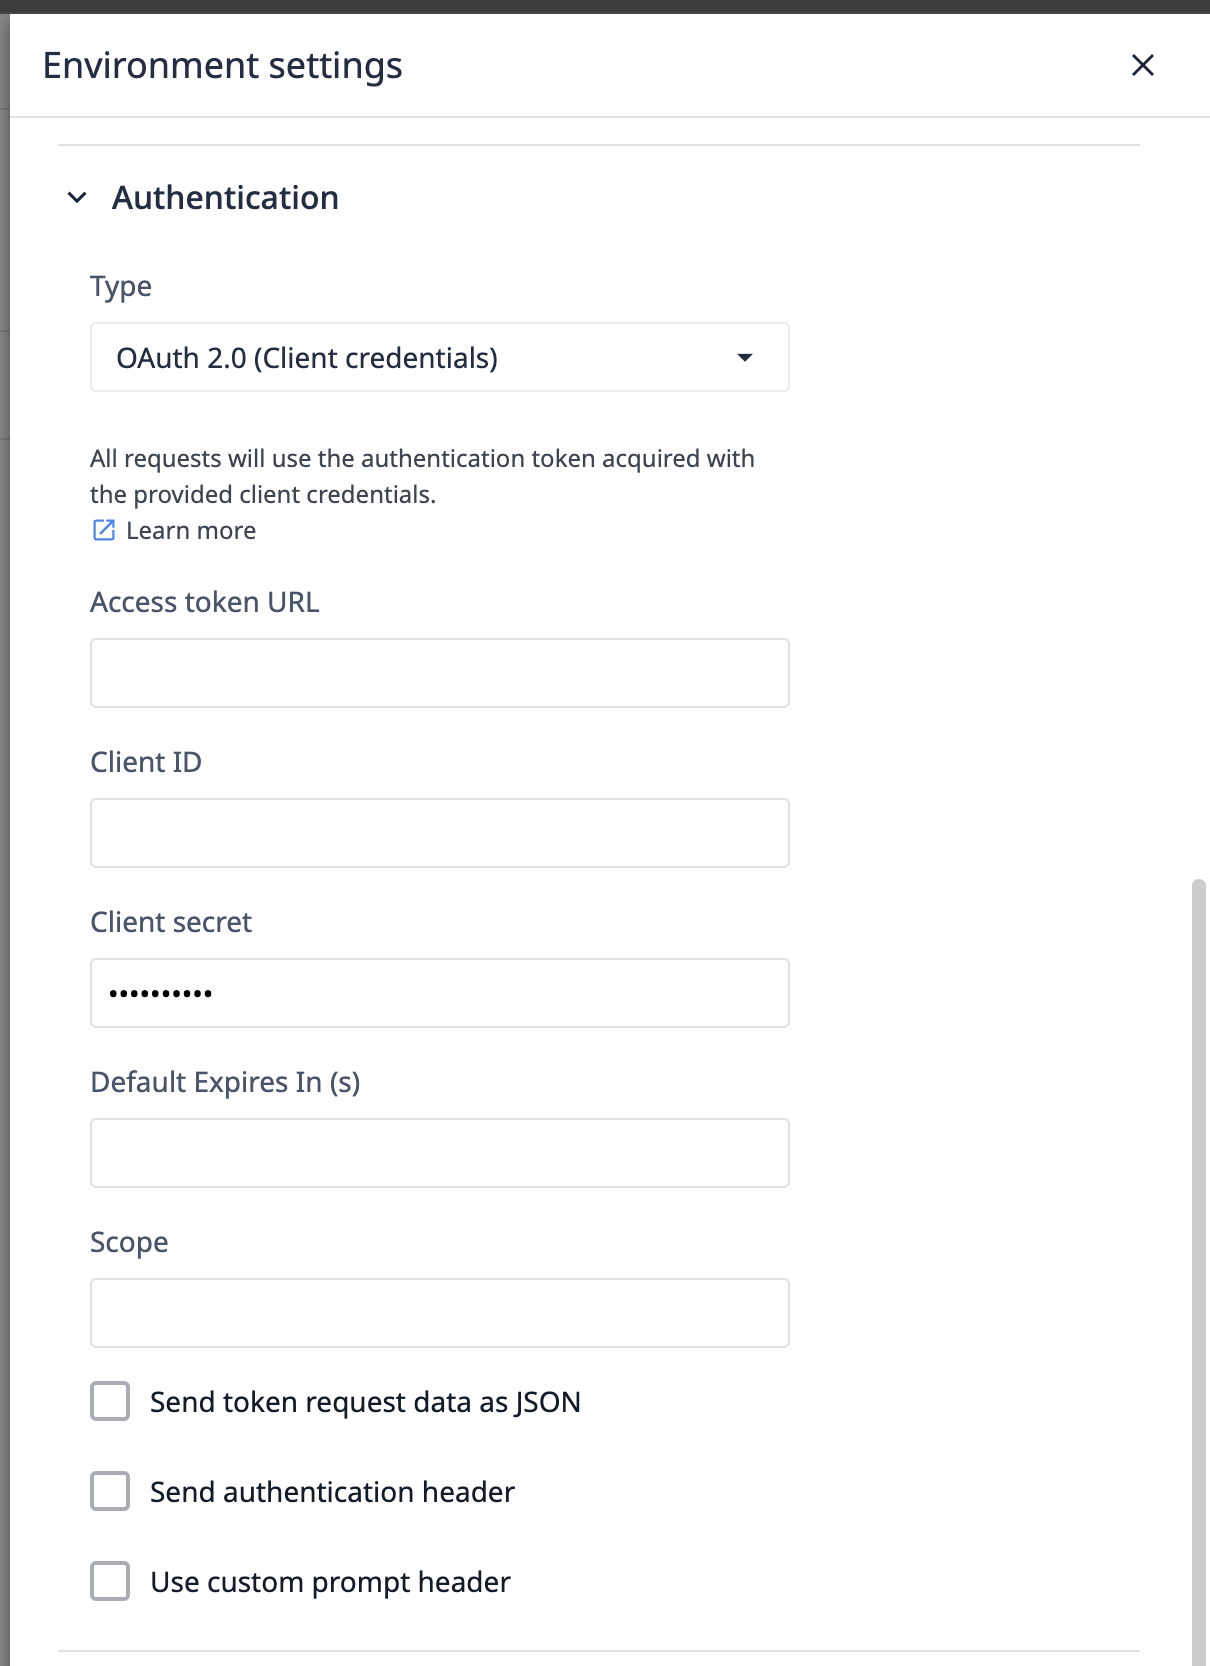
Authorization code URL
This is the URL Tulip contacts in step 2 of the authentication code flow. Found in your OAuth provider's API documentation, it typically ends in /auth or /authorize.
Note: This field is not present for Client Credentials.
Access token URL
After the authorization server response, a request is made to the Access Token URL to obtain a token for authentication. Generally ends in /token.
Note: This field is not present for Client Credentials.
Client ID and client secret
Generated from your OAuth provider's UI, the Client ID is passed with the initial request for an authorization code. The Client ID and Client Secret accompany all token requests.
Default expiration time (seconds)
This field specifies the default time (in seconds) after which tokens will be refreshed if no expiration time is explicitly provided or defined through another mechanism outside the expires_in field.
Audience and scope
Audience specifies the specific assets your user seeks access to, while Scope defines the actions desired on these assets. Both are conveyed during the authorization code request in step 2.
Additional options
- Send token request data as JSON: Changes encoding type for the request sent to the token URL. Enable if needed for specific integrations.
- Send Authentication Header for refresh request: Adds an extra header to refresh requests when enabled.
- Skip User Consent Prompt: Controls the prompt attribute of the authentication code request. Disabled sets it to
consent, while enabled sets it tologin, letting the OAuth provider decide on the login screen to display.
For some integrations, exclude or set the prompt attribute to none. Reach out to support@tulip.co for further functionality.
Technical details
Here are details around what Tulip supports, and how OAuth is integrated for connector authentication.
The Client Credentials flow differs some from the authorization code flow. Steps 1 and 2 are not relevant for the Client Credential flow.
Tulip authorization code flow
The Authorize and Token endpoints must be accessible to the cloud for Tulip to execute authentication for connectors
Tulip initiates the authentication process when testing a Connector or running a Connector Function within an application.
1. Redirect to authorization server
Tulip application redirects the user to the Authorization Server (AS) along with specific parameters, including the response_type (set to "code" for Authorization Code Flow), client_id (assigned in the connector UI), redirect_uri (predefined by Tulip), scope and audience (set in UI), and state (a random string to protect against Cross-Site Request Forgery attacks).
Example
GET /authorize?response_type=code&client_id=CLIENT_ID&redirect_uri=REDIRECT_URI&scope=SCOPE&audience=AUDIENCE&state=STATE
2. User grants consent
The Authorization Server authenticates the user and presents them with a consent screen. The user can review the requested permissions and decide whether to grant or deny access to the third-party application.
Within the configuration of a give connector, the "Skip user consent prompt" control allows you to control the prompt attribute on the authorization request. With this control disabled, the value consent will be used, when enabled login will be used.
If additional values of the prompt attribute are required, reach out to support@tulip.co, and we will enable further options for this property.
3. Authorization code
If the user grants consent, the Authorization Server generates an authorization code and redirects the user back to Tulip along with the authorization code. The state parameter is also included, allowing the client to verify the integrity of the response. This state parameter must match the state parameter passed at Step 1.
Example redirect to the client's redirect URI:
REDIRECT_URI?code=AUTHORIZATION_CODE&state=STATE
4. Token request
The client now has the authorization code and uses it to make a secure, server-to-server request to the Authorization Server's token endpoint. The client includes the grant_type (set to "authorization_code"), client_id, client_secret (a secret known only to the client and the Authorization Server), redirect_uri, and the authorization code.
Example token request:
POST /token
Content-Type: application/x-www-form-urlencoded

grant_type=authorization_code&code=AUTHORIZATION_CODE&redirect_uri=REDIRECT_URI&client_id=CLIENT_ID&client_secret=CLIENT_SECRET
5. Access token response:
If the authorization code is valid, the Authorization Server responds with an access token and, optionally, a refresh token. The access token is used by the client to authenticate itself when making requests to the protected API on behalf of the user.
Example token response:
{
  "access_token": "ACCESS_TOKEN",
  "token_type": "Bearer",
  "expires_in": 3600,
  "refresh_token": "REFRESH_TOKEN",
  "scope": "SCOPE"
}
expires_in
If the token's expiration time is not provided via the expires_in key, the "Default Expiration Time (seconds)" field in the authentication configuration will be used to automate token renewal.
6. Accessing the resource server
Tulip can now use the obtained access token to make authorized requests to the Resource Server (API) on behalf of the user. The access token is usually included in the Authorization header of the HTTP request.
Example API request:
GET /api/resource
Authorization: Bearer ACCESS_TOKEN
Manage token expiration with refresh tokens
Authorization servers typically set expiration dates for tokens to regulate access, with varying expiration windows depending on the interfaced system. However, short-lived tokens pose a challenge as constant user authentication disrupts the user experience in Tulip applications.
To address this issue, OAuth supports refresh tokens. While optional, they are highly recommended as they streamline the user experience by allowing Tulip to refresh tokens seamlessly without requiring manual input from operators.
How does Tulip manage token refresh?
When Tulip detects that an access token has expired, it automatically attempts to use the associated refresh token to obtain a new token. The primary objective is to minimize user reauthentication. The following steps outline the logic executed by Tulip:
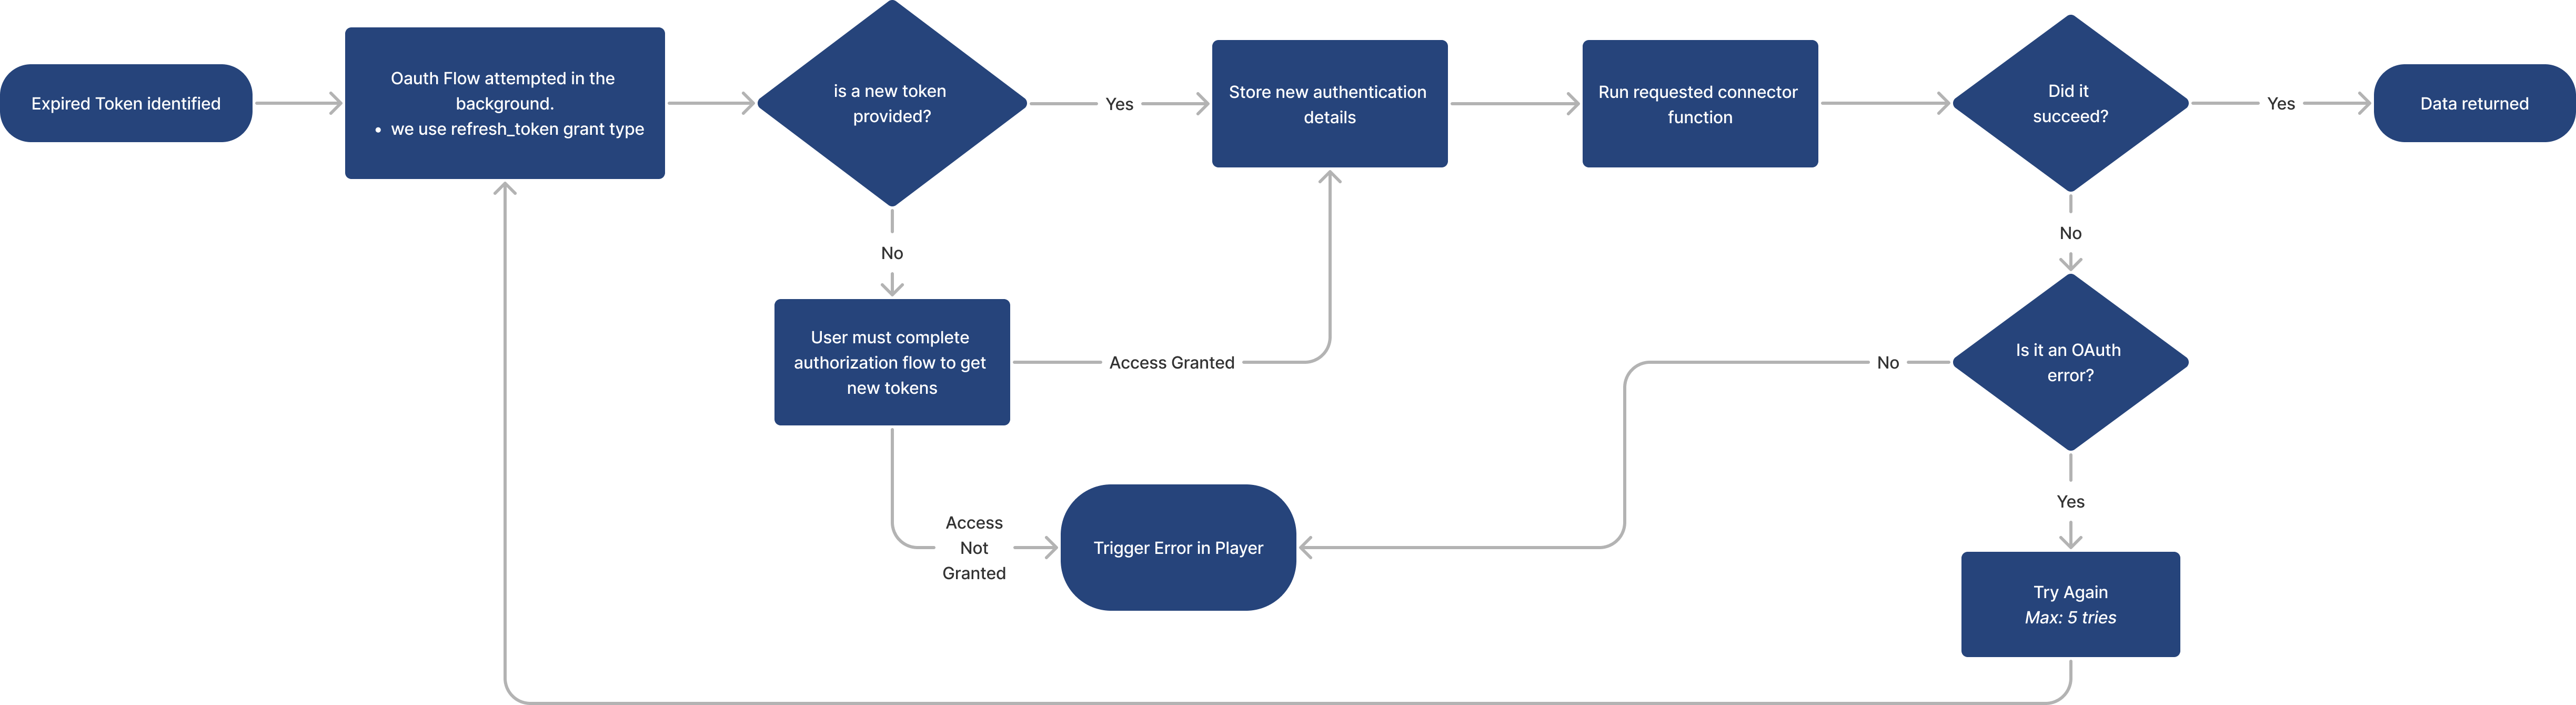
1. Expiration Detection:
- Tulip identifies an expired token based on its
expires_inattribute received in step 5 of the authentication flow.
expires_in
If the token's expiration time is not provided via the expires_in key, the "Default Expiration Time (seconds)" field in the authentication configuration will be used to automate token renewal.
2. Token Flow Attempt:
- Tulip initiates the token flow using the
refresh_tokengrant type, replacing the grant type used in the initial authentication flow.
3. Token Validation:
- If a new token is obtained, Tulip stores it and proceeds to execute the user-requested connector function.
- If successful, data is provided to the Tulip app runtime.
- If the new token fails with an OAuth error, Tulip retries the process up to 5 times, reverting to step 1 each time.
- If the new token fails with any other error, an error is displayed in the player runtime.
4. Handling Token Absence:
- If a new token is not provided, Tulip prompts the user in the player to undergo authentication, initiating the entire authentication process.
- Upon completion, the connector function is executed, and data is returned.
By implementing refresh tokens, Tulip ensures a smoother user experience by intelligently managing token expiration and renewal, minimizing disruptions in workflow.
Did you find what you were looking for?
You can also head to community.tulip.co to post your question or see if others have faced a similar question!
.gif)