
How To Use Manufacturing Apps in High Mix Environments
Learn how you can set up work instructions in a high-mix environment with Tulip.
In this guide, you will learn…
- How to combine Tulip features to fit your high-mix environment.
- The pros and cons of each approach to handling variation in Tulip
Do you manage hundreds of SKUs on your shop floor? Or, do you have a series of processes that are reused across multiple product lines?
This guide will cover all the different ways that Tulip can help you handle high variability within your products.
There are multiple factors that can create a “high mix environment”, so there is no single tool or feature in Tulip that can cover all high-mix scenarios. Instead, you will combine multiple features, depending on your situation. Key factors include:
- Number of connected devices
- Variation between SKUs
- Analytics requirements for Tulip data
- Whether “families” of products exist
In general, there are 5 different ways to handle a high mix of products:
- Apps: Creating specialized apps for each product, or each family of product
- Steps: Creating different combinations of step groups
- Tables: Dynamically loading work instruction data from tables without creating multiple steps
- Triggers: Using “If” statements or string concatenation to handle hundreds of combinations
- SQL: If you have written SQL in the past, you can use Connector functions to work with an external SQL database.
Here are some strategies that you can use with each of these features.
Note: This guide is meant for Tulip users with some app building experience. If you haven’t built an app yet, you should start with Tulip Basics
Apps
There are two ways that you can leverage multiple apps to manage complexity.
The first way is to create a distinct app for every product or SKU, and use one routing app to automatically send operators to the correct app. This works well if the products on your floor have limited overlap in work instructions.
Here's a full guide to routing apps.
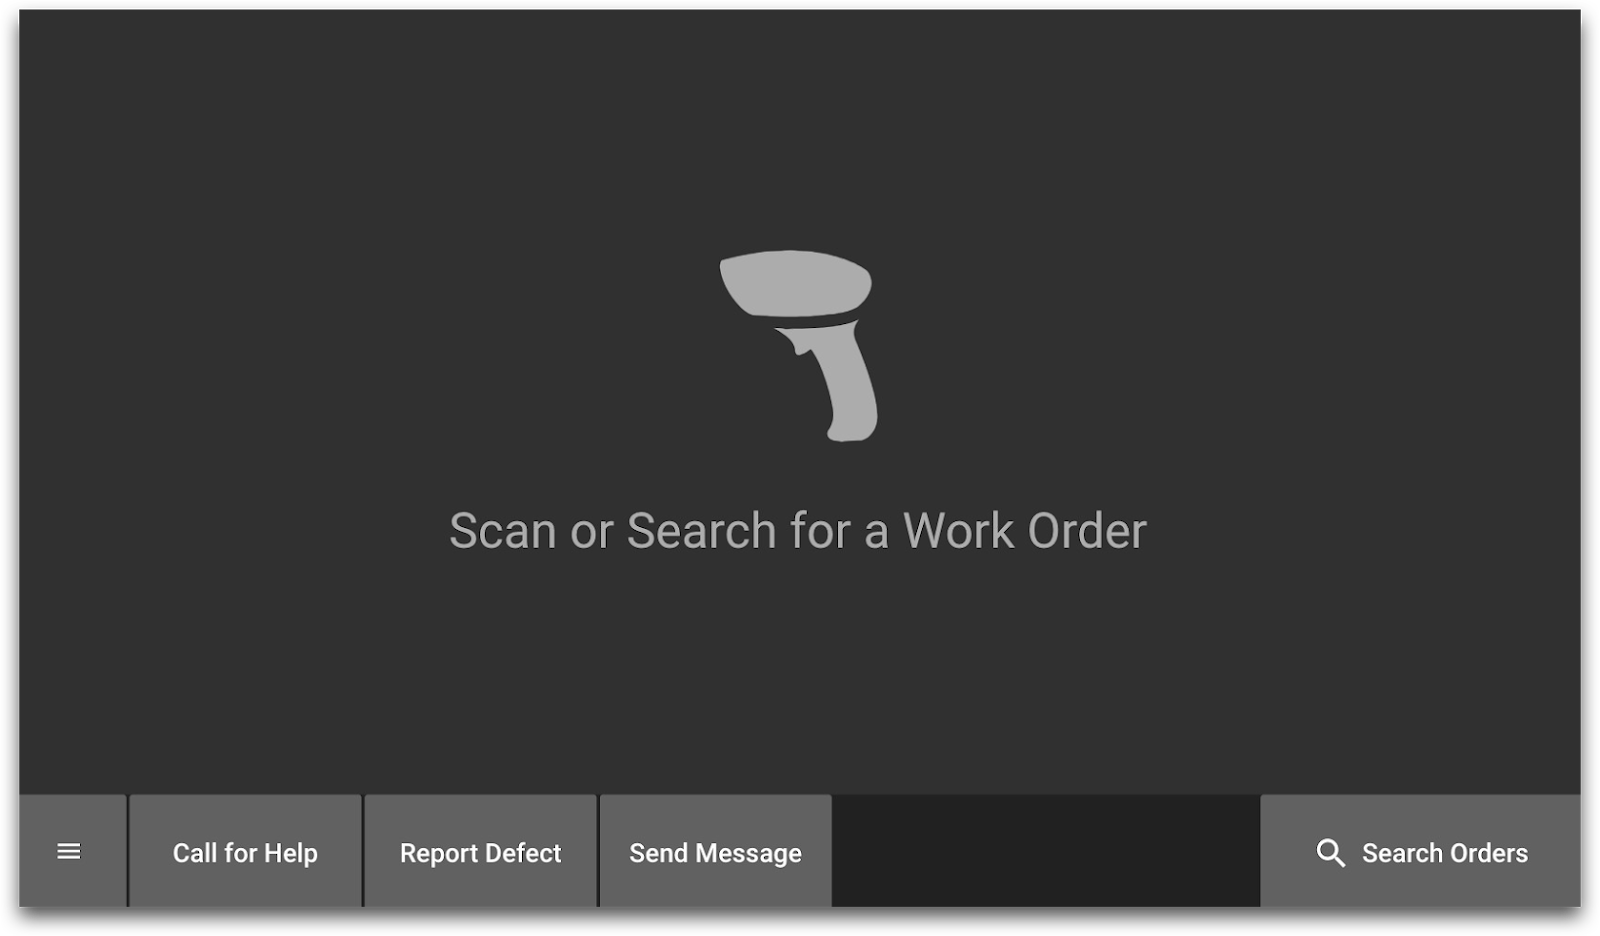
To accomplish this, you will want to create a one-step app called “Routing”. This might run on every station on your floor by default. When an operator begins a new work order, they can scan their work order and get automatically directed to the correct app.
The step might look like this step from the Tulip Terminal
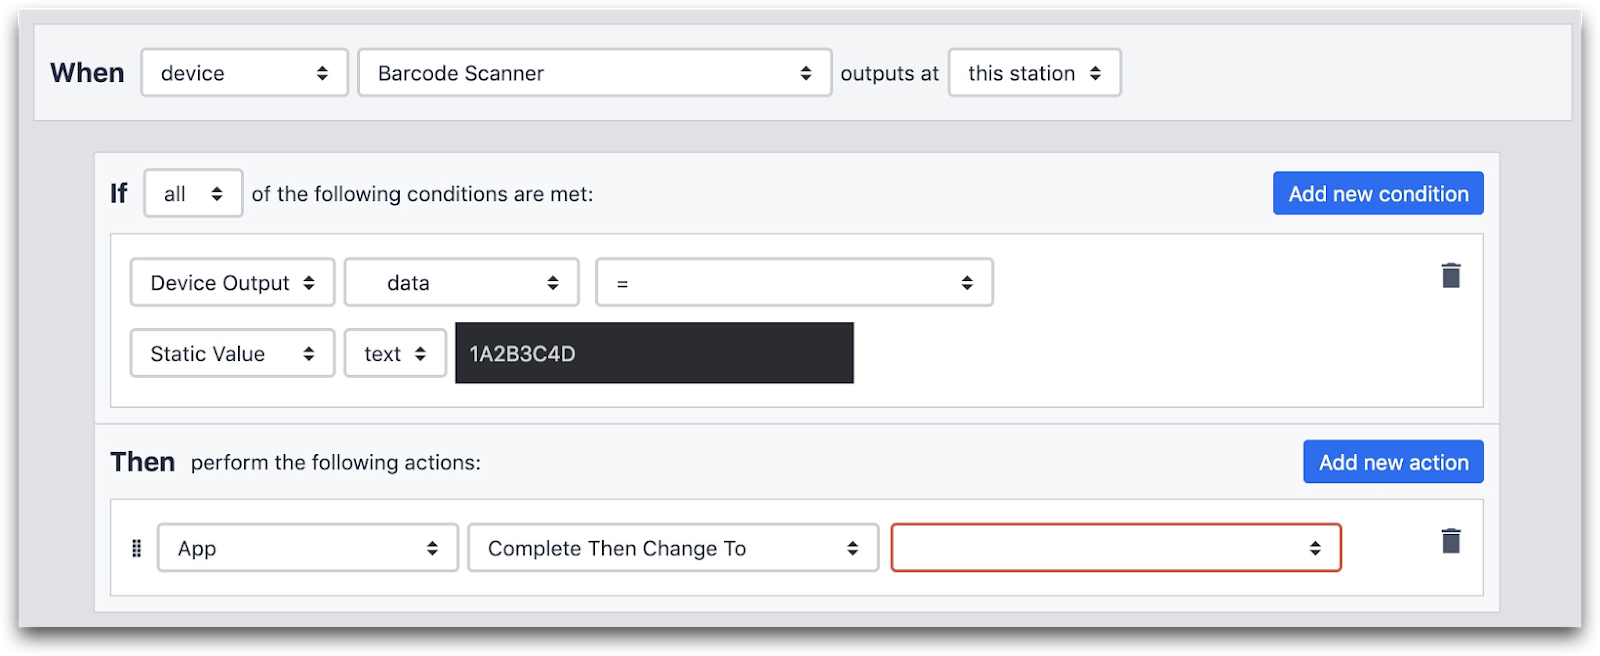
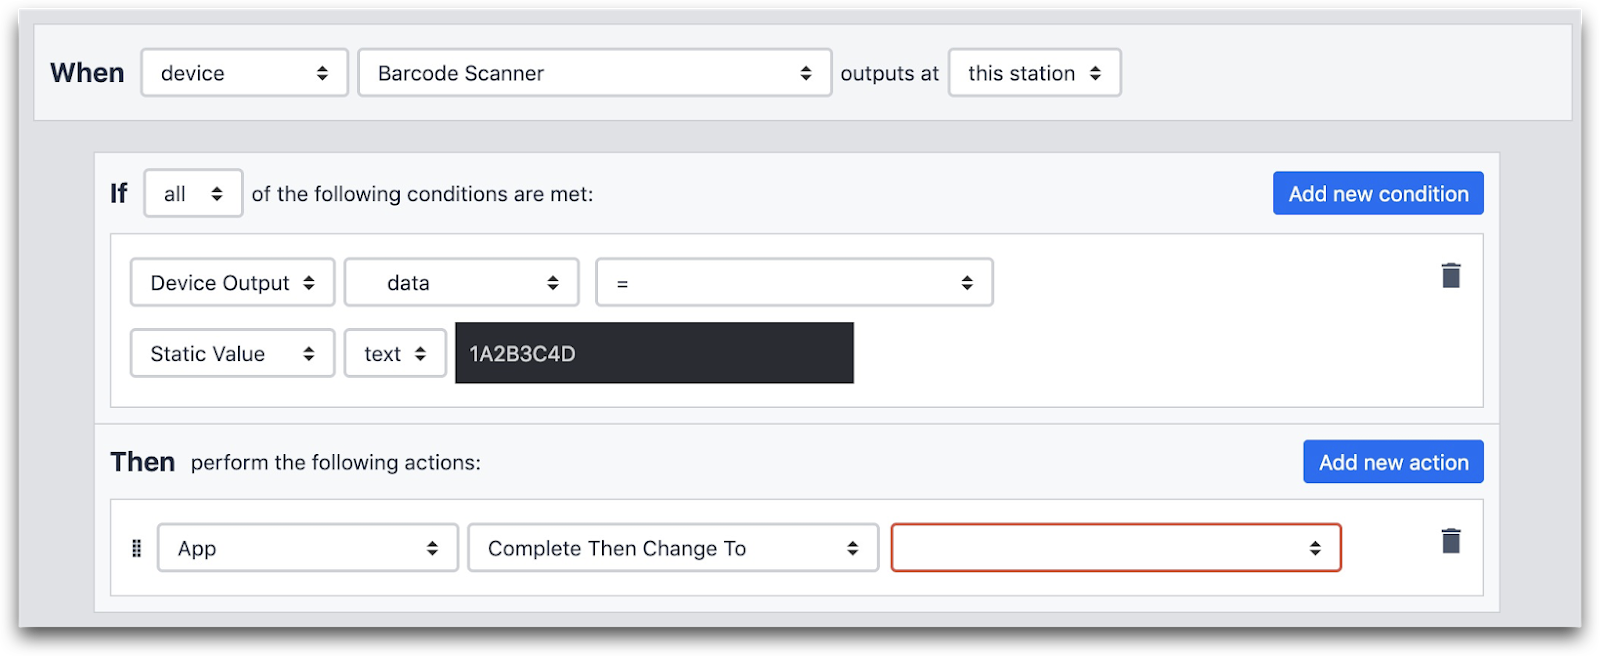
You would then write a series of “If” statements in one trigger on the step to route operators to the correct set of instructions.
Here’s what an “If” statement would look like for a product with SKU “1A2B3X4D”.
This presents a challenge- if an operator scans a barcode in the routing app, you will need to find a way to pass this data to the next app. Use this guide to learn how to pass data between apps.
You could then include some sort of confirmation at the beginning of every app to ensure that the operator did not mistype the SKU and end up in the wrong app.
Duplicating An App With A Comprehensive Set of Instructions
You can also use the “multiple apps” approach when all apps use a subset of a series of steps. This works when there are many common steps between products.
First, you will want to create one “General Template” app that contains all steps that are used by multiple products or SKUs. Then, for each distinct product, duplicate the app and cut out all the steps that are irrelevant to that particular product.
These app-based strategies are easy to manage for all new Tulip users, since all Triggers are simple. The “one app to one product” pattern is easy to understand. But, if you want to change the design of individual steps, then this approach will require you to redo the step in every single app.
Steps/Step Groups
You can also make individual steps and step groups more dynamic if your products have similar work instructions. Rather than creating multiple apps, you can create many step groups within one app and route operators through the step groups with trigger logic.
You still may want to include a barcode scan step, like the example in the section above. Then, you will want to store the barcode data as a variable to tie the barcode to an app completion and route the operator to the correct step.
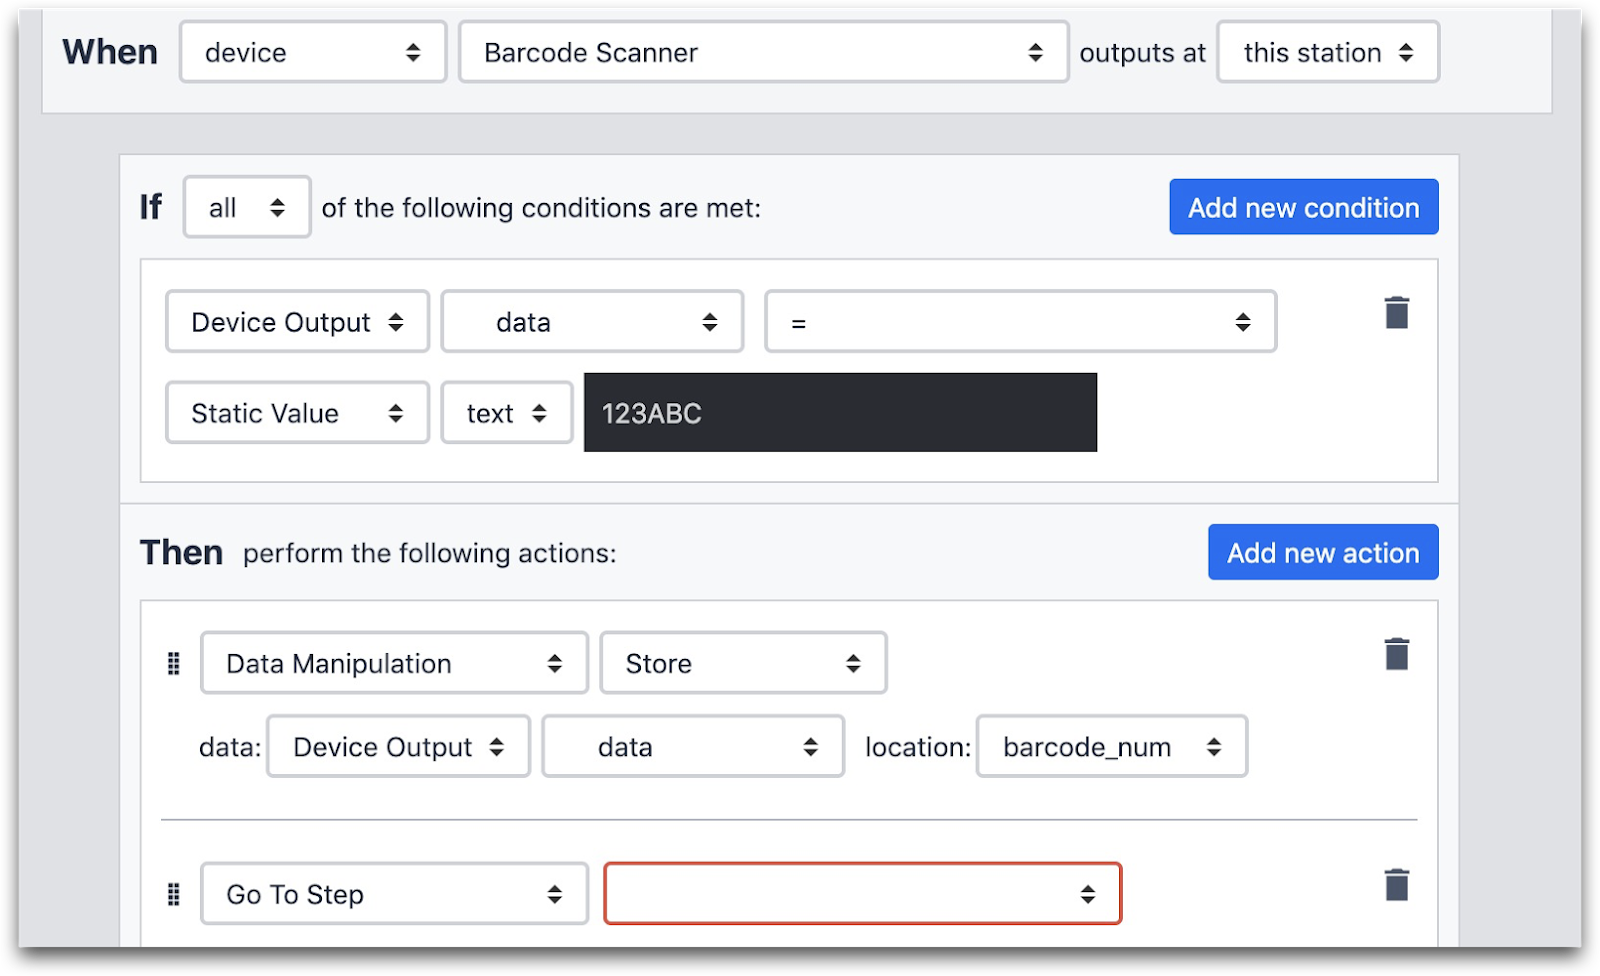
Since the barcode data is now stored within the app, you can also reference it later if you want to recombine work instructions in multiple ways using Triggers.
This makes it easy to update all work instruction steps in one place from the main Tulip interface. But, if you have hundreds or thousands of SKUs, you may want to make it even easier to update steps in real-time, so that lead operators or supervisors can make real-time changes.
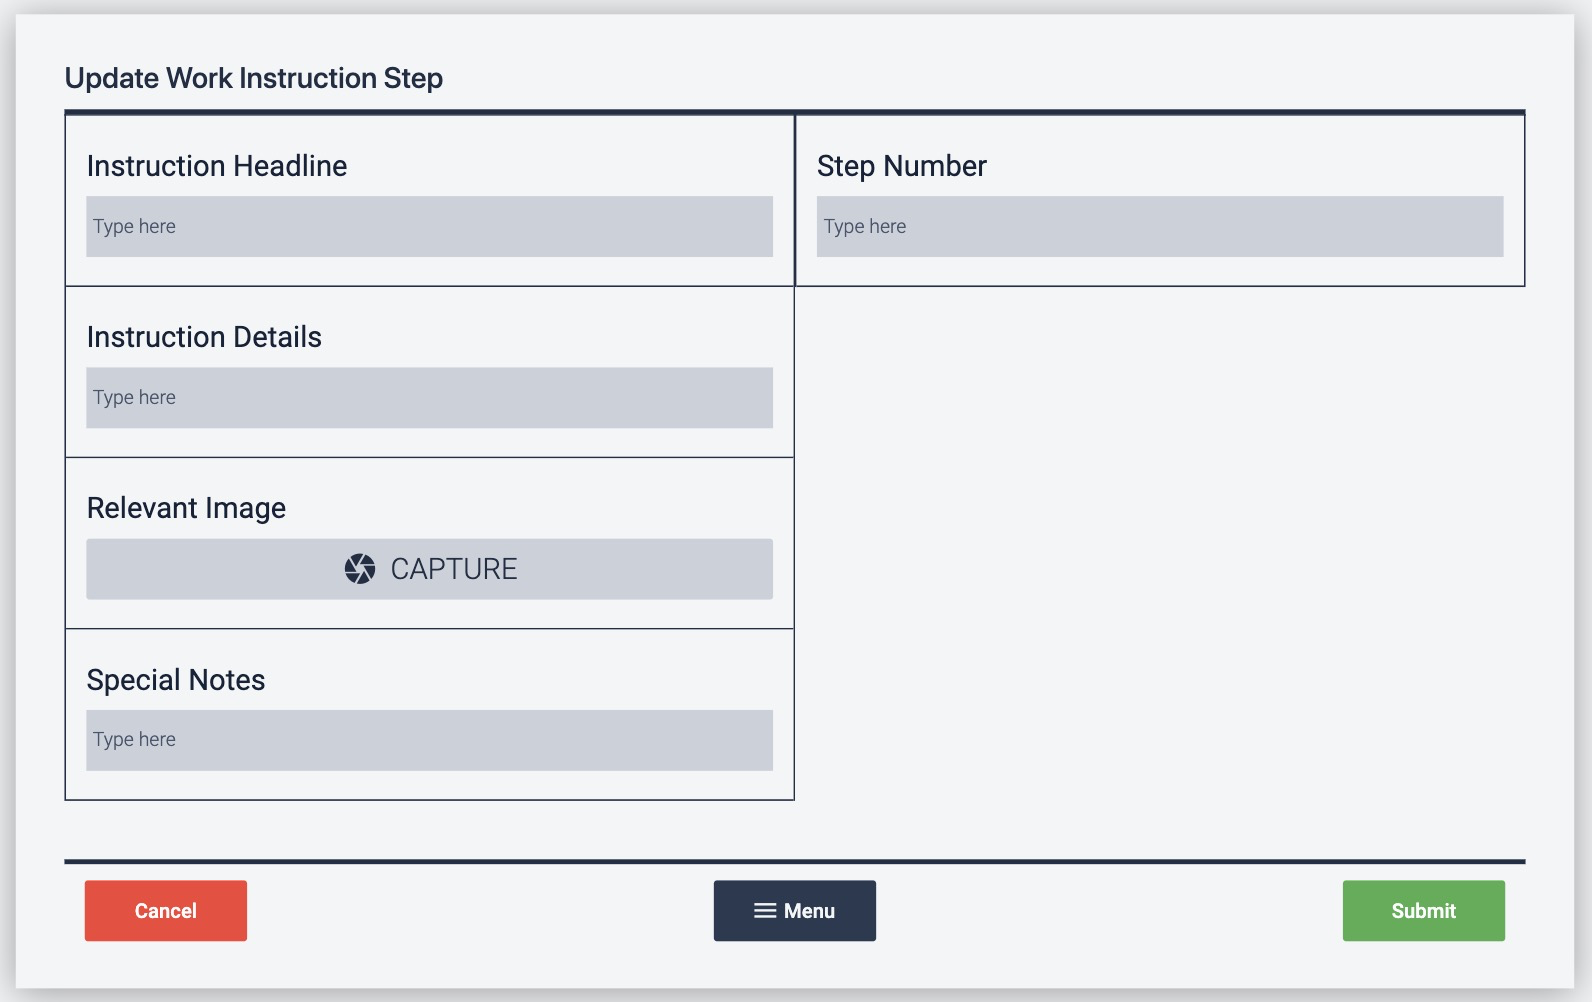
To make real-time updates to each set of work instructions, you can use a Form Step with a few fields. Let’s imagine that each work instruction step has the following fields:
- Main instruction headline
- Instruction details
- Image
- Special notes
It might look something like this:
To update these instructions in real-time, you can use a Form Step like this:
Then, you can store the results in a Table or SQL database and retrieve them dynamically when an operator goes through the app based on the “Step Number” field. Here’s how to do that.
Tables
Tulip’s Tables feature allows you to create a database with app data or sets of instructions without writing any code. You can use them for instructions if:
- All products have different sets of instructions.
- Products share a series of common processes, like casting, cleaning or auditing, and there is little to no variability within those processes.
Also, each step in the instructions must have the same content, like one headline, one set of details, and one image.
If your work instructions do not fall into either of those two categories, then tables may not be a good fit.
However, if they do follow one of these patterns, then you can create an app with just one step that dynamically loads work instructions from a table.
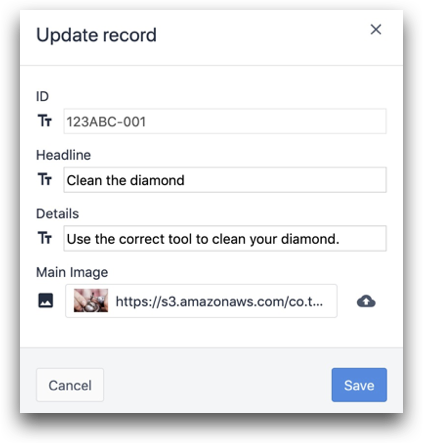
First, create a Table with fields like this:

Then, add at least one record, for example:
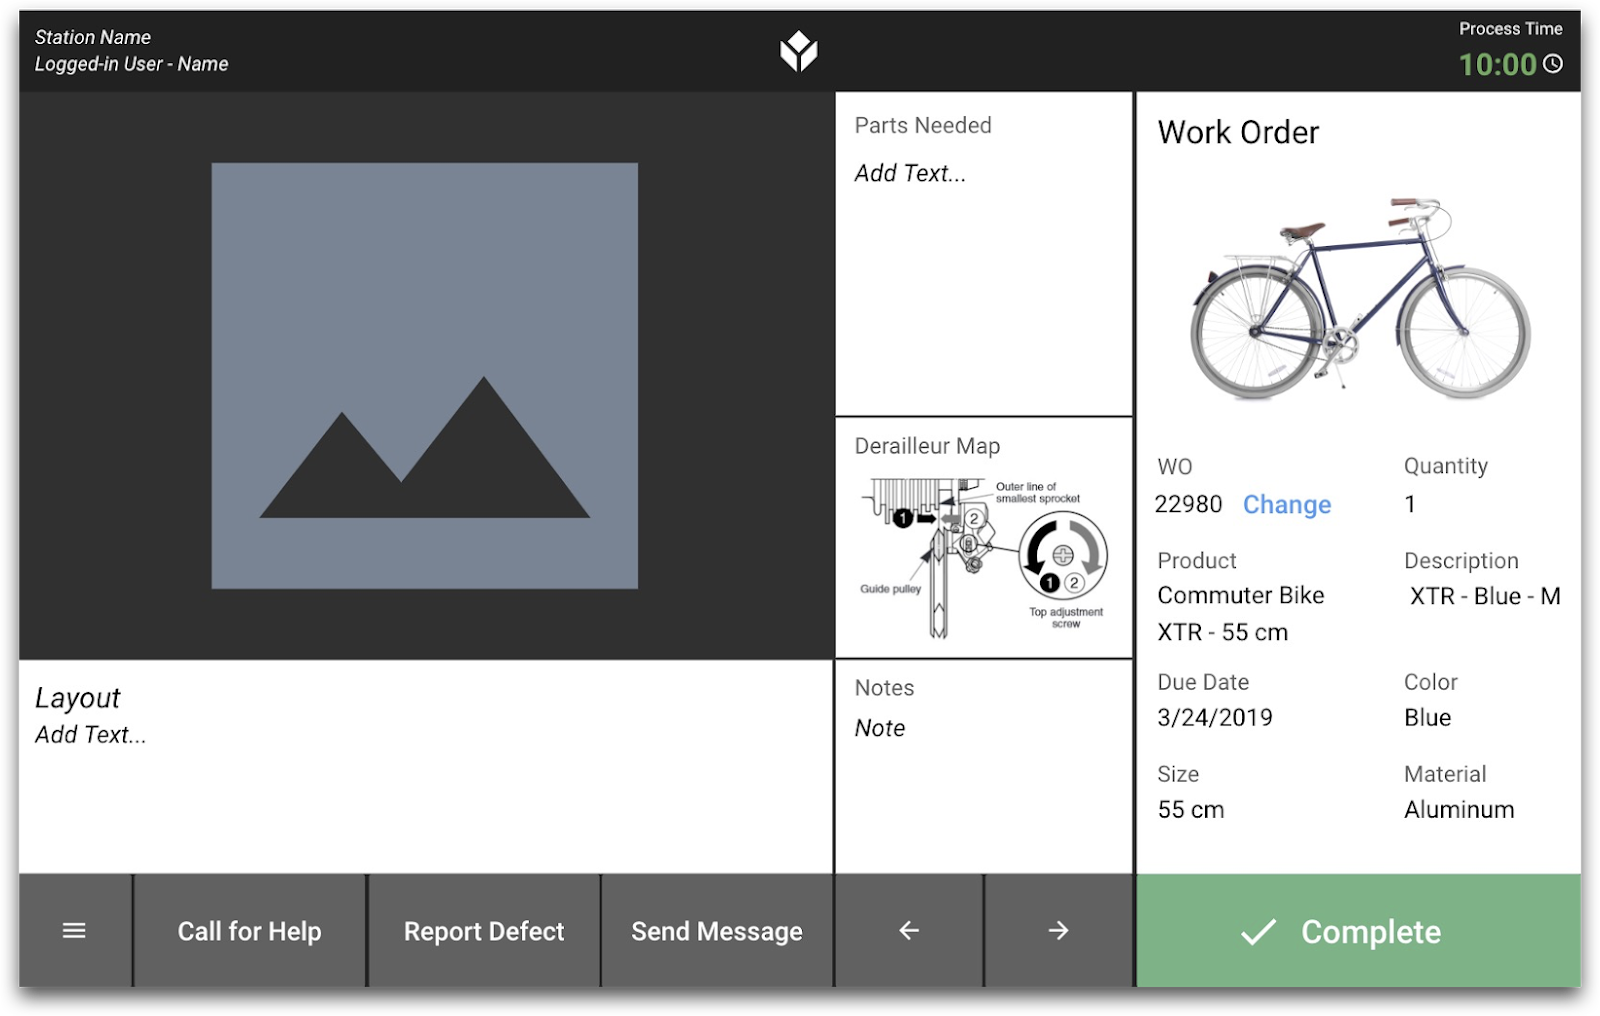
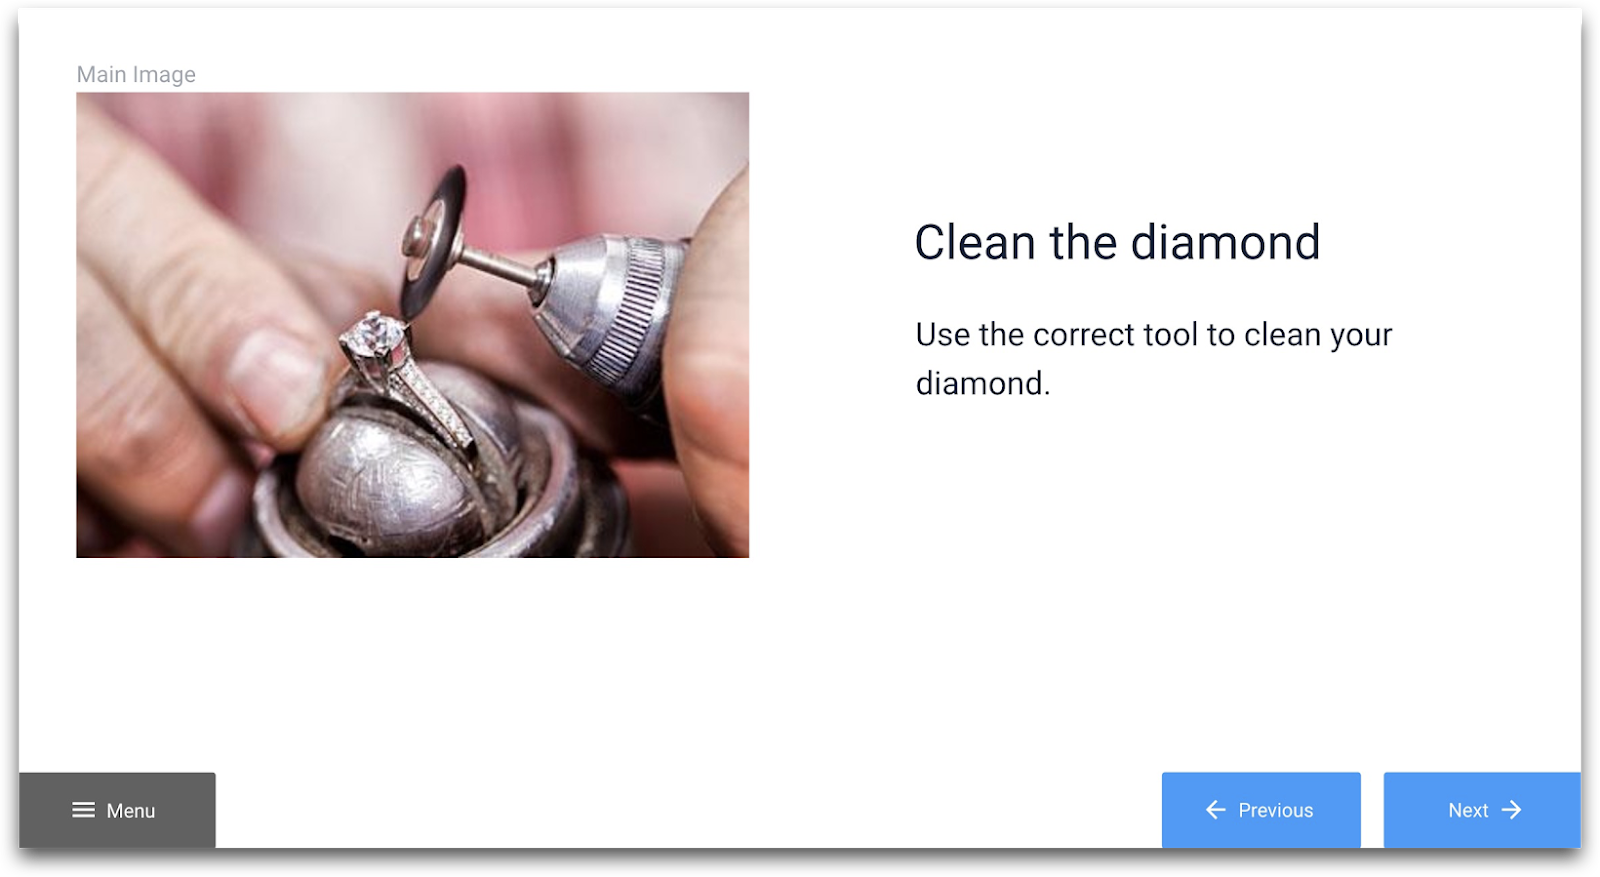
Then, create an app and create one step that will load all work instructions dynamically. You will use the “Table Record” text widget to change the text and image(s) on the step as soon as the operator is ready to progress.
Here is a sample layout that uses fields from the “Table Record” widget:
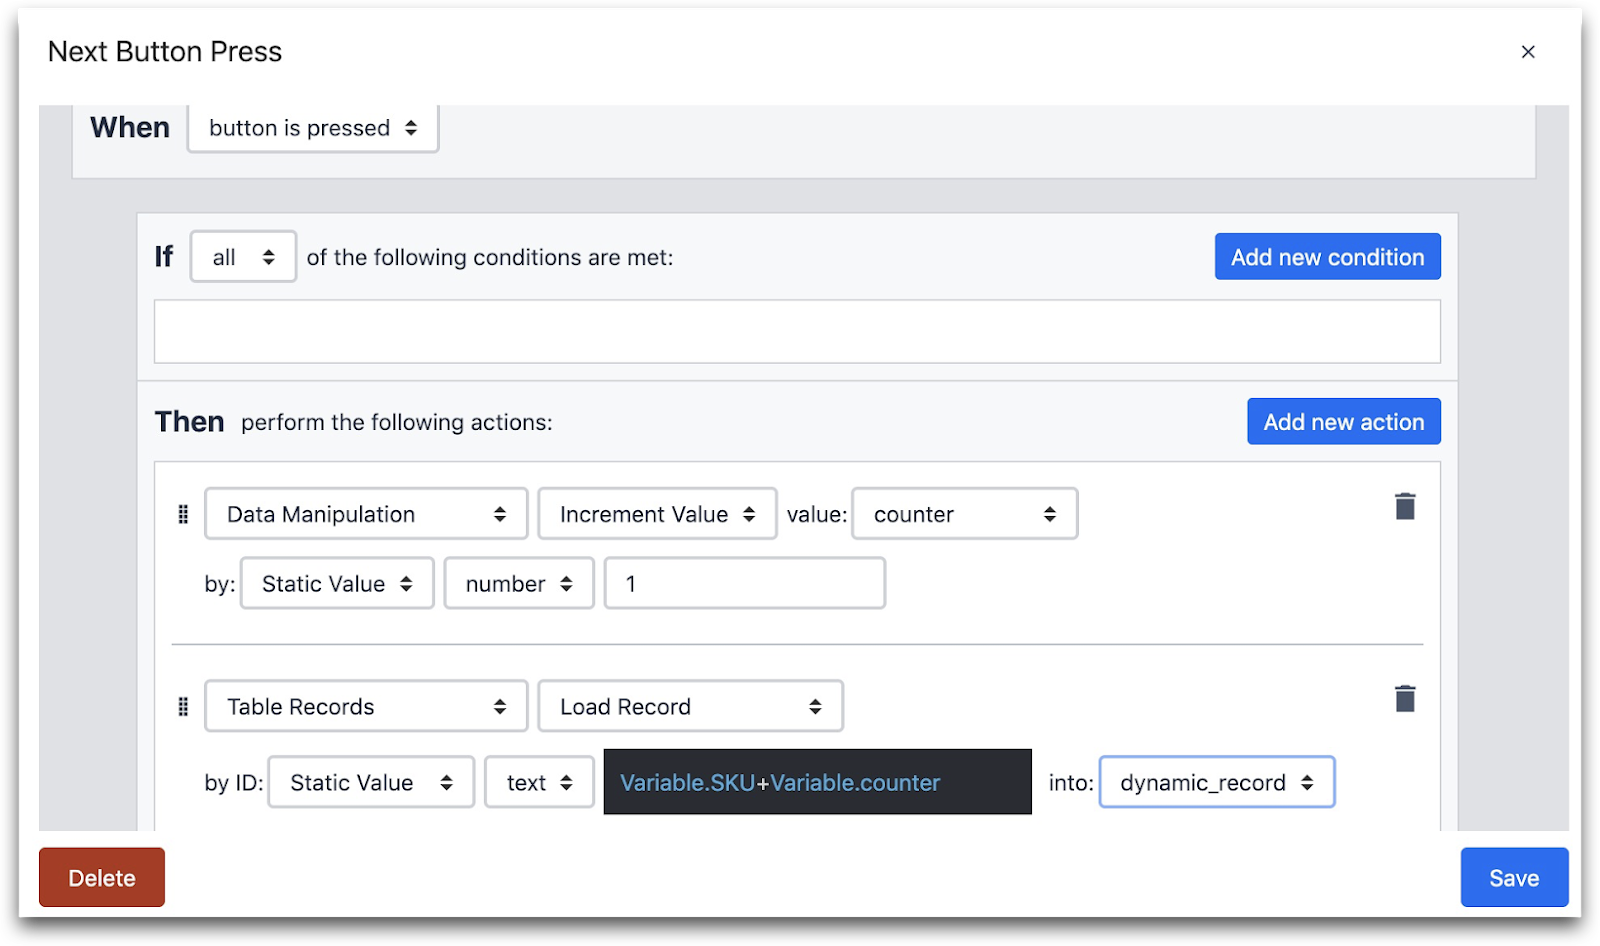
Then, when an operator presses the “Next” button, you will not want to advance to the next step. Instead, you will want to write logic so that the next record in the table is loaded. You need to use a variable that will increment on every button press in order to change the record. Like this:

WHEN
- “Button is pressed”
THEN
- “Data Manipulation” “Increment Value” “counter”
- By: “Static Value” “Number” “1”
- “Table Records” “Load Record”
- By ID “Static Value” “text” (variable containing SKU) + (counter variable) into: (record placeholder)
So, you will need one variable that contains the active SKU, and another that is consistently counting up as the operator advances.
This approach makes it easier to maintain all the content in multiple sets of work instructions. It works well if your instructions have a consistent format, but if you have multiple types of steps in your instructions, you will probably want to use a different method.
Using Trigger Logic
In almost every scenario highlighted above, you will need to create custom Triggers to successfully build your app(s). We have already shown simple ones, like:
- Increment a counter variable
- Change to a new app
- Move to a different step group
- Store a barcode number
Here are some more advanced patterns that could appear in any of the app-building patterns above:
Series of IF Statements
Let’s say that you have 50 different active SKUs in your factory. Each one has a separate set of work instructions. If you want to create a “routing app” that automatically sends operators to the correct set of instructions, you will need to create 50 “if” statements with different SKU numbers. You can do all of this in one Trigger. Although this requires a lot of manual creation of if/then statements, it allows anyone to click into the trigger and easily understand what is happening.
Here is an example of one if/then statement:
String Concatenation
Concatenation simply means “combining two strings”. Since table record IDs are strings, you can get creative with using the string ID to serve the correct content to the operator.
Let’s say that you have a cleaning process that is common across multiple product lines. It has 5 steps. You may not want to rebuild the same cleaning instructions in multiple apps, since that will be hard to maintain.
Instead, you could create a Table called “Common Procedures” that included instructions for common processes. Then, you might want to use record IDs like “Cleaning-1” and “Cleaning-2” to show a series of steps around one process.
Then, in the Trigger Editor, you will combine the specific process with a variable that increments with every step advance. Here is the example from the “Tables” section above of combining two variables in the “Static Value:Text” field-
With string concatenation, you may not know when to stop. In other words, if there are 5 steps in the cleaning process, you need to move to a different step once the counter reaches “6”. To accomplish this, you can use an “If” statement in the Trigger to first check if the step exists.
Like this:
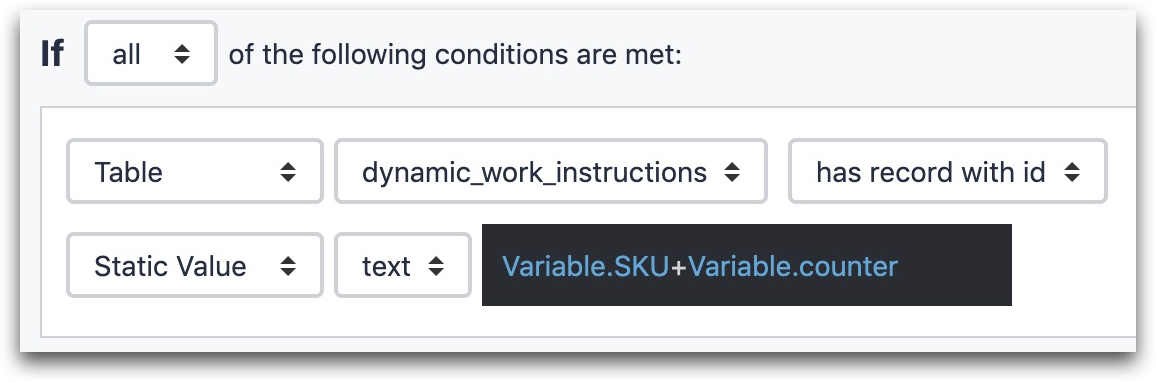
IF
- “Table” “dynamic_work_instructions” “has record with ID”
- “Static Value” “text” (insert dynamic content here)
Using SQL
If you have past experience with creating SQL databases, then you can also create a SQL connector to dynamically load text and images from a SQL database. This will allow you to create one step template and load data into it, just like the Tables example above.
This works well if you have complicated requirements for loading data. Contact a Tulip representative if you are planning on using this approach, and we would be happy to advise you on how to set up your database.
Further Reading
- How To Build Digital Work Instructions in Tulip
- How To Use the Tulip Terminal For Scalable Work Instructions
Did you find what you were looking for?
You can also head to community.tulip.co to post your question or see if others have faced a similar question!