This article explains how to connect to HiveMQ's Public MQTT Broker
[Overview video here] Pete's video
Purpose
Gathering and consolidating machine and operational data across your Shop Floor can be a big challenge. HiveMQ's Enterprise MQTT platform offers a scalable, reliable and secure method to create a single source of truth for your manufacturing data, by centralizing data in a unified namespace.
Leveraging a solution like HiveMQ, you can connect to these diverse systems, and with Tulip's native support of MQTT as a datasource, you can not only visualize this data in real-time, but help drive data driven insights.
Getting Started with HiveMQ
HiveMQ empowers businesses to transform with the most trusted MQTT platform. Designed to connect, communicate, and control IoT data under real-world stress, the HiveMQ MQTT Platform is the proven enterprise standard and powers use cases in automotive, energy, logistics, smart manufacturing, and transportation. Architected for flexibility and scalability, HiveMQ is the MQTT authority loved by developers and enterprises. HiveMQ is used to build smarter IoT projects, modernize factories, and create better customer experiences.
Integration Setup
Hive MQ Public Broker Configuration
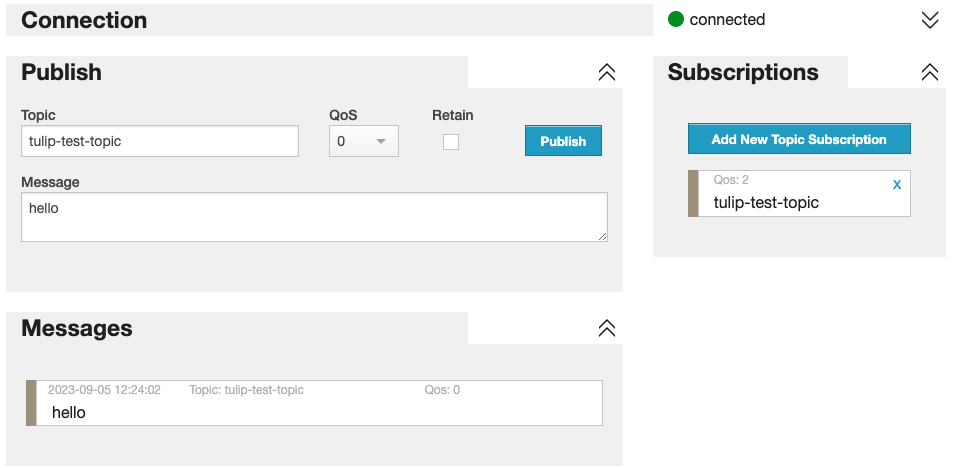
HiveMQ provides a free public MQTT broker, as well a MQTT WebSocket client to interact with the broker.
- Launch the HiveMQ Broker, and select Try MQTT Browser Client . Keep the default settings, and select Connect.
Through the Web Client, we will be able to publish messages, that we will ultimately bring into Tulip.
-
Create and Subscribe to a Topic (e.g. tulip-test-topic)
-
Publish a test message (e.g. hello)

Tulip MQTT Connector Configuration
- Create the HiveMQ Data Source with the following details:
- Name: HiveMQ Public Broker
- Runs on: Cloud Connector Host
- Type: MQTT, Version 5.0
- Host: broker.hivemq.com
- Port: 1883
- Protocol: MQTT
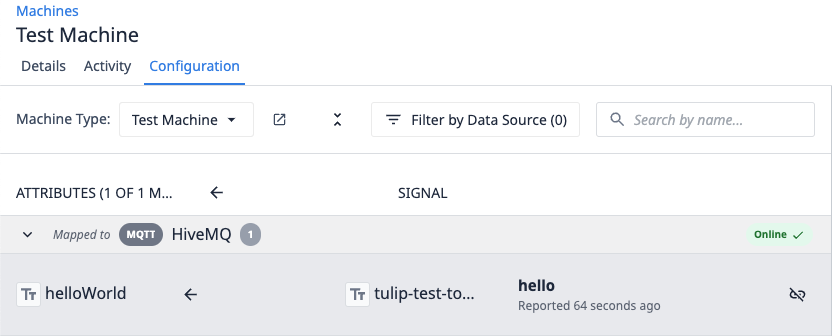
- Create a Machine Type, and add a Machine Attribute - in this example, we'll use text type attribute, helloWorld
- Create a Machine of the Machine Type, select the Configuration tab, and select your Machine Attribute (e.g. helloWorld)
- Enter the topic created through the HiveMQ Client, then Map to attribute
Test Connection
- Publish to the created Topic, and confirm you can see the attribute update in Tulip: