

品質アプリ・スイートは、検査や品質関連のアクションを管理するための適切なツールを提供します。歩留まりを向上させるために、品質に焦点を当てたメトリクスを確実に理解することができます。
前提条件
このアプリ・スイートでは、従うべき様々なApp Builder Tipsがあります。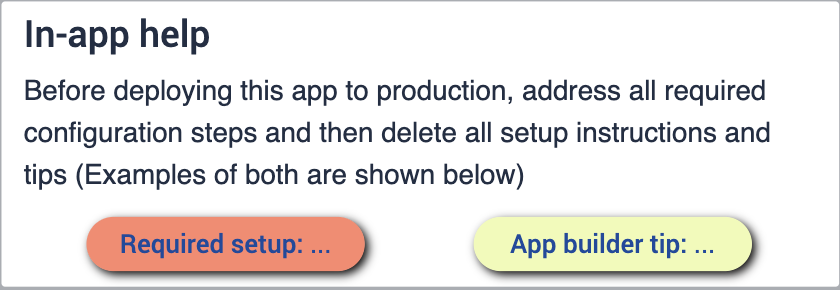 {height="" width="300"}.
アプリスイートを設定する前に、以下のスキルに精通していることを確認してください:
- 基本的なアプリの構築
- チューリップ・テーブル(フィールドの編集、フィルタの使用、レコード・プレースホルダを含む)
デプロイメント
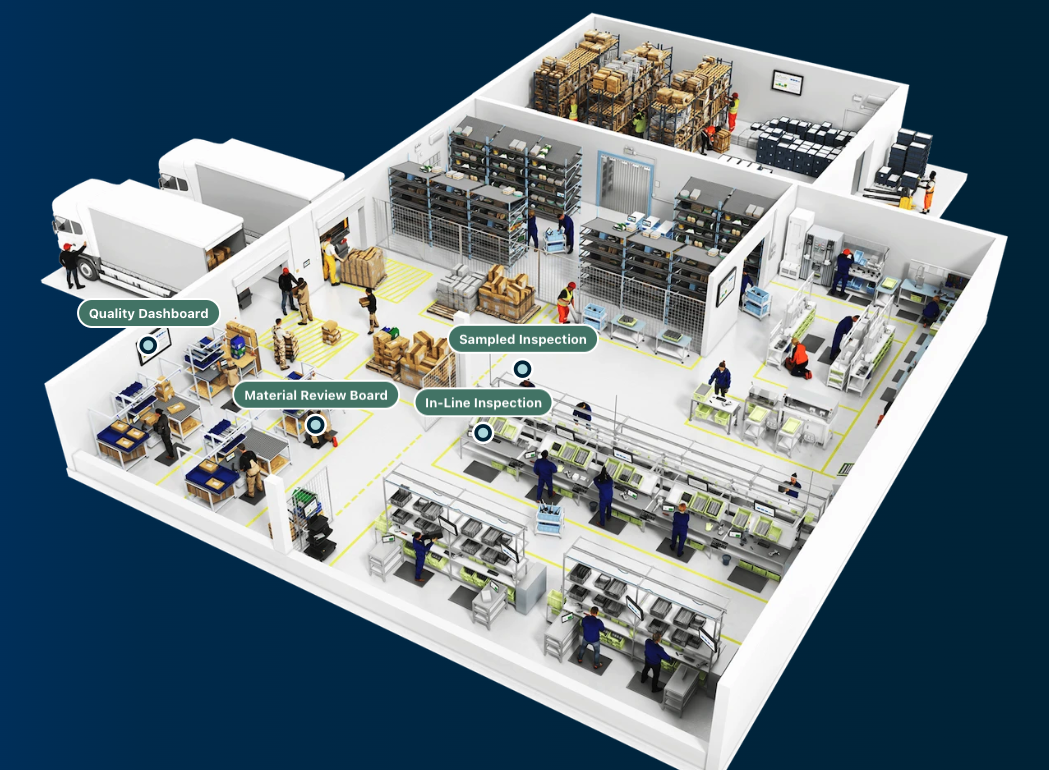
これらのアプリケーションを希望のデバイスにデプロイする方法と、ステーションで実行する方法について正しく理解していることを確認したい。ビジネスの流れを理解することが重要です。ショップフロアの図があれば、プロセスを進める中でアプリケーションをどこに配置したいかをよりよく理解することができます。
接続されたテーブル
このアプリ・スイートを通して使用するテーブルは、様々なアプリケーションを通して使用され、接続されます。これにより、ユーザーエクスペリエンスが向上するだけでなく、将来のアプリケーション開発で使用できるテーブルのネットワークが構築されます。共通のデータモデルを使用することで、テーブルの冗長性を最小化し、互換性を最大化する方法については、こちらをご覧ください。
cMES全体で使用されている一般的なチューリップ・テーブルに精通してください。
ダウンロード
Quality Management App Suiteへのリンクをクリックしてください。アプリをインスタンスに追加できるライブラリページに移動します。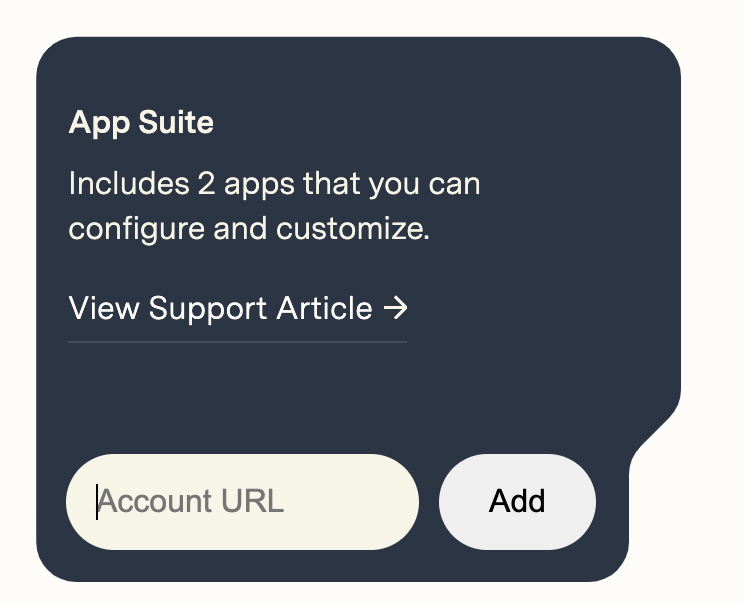 {高さ="250" 幅="300"}。
App Suiteが追加されると、インスタンスに「Quality Management」というタイトルのフォルダができます。これにより、スイート内にあるすべてのアプリを確認できます。
品質管理
このアプリ・スイートの目的は、検査プロセスを完全に可視化することで、ビジネス内のさまざまな品質分野への対応を支援することです。ここから得られる価値は、品質管理プロセスを改善し、トレーサビリティを高め、品質不良のコストを把握し、データ主導の意思決定を行うことにあります。また、オペレーター、ステーション、製品などによる不良をよりよく把握することができます。
 {高さ="" 幅=""}
アプリの設定
While configuring applications, any changes made to tables need to be made across all applications for connectivity.
欠陥管理
このアプリケーションでは、欠陥イベントの監視とレポートができます。不具合イベントを整理し、適切なリワークの詳細を提供することができます。
欠陥のレビュー
現場で記録されたすべての不具合を確認できます。より詳しく知りたい不具合イベントを選択してください。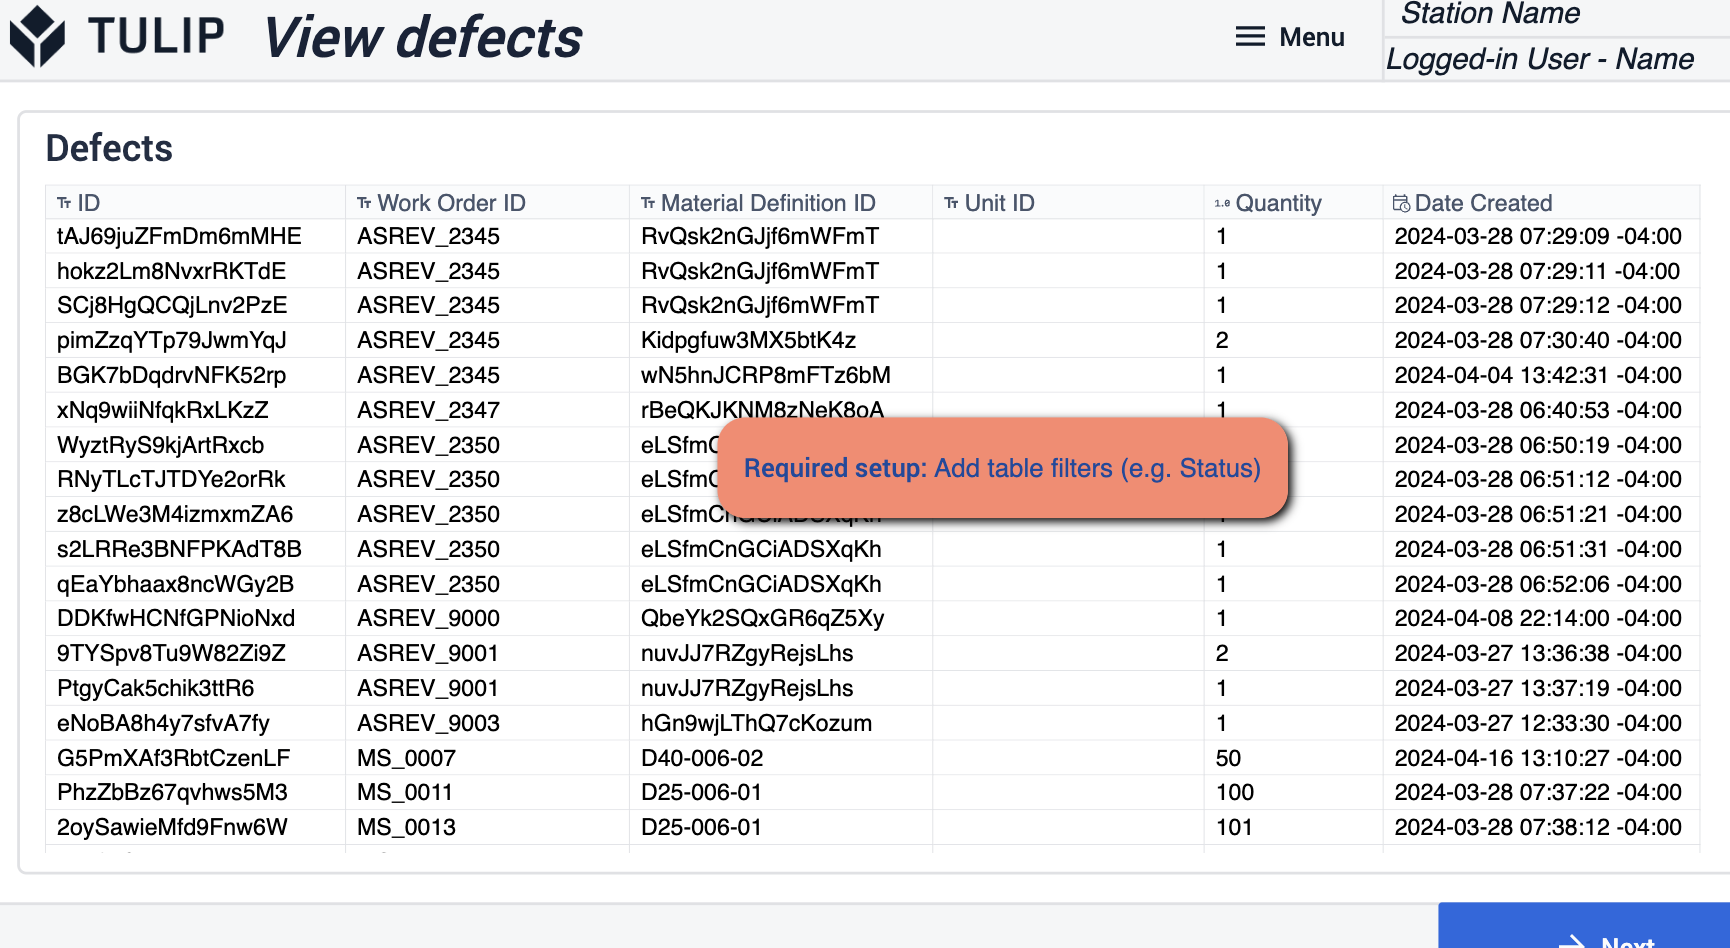 {height="300 "幅=""}*このステップで必要な変更は、チューリップテーブルにフィルターを追加することです。
不具合単位の管理
このステップでは、選択した欠陥に属する特定の詳細を表示および管理できます。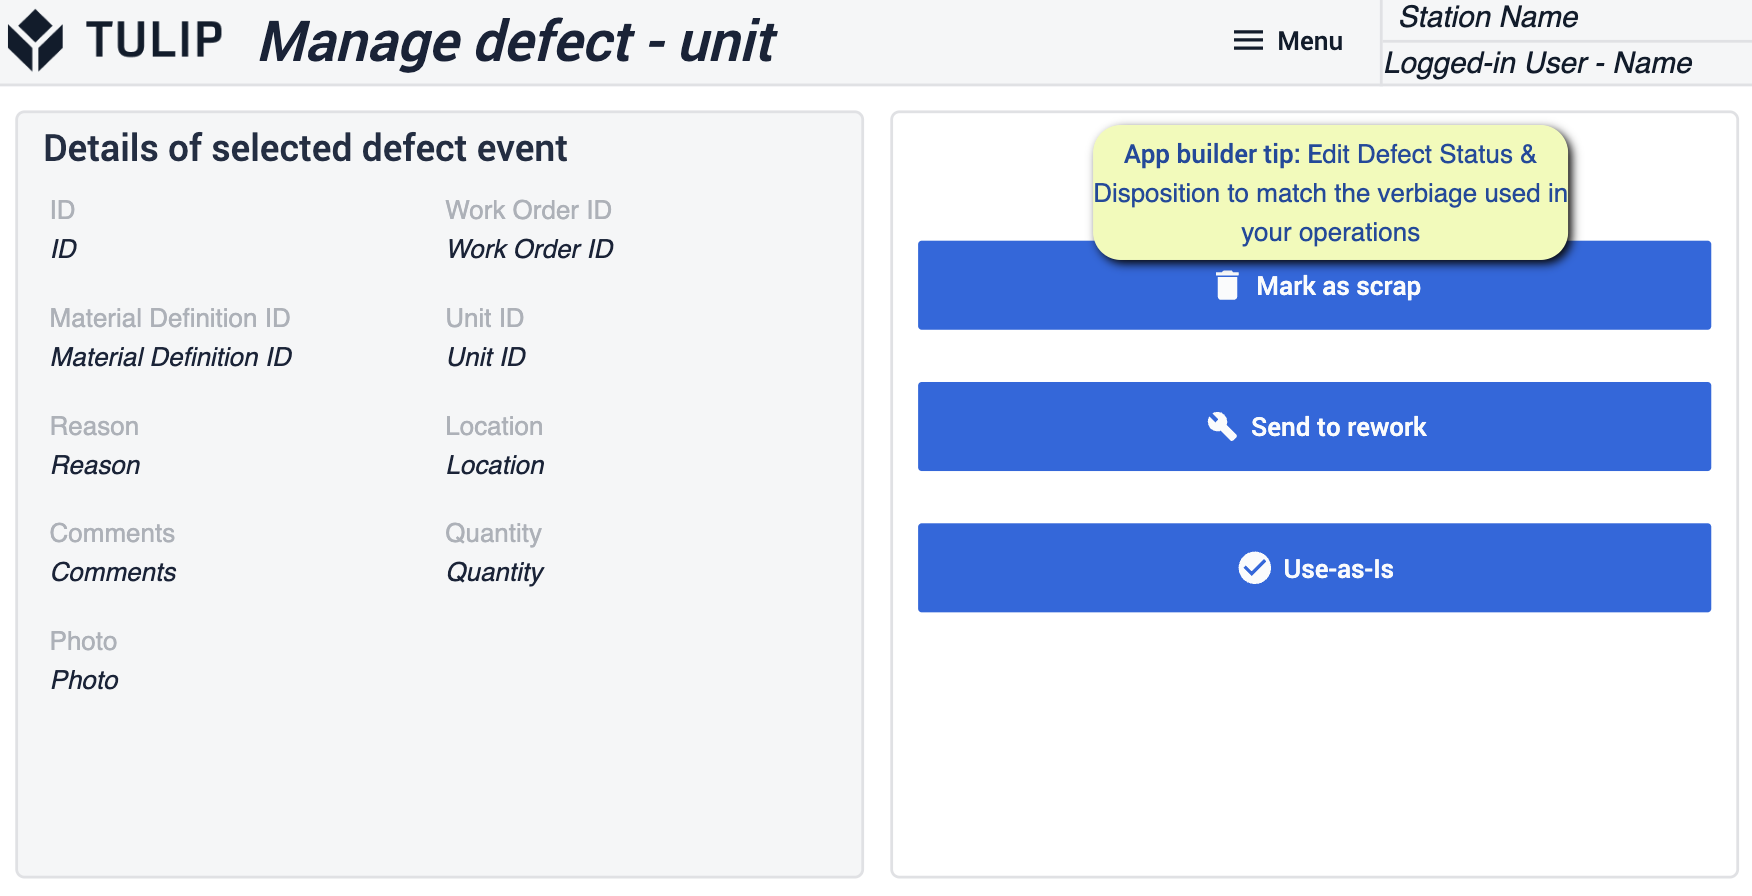 {height="300" width=""}* App Builder Tip to Follow, Edit defects and dispositions to match the language by the facility.
欠陥の管理 - バッチ
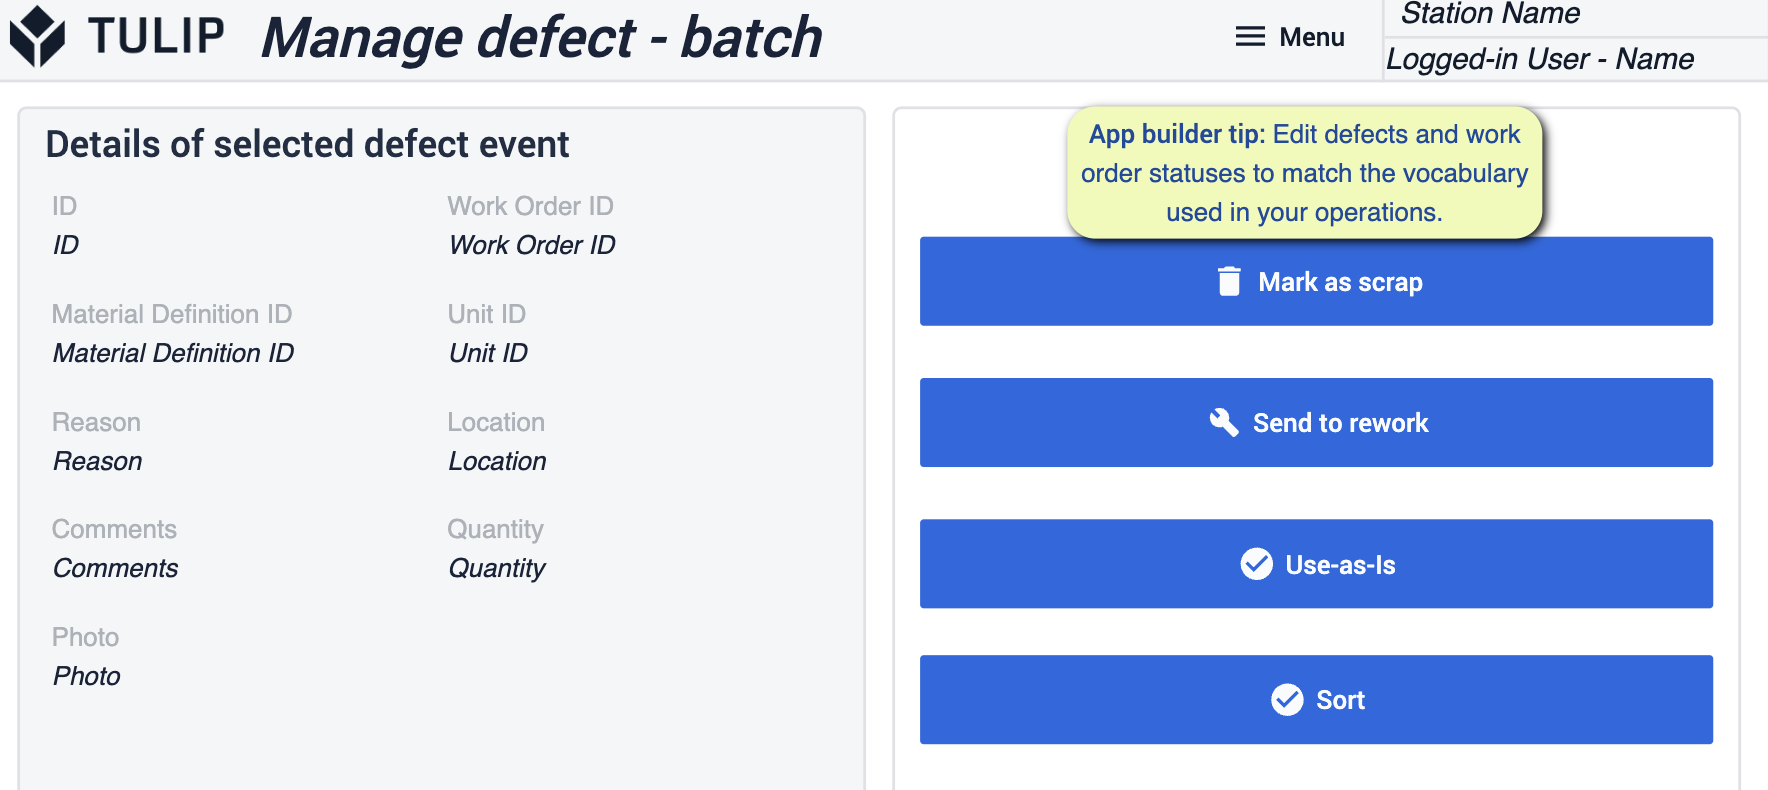 {height="300" width=""}* App Builderのヒント: 不具合と処分を施設で使用されている言語に合わせて編集します。
リワークの詳細
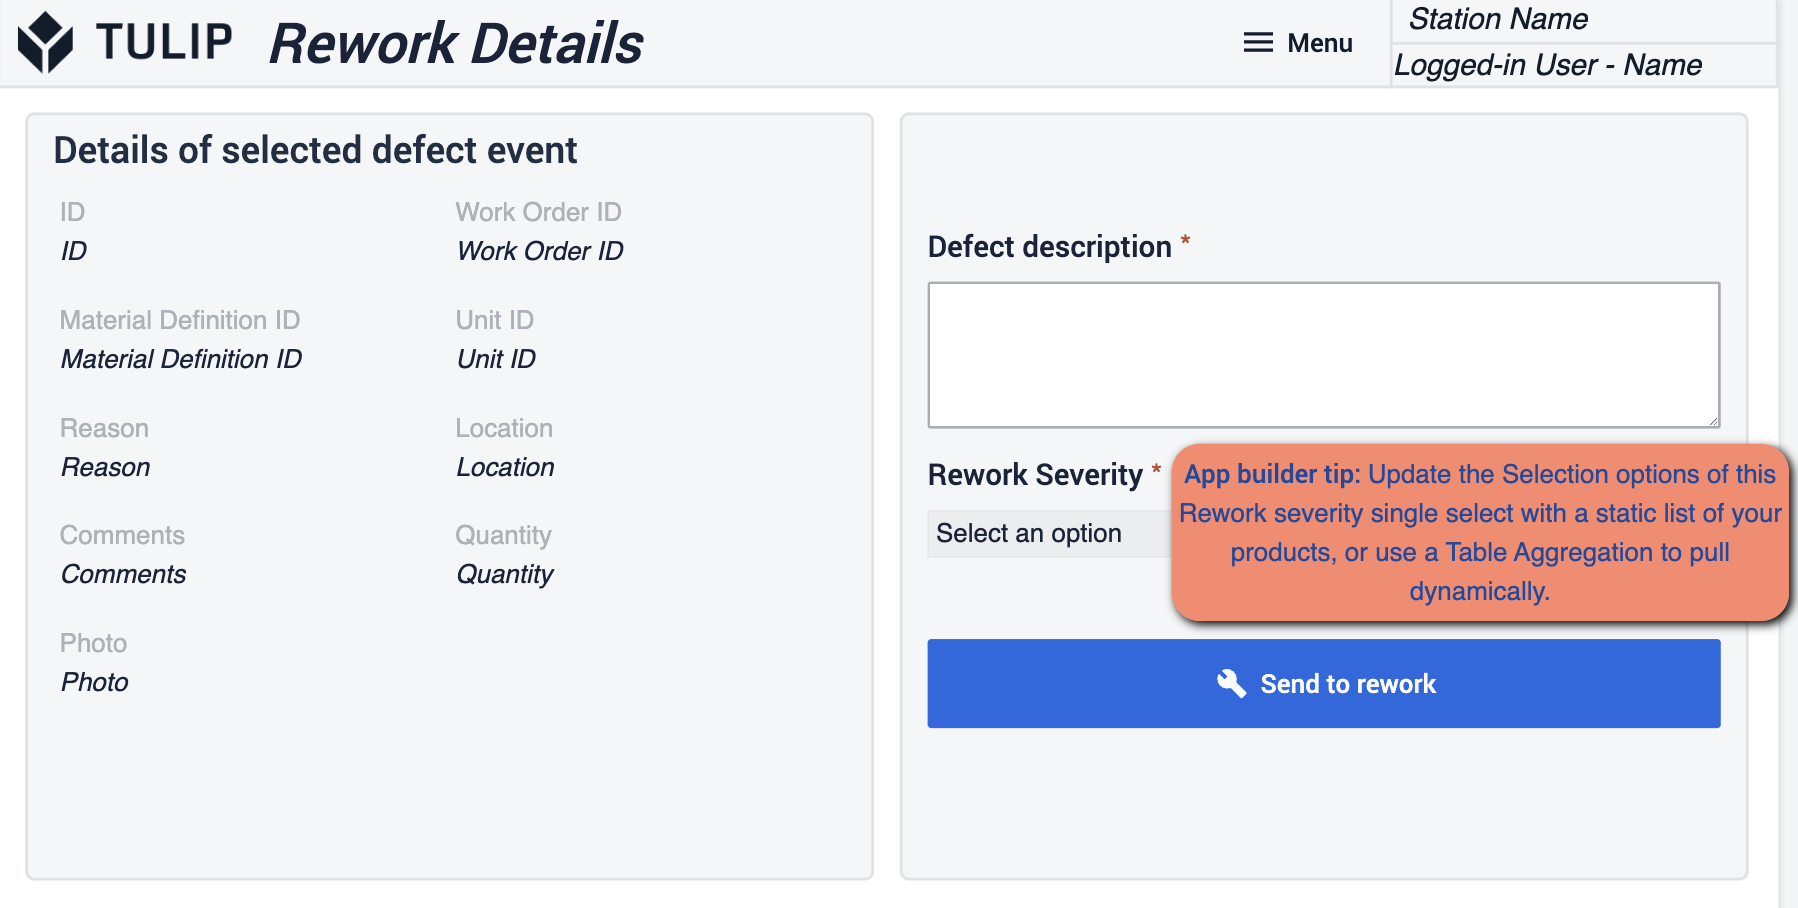 {height="300" width=""}* リワークの選択オプションは必ず更新してください。静的な値は、運用に合わせて変更することができます。
品質管理ダッシュボード
品質ダッシュボードアプリケーションは、一日を通して記録された情報を把握することができます。欠陥の発見数や解決までの時間をリアルタイムで把握できます。
品質ダッシュボード
このステップでは、タスクそのものを表示します。実際の数値とグラフで主要な指標を表示します。
 {height="300 "width=""}*このアプリケーションで必要な設定は、適切なトラッキングのために、タイムゾーンがオペレーションに合わせて変更されていることを確認することです。
検査結果の表示- バッチ
この「Visual Inspection」セクションでは、特定のオーダーに関する詳細を表示することができます。 {height="300" width=""}*ここで必要な設定は、見たい特定の分析結果をフィルターに設定することです。グラフの種類と、そのグラフが表示しようとしているメトリクス。
検査結果の表示-作業
このビューは作業オーダーにフォーカスしており、アナリティクスにアプローチするためのいくつかの異なる方法があります。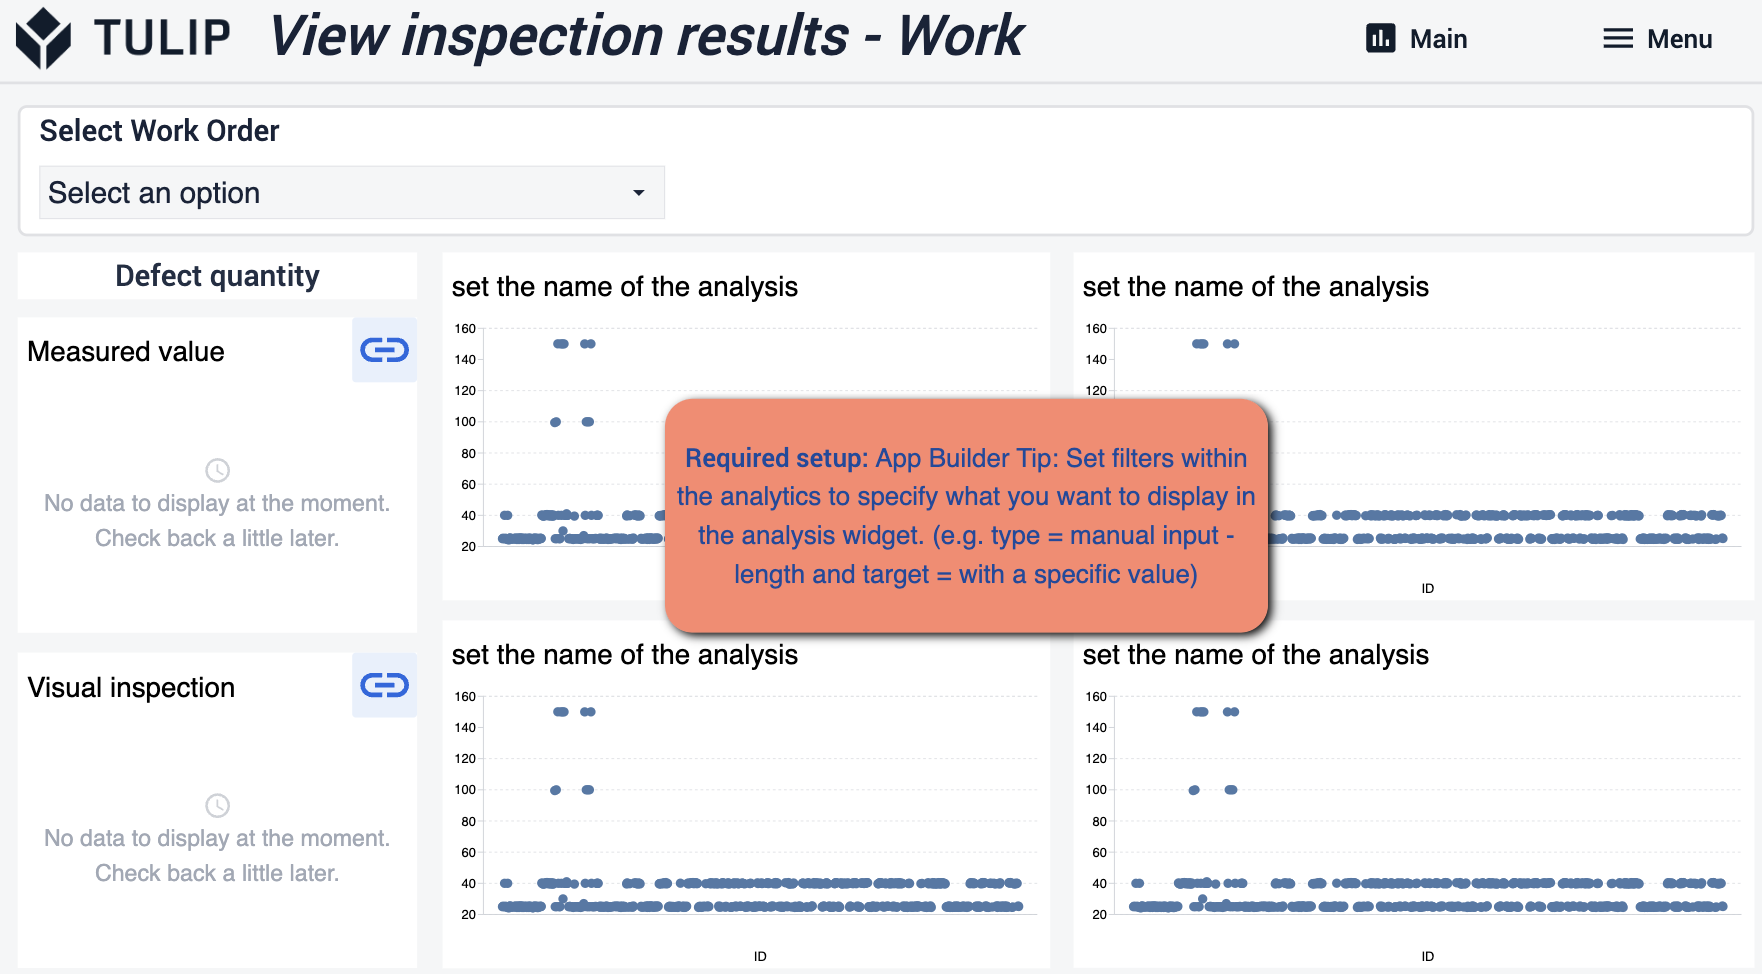 {height="300" width=""} 同じヒントに従いましょう。
測定値 結果
ここには、作業指示の履歴の詳細が表示されます。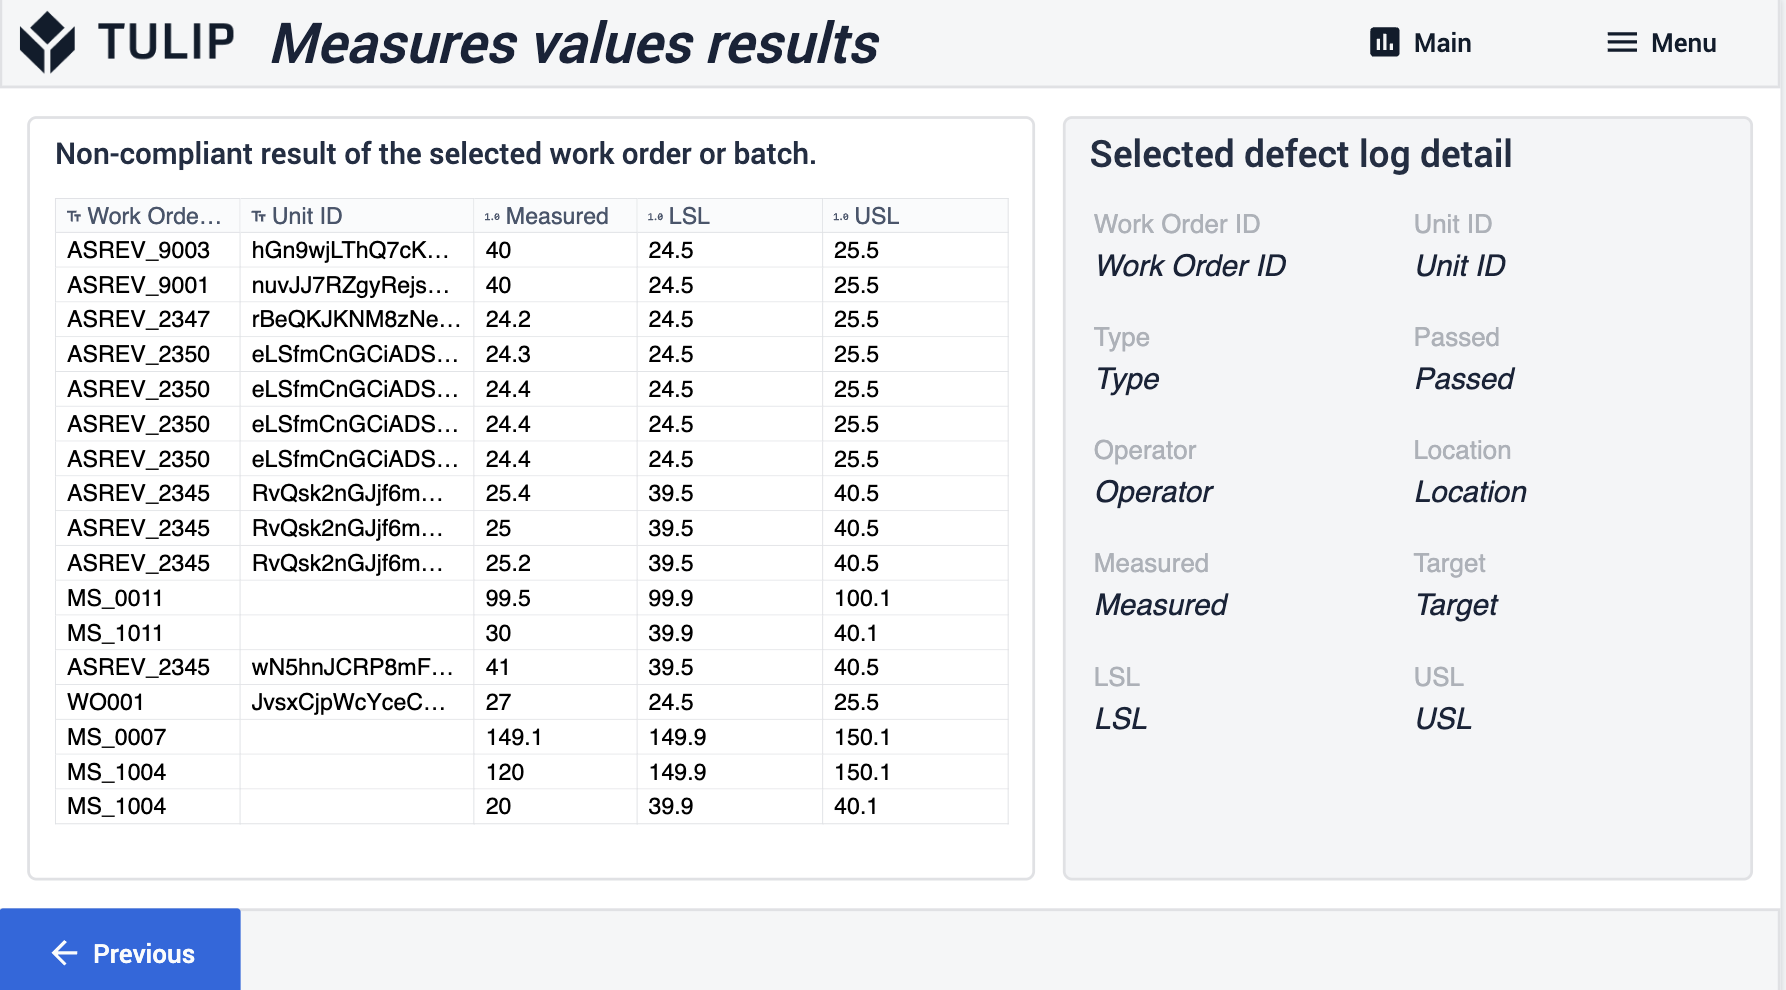 {height="300" width=""} 作業オーダーの履歴の詳細が表示されます。
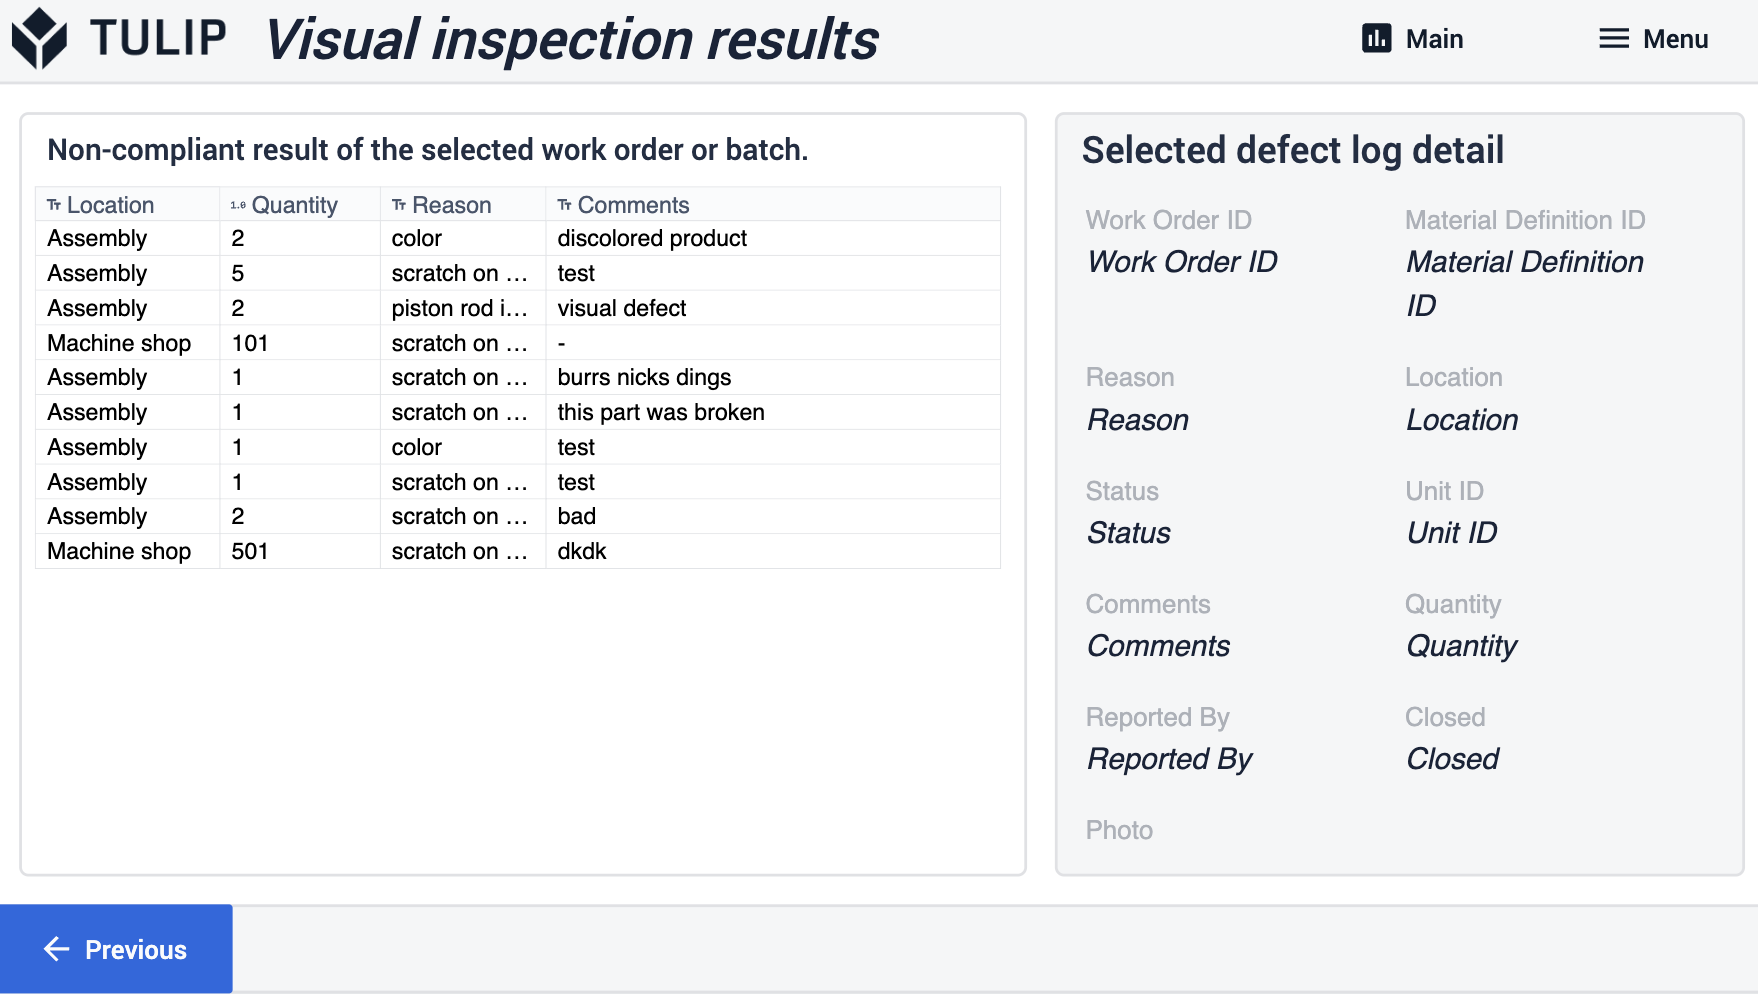
目視検査結果
 {height="300" width=""} 品質検査テンプレート
品質検査テンプレート
完全検査ステップグループテンプレート
バッチの表示
このステップでは、生産を完了したすべての利用可能なバッチを表示できます。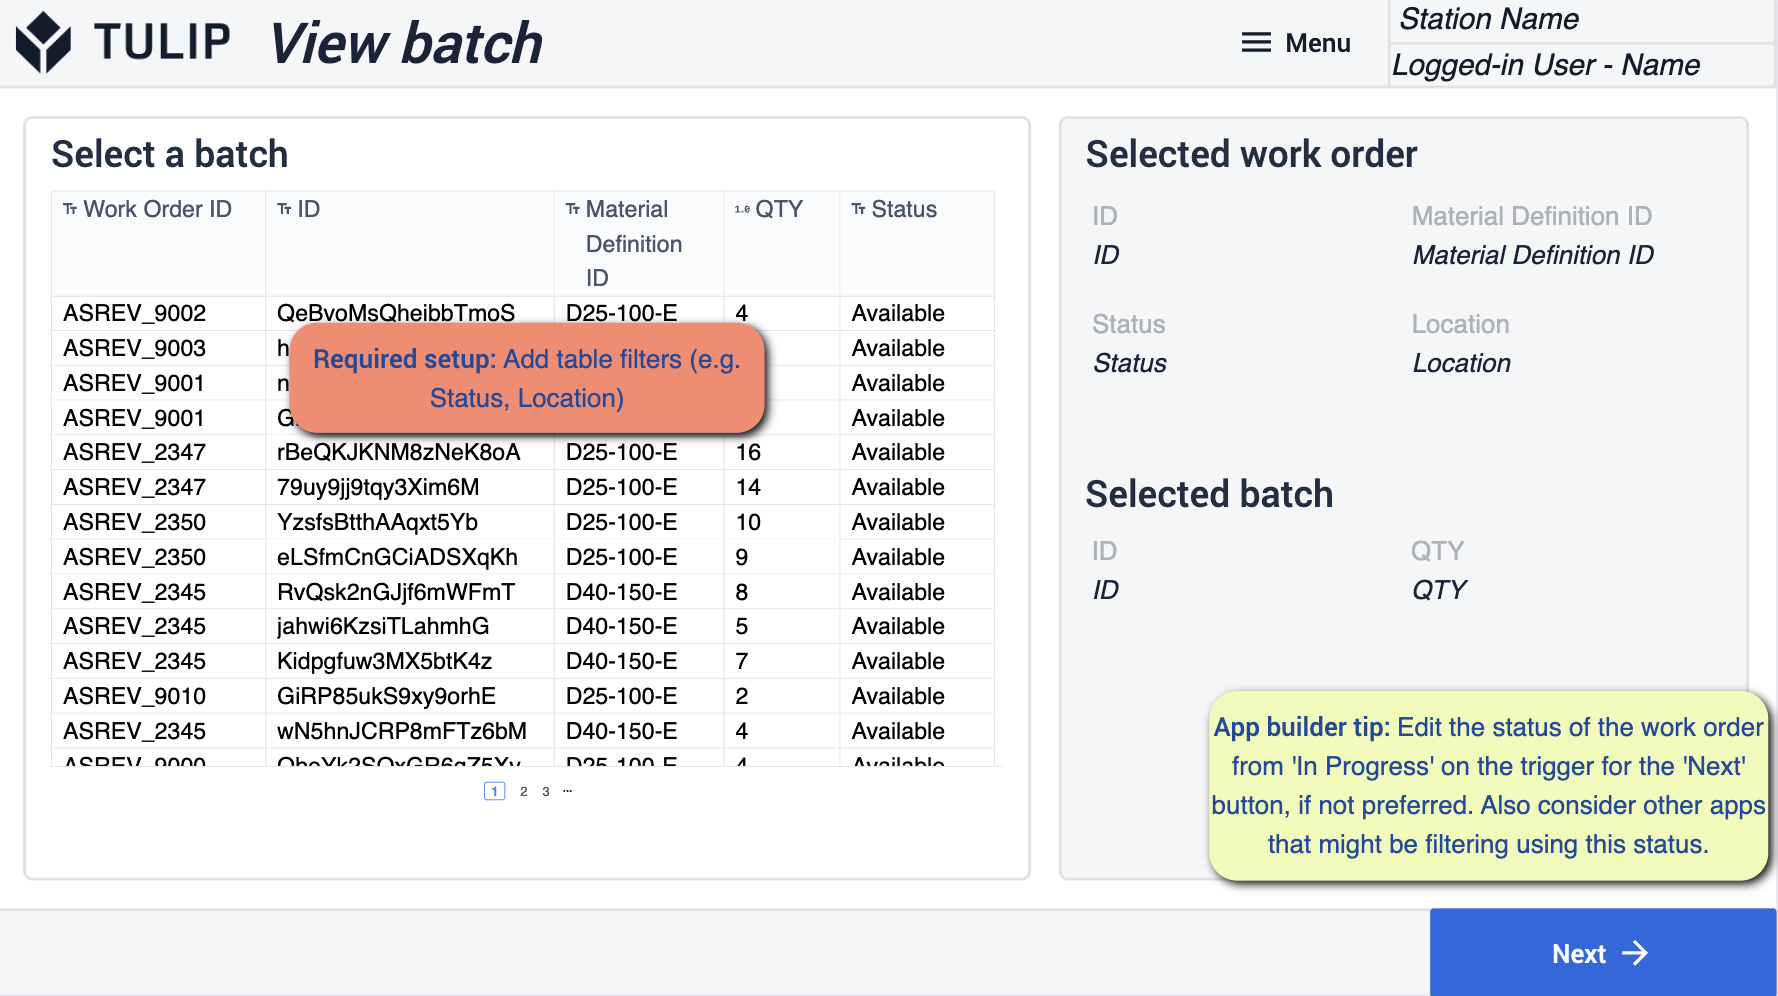 {height="300" width=""}*業務に合わせてテーブルフィルターを追加してください。次のボタンのトリガーを使って、作業オーダーのステータスを「進行中」に編集します。
目視検査(テンプレート)
このテンプレートは、出荷された製品を目視で確認するためのものです。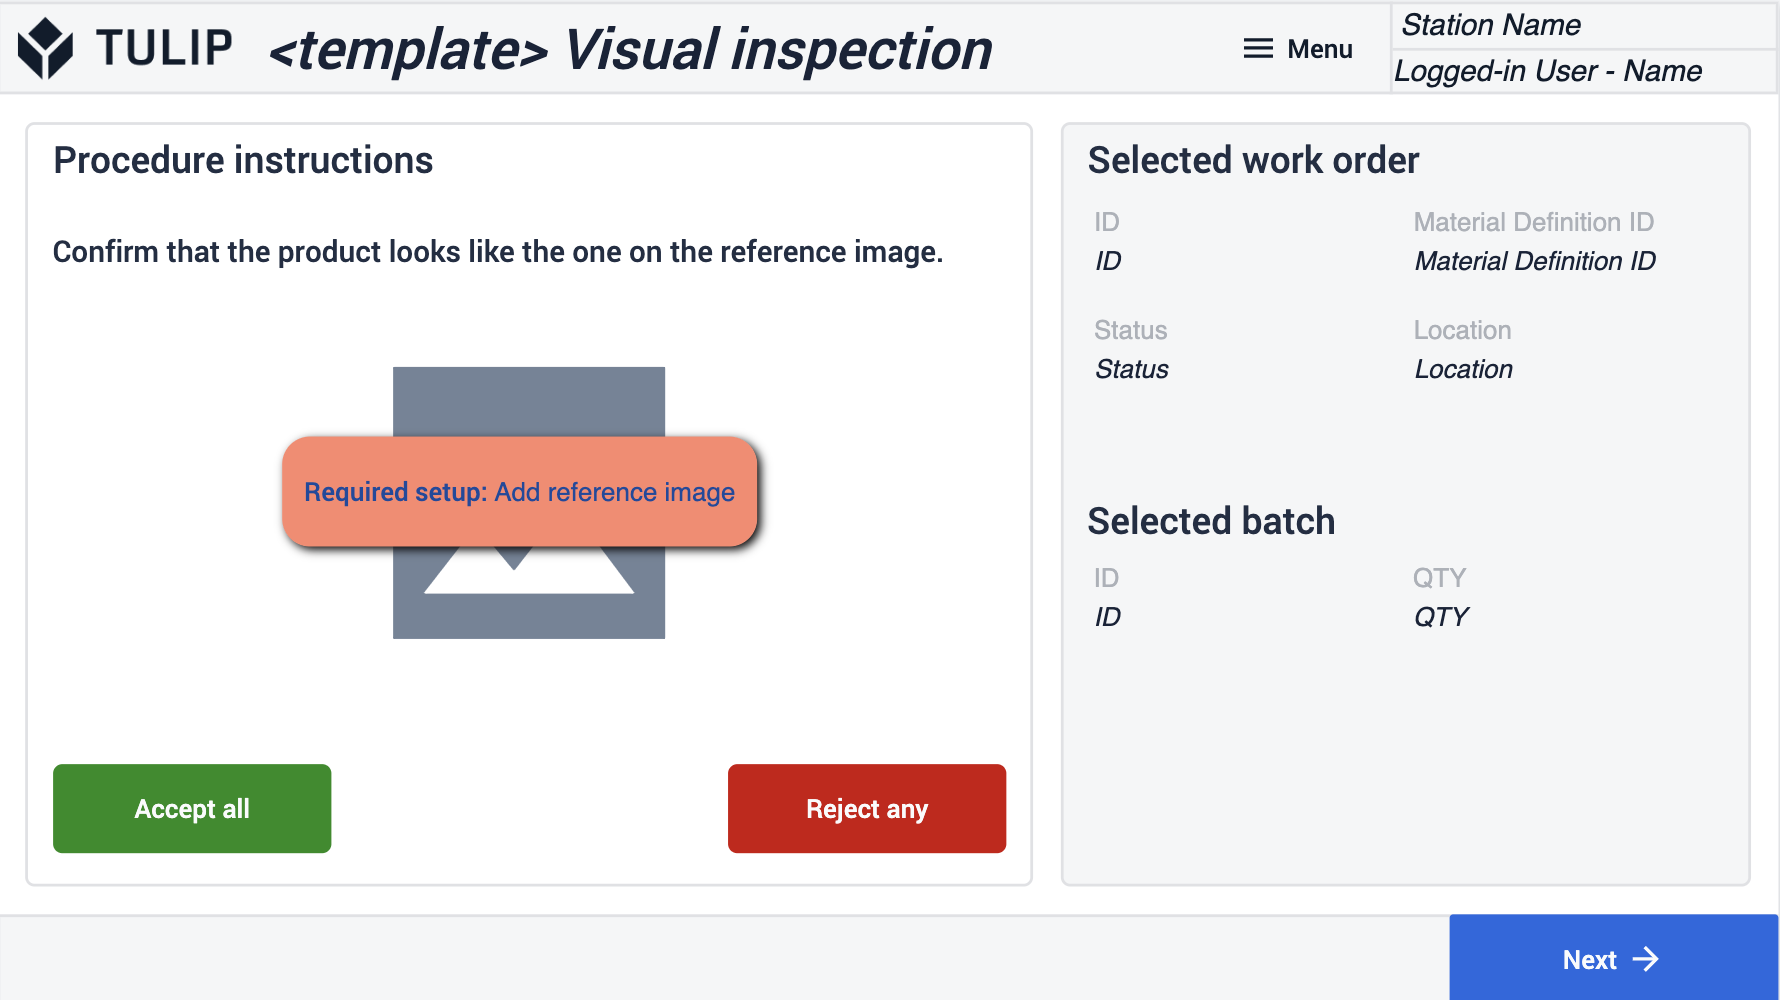 {height="300" width=""}* 検査に合格したオーダーのビジュアルを必ず追加してください。
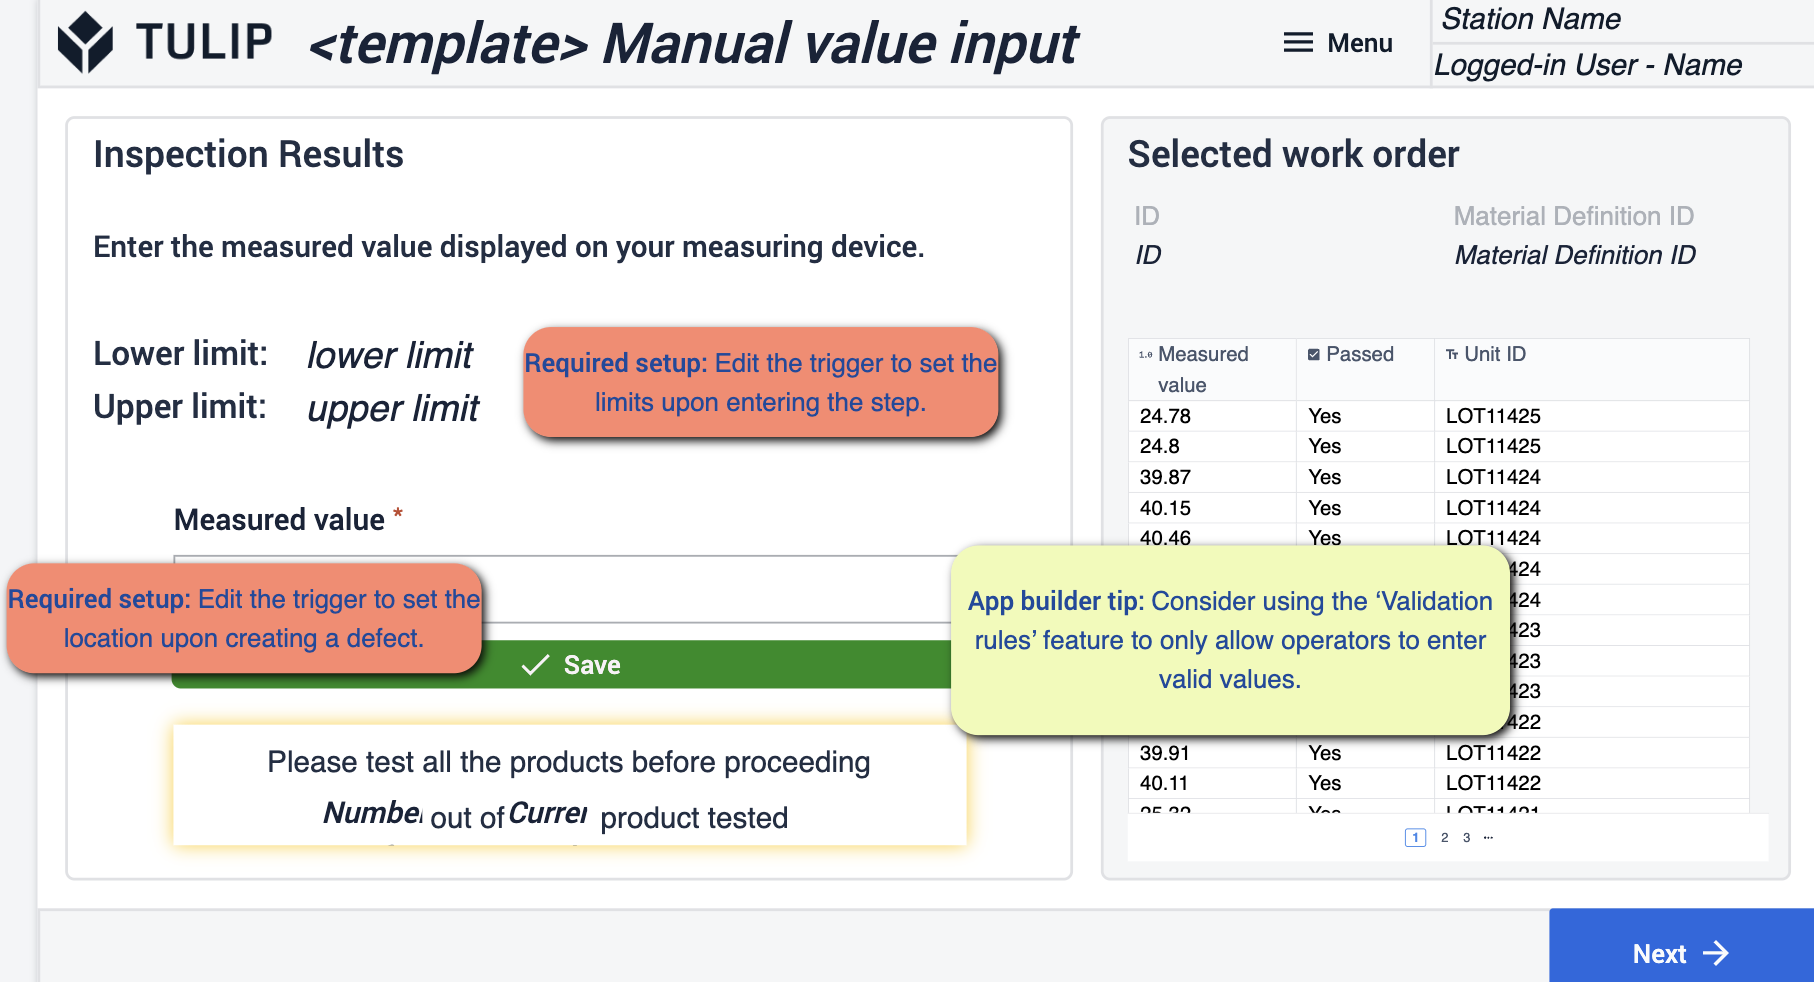
手動値入力(テンプレート)
 {height="300" width=""}* 検査に合格したオーダーのビジュアルを追加してください。
- トリガーを編集して、合格のために設定した制限に従うようにし、欠陥が記録されたときに場所をキャプチャするようにトリガーを編集してください。
結果サマリーの表示
ここで、検査を通過したオーダーを確認します。 {height="300" width=""}* トリガーを使って、作業指示書と場所を編集します。
不具合のログ
このステップでは、検査で見つけた欠陥を記録します。 {height="300" width=""}* アプリケーションで、欠陥のステータスと場所を業務に合わせて編集してください。不具合を記録する際に、トリガーを編集して場所を設定する必要があります。
サンプリング検査ステップグループテンプレート
作業指示の表示
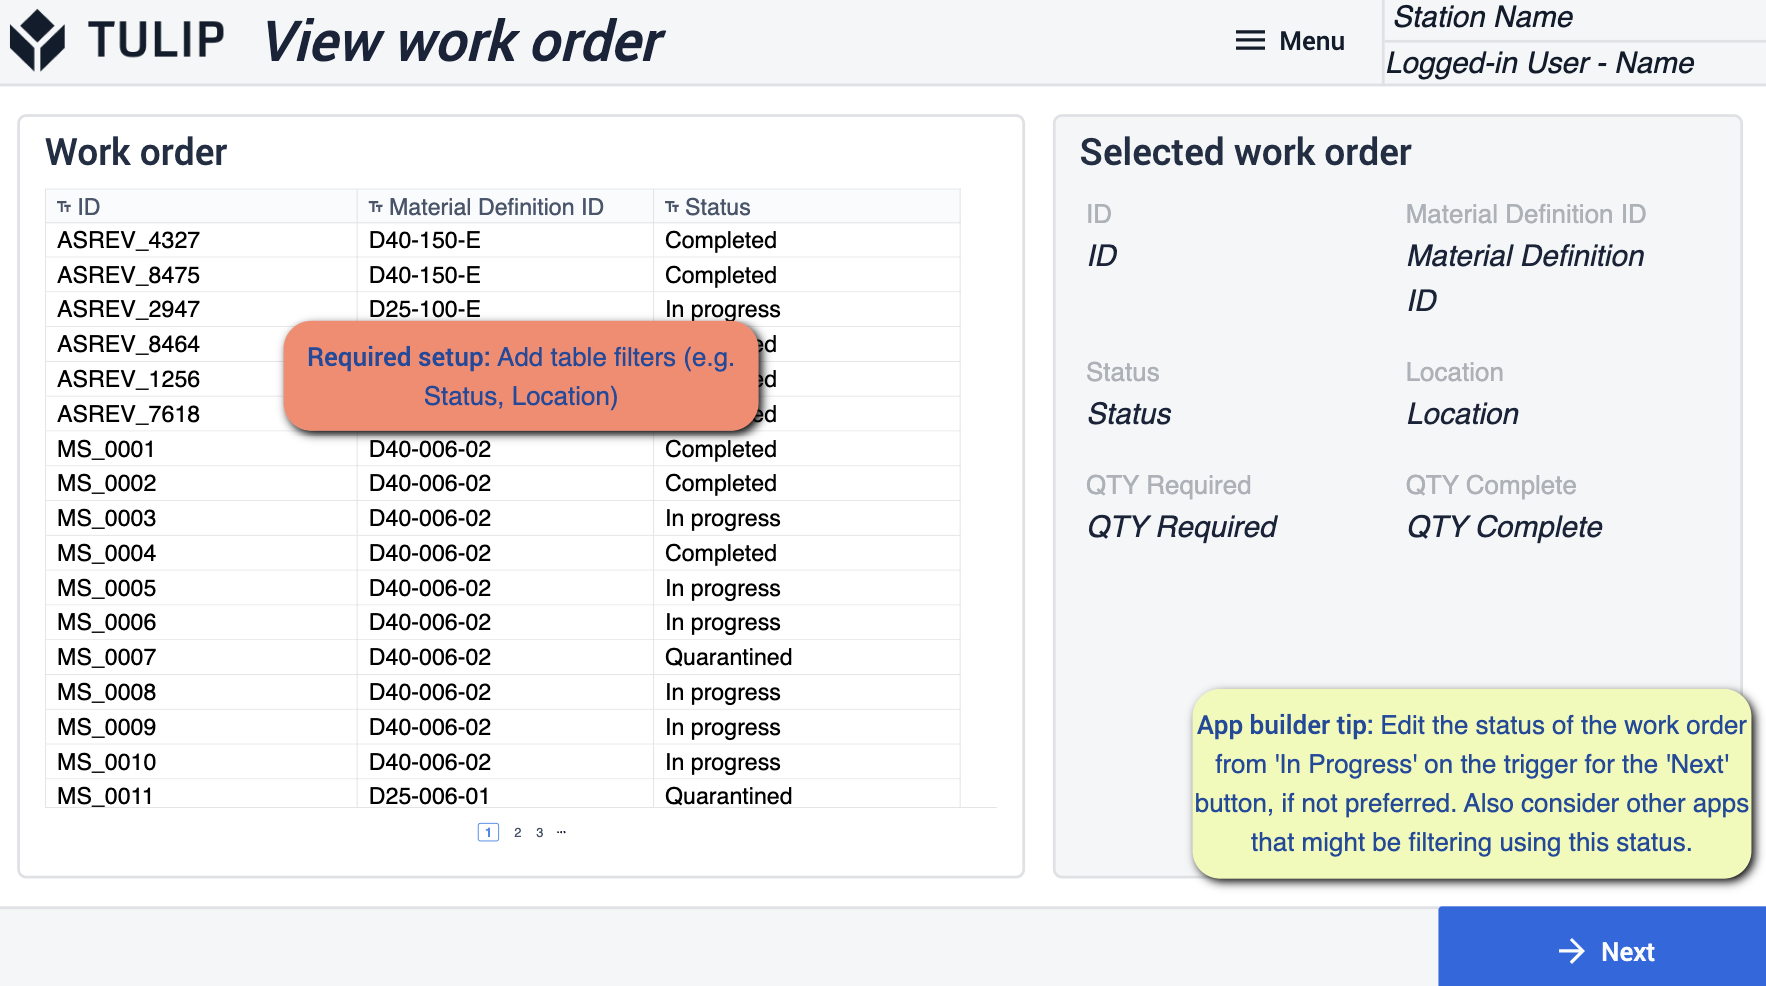 {height="300" width=""}* 業務に合わせてテーブルをフィルタリングしてください。Next(次へ)」ボタンと連動するトリガーを使って、作業指示のステータスを編集します。
サンプリング指示(テンプレート)
このテンプレートは、選択した作業オーダーを進行する際に従うべき指示を与えるためのものです。 {オペレータが行う作業に合った指示を追加してください。また、チェックボックスの名前も、分析のために取得しようとしているものと一致するように変更してください。
目視検査(テンプレート)
このテンプレートは、製品が通関してくるのを目視で確認するためのものです。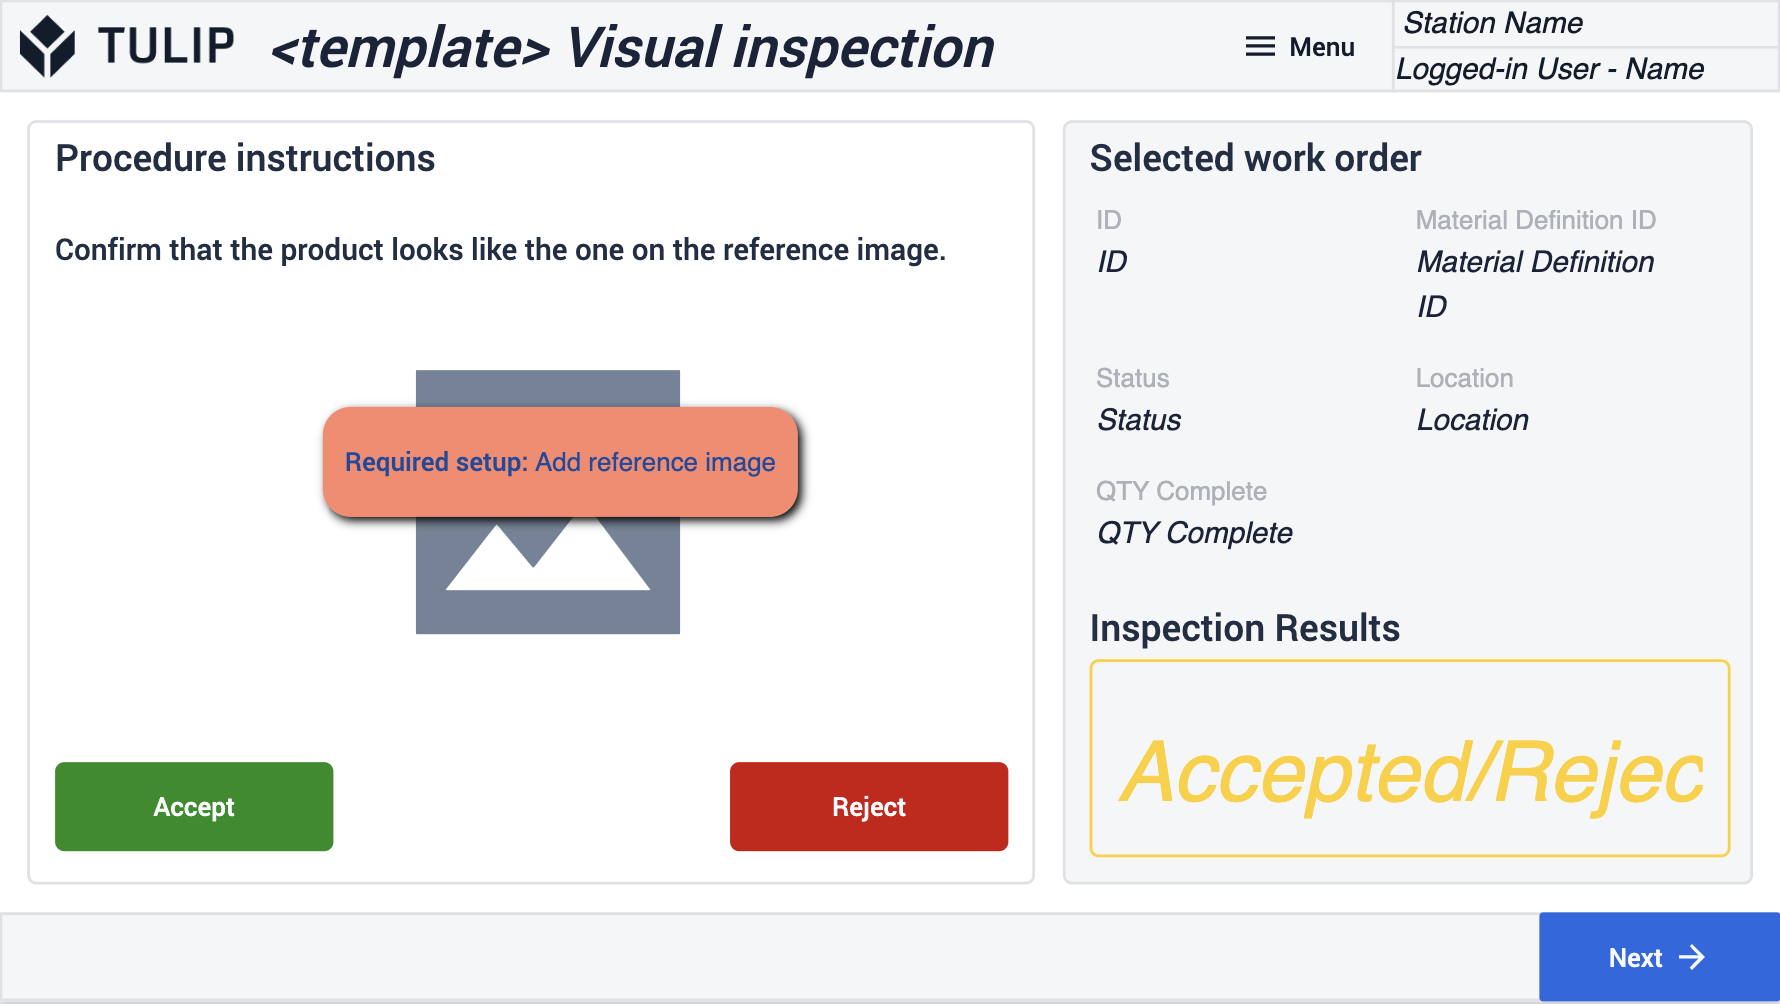 {height="300" width=""}* 検査に合格したオーダーのビジュアルを必ず追加してください。
手動値入力(テンプレート)
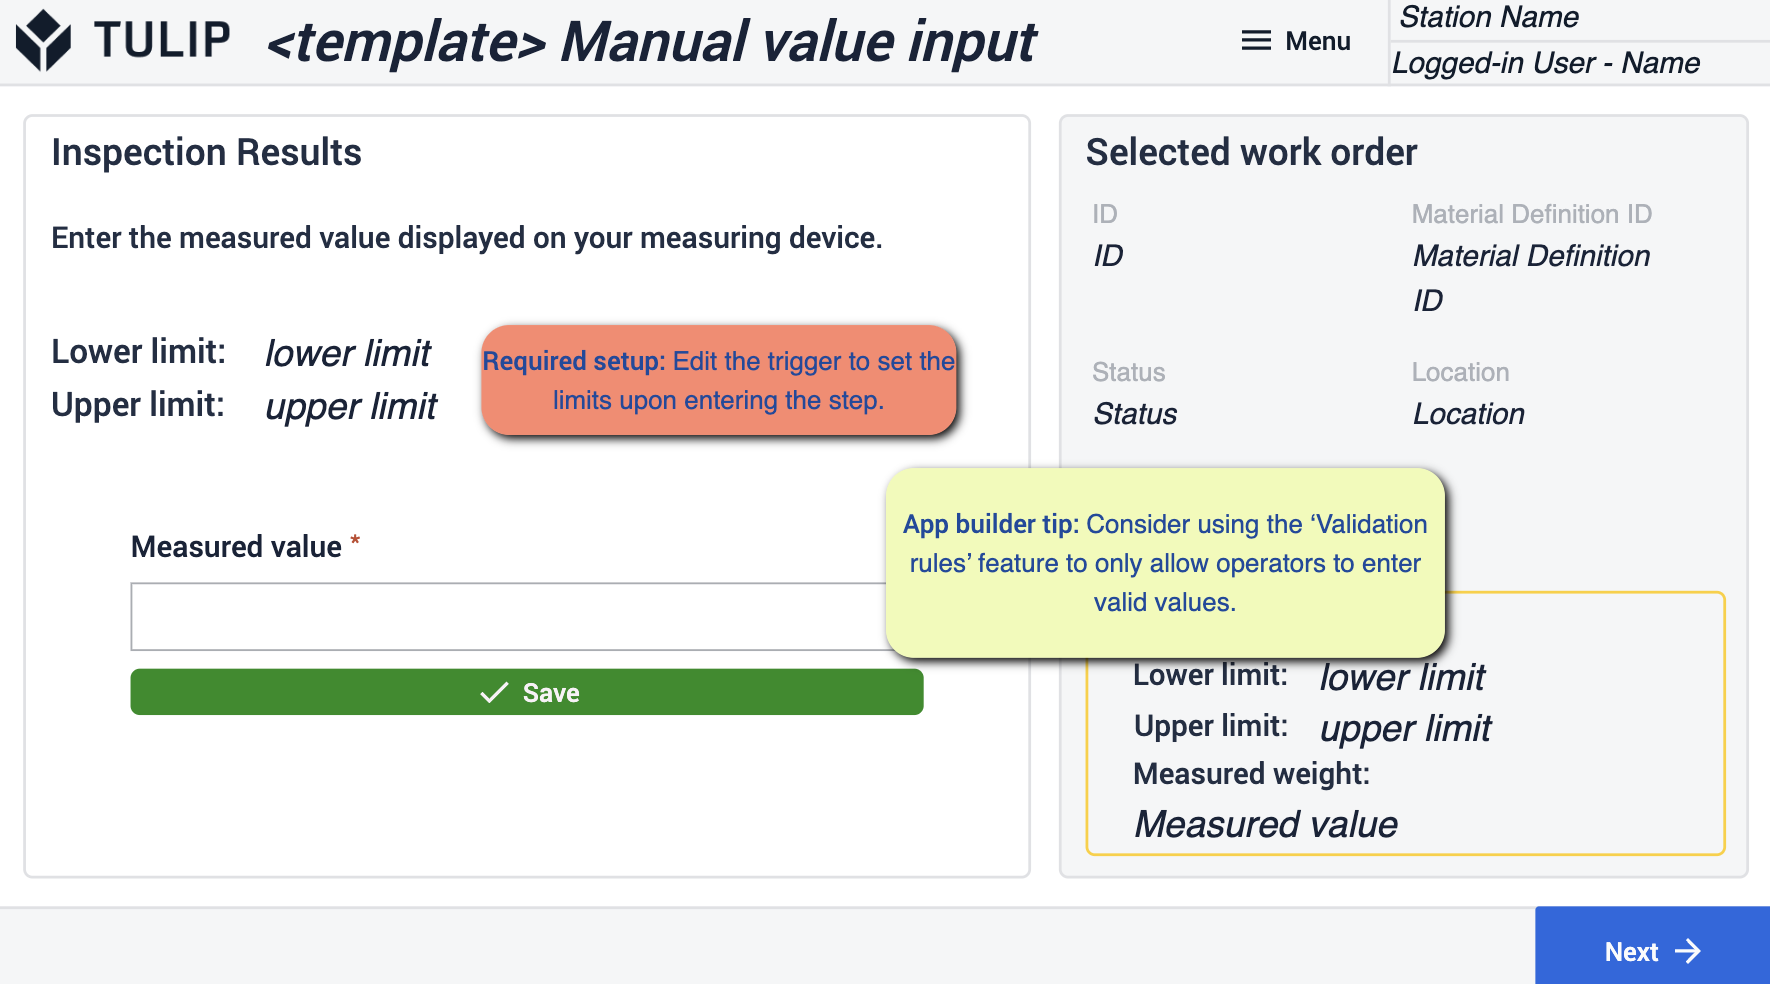 {height="300" width=""}* トリガーを編集して、合格のために設定した制限に従うようにし、欠陥が記録されたときに場所をキャプチャするようにトリガーを編集してください。
結果サマリーの表示
ここで、検査を通過したオーダーを確認します。 {height="300" width=""}* トリガーを使って、作業オーダーの統計と場所を編集します。カンバンシステムを使用していない場合は、資材要求のトリガーを削除する手順に従ってください。使用する場合は、ステータスがカンバンシステムのステータスと一致していることを確認してください。
不具合のログ
このステップでは、検査で見つかった欠陥を記録します。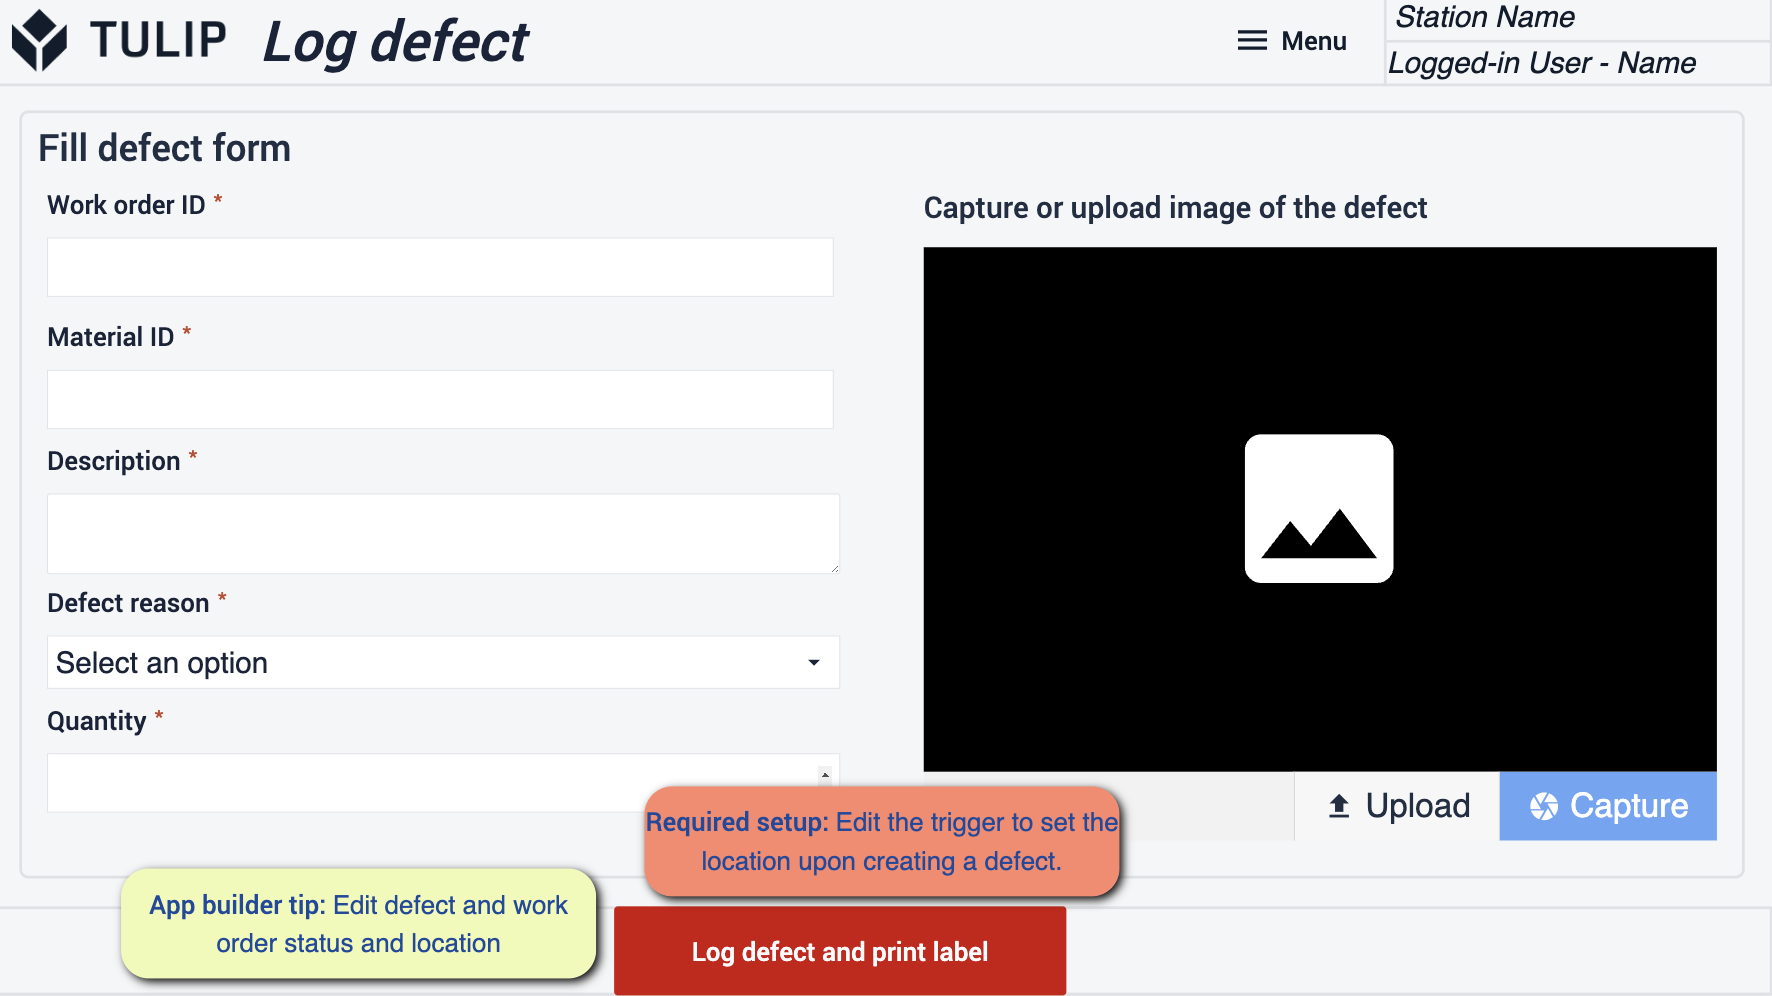 {height="300" width=""}* アプリケーションで、欠陥のステータスと場所を業務に合わせて編集してください。不具合のログを記録する際に、トリガーを編集して場所を設定する必要があります。
ラベル
 {height="300" width=""} オペレータが終了したら、オーダーの履歴を表示するラベルを作成します。
- ラベルを編集して、必要な情報を表示することができます。
準備
アプリ・スイートを利用する際には、アプリ・ビルダーのヒントに従うことが重要です。これらのヒントは、デプロイのためにアプリケーションを準備するためのガイドとなります。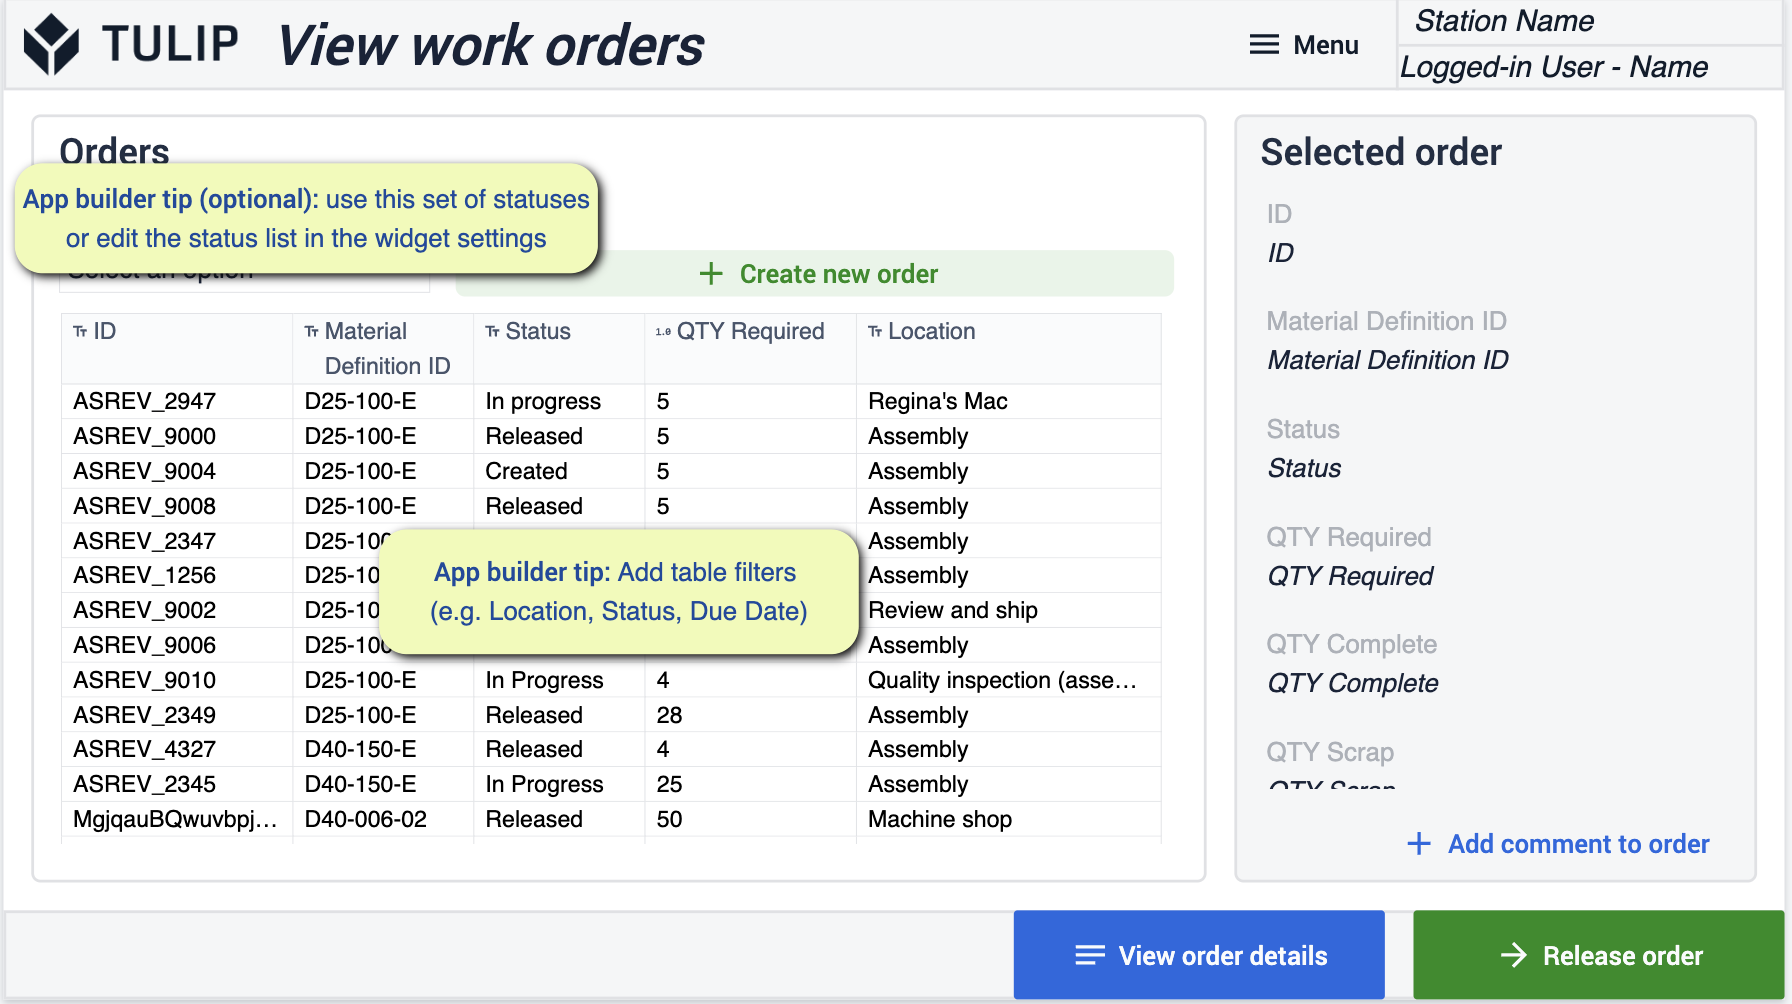 {height="300" width=""} 前提条件を参照し、各ステップ内の「必須ステップ」と「App Builder Tips」の両方に従ったことを確認することが重要です。