- 第一段階。
- 建物
- アプリケーションデザイン
- アプリケーション・エディター
- チューリップ・アプリ・エディター入門
- 新しいチューリップ・アプリの作成
- アプリのエディターとプレーヤーでキーボードショートカットを使う方法
- チューリップの多言語機能
- ステップ
- ウィジェット
- ウィジェットとは?
- 入力ウィジェット
- 埋め込みウィジェット
- ボタンウィジェット
- ウィジェットの設定方法
- ステップに入力ウィジェットを追加する
- インタラクティブ・テーブル・ウィジェットとは?
- Product Docs Template
- 動画を埋め込む方法
- アプリにアナリティクスを組み込む方法
- ファイルを扱う
- 単一または複数選択ウィジェットに動的に入力する
- チェックボックス・ウィジェットの使用方法
- バーコードウィジェットの追加方法
- ステップにグリッドウィジェットを追加する方法
- アプリ内やアプリ間でコンテンツをコピー/ペーストする方法
- ステップにゲージウィジェットを追加する方法
- カスタムウィジェットの概要
- 署名フォームの作成 ステップ
- 入力ウィジェットによるデータ検証
- 記録履歴ウィジェット概要
- フォーム・ステップの技術的詳細
- アプリに画像を追加する方法
- 電子署名ウィジェットの使用方法
- アプリでの数字の書式設定
- イネスコ
- トリガーとは何か?
- ステップ・レベル・トリガー
- アプリレベルのトリガー
- ウィジェット・トリガー
- アプリ移行ガイド
- タイマートリガー
- デバイストリガーを追加する方法
- 条件(If/Else文)でトリガーを追加する方法
- トリガーエディターのアクションとトランジションのリスト
- 最も一般的な誘因トップ10とは?
- トリガーからウィジェットの色を設定する方法
- メールの送り方
- SMS通知用チューリップ・ユーザーの設定方法
- トリガーからステップを印刷する方法
- アプリ・エディターでのエクスプレッション・エディターの使い方
- エクスプレッション・エディターの技術的詳細
- アプリ・エディターの表現一覧
- Datetime式の使用
- タイプキャスティング表現
- 配列とオブジェクトで式を使う
- トリガーで時間を扱う
- サポートされているカスタム日付形式
- アプリを完成させる方法
- デバイスのカメラでバーコードとQRコードをスキャンする方法
- トリガーに正規表現を追加する方法
- チューリップのアプリでアプリ情報を使う
- トリガーを使用してコネクタ関数を呼び出す方法
- 可変
- 問題解決
- ダティ(ヒンドゥー教の女神)。
- コネクタ
- 分析
- 分析とは何か?
- アナリティクス・ビルダー入門
- 新しい分析の作成方法
- ディスプレイの種類
- テンプレートの種類
- ユニバーサルテンプレートの使用方法
- アナリティクスの数値フォーマット
- チャートレイヤー入門
- 管理図とは何か?
- 管理図のアラート
- アプリにアナリティクスを組み込む方法
- 複数のアプリからデータを分析する方法
- アナリティクス・エディターでマシンデータを使用する
- 日付の範囲を理解する
- アナリティクス コンテキスト ペインのフィールド一覧
- アナリティクス・エディターでのエクスプレッション・エディターの使い方
- エクスプレッション・エディターの技術的詳細
- アナリティクス・エディターの表現一覧
- アプリ解析の修正方法
- フォーキャスト・レイヤーとは?
- 分析例
- ショップ・フロア・ダッシュボードの作り方
- 分析またはダッシュボードを共有する方法
- ダッシュボードの作成方法
- ビジョン
- 機器モニタリング
- マシン・モニタリング入門
- 最初のマシンのセットアップ方法
- トリガーでマシン出力を使用する方法
- 最初のOPC UAデータソースを構築する方法
- 最初のMQTTコネクタを構築する方法
- アプリにマシンウィジェットを追加する方法
- チューリップに接続するためにマシンを準備する方法
- マシン属性、ダウンタイムの理由、ステートの追加方法
- OPC UA/MQTTプロトコルを使用したマシン属性への書き込み 新機能
- オンプレムコネクタホストで実行するエッジデバイスの使用
- Edge MCを使用してOPC UAを実行する
- 機械属性APIの使用方法
- マシンタイプの設定方法
- マシンの追加と設定方法
- 初めてのマシン・トリガーの作り方
- Tulipによるマシン監視アーキテクチャの推奨
- 規制産業
- 副操縦士は最前線にいる
- オートメーション
- 輸入における輸出
- アプリケーションの実行
- チューリップ・プレーヤーの使い方
- チューリップ・プレーヤーでアプリを実行する方法
- チューリップ・ウェブ・プレーヤーとチューリップ・プレーヤーのどちらを選ぶか
- 複数のチューリップ・アカウントを切り替える方法
- Apple iOS & iPadOSでのチューリップ・プレーヤーの使い方
- Tulipでサポートされている言語
- How to access your Tulip Player/Instance in an iFrame
- 異なるデバイス上でチューリップ・アプリケーションを実行する方法
- チューリップ・プレーヤーのトラブルシューティング方法
- チューリップ・プレーヤーの推奨デバイス
- チューリップ・プレーヤーの画面が真っ白になった場合の再起動方法
- アプリのデータをCSVにエクスポートする方法
- マネジメント
- Developers
- Connect to Software
- Connectors
- 生態系の統合に関するガイダンス
- アマゾン・ベッドロックとの統合
- AWSインテグレーション - Tulipの全テーブルを取得してS3に書き込む
- AWSインテグレーション - API GatewayとLambdaを介してAWSにデータを送信します。
- AWSインテグレーション - Tulipテーブルからデータを取得する
- AWS Integration - Fetch All Tulip Tables in Lambda Function
- チューリップ・テーブル・データをロードするためのグルーETLスクリプト例
- IoT Sitewiseの統合
- AWSによるリーンな日常管理
- Microsoft Azure機械学習統合
- マイクロソフト・ファブリックの統合
- ロックウェルFactoryTalk Optixの統合
- SnowflakeとFabricの統合 - TulipテーブルをSnowflakeに取り込む
- Connect to Hardare
- Edge Devices
- 対応機器
- チューリップで動作するプラグアンドプレイ機器のリスト
- デバイスドライバの作成とサポート
- チューリップのデバイスドライバサポート
- バーコードスキャナのセットアップ方法
- シリアルドライバーの使用
- ZebraプリンタとTulipを統合する方法
- Zebraネットワークプリンタドライバの使用
- Zebra GK シリーズラベルプリンタドライバの使用
- USB Bobe Boxドライバの使用
- コグネックス In-Sight 2000 ドライバの使用方法
- コグネックスとチューリップの設定方法
- MTセブンエクセレンスPHメータードライバーの使用方法
- 汎用ADCドライバーの使用
- オメガHH806温度計ドライバの使用法
- デジタルキャリパードライバの使用
- 一般的なTS05 Bluetooth温度ガンの設定方法
- コグネックスDataMan TCPドライバの使用方法
- ミツトヨU-WAVEレシーバー for Windows Tulip Playerのセットアップ
- ブレックネル PS25 スケールドライバの使用法
- RFIDドライバーの使用
- Kolver EDU 2AE/TOP/E ドライバの使用方法
- USBフットペダルドライバーを使う
- トルクオープンプロトコルドライバの使用
- Dymo M10 USBスケールドライバーの使用方法
- コグネックス In-Sight ドライバの使用
- Telnetドライバの使用
- 汎用I/Oドライバの使用
- コルバートルクコントローラーの設定方法
- インサイズ・マルチチャンネル・キャリパードライバの使用法
- Dymo S50 USBスケールドライバーの使用方法
- Zebra Android DataWedgeの設定
- ミツトヨデジタルキャリパとミツトヨU-waveドライバの併用
- Troubleshoot
- ノド・ロッソ
- 再利用可能なコンポーネントの作成
- APIを使う
- Connect to Software
- 技術文書およびIT文書
- メンテナンス・イベント・スケジュール
- チューリップのサポートを受けるには
- ITインフラ
- チューリップITウェルカムガイド
- IP許可リストの設定
- チューリップのセキュリティ・オプションの概要
- チューリップ ITセキュリティガイド
- チューリップ・コネクタ・ホストの紹介
- On-Prem Connector Host Version Support
- 既存のオンプレミスConnector Hostコンテナのログローテーションを有効にする
- Tulipによるマシン監視アーキテクチャの推奨
- チューリップ・オンプレミス仮想マシンの詳細
- チューリップ・プラットフォームのコンポーネントとネットワーク図
- AWS GovCloudでのチューリップの展開
- WindowsでTulip Playerを使用してプロキシサーバーを使用する方法
- オンプレミス・コネクタ・ホストの概要
- チューリップ・クラウド導入のためのネットワーク要件
- チューリップW-9フォーム
- チューリップのサイバーセキュリティ方針とインフラについて教えてください。
- LDAP/SAML/SSO
- チューリップ・パートナー・ポータルの使い方
- ガイド
- デジタルトランスフォーメーションに向けて
- Use Cases by Solution
- 例
- ワークステーション別の作業指示をリアルタイムで把握する方法
- 5S監査アプリのチュートリアル
- 自動不合格レポートアプリの作り方
- 最初のフロントライン・オペレーション・アプリケーションを計画するには
- 表で機械監査を追跡する方法
- 現場業務アプリで作業指示を自動化する方法
- 混在率の高い環境における製造アプリの活用法
- デジタル作業指示アプリの作り方
- テーブルを使った製品系譜の記録方法
- オウス社のスケールを追加し、出力を変数に保存する方法
- 作業完了時に在庫表から差し引く方法
- 作業指示書 "UIテンプレート "の使い方
- ユーザーフィールドでスキルマトリックスを作成する方法
- 部品表(BOM)の作成方法
- スプレッドシートをテーブルにインポートする方法
- テーブルを使って在庫を管理する方法
- ユーザーフィールドを使って複数のアプリ間で動的データを受け渡す方法
- "ルーティング・アプリ "を作って複数のアプリ間をナビゲートする方法
- 📄 注文追跡
- 📄 障害トレーサビリティ
- 図書館
- チューリップ・ライブラリーの利用
- Laboratory Operation App Suite
- 図書館コレクション
- ライブラリーアプリ
- 教科書の例
- アプリケーション・ソリューション
- CMMSアプリケーションパッケージ
- Zerokey solutions
- 結果の可視性
- 物品委託電子申告(eBR)申請書類一式
- PCGによるCAPA Lite
- 5 なぜAIで根本原因を探るのか
- AIによるシンプルな欠陥報告
- ビジネス・ケース・ビルダー
- シフト・スターター・ミーティング
- カンバン・アプリ・スイート
- シンプルなOEEダッシュボード
- アリーナBOMソリューション
- 設備管理アプリ・スイート
- 簡単なチェックリスト
- チェックリスト管理スイート
- 紙芝居アプリ・スイート
- カイゼン・ファネル
- 勤怠管理シンプル・ソリューション
- 紙芝居品質監査
- パック&シップ・ライブラリー・アプリケーション
- CAPAマネジメント
- モバイルカメラアプリ
- OEE計算機
- 時間当たり生産スコアカード
- 素材のバックフラッシュ
- 品質イベント・ダッシュボード
- 一次パス収量申請
- ピック・トゥ・ライト
- トレーニング・ソリューション
- デジタル・システム・インベントリー
- ビジョンによる位置追跡
- デジタル・システム・アクセス管理
- 資材管理
- ツール&アセット・マネージャー
- 質の高いイベント管理
- ブレークビームセンサー付きステップ前進
- デジタルストップウォッチ
- 監査チェックリスト
- カタナERPアプリ
- ハイレベル・ベースライン評価
- BOM管理
- 安全インシデント・マネージャー
- 紙芝居カード管理
- リーンダッシュボード
- 5S結果レーダー(スパイダー)チャートウィジェット
- 5Sチェックリスト
- モバイル・プロダクション・スコアカード
- モバイルデザインテンプレート
- プロセス・エンジニアリング(モバイル)
- メンテナンス・オーダーの実行
- マシン・スタートアップ・チェックリストの例
- 応募方法
- コンポスタブルMES
- 製薬部門向けMESシステム
- コネクターとユニットテスト
- プラネウス単体テスト
- COPA-DATA Connector
- プレーナスコネクター
- Veeva コネクタ
- インキット・コネクター
- MRPeasy コネクタ
- オラクルFusionコネクタ
- LabVantage コネクタとユニットテスト
- グーグル・チャット・コネクター
- セールスフォース・コネクター
- リトマス概要
- eMaintコネクタ
- eLabNext コネクタ
- Acumatica ERPコネクタ
- CETECコネクター
- ページャーデューティ コネクター
- NiceLabelの統合
- Arasの統合の概要
- SDAの統合
- ナイミ・バンド ユニットテスト
- アリーナ・インテグレーション
- バーコードスキャナのユニットテスト
- フットペダル単体テスト
- RealWearヘッドセットでTulipを使い始める
- エアテーブル用コネクター
- 七宝コネクター
- バーテンダーの統合
- SAP S/4 HANA Cloud Connector
- RFIDスキャナー・ユニットテスト
- Jiraコネクタ
- ゼブラ・ラベル・プリンター・ユニット・テスト
- Google翻訳コネクタ
- MSFT Power Automate
- OpenAIコネクタ
- Googleカレンダー・コネクター
- チューリップAPIユニットテスト
- デュロPLMユニットテスト
- HiveMQユニットテスト
- NetSuiteとの統合
- コグネックス ユニットテスト
- PowerBIデスクトップ統合
- プログローブ・ユニット・テスト
- フィベトランの統合
- ParticleIOの統合
- グーグル・ドライブ・コネクター
- スノーフレーク・コネクター
- SAP SuccessFactorsコネクタ
- ZeroKey Integration
- グーグル・ジオコード・コネクター
- Googleシートコネクター
- チューリップとSlackを統合する方法
- ハイバイトインテリジェンスハブ ユニットテスト
- LandingAIユニットテスト
- LIFXユニットテスト(ワイヤレスライト)
- マイクロソフト・カレンダー・コネクター
- M365 Dynamics F&O コネクター
- マイクロソフト・アウトルック・コネクター
- Microsoft Teams コネクター
- Microsoft Graph APIとTulipをOauth2で接続する
- Microsoft Excel コネクタ
- NetSuite アプリとコネクタ
- OpenBOMコネクタ
- 計量器ユニットテスト
- InfluxDBコネクタ
- オーグリー・コネクター
- イラート・コネクター
- シェフラーオプティムコネクター
- MongoDBアトラスコネクタ
- MaintainXコネクタ
- Twilio コネクター
- SendGridコネクタ
- ソレイス・コネクター
- RealWearヘッドセット用Tulipアプリのデザイン方法
- オンシェイプ・コネクター
- カスタマイズ可能なウィジェット
- Job Planning/Scheduling Board
- タイムラインウィジェット
- jsonツリービューアウィジェット
- かんばんタスク管理ウィジェット
- バッジウィジェット
- 高度なタイマーウィジェット
- セグメントボタンカスタムウィジェット
- ダイナミックゲージカスタムウィジェット
- スナックバーウィジェット
- チェンジディテクター・ユニット・テスト
- ステータス・カラー・インジケータ ユニット・テスト
- 入力長チェック・ユニット・テスト
- 電卓カスタムウィジェット単体テスト
- 画像アノテーション・ウィジェット単体テスト
- リーン・ダッシュボード・ウィジェット
- ルーパー単体テスト
- ストップウォッチ・ユニット・テスト
- 数値入力ユニットテスト
- ナンバーパッド単体テスト
- ラジアルゲージ
- ステップ・バイ・ステップ メニュー ユニットテスト
- SVGウィジェット
- テキスト入力ユニットテスト
- ツールチップ ユニットテスト
- 作業指示 ケアポイント 単元テスト
- 電子署名ウィジェット単体テスト
- ZPLビューア単体テスト
- シンプルな折れ線グラフウィジェット
- 棚カスタムウィジェット
- スライダーウィジェット
- NFPAダイヤモンドカスタムウィジェット
- 合格 - 不合格 カスタムウィジェット
- よりシンプルなタイマーカスタムウィジェット
- Nymiプレゼンス統合ウィジェット
- オートメーション
Introduction
This article will describe how to connect a Quantum RTLS 2.0 deployment to the Loss Prevention Template App on the Tulip Library to:
Dynamically create 3D zones within your physical environment
Assign zones to Locations within Tulip’s Common Data Model
Assign ZeroKey Mobiles to Equipment and Assets within Tulip’s Common Data Model
Monitor the production environment and generate real time alerts for nonconformities (i.e., equipment leaving it’s assigned stations or entering an out of bounds area)
Whitelist Equipment to allow them to move freely without alerting
Designate specific Locations as Out Of Bounds
Easily apply this template application to your own use case by integrating ZeroKey Zones and Devices within a common data model. Use the predefined alert triggers to send notifications to key personnel, trigger IP cameras to take a photo, and more when nonconformities are detected.
Requirements
An existing Quantum RTLS 2.0 deployment with ZeroKey SIP 2.3.0 or higher
- To verify your SIP version in the dashboard, click the ZeroKey Logo in the top left corner
Connection of your ZeroKey Edge Compute Device to a network with unrestricted internet access
A Professional or enterprise subscription to Tulip Interfaces
(Optional but recommended) The ability to connect your Tulip client devices to the same local network as the ZeroKey Edge Compute Device
Obtain your Edge Compute Device’s (ECD’s) Cloud URL
In the dashboard, navigate to the System tab and go to the Information section. Here, you’ll see values under ECD Edge URL, ECD Cloud URL, ECD Serial Number, and Hardware Identifier.
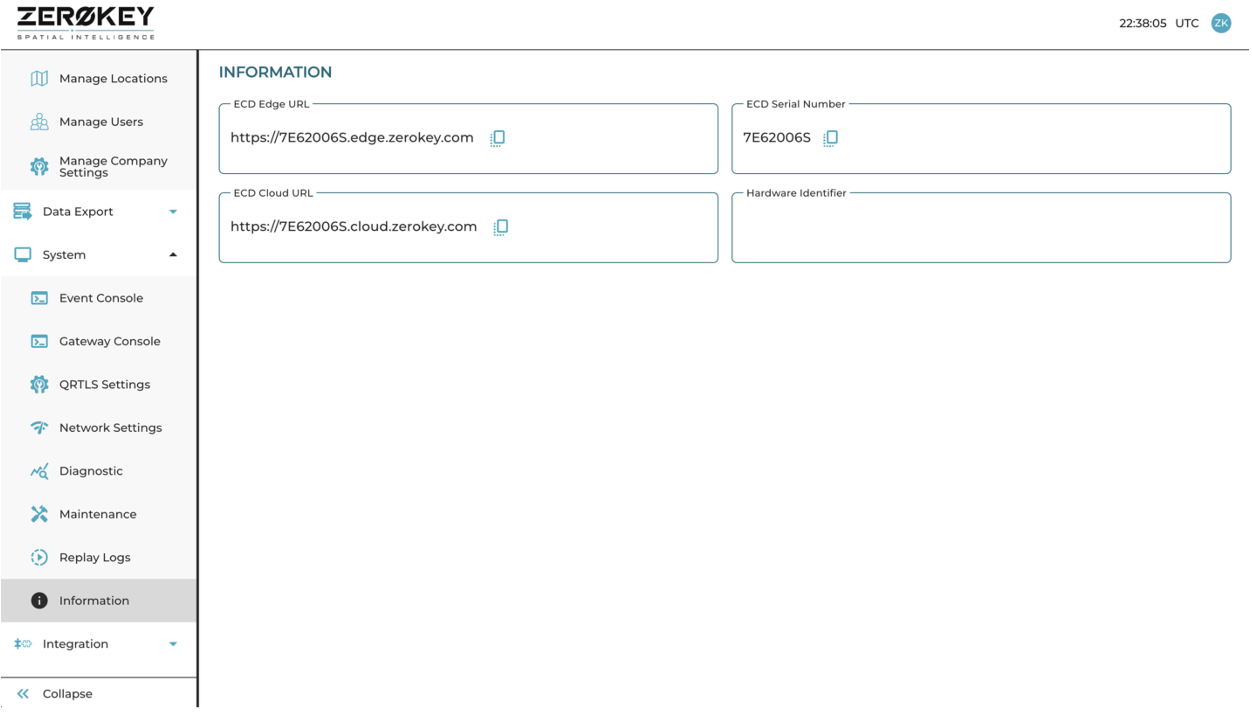
You will need the ECD Cloud URL for the ZeroKey Connector Suite. You will need either the ECD Cloud URL or the ECD Edge URL for the Base Layout ZeroKey Custom Widget. The Edge URL may only be used if both the ZeroKey System and the Tulip client device are on the same LAN but will minimize event latency between the systems.
Configure the Connector Environment Settings
This app requires the use of the ZeroKey Connector Suite. If not already configured, follow the instructions in the support article to configure the Connector Environment Settings and test the connection.
To learn more about the ZeroKey Connector configuration visit this page.
Configure the Base Layout Custom Widget
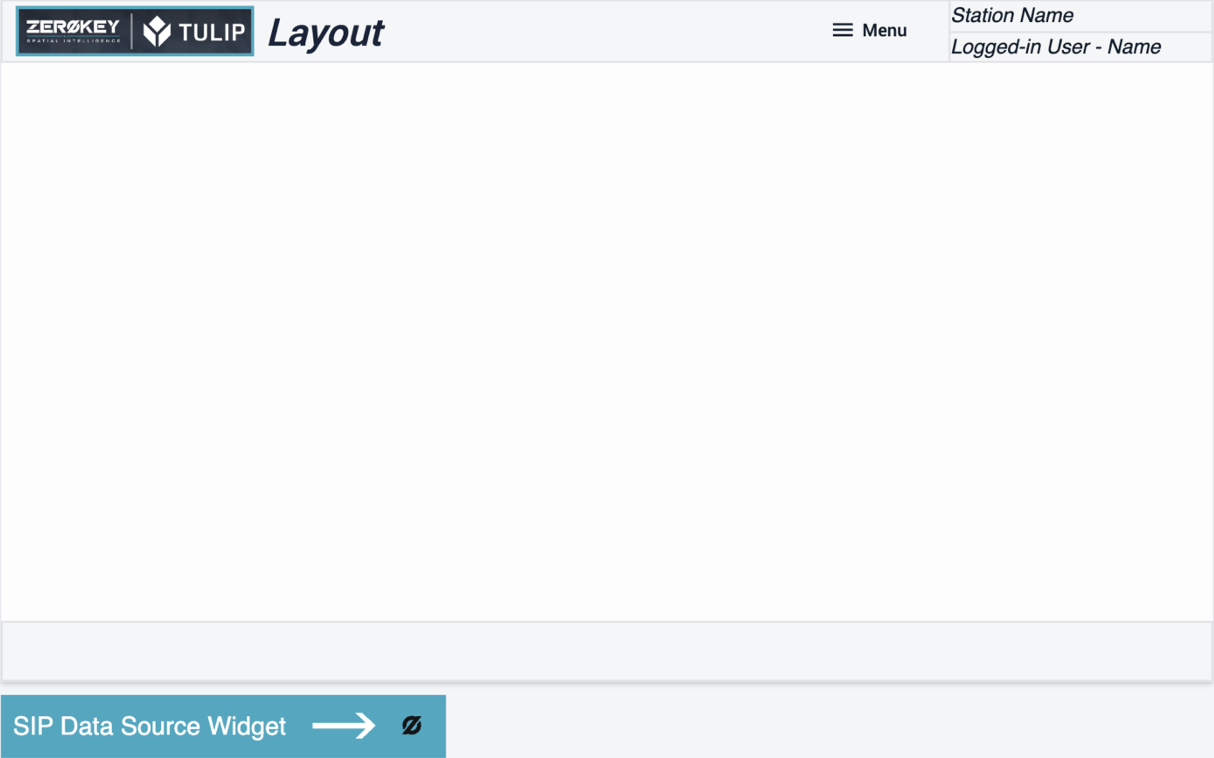
This app uses the ZeroKey Custom Widgets to trigger logic based on real time data coming out of your ZeroKey system and will require you to configure the connection settings in the SIP Data Source Widget on the Base Layout of the app.
Select the ZeroKey Icon on the Base Layout of the app and input your ECD Cloud or Edge URL and credentials into their respective fields.
Create Zones
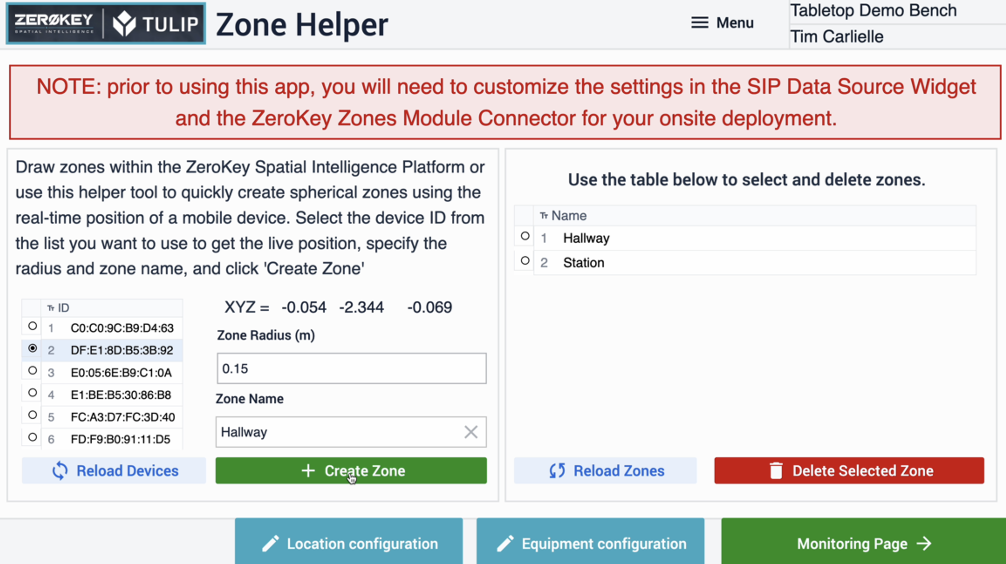
When the app is first opened, the Admin step will display a list of all the ZeroKey Mobile devices connected to the system. Select the MAC address corresponding to a device you want to use to create Zone locations. Once selected, the real time coordinates will be displayed on screen. Specify a radius for the zones (in meters) and the zone name. Position the device you selected in the center of your new zone and click Create Zone. A new spherical zone will then be created centered on the live position of the Mobile.
You may also create zones within the ZeroKey dashboard. Generally, workstations and out of bounds areas are best created this way as you can more precisely draw polygon zones around the exact boundaries of the location, however, using the app to create spherical zones is a quick and easy starting point for evaluation purposes. Regardless of whether the zones are created from the dashboard or from the Tulip Zone Helper step, they will show up on this step. If you create a zone from the dashboard while this step is open, you will need to click the Reload Zones button to refresh the table.
Using the Location Configuration Step
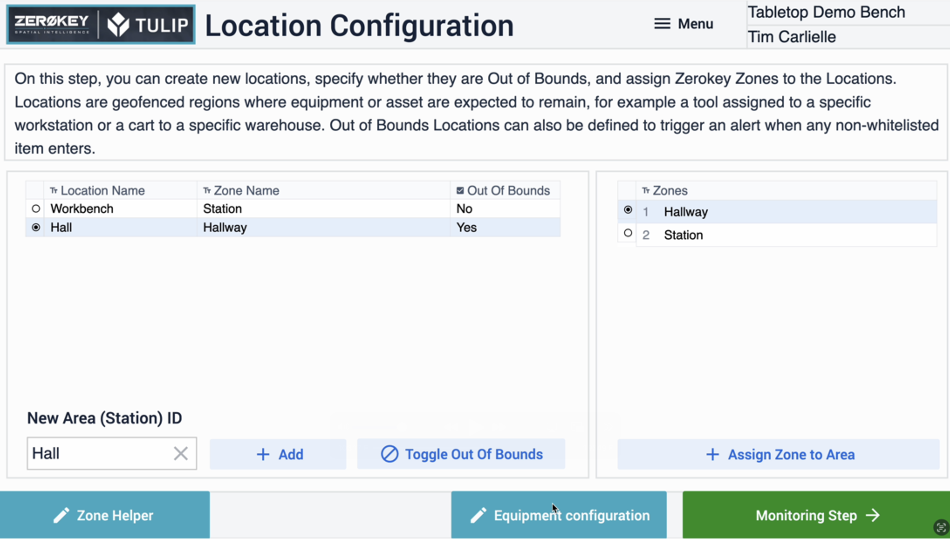
This step allows you to create new Locations, assign Zones to Locations, and toggle whether the Location is Out Of Bounds or not.
To link a ZeroKey Zone to a Location, select the entities you want to link from both tables and click Assign Zone to Area.
To toggle whether a Location is an Out Of Bounds area, selection the Location and click Toggle Out Of Bounds. Out Of Bounds areas will trigger alerts when any (non-whitelisted) Equipment enters the area.
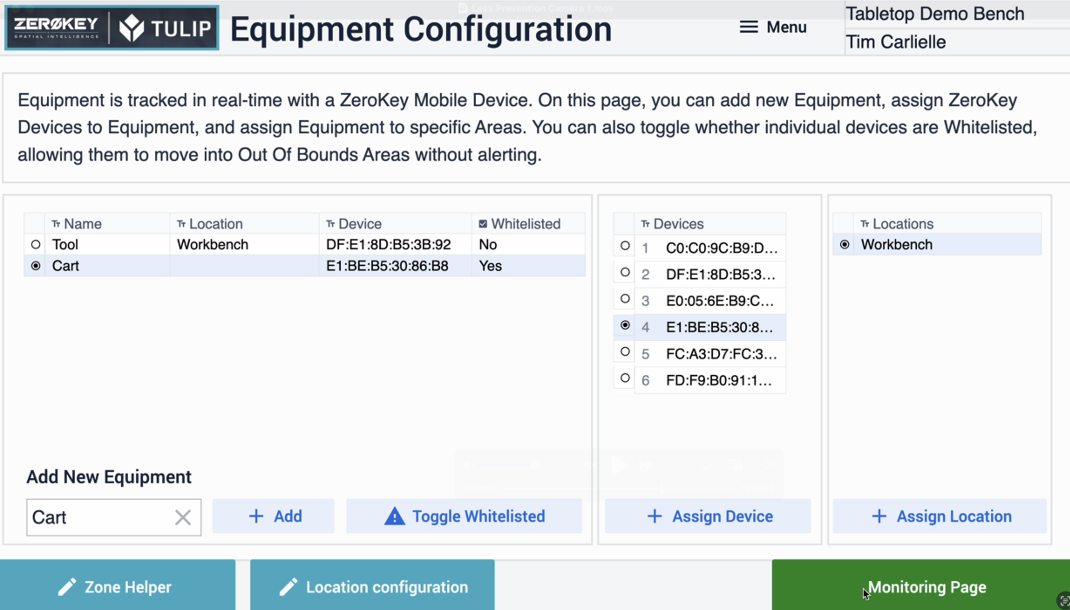
Using the Equipment Configuration Step
This step allows you to add new Equipment, assign ZeroKey devices to specific Equipment, assign Locations to Equipment, and toggle whether Equipment is Whitelisted or not.
To assign a ZeroKey device to Equipment, select the entities you wish to link from their respective tables and click Assign Device.
Ditto Locations.
To toggle whether Equipment is Whitelisted, select the record you wish to toggle and click Toggle Whitelisted.
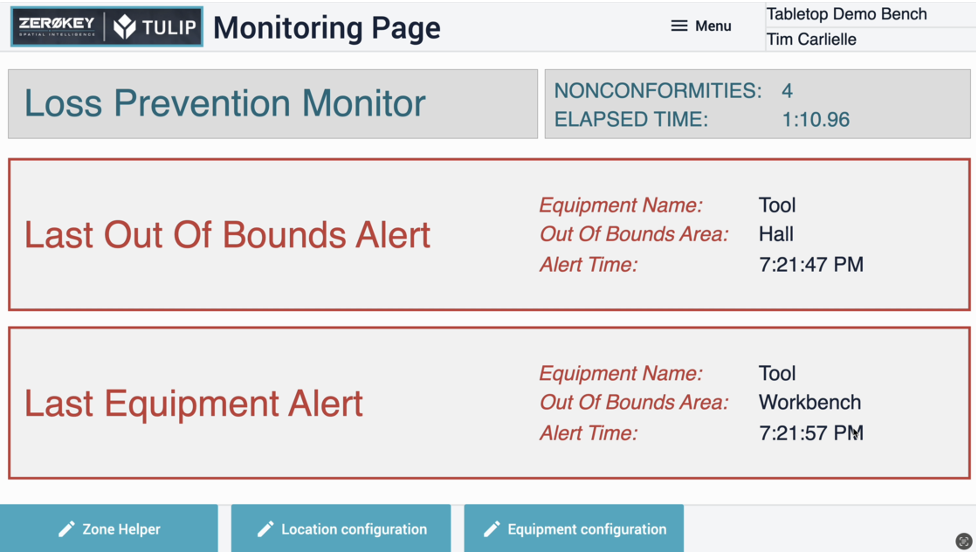
Using the Monitoring Step
When open to the Monitoring step, the app uses Zone Entry and Zone Triggers on the SIP Event Trigger Widget to automatically detect nonconformities and generate alerts as Equipment leaves it’s assigned location, or non-whitelisted equipment enters an out of bounds area.
The step will display the details of the for recent alerts, using local app variables to store the data that are subsequently overwritten the next time an alert is created. In a production environment, a Table could be used to store alert information for future recall. Other actions can be added to the Zone Entry and Zone exit triggers as needed to Email or SMS a manager, trigger a security camera, turn on an Andon light, etc.
Further Reading
If you want to know more about our partnership with ZeroKey visit our partner page.
To learn more about ZeroKey solutions you can check out these resources: