Using the ZeroKey Bolt Sequencing Template Tulip App
Introduction
This article will describe how to connect a Quantum RTLS 2.0 deployment to the Bolt Sequencing Template App on the Tulip Library to:
-
Dynamically create zones around bolt locations using the live position of a ZeroKey Mobile
-
Use a ZeroKey device to track a tool in real time to determine what bolt the tool is on
-
Provide the user with real time visual feedback when the tool is placed on the correct bolt
-
Only advance work instructions when steps are successfully completed
-
Generate an instant error message if the sequence is not followed
-
Capture data on fastener tightening step times and accuracies
Easily extend this template application to your own use case by adding or removing work instruction steps and modifying the onscreen graphics. Integrate smart tools (if available) with the pre-defined event triggers to lock or unlock tools and resolve torque data to the specific bolt the tool is on.
Requirements
-
An existing Quantum RTLS 2.0 deployment with ZeroKey SIP 2.3.0 or higher
- To verify your SIP version in the dashboard, click the ZeroKey Logo in the top left corner
-
Connection of your ZeroKey Edge Compute Device to a network with unrestricted internet access
-
A Professional or enterprise subscription to Tulip Interfaces
-
(Optional but recommended) The ability to connect your Tulip client devices to the same local network as the ZeroKey Edge Compute Device
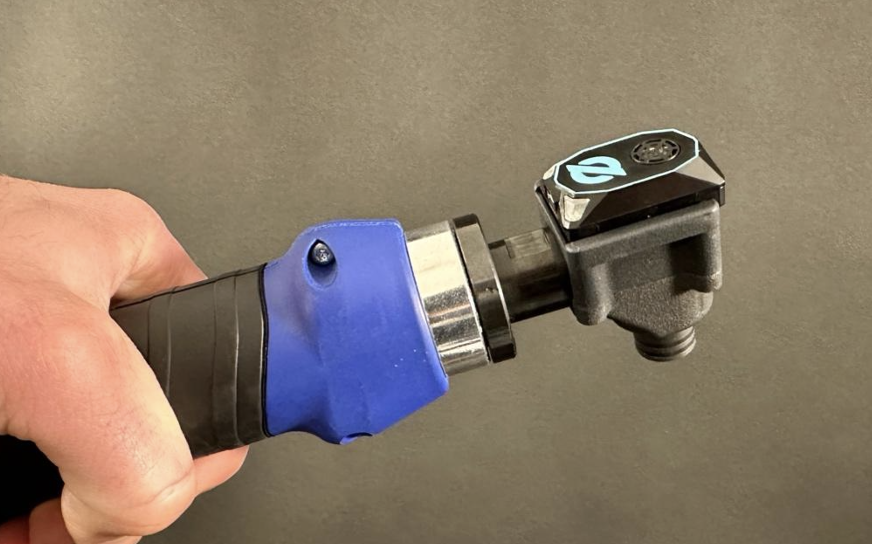
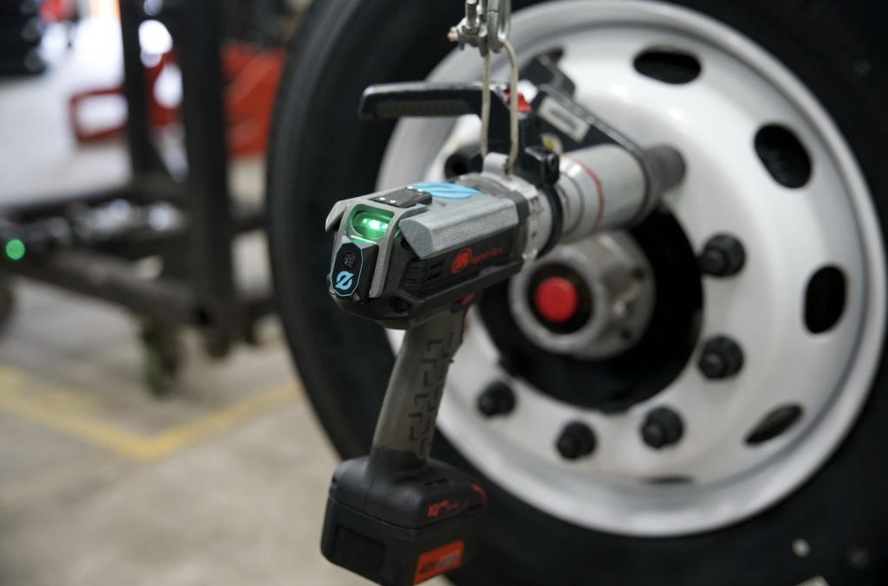
Tool Mounting
Position your ZeroKey Mobile device on your tool so that that the transducer of the Mobile will have unobscured line of sight to your anchor network while in use. For best results, position the transducer centered over the tip of the tool.
For applications where the transducer cannot be positioned directly over the tip of the tool or if you require more precise tool tip tracking, use ZeroKey's Virtual Devices capability to project the tip of the tool and account for the position offsets of the transducer to tool tip.
Obtain your Edge Compute Device’s (ECD’s) Cloud URL
In the dashboard, navigate to the System tab and go to the Information section. Here, you’ll see values under ECD Edge URL, ECD Cloud URL, ECD Serial Number, and Hardware Identifier.
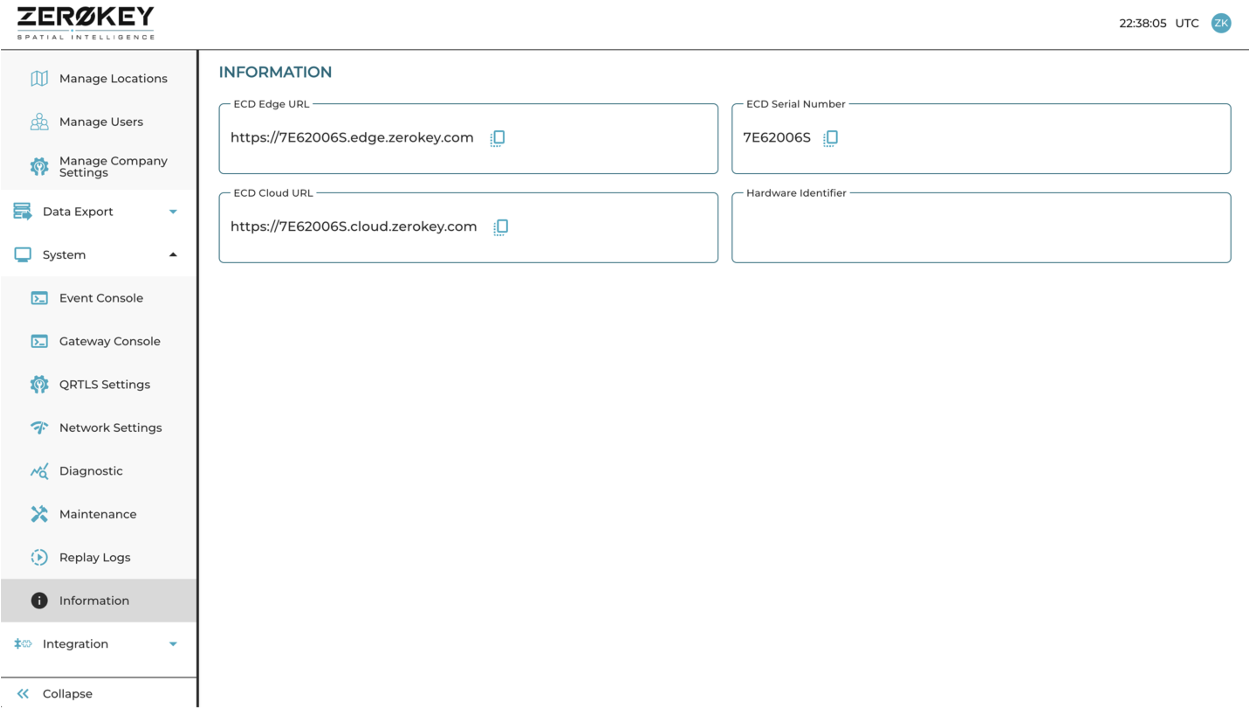
You will need the ECD Cloud URL for the ZeroKey Connector Suite. You will need either the ECD Cloud URL or the ECD Edge URL for the Base Layout ZeroKey Custom Widget. The Edge URL may only be used if both the ZeroKey System and the Tulip client device are on the same LAN but will minimize event latency between the systems.
Configure the Connector Environment Settings
This app requires the use of the ZeroKey Connector Suite. If not already configured, follow the instructions in the support article to configure the Connector Environment Settings and test the connection.
To learn more about the ZeroKey Connector configuration visit this page.
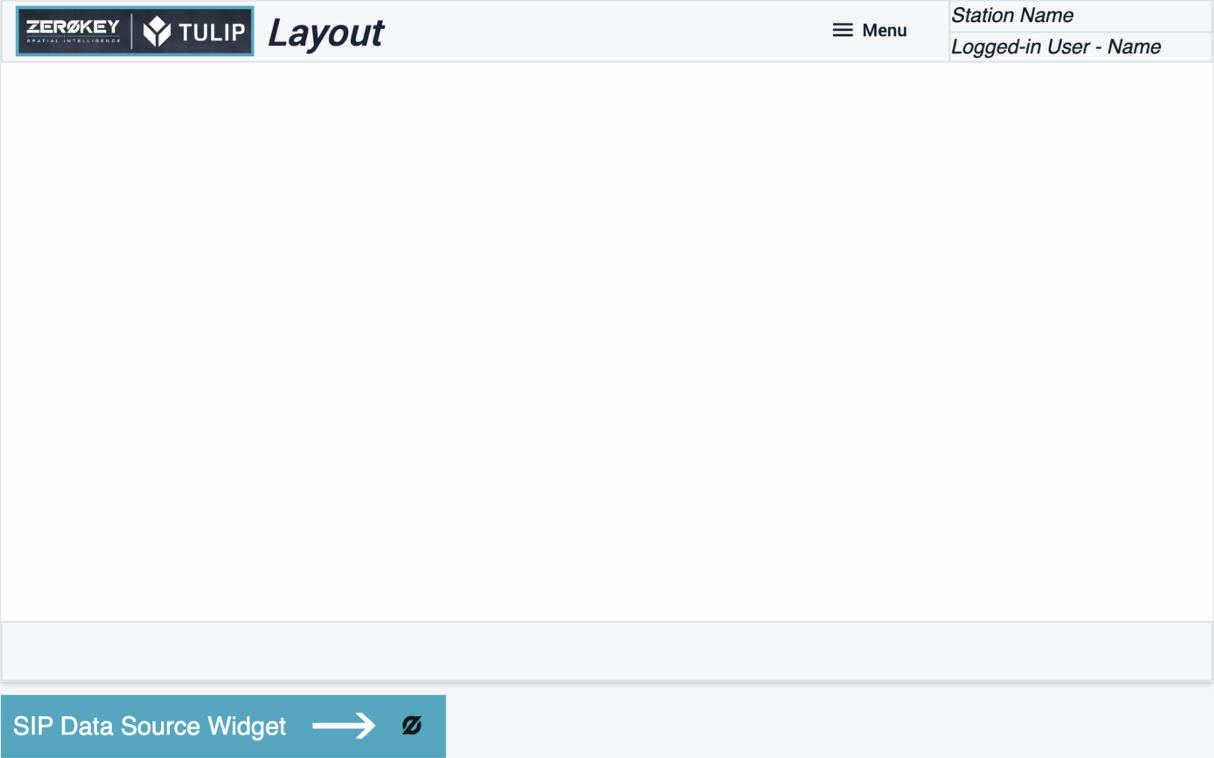
Configure the Base Layout Custom Widget
This app uses the ZeroKey Custom Widgets to trigger logic based on real time data coming out of your ZeroKey system and will require you to configure the connection settings in the SIP Data Source Widget on the Base Layout of the app.
Select the ZeroKey Icon on the Base Layout of the app and input your ECD Cloud or Edge URL and credentials into their respective fields.

Create Bolt Zones
Upon loading the app, the Admin step will display a list of all the Zerokey Mobiles connected to your system. Select the MAC address corresponding to your tool mounted device. Once selected, the coordinates of that Mobile device will display in real time. Specify a radius for the zone you want to create (in meters) or use the default radius value of 0.05 m. Place the tool on Bolt 1 and hold it steady in place, while pressing the ‘Create Bolt 1 Zone’ button. If necessary, you can select and delete zones from the table on the bottom of the step.
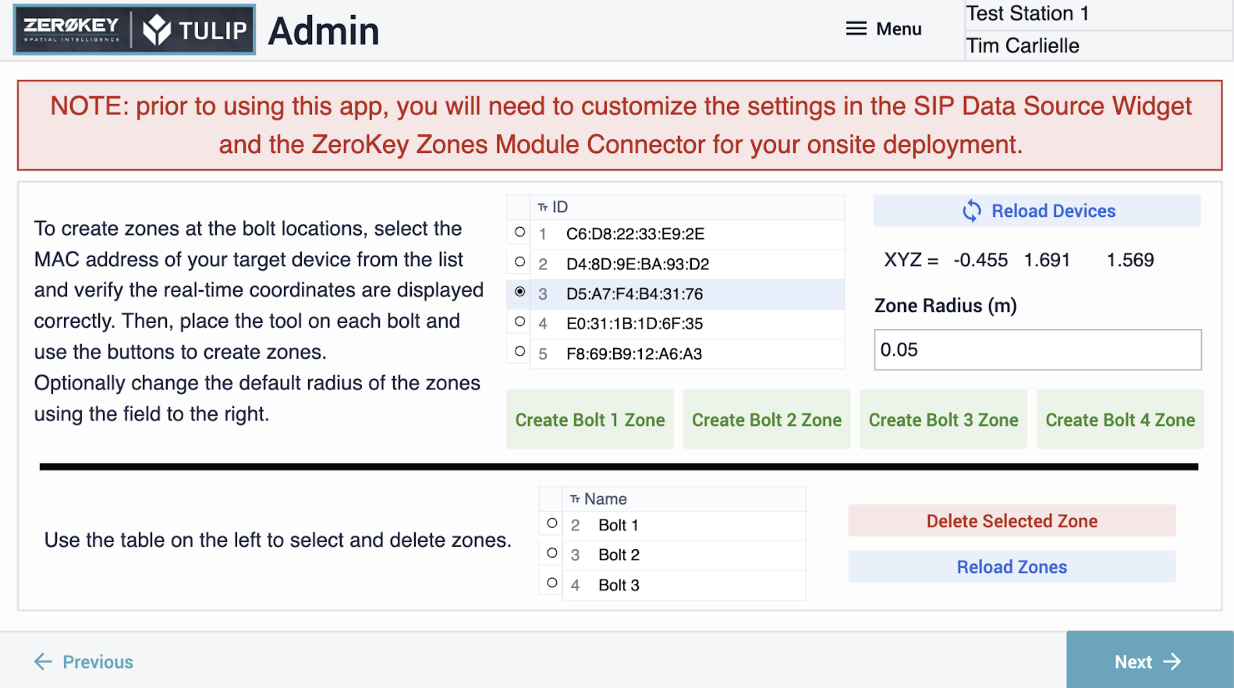
The app logic will only use Zones named “Bolt 1”, “Bolt 2”, “Bolt 3” and “Bolt 4” so if there are Zones with other names that show up in this list, they can simply be ignored. It is possible to create multiple Zones with the same name, so ensure that if you create a new Bolt Zone you manually delete the old one with the same name. If you add Devices or Zones while the step is running, you can use the “Reload Devices” and “Reload Zones” buttons to refresh the tables, but as Zones are created or deleted from within this step the Zone list will automatically refresh afterwards.
Using the Work Instruction steps
The work instruction steps use logic on the Zone Entry trigger of the SIP Event Trigger Widget to check whether every zone collision corresponds to a correct or incorrect bolt.
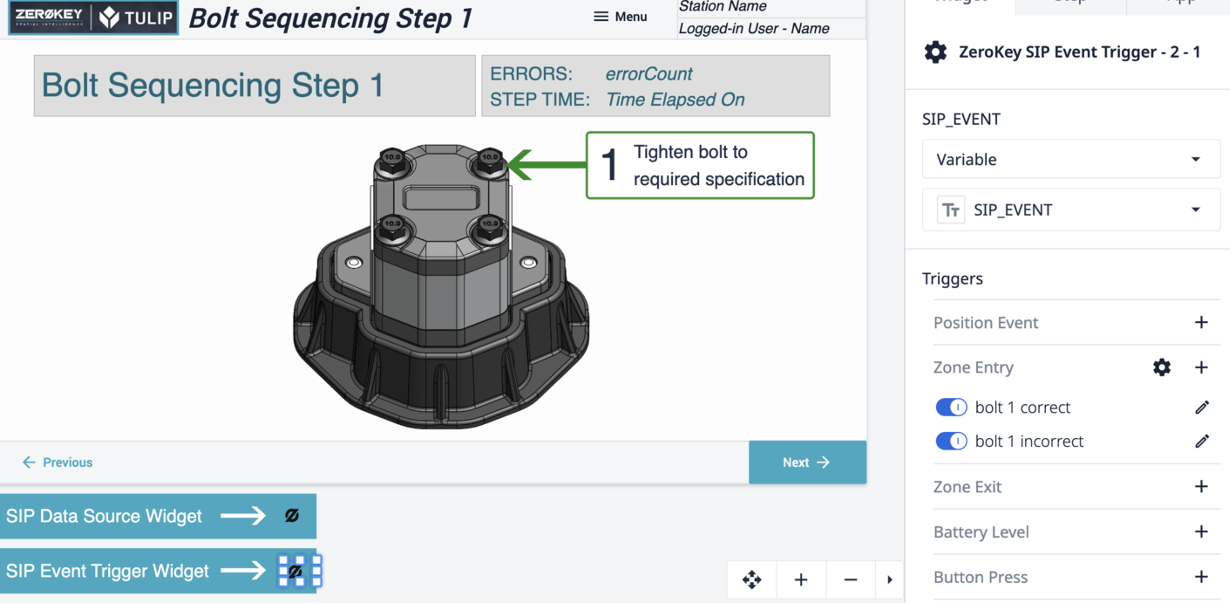
The logic checks to see if the name of the colliding zone is the target zone for the step. For simplicity, the template app uses a static value here, but as this application is scaled up to multiple stations it would be nescessary to differentiate the names of these target zones between each station.
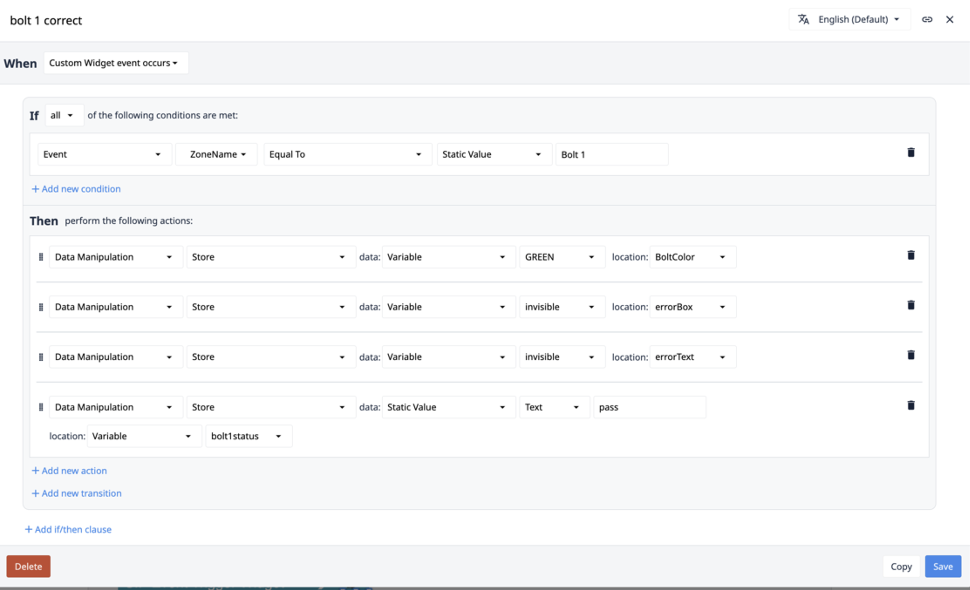
If a correct bolt is detected, the trigger will automatically turn the onscreen bolt box green, indicating that the app has detected the tool on the bolt and will now allow the work instructions to be advanced. If you are integrating a smart tool, this same trigger could be used to unlock the tool. The bolt1status variable could be subsequently linked to the output of the tool. For a completely keyless experience, a Zone Exit trigger could be used to advance to the next step page if the bolt1status has passed and the zone name of the exiting collision matches the target zone for the step.
If an incorrect bolt is detected, the trigger will automatically display an onscreen error box that is by default set to be transparent. It will also increment the error count for the workflow and update the flag that an error was detected for this specific bolt. The error box will be subsequently cleared upon the correct bolt zone getting detected.
If a smart tool is integrated, this same trigger could be used to lock out the tool, making it impossible to make a mistake as the tool would only be unlocked again by putting it on the correct bolt.
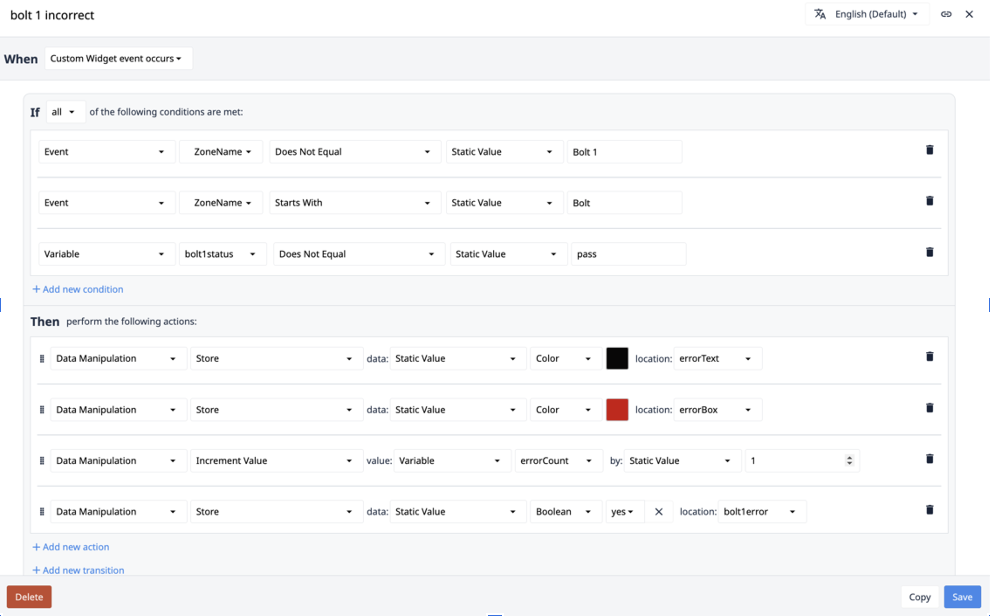
Occasionally, you may see false errors as a result of moving the tool through an incorrect bolt zone while on the way to the correct bolt zone. These can easily be filtered out by putting the error actions on a timer trigger and instead using the zone entry trigger to write a Boolean variable indicating the wrong zone is detected. This variable can be cleared on a subsequent Zone Exit trigger, so errors will only be flagged if the device is in the incorrect zone for however long the timer is set to fire and quickly passing through a wrong zone will toggle the Boolean back before the timer catches it.
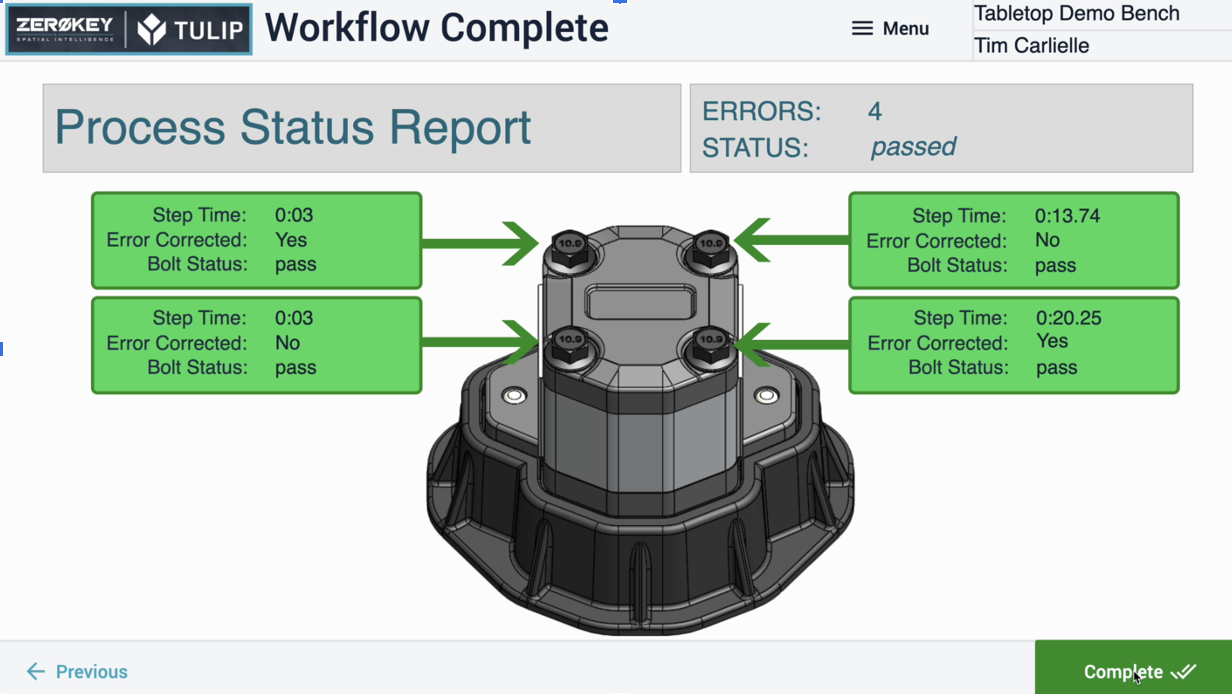
Workflow Complete Step
Upon successful completion of the steps, the data collected will be displayed at the end. In the app template, this data is written to local app variables that are overwritten on subsequent passes. In a live environment, this data could be stored in a table record for future reference.
Other Approaches to Bolt Sequencing
In this application, predefined zones are used to denote the individual bolts in the process allowing up to drive real time feedback on each step. This requires the part to be placed in the same location each time for the bolt zones to align with the physical part. This can be accomplished using a Jig or tape/markings in the work environment.
In many cases, operators may not need the real time feedback for individual fasteners, and it is enough to verify that the torque events took place at the correct relative locations. In situations like this, an alternate but equally powerful approach is to simply store the real time position of the device in a table along with the torque data at the time the torque data is received.
This allows you to compare the relative geometry of all the events after the fact to ensure it corresponds to the actual geometry of the bolt distribution on your physical part, eliminating the need for the item being worked on to be placed in the same location each time. For example, if a hub with 10 bolts has 10 torque events but the coordinates of two of the events are nearly the same, this would indicate one of the bolts was tightened twice and it follows that one was missed. A real time check to iterate over the past recorded values from the sequence could also catch this type of error as it occurs and communicate it to the operator with a tool lockout or Andon light.
Further Reading
If you want to know more about our partnership with ZeroKey visit our partner page.
To learn more about ZeroKey solutions you can check out these resources: