Kitting - configuration and customization
- 17 Mar 2025
- 9 Minutes to read
- Contributors

- Print
Kitting - configuration and customization
- Updated on 17 Mar 2025
- 9 Minutes to read
- Contributors
- Print
Article summary
Did you find this summary helpful?
Thank you for your feedback!
The Kitting app is part of the Traceability App Group. If you'd like to learn more about the Traceability App Group, you can explore more information through this Traceability App Group.
Overview
The Kitting App helps operators gather the required components for a selected work order while assigning them to the appropriate subassembly unit.

Component Selection & Assignment
- Operators can collect the necessary components for a work order and link them to the correct subassembly unit.
Automated Verification
The app checks the following to ensure error-free operation:
- Availability: Confirms that the scanned component is in stock.
- Requirement: Verifies that the component is needed for the selected work order.
- Duplication Prevention: Ensures the component has not already been picked.
By automating these checks, the Kitting App helps operators work efficiently and accurately, reducing errors in the process.
Tulip Tables in the app
(Operational Artifact) Work Orders
The production requirements of your operation. These are generated from Orders and represent a demand of specific materials to be produced in order to fulfill the order.
Key Fields
Material Definition ID
This field stores the unique identifier of the product. This ID must also be present in the Material Definition table, where additional details about the product can be found.
By maintaining a clear connection between production requirements and material definitions, your operation can efficiently track, manage, and produce the necessary materials to fulfill orders accurately and on time.
Status
In a production operation, the status of a work order (WO) indicates its progress through the system. The statuses can be as follows:
OPEN – This status is assigned when the order is created and enters the system.
IN PROGRESS – The work order takes on this status when an operator interacts with it for the first time.
COMPLETED - This status is assigned when the final process step has been executed on the product before it is ready for shipment. In most cases, a work order is considered COMPLETED once the quality inspection has been successfully carried out.
QTY Required (Required quantity)
This field represents the necessary quantity of a material that must be produced to fulfill the order. Ensuring accuracy in this value is essential for meeting customer demand and maintaining efficient production workflows.
(Reference) Material Definitions
Definitions of all Items made, purchased, or assembled. This describes items and their specific properties.
Key Fields
ID
The ID field uniquely identifies the material. In every other table where the Material Definition ID field appears, it refers back to this table. The saved value in those tables represents the ID of a record from the Material Definitions table.
Since this table is marked as a reference table, it may not be needed if there is an ERP system and a connector between the system and Tulip. Whether this table is necessary depends on how the connector is set up.
Type
The Type field stores the material type, which can be Serialized, Bulk, Intra-product, or Finished Product. This classification is important in applications like the Kitting app, where the material type affects the process.
For example, in the case of bulk materials, an extra step is required to split the material into smaller units before associating it with a Work Order (WO) or Assembly Unit. This ensures traceability throughout the process.
(Reference) Bill Of Materials
This table is typically used in lieu of integration with a system of record that could pass this data in real time. This table holds a bill of material and procedures for a given product or parent item. It can be used to display required component items and quantities broken down by process step.
The BOM (Bill of Materials) is created specific to each product. If a parent unit has multiple components, we create a separate record for each component, all linked to the same parent material.
Both the Parent Material Definition ID and the Component Material Definition ID reference the Material Definition Table described earlier.
Since this table is marked as a reference table, it may not be needed if there is an ERP system and a connector between the system and Tulip. Whether this table is necessary depends on how the connector is set up.
Key Fields
ID
The ID is the unique identifier for a given record.
Parent Material Definition ID
The Parent Material Definition ID is the ID of the record from the Material Definition table that represents the final product in the process/Work order.
Parent Material Description
The Parent Material Description is the name of the product, which corresponds to the Name field in the Material Definition table.
Component Material Definition ID
The Component Material Definition ID is the ID of the record from the Material Definition table that represents the component of the product in the process or work order.
Component Material Description
The Component Material Description is the name of the product, which corresponds to the Name field in the Material Definition table.
Component Quantity
The quantity of a component required to produce one unit of the product. In our example, this is the amount needed to manufacture one product.
(Log) Units
Used to Store Unique, physical lots, serial numbers, and batches.
In the unit table, we store the subassembly units too. A subassembly unit is created at the beginning of the pick materials step when using the kitting app.
The status of a subassembly unit can be used to track progress, and once the process is complete, it receives the standard material statuses.
The possible statuses are:

(Log) Genealogy Records
Each record is a parent/child relationship. The child could be either a serialized or unserialized subassembly or individual part.
Key Fields
Parent Unit ID
The unique identifier of the parent assembly, referencing the corresponding unit record from the unit table.
Parent Material Definition ID
Represents the material definition of the parent unit, linking to the Material Definition Table.
Component Unit ID
The unique identifier of the component unit (which could be a serialized or unserialized subassembly or individual part).
Component Material Definition ID
Links to the Material Definition Table for the component unit/part.
Work Order ID
Links the parent-child relationship to a specific work order from the Work Order Table.
Simulation Buttons

In the app, there are several buttons displayed in Rose color. These buttons are only for demo purposes and allow users to simulate the app’s functionality using pre-defined data after downloading it.
Key Notes:
- Not needed in the final production environment – these buttons are for simulation only.
- Before deploying the app in a live environment, these buttons must be removed to ensure a clean and accurate production setup.
Configuration and Customization
To use several functions of the application, a barcode scanner is required. You can find more information about setting up barcode scanners at the following link:
How to Set Up a Barcode Scanner
Additionally, a printer setup is necessary for label printing. Supported printers include Zebra printers, and you can find a setup guide for them here:
How To Integrate a Zebra Printer with Tulip
Key Triggers and Logic in the App
Pick Materials Step
- Parent Unit ID is automatically loaded if a work order has an associated AT KITTING status record in the (Log) Units table.
- If no such record exists, the app generates an ID automatically.
- The ID generation logic can be modified according to your methodology.
- The logic can be found in the Set Parent Unit ID trigger.
Interactive Tables
Two tables are present in this step:
Bill of Materials Table: Filters based on the Material Definition ID from the work order, matching it to the Parent Material Definition ID field in the table.
Genealogy Table: Filters based on Work Order ID and Parent Unit ID fields.
Barcode Reader Use
The step relies on the barcode reader.
The barcode must point to the ID field in the (Log) Units table.
After scanning the barcode, the app checks if the scanned ID exists in the (Log) Units table.
Trigger: Validation: Scan Material ID.
Material Validation Triggers
Trigger: Validation: Scan Material ID
- After scanning the barcode, the app checks if the scanned ID exists in the (Log) Units table.
Validation: Check the Material ID and Available Quantity
- The app checks if there is available quantity for the scanned material in the system.
Validation: Check that the Material is Needed for the Work Order
- Verifies if the material needs to be used for the specified work order.
Validation: Check that the Material Has Not Already Been Kitted
- The app checks if the scanned material has already been kitted.
Navigation Triggers
Navigation: Go to Print LOT Label in Case of Bulk Material
- For bulk materials, when multiple items need to be used from the same LOT number, the app navigates to the Print LOT Label step.
Navigation: go to next
- Once all required materials are successfully kitted in the correct quantities, the app navigates to the Print Label step.
Create Genealogy Record for Serialized Unit
For serialized materials, after scanning, the app creates a Genealogy Record and:
Decreases the quantity in the Units table by 1.
Increases the Reserved Qty by 1.
Print LOT label
In this step, the Calculate Remaining Quantity trigger is responsible for calculating the amount of material required to complete the picking process. Here's how it works:
- The trigger subtracts the quantity already recorded in the Genealogy Table for the specified work order and production unit from the required quantity of the material recorded in the Bill of Materials (BOM) table.
- If no quantity has been recorded in the Genealogy Table for this material, the trigger subtracts 0 from the required quantity.
- The if(isnull) expression is used to handle cases where the quantity has not yet been recorded in the Genealogy Table.

Calculating the validation rules for the number input widget.
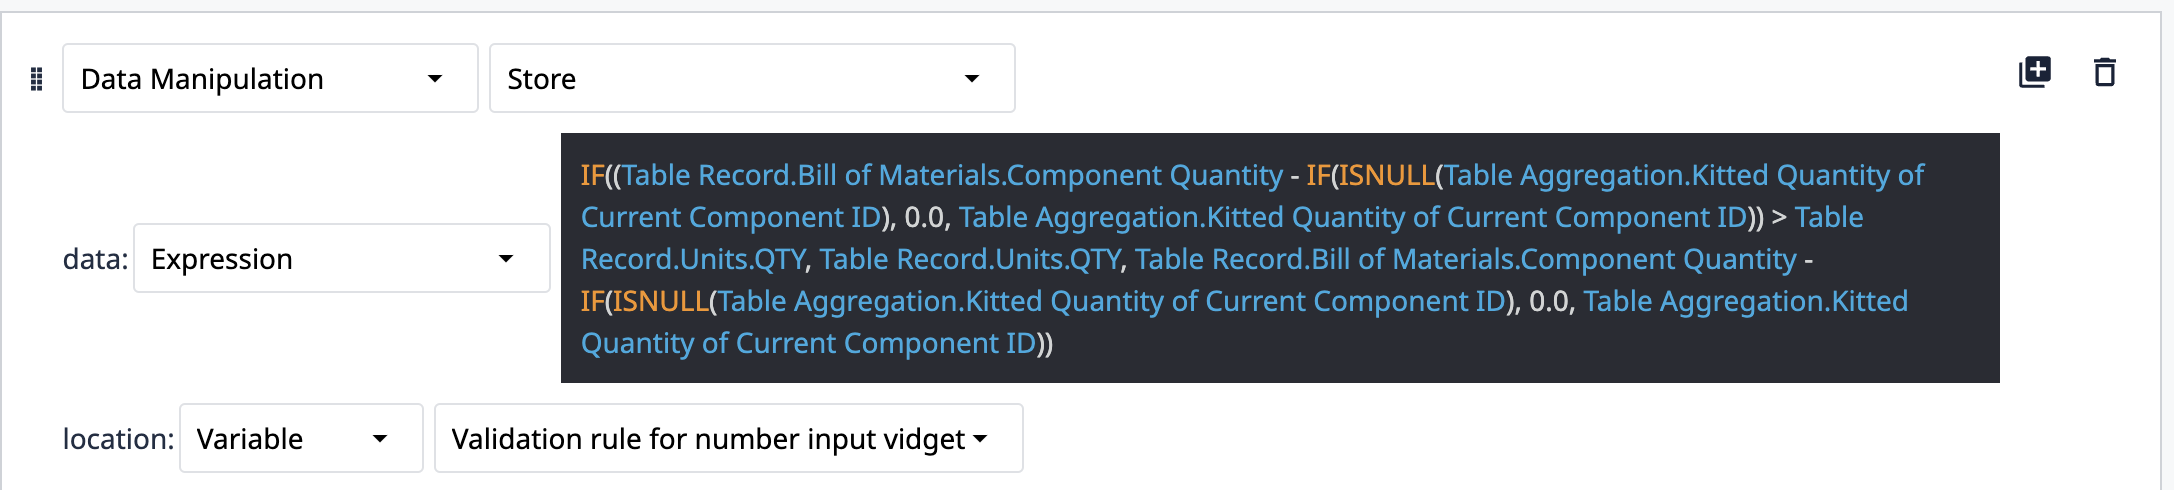
Calculation of Remaining Quantity
- The first part of the expression calculates the remaining quantity needed for the component by subtracting the kitted quantity (from the Genealogy Table) from the required quantity (from the Bill of Materials (BOM) table).
Set the upper limits
- The if statement checks if the remaining quantity is greater than the available units in the Units Table (@Table Record.Units.QTY).
- If the remaining quantity is greater than the available units, it uses the available units (@Table Record.Units.QTY) as the apper limit for the input.
- If the remaining quantity is less than or equal to the available units, it uses the calculated remaining quantity as the upper limit for the input.
Handling Null Values for Kitted Quantity
- The if(isnull(...)) part ensures that if there is no value for the Kitted Quantity of the component in the Genealogy Table, it treats it as 0, preventing errors in the calculation.
Print Button
The user can input the desired quantity to be picked in the Input Widget. If the input quantity falls within the specified range, the Print button becomes active.
Upon clicking the Print button, the following actions take place:
- The available quantity in the LOT is reduced by the input quantity.
- The Reserved Quantity in the Units table is increased by the same amount.
- A new Genealogy record is created with the necessary details.
- Navigation.
- Navigates back to the Pick Materials step, or
- If all components have been kitted for the work order, it navigates to the Print label step.
Print label
In the Print Label step, the label to be printed is displayed. The content of the label can be modified as needed.
Printer Integration
The label printer must be integrated with the system, and the necessary data should be provided to the printer for proper printing
Confirm Button
When the Confirm button is clicked:
- The app checks if all subassembly units have been kitted for the specified work order.
- If all subassembly units are kitted, the app navigates to the Confirm Completion step. From there, it allows moving to the Select Work Order step.
- If any subassembly units are missing, the app navigates back to the Pick Materials step to begin the process again.
Was this article helpful?
