Building Your First Table (Walkthrough)
- 19 Nov 2024
- 8 Minutes to read
- Contributors


- Print
Building Your First Table (Walkthrough)
- Updated on 19 Nov 2024
- 8 Minutes to read
- Contributors
- Print
Article summary
Did you find this summary helpful?
Thank you for your feedback!
This guide will teach you how to use the Tables feature to store data across multiple apps.
In this article, you will learn:
- How to create a typical “Work Orders” Table
- How to read, create and edit Record in that table via the Trigger Editor
Note: This topic is featured in the "Working With Data and Tables" section of Tulip University.
Without using Table, you may find it difficult to update data that is used in multiple frontline operations apps in Tulip.
For example, you may want to read and modify a bill of materials (BOM) or work order across multiple apps that are running on your shop floor.
You could create a SQL database and call Connector functions to update rows in a table. Or, you could use an HTTP connector to read/write from an ERP.
But, that will require you to write code.
The Table feature allows you to create tables that you can read and edit via Tulip apps.
No code is required, and you can instantly use them in your frontline operations apps.
In this guide, we will show you the basics of Tables by creating an example Table that stores work orders and then allows you to use these work orders within apps.
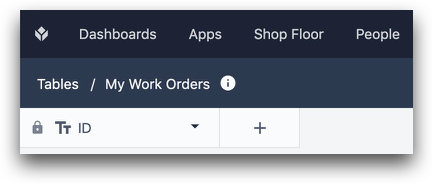
At the end of this tutorial, the “Work Orders” table will look like this:
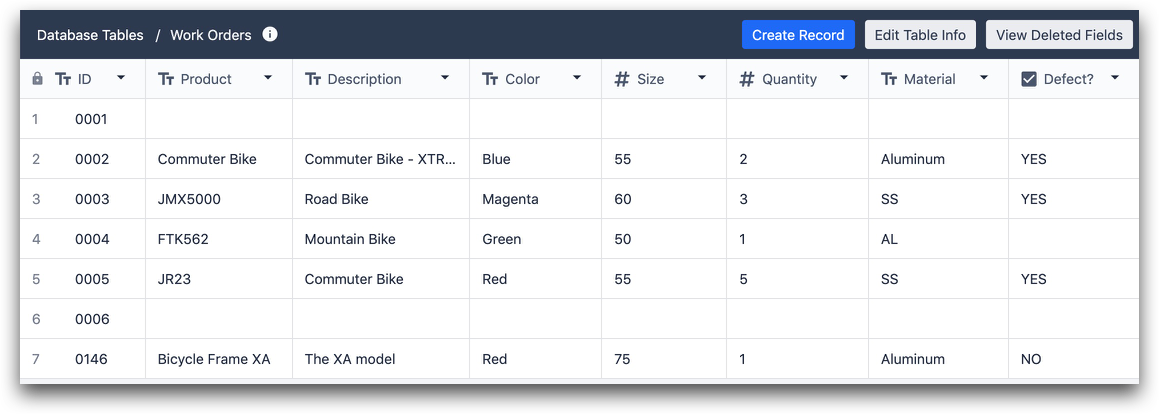
It will have 8 columns:
- ID (text)
- Product (text)
- Description (text)
- Color (text)
- Size (number)
- Quantity (number)
- Material (text)
- Defect (boolean)
You will learn how to:
- Read from these records and use existing values in your apps
- Edit existing records
- Create new records
You can edit Tables from two parts of Tulip:
- The “Tables” option under the “Apps” tab in the menu bar
- The Trigger Editor in the App Editor
Creating A New Table
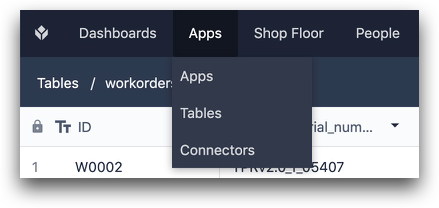
Here’s how to create the “Work Orders” table. Click the “Tables” option under the Apps tab.
Then, use the Create Table button in the top right of the Tables List, and name the new table “Work Orders”.

Then click the new Work Orders table on the list to start editing it.
To begin, you will have 0 records and just one column, ID, which is a text field. This is one area where Tables differ from tables in a traditional database: each “Record”, or row in the table, must have a unique text value rather than a unique number value.
You will want to add a few more fields. To add fields to the table, click the “+” button next to the ID. You must select a field type and a label.
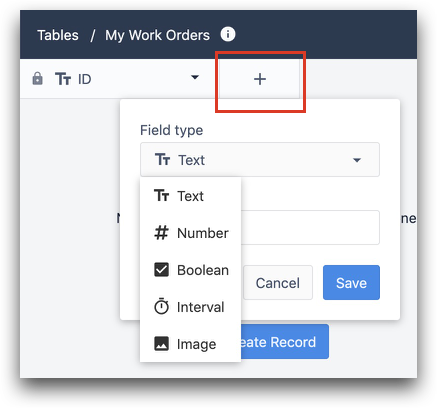
Add the following fields to your table:
- ID (text)
- Product (text)
- Description (text)
- Color (text)
- Size (number)
- Quantity (number)
- Material (text)
- Defect (boolean)
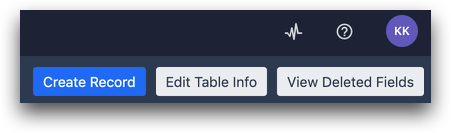
If you want to test it out, click “Create Record” in the top right of the page.
After you are satisfied with the table, go to the App Editor to connect the table to a specific app.
Connecting Tables to an App
Now, you need to create the logic so that apps can read and/or update the table.
This is perhaps the most important part of using Tables in apps.
After opening an app, click the Records Tab next to the .
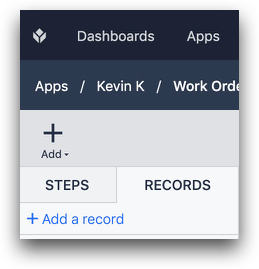
Then, select “+ Add Record”.
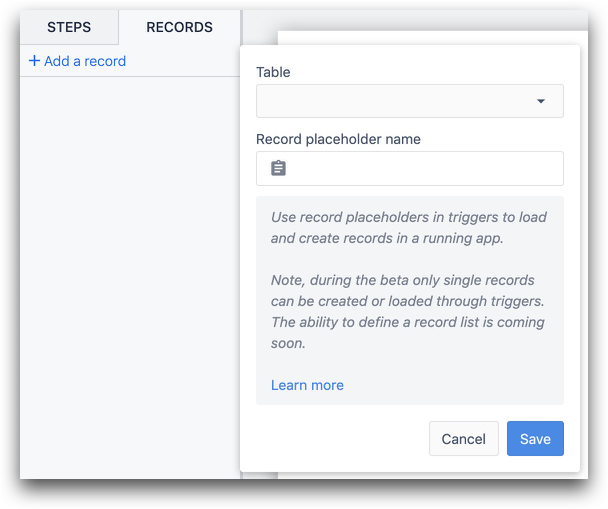
This is the Record Placeholder creator. Think of this as a tool to name the type of records that you will be loading from a table.
In this case, you will want to dynamically load a specific work order when an operator is using the app.
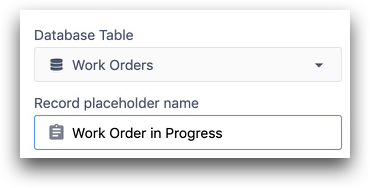
So, name the Record Placeholder “Work Order In Progress” and select the “Work Orders” table.
This means that we are about to write the logic that will dynamically select a specific work order, and then refer to it as the “Work Order in Progress”.
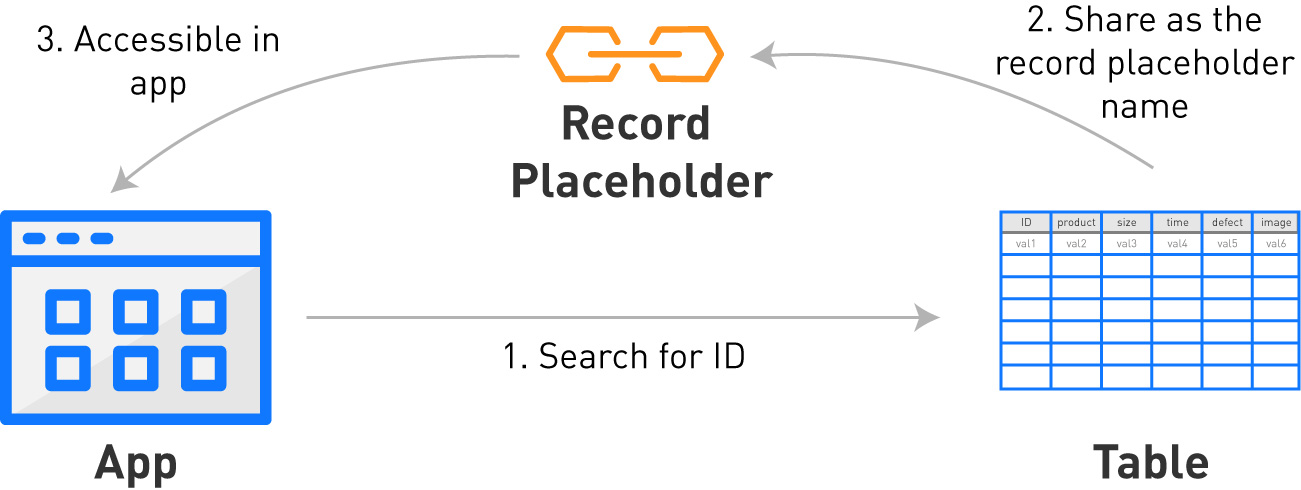
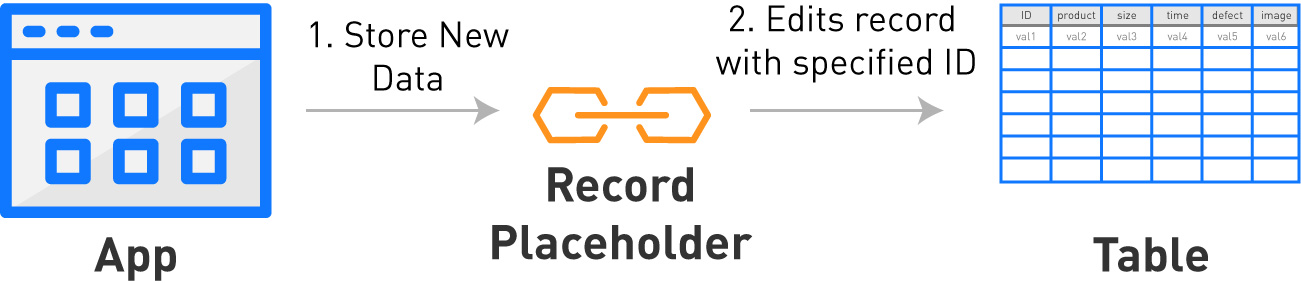
Here’s how the Record Placeholder works:

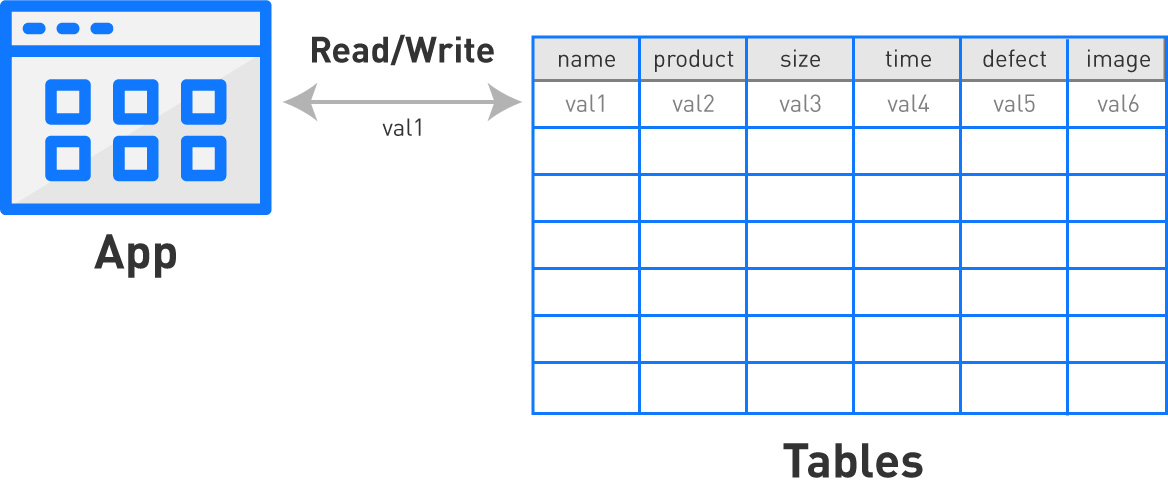
If you want to read or edit an existing record, you must load that record into the app and give it a placeholder name. The record placeholder will make it much easier to follow your logic when you review it in the Trigger Editor.
In the image above, you would be loading the record with id “val1” and naming it “Work Order in Progress”.
Loading Records
Here’s what happens when you want to load a record in order to read or edit it.
Editing records
Then, if you want to edit the record after it is loaded, just choose the record that is stored with a given placeholder name.

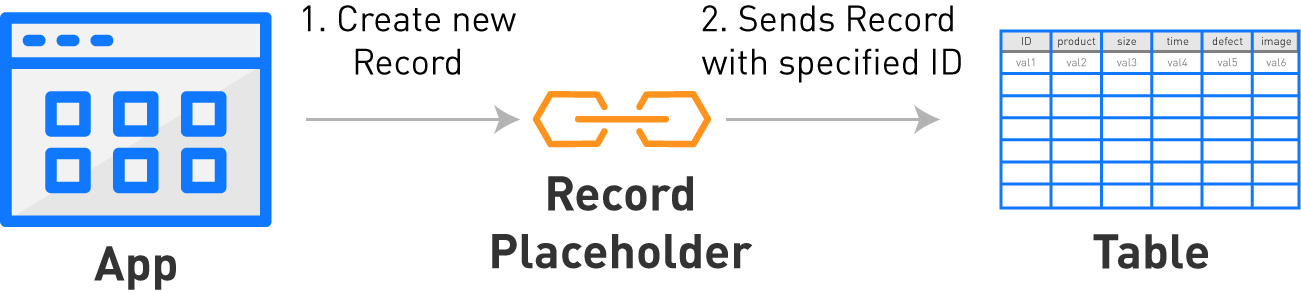
Creating a new record
If you want to create a new record in a table, you must also load it with a placeholder name, which will add it to the appropriate table.
Let’s return to our example. You first want to dynamically load a record with the “Work Order in Progress” placeholder name.
First, you will want to add the “Work Order in Progress” placeholder to your app so that operators can see the specific record that is coming from the “Work Orders” table.
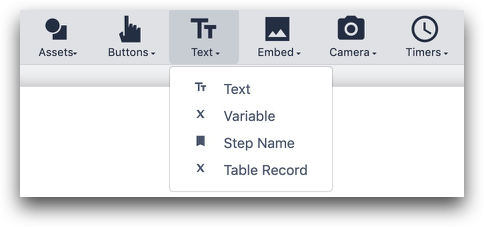
To do this, select the “Table Record” option under the Text header in the Widget Menu.
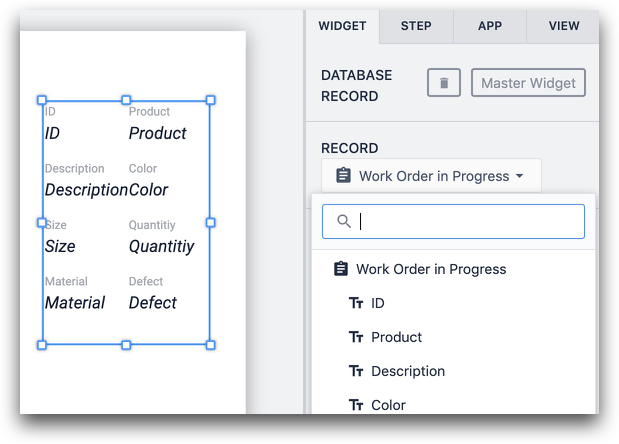
Then, select “Work Order In Progress” from the Record dropdown in the Widget tab of the side pane. You may need to expand the text box to fit all the labels and values.
Modifying Tables In The Trigger Editor
First, we need to add a record to the table so we can use it in our app.
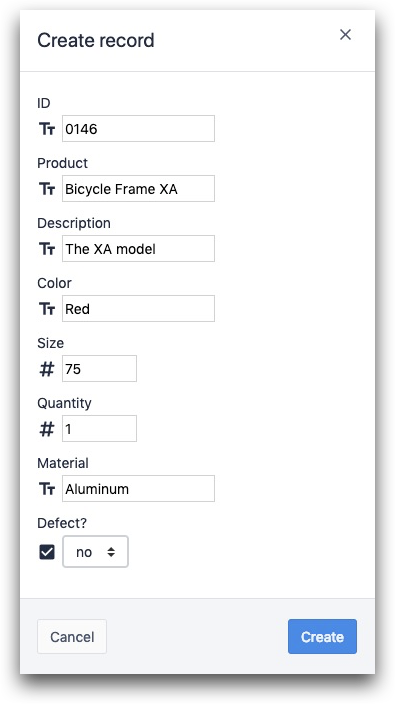
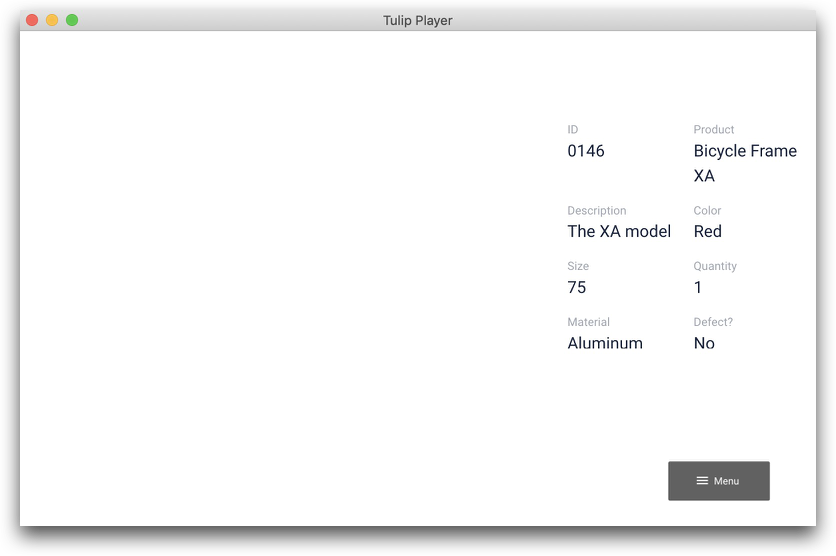
Go back to the “Work Orders” table, and create a record for a bicycle frame.
It should look something like this, with ID ”0146”.
Then, return to the step in the App Editor and create a Step Trigger.
You will first load the correct record as “Work Order In Progress” so you can later update it.
Set the Trigger to fire upon “When step is opened”. Then choose “Table Records” in the first dropdown in the “Then” statement, and choose “Load Record”.
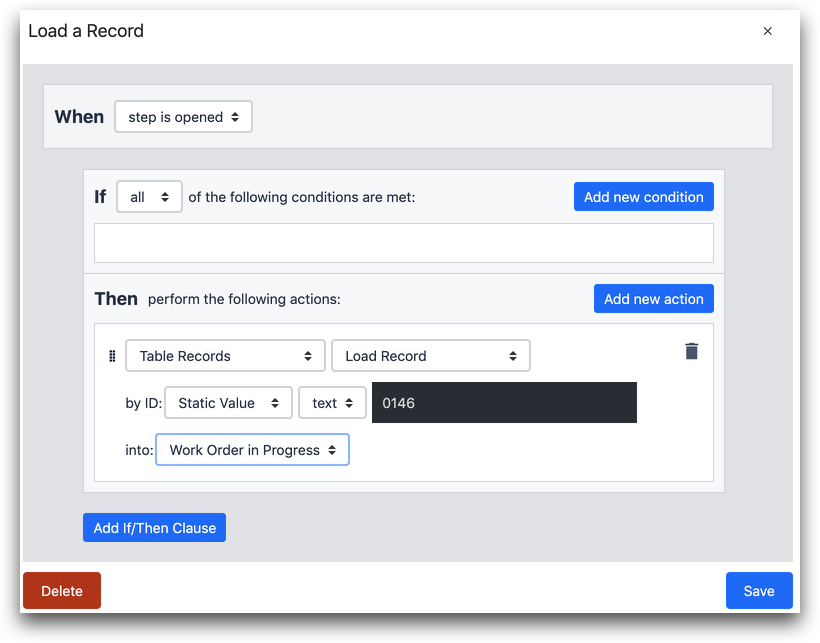
Then, choose “Static Value”, “Text” and enter “0146” into the “Work Order in Progress” placeholder. Click “Save”.
Then, if you run this app in the Player, you will see all the data from the record with ID “0146” in the app. The Trigger pulls it from the correct table.
You can only load and edit one record at a time per placeholder. However, you can create multiple placeholders and then edit multiple records at once via multiple “then” statements in a Trigger.
Editing A Record
In this example, there has been a product change, and we need to update this bike to be “blue” instead of “green”. Here’s how we're going to do it.
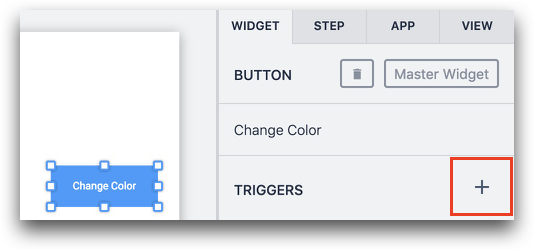
You will edit this record by changing the “Color” field from “Blue” to “Green”. To accomplish this, first add a “Change Color” button, and attach a Trigger.
Choose “Data Manipulation” in the first dropdown of a “Then” statement, then choose “Store” and “Static Value” “Text” with the word “Blue”.
Select a location of “Table Record” and then “Work in Progress”, and then you will see a series of options.
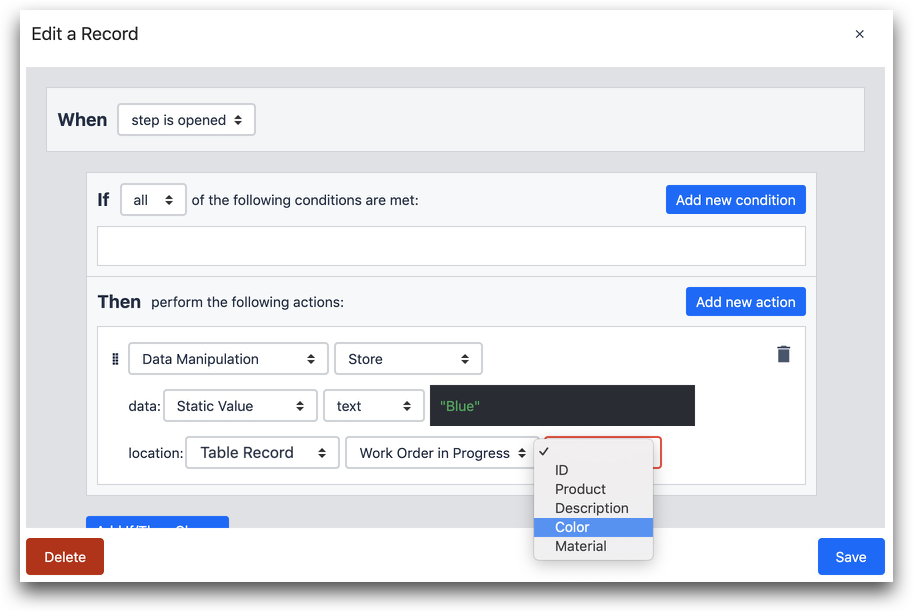
The options in the dropdown are all the text fields from the “Work Orders” table. Since you have already loaded the most relevant work order, you will be able to change its color by selecting “Color”, then “Save”. Run the app and press the button to try it out.
Upon clicking the button, you will store “Blue” in the “Color” field of the “Work Order in Progress”, which will then be passed on to the correct record in the Work Order table.
Creating A New Record
If you are certain that a record with a specified ID does not exist yet, and you want to create it, choose the “Table Records” option in a “Then” statement, and then select “Create Record”.
Next, you need to create a unique ID, in this case, “0148”.

Then, choose the placeholder where you would like to load the new record. This will replace whatever record is loaded using the placeholder name, and then send the new record with just an ID and blank values in every other field to the appropriate table.
If you want to modify the values in the record, use the “Editing” method described above to change the values one by one.
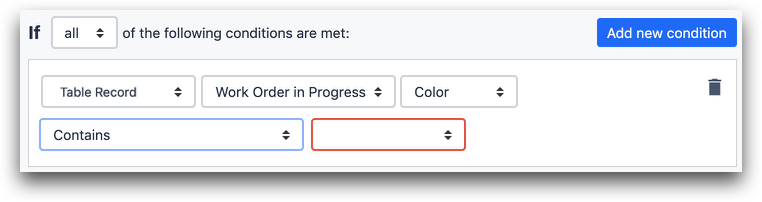
Conditional Statements Using Records
Select “Table Record”, choose your record placeholder, then select one of the fields to create logic. Make sure you have loaded a record using the record placeholder before using conditions, or else the “Table Record” fields will be blank.
Further Reading
- How To Modify Tables in the App Editor
- How To Analyze Table Records Alongside App Data
- Displaying Lists of Records in Apps
Did you find what you were looking for?
You can also head to community.tulip.co to post your question or see if others have faced a similar question!
.gif)

Was this article helpful?
