::: (info) ()Download this app suite here.:::O Composable MES Suite oferece um ponto de partida fácil para os engenheiros que desejam implantar um MES focado na criação de valor para suas operações. Esse pacote de aplicativos mostrará a você como organizar e coletar dados e, ao mesmo tempo, ensinará as práticas recomendadas para criar valor em seus negócios.
O pacote de aplicativos Production Management oferece um ponto de partida para gerenciar o fluxo de trabalho da produção. A coleta de informações detalhadas sobre a sua produção permite que a sua equipe tome decisões melhores para aprimorar as operações.
As áreas comuns de aprimoramento são a entrega no prazo, a análise da causa raiz do tempo de inatividade e a capacidade de rastrear o OEE de forma holística (equipamentos, pessoas, fluxo de materiais etc.)
Pré-requisitos
Neste pacote de aplicativos, haverá uma variedade de dicas do App Builder a serem seguidas. 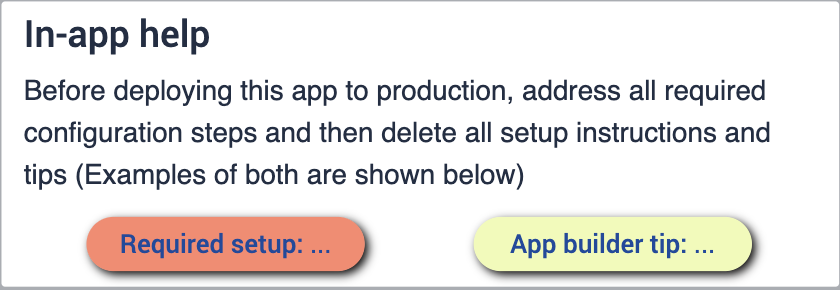
Antes de configurar o pacote de aplicativos, certifique-se de estar familiarizado com as seguintes habilidades:
- Criação básica de aplicativos
- Tabelas Tulip (incluindo edição de campos, uso de filtros e espaços reservados para registros)
Implementação
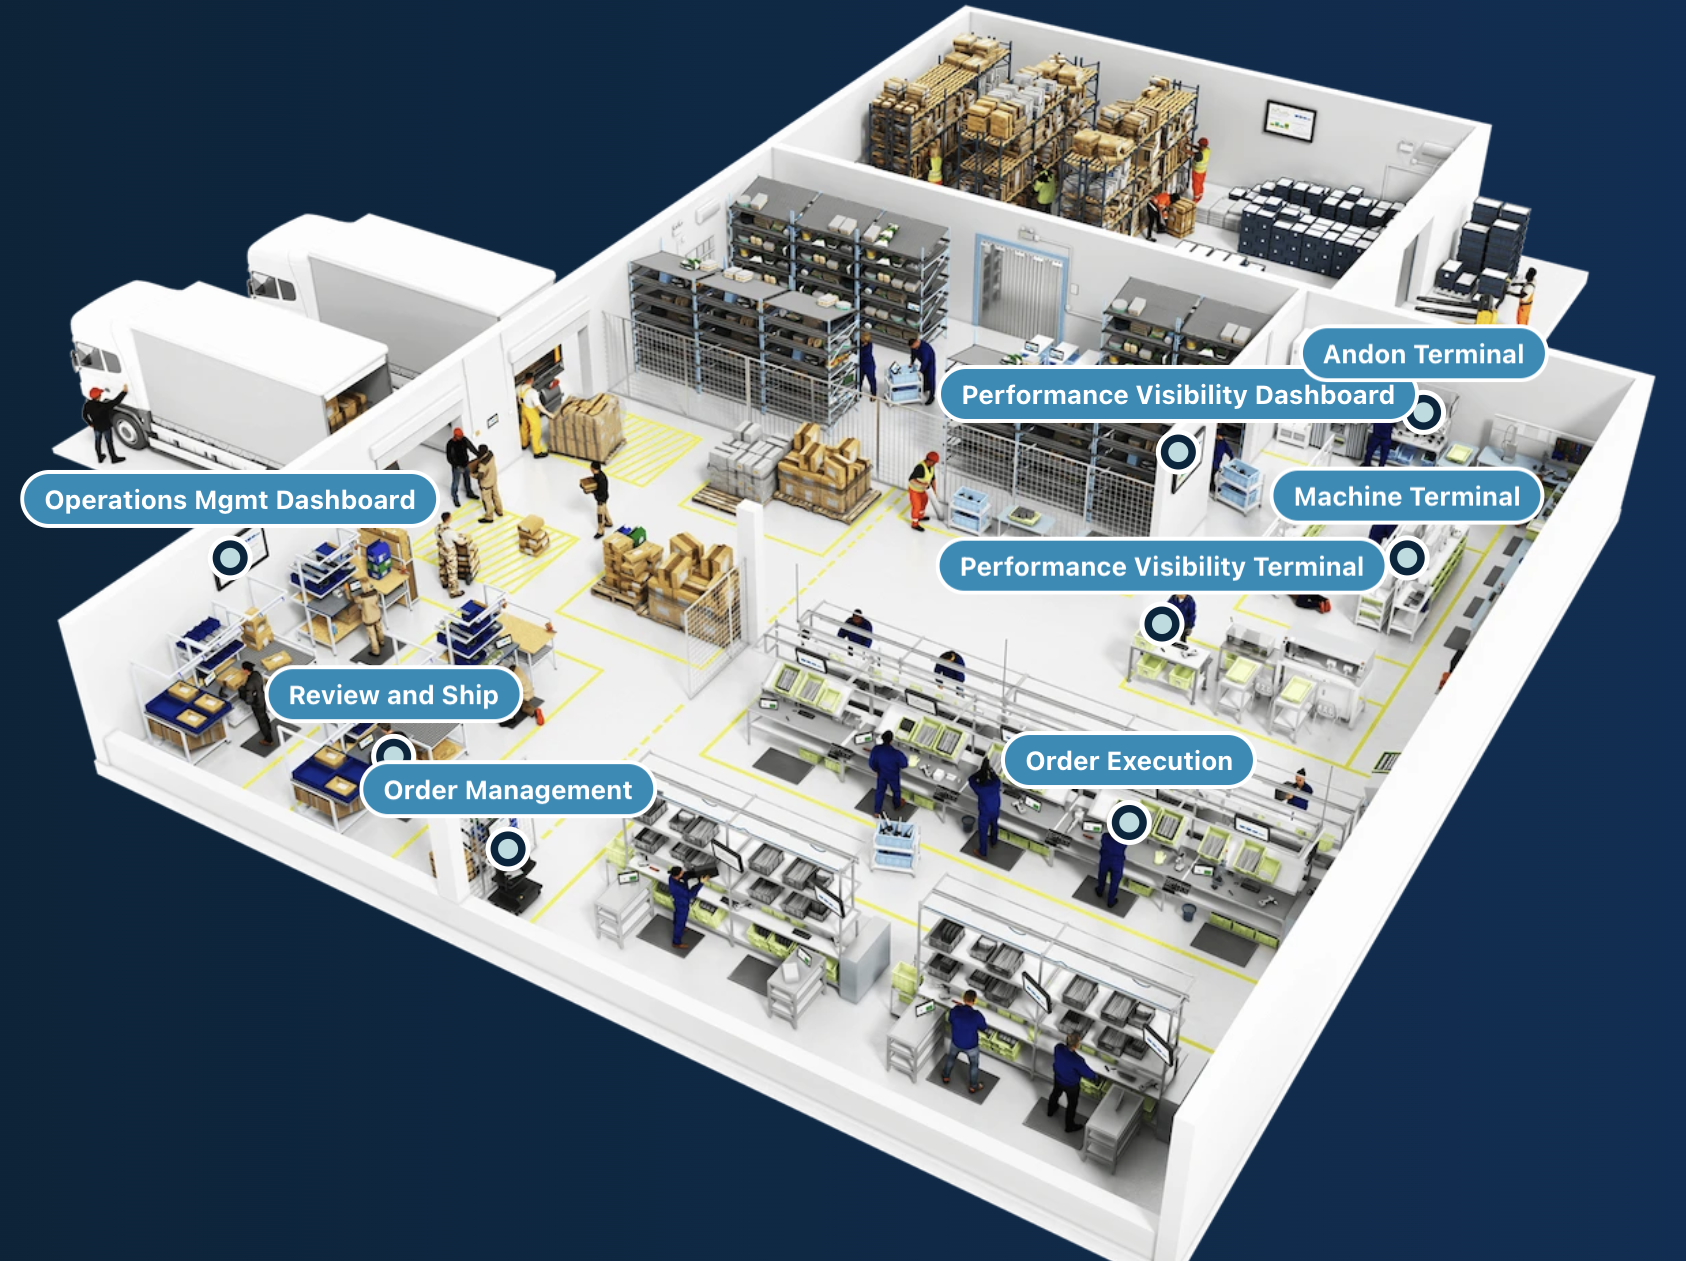
Você deve se certificar de que tem um entendimento adequado de como implantar esses aplicativos nos dispositivosdesejados e de como executá-los em uma estação. É importante entender o fluxo de seus negócios. Ter um diagrama do seu chão de fábrica lhe dará uma melhor compreensão de onde você quer que seus aplicativos fiquem ao longo do processo.
Tabelas conectadas
As tabelas que você usará neste pacote de aplicativos serão usadas e conectadas em seus vários aplicativos. Isso permite que você tenha uma experiência de usuário mais fácil, bem como uma rede de tabelas que pode ser usada no desenvolvimento de aplicativos futuros. Saiba mais sobre como as tabelas minimizarão a redundância e maximizarão a compatibilidade por meio do uso de um modelo de dados comum.
Familiarize-se com as tabelas tulip comuns usadas em todo o cMES.
Download
Clique no link para o Production Management App Suite. Isso o levará à página da biblioteca, onde você poderá adicionar o aplicativo à sua instância. 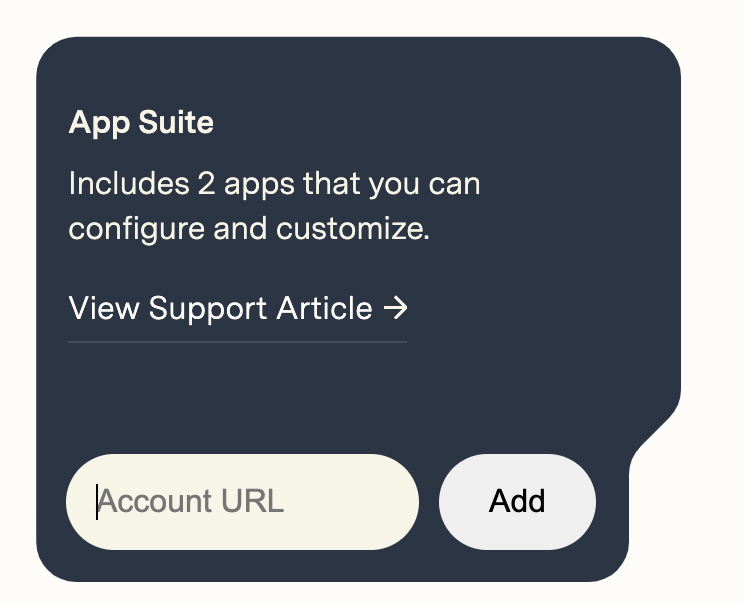
Depois que o App Suite tiver sido adicionado, você encontrará uma pasta na sua instância intitulada Production Management que contém todos os aplicativos do pacote.
Configurar aplicativos
:::(Info) (NOTE)While configuring applications, any changes made to tables need to be made across all applications for connectivity.:::
Gerenciamento do Andon
O aplicativo Andon oferece uma maneira rápida e fácil de sinalizar problemas no chão de fábrica. Quando um problema é sinalizado, os alertas notificam as pessoas necessárias para resolvê-lo em tempo real, de modo que a ação possa ser tomada o mais rápido possível.
Mapa de status da estação
Ao abrir o aplicativo pela primeira vez, você verá "Dicas do App Builder" para orientar os usuários na configuração do aplicativo para o seu chão de fábrica. Essa etapa do aplicativo é uma representação visual do status de suas operações em todo o chão de fábrica.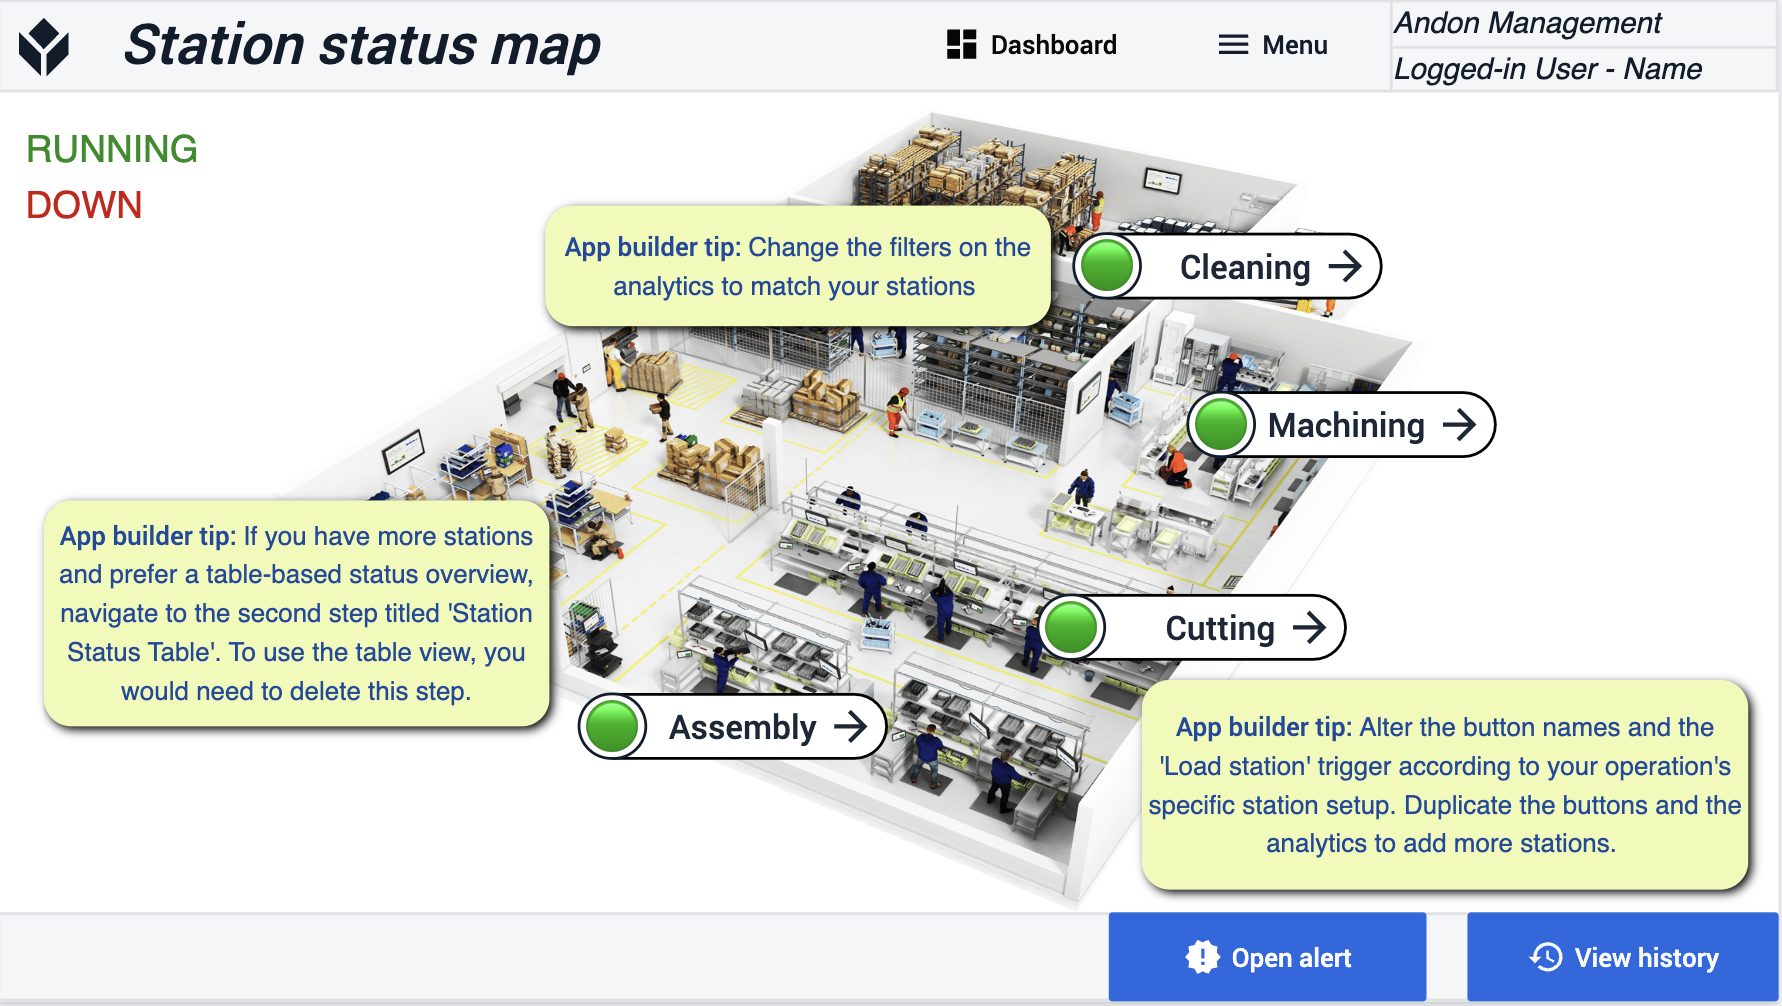
Tabela de status da estação
A inclusão dessa etapa aqui é opcional. Se você preferir ter uma visão geral de tabela em vez de um mapa, poderá remover o mapa.
Exibir detalhes da estação - alertas
Veja eventos específicos que foram sinalizados no chão de fábrica. Atribua esses eventos a diferentes usuários ou resolva-os você mesmo. Você também terá visibilidade do histórico por trás da origem desse evento.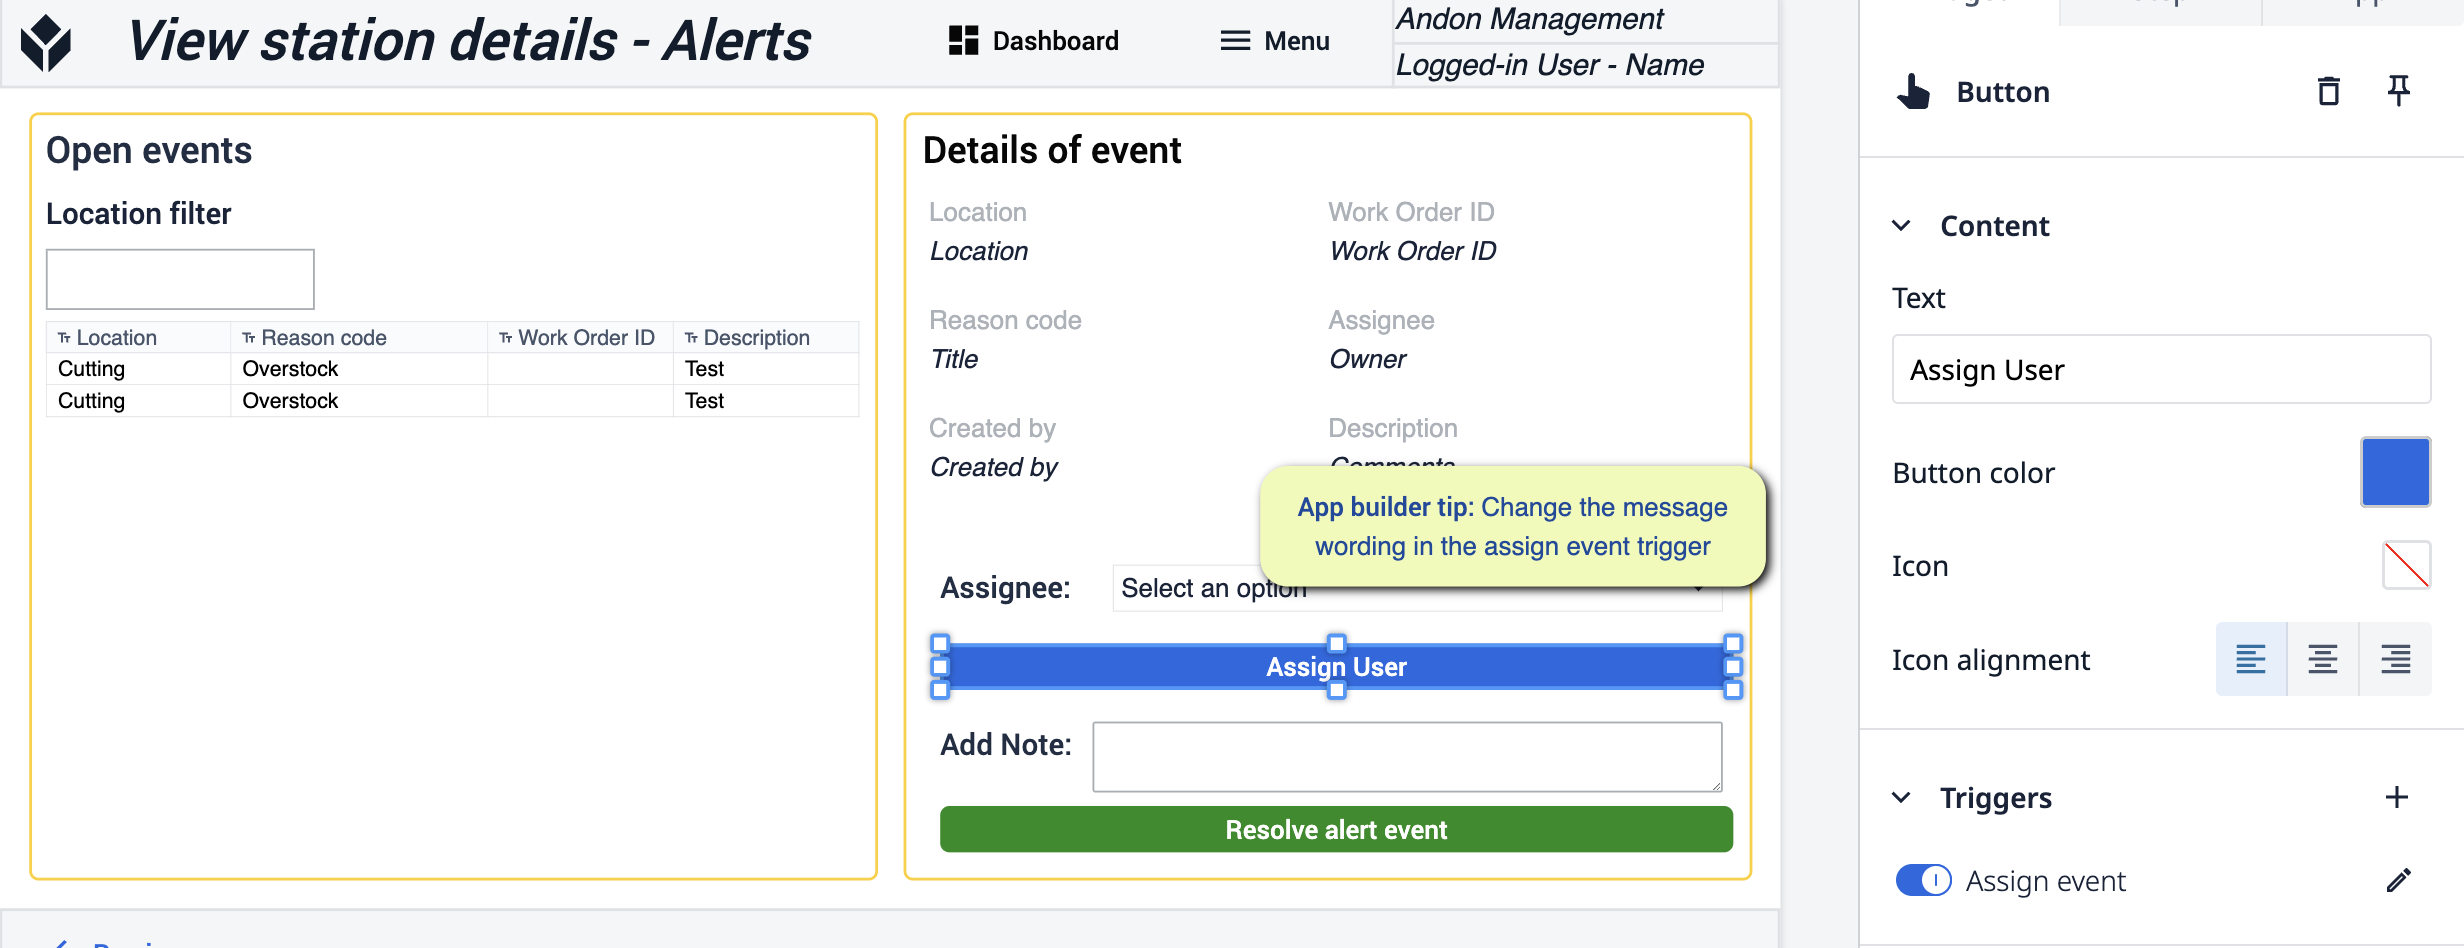 {height="300" width=""}* Nesta etapa, você fará alterações no acionador do botão "Assign User" (Atribuir usuário). Adapte a mensagem às suas necessidades específicas.
Andon
Ao usar a versão Andon desse aplicativo, você fará as mesmas alterações quando se trata de fazer alterações atribuindo o idioma no acionador para corresponder ao seu processo.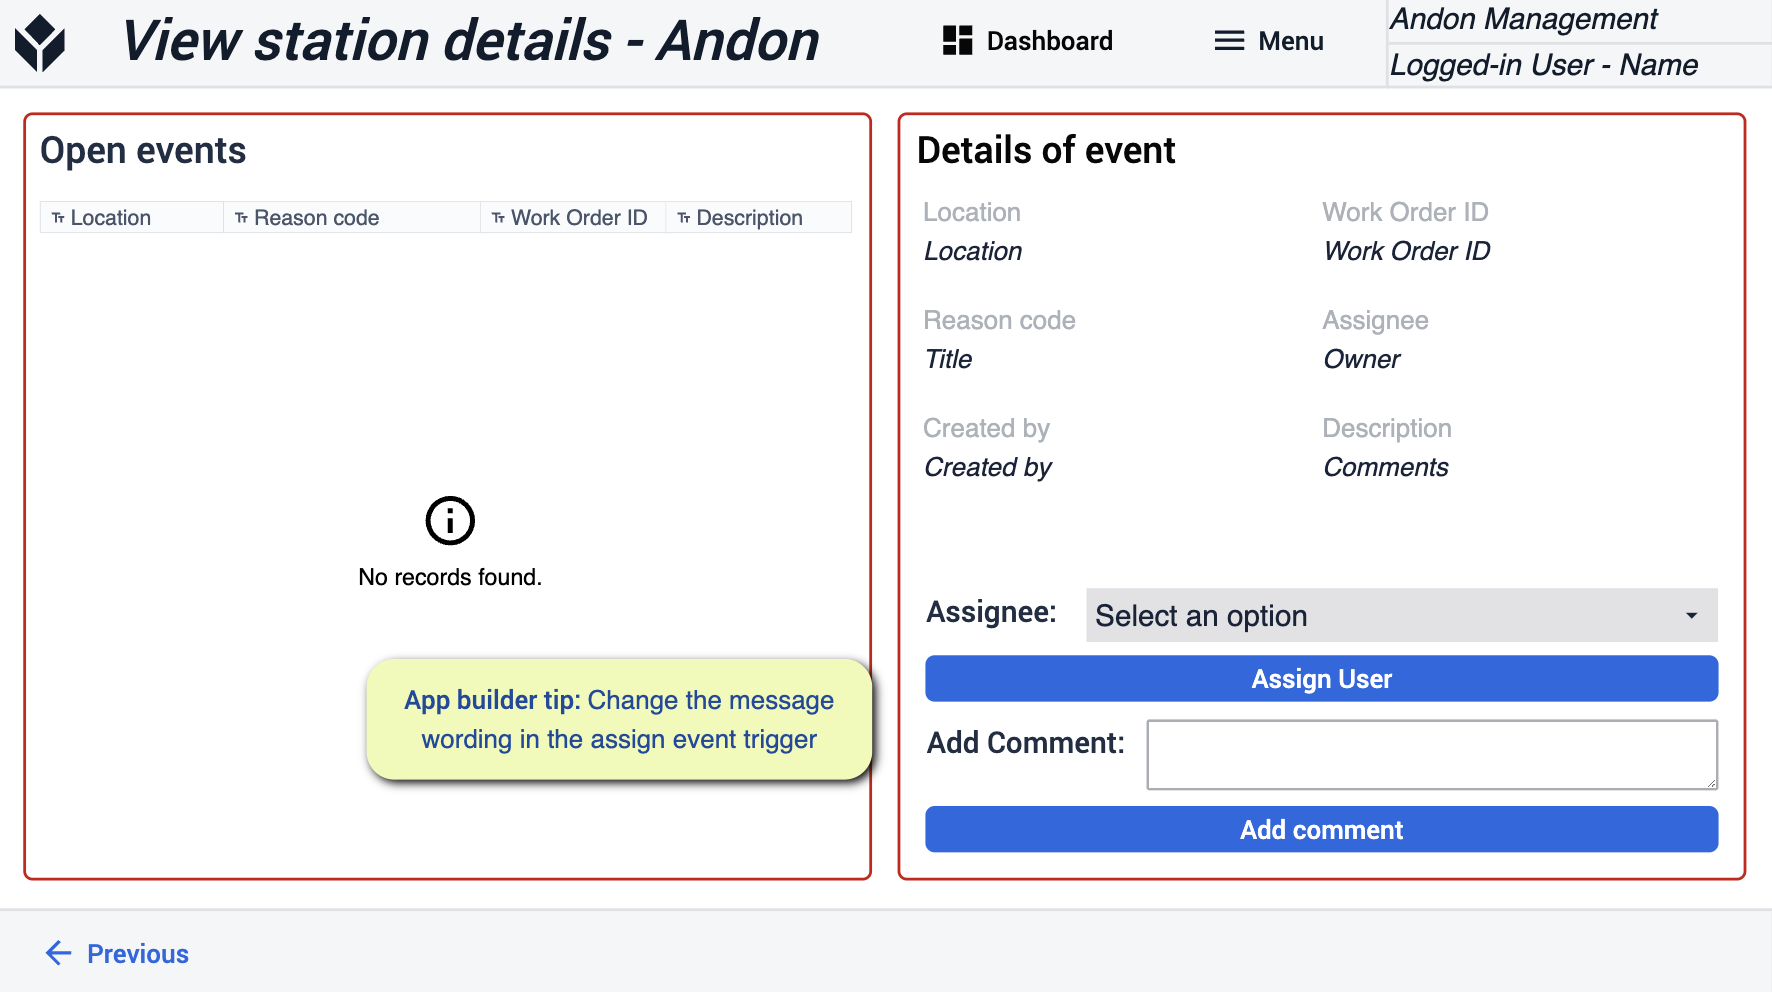
Exibir histórico
Visualize os eventos que foram registrados em todo o aplicativo. Obtenha informações mais detalhadas sobre o que está acontecendo.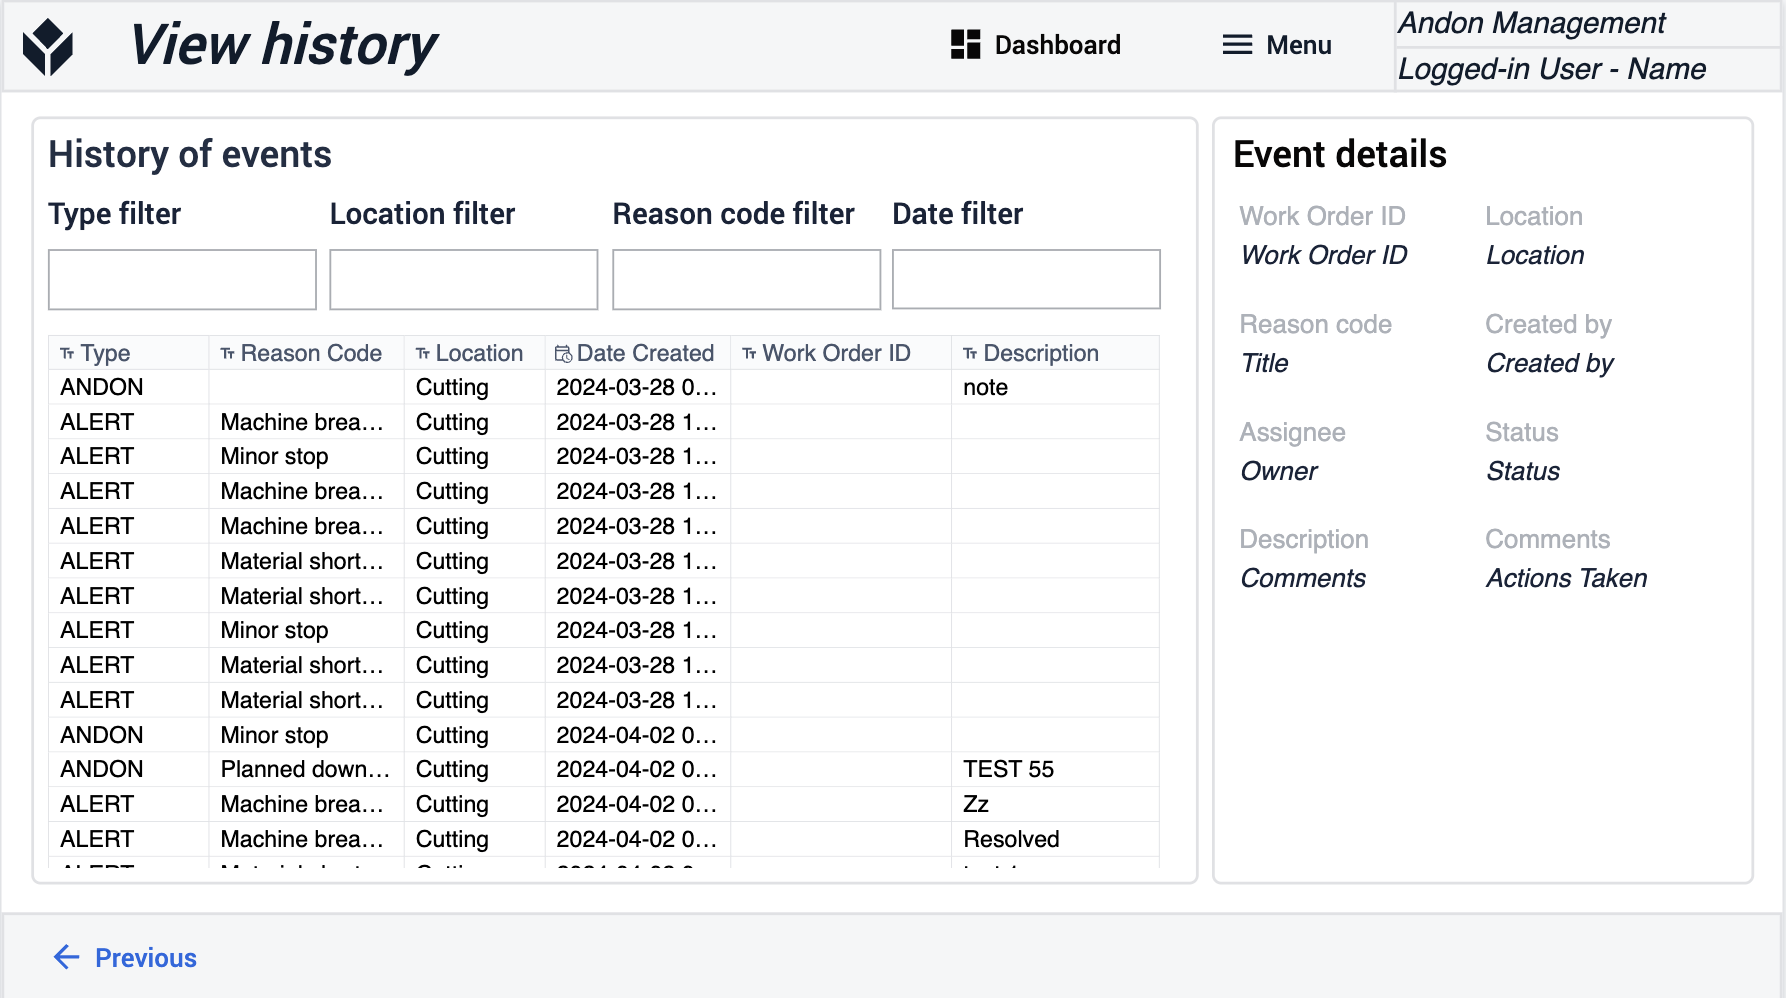
Dashboard (Painel)
Essa visualização serve para que você possa ver o número de alertas que ocorreram em ambas as categorias até o momento e entender o tempo perdido com esses eventos.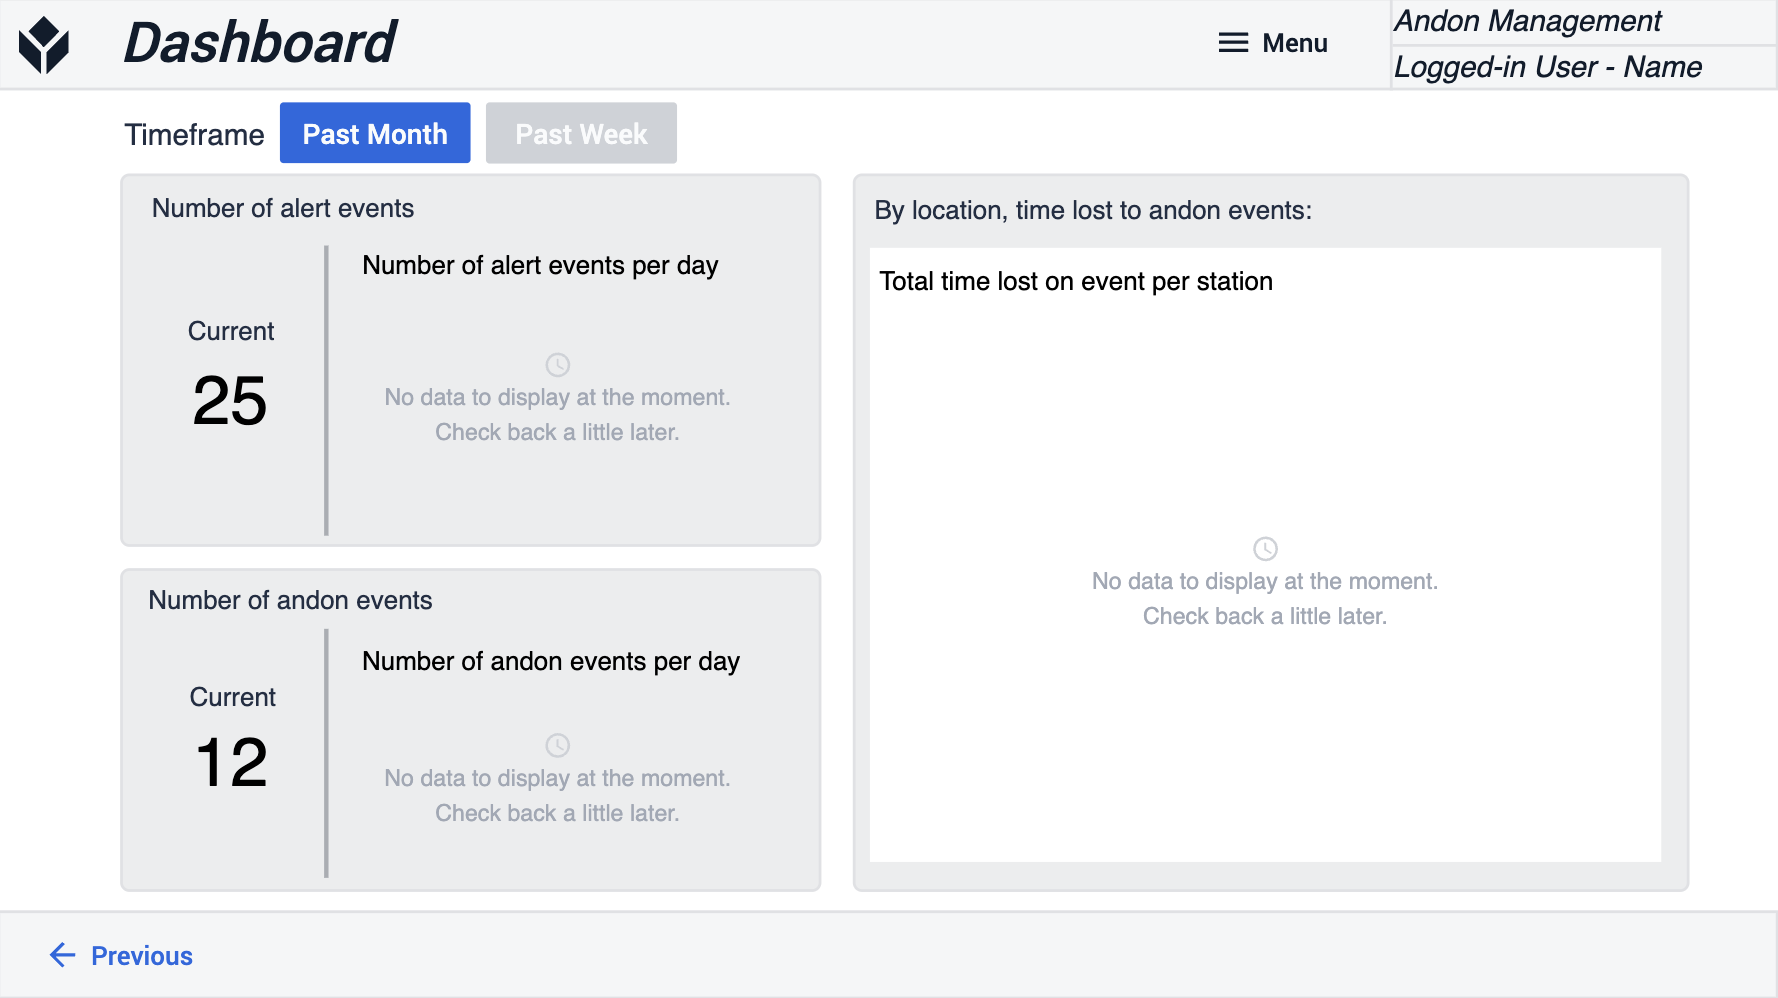
Terminal de monitoramento de máquinas
O aplicativo Machine Monitoring Terminal foi desenvolvido para rastrear a utilização e o desempenho da máquina. Oferece aos operadores uma maneira de adicionar mais contexto para relatar o tempo de inatividade, registrar taxas de produção e detalhes sobre as peças que estão sendo produzidas. Para os supervisores, há uma visão geral clara das principais métricas relacionadas ao OEE.
Selecionar pedido
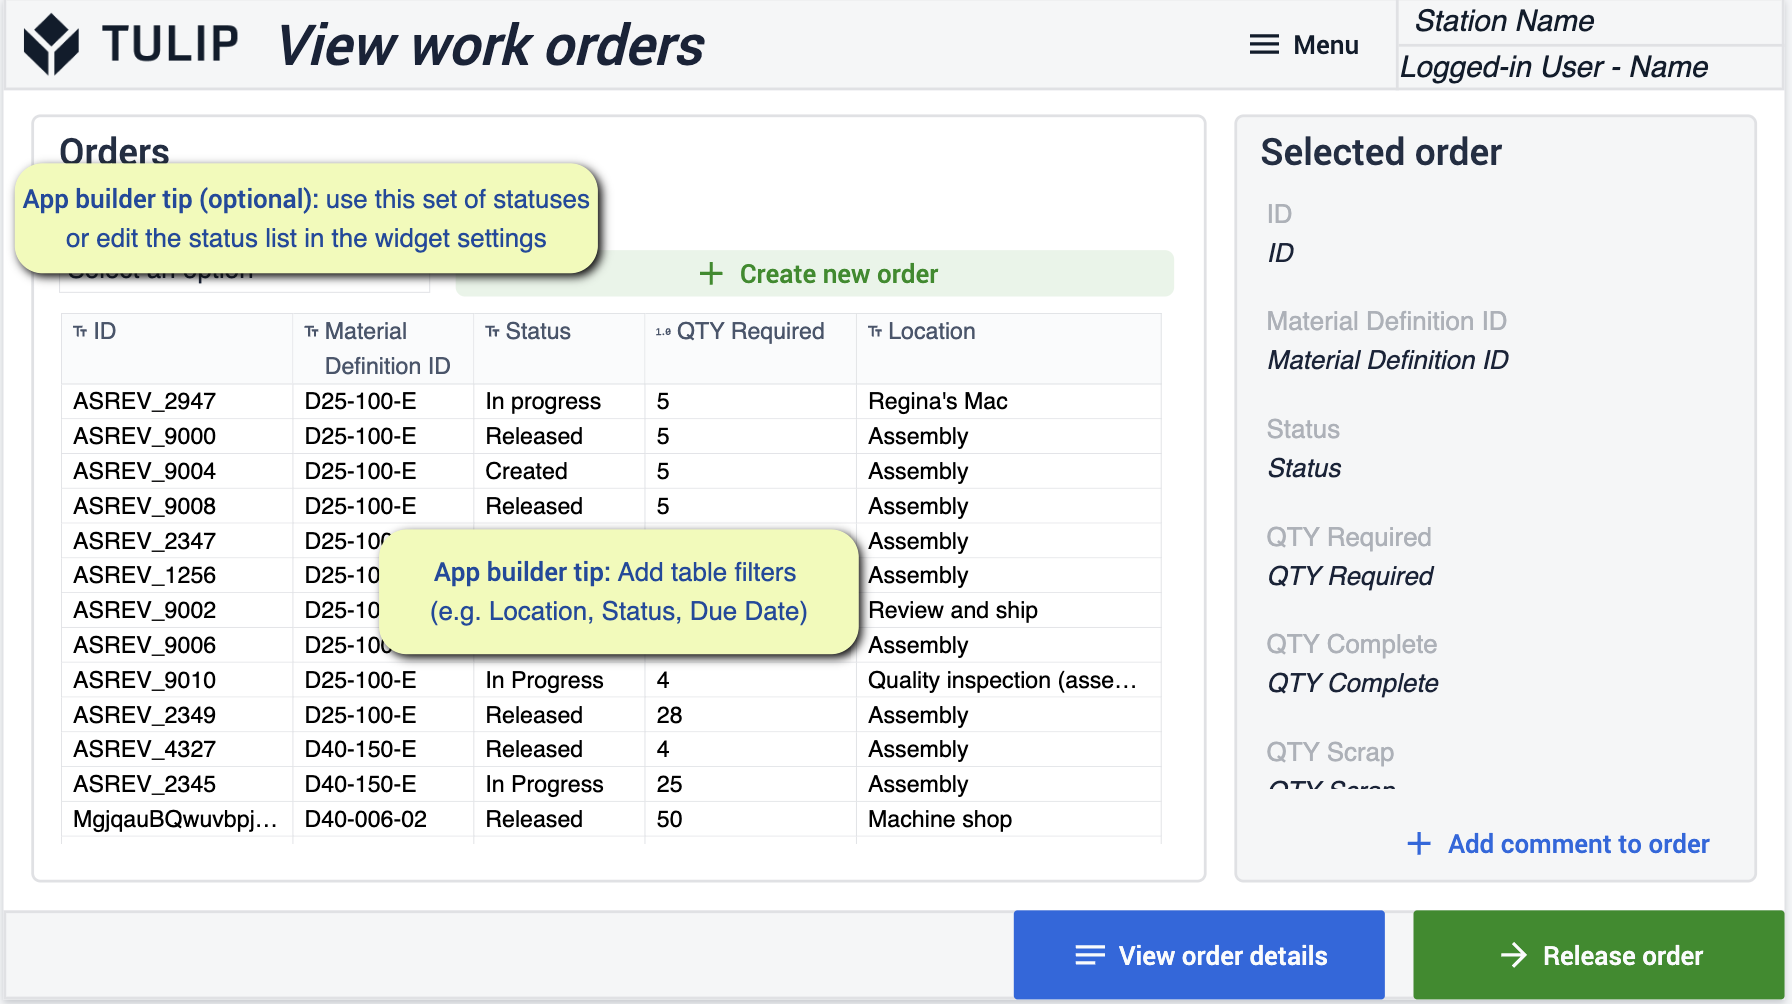
Nesta etapa, você poderá ver e selecionar ordens de serviço para iniciar a produção.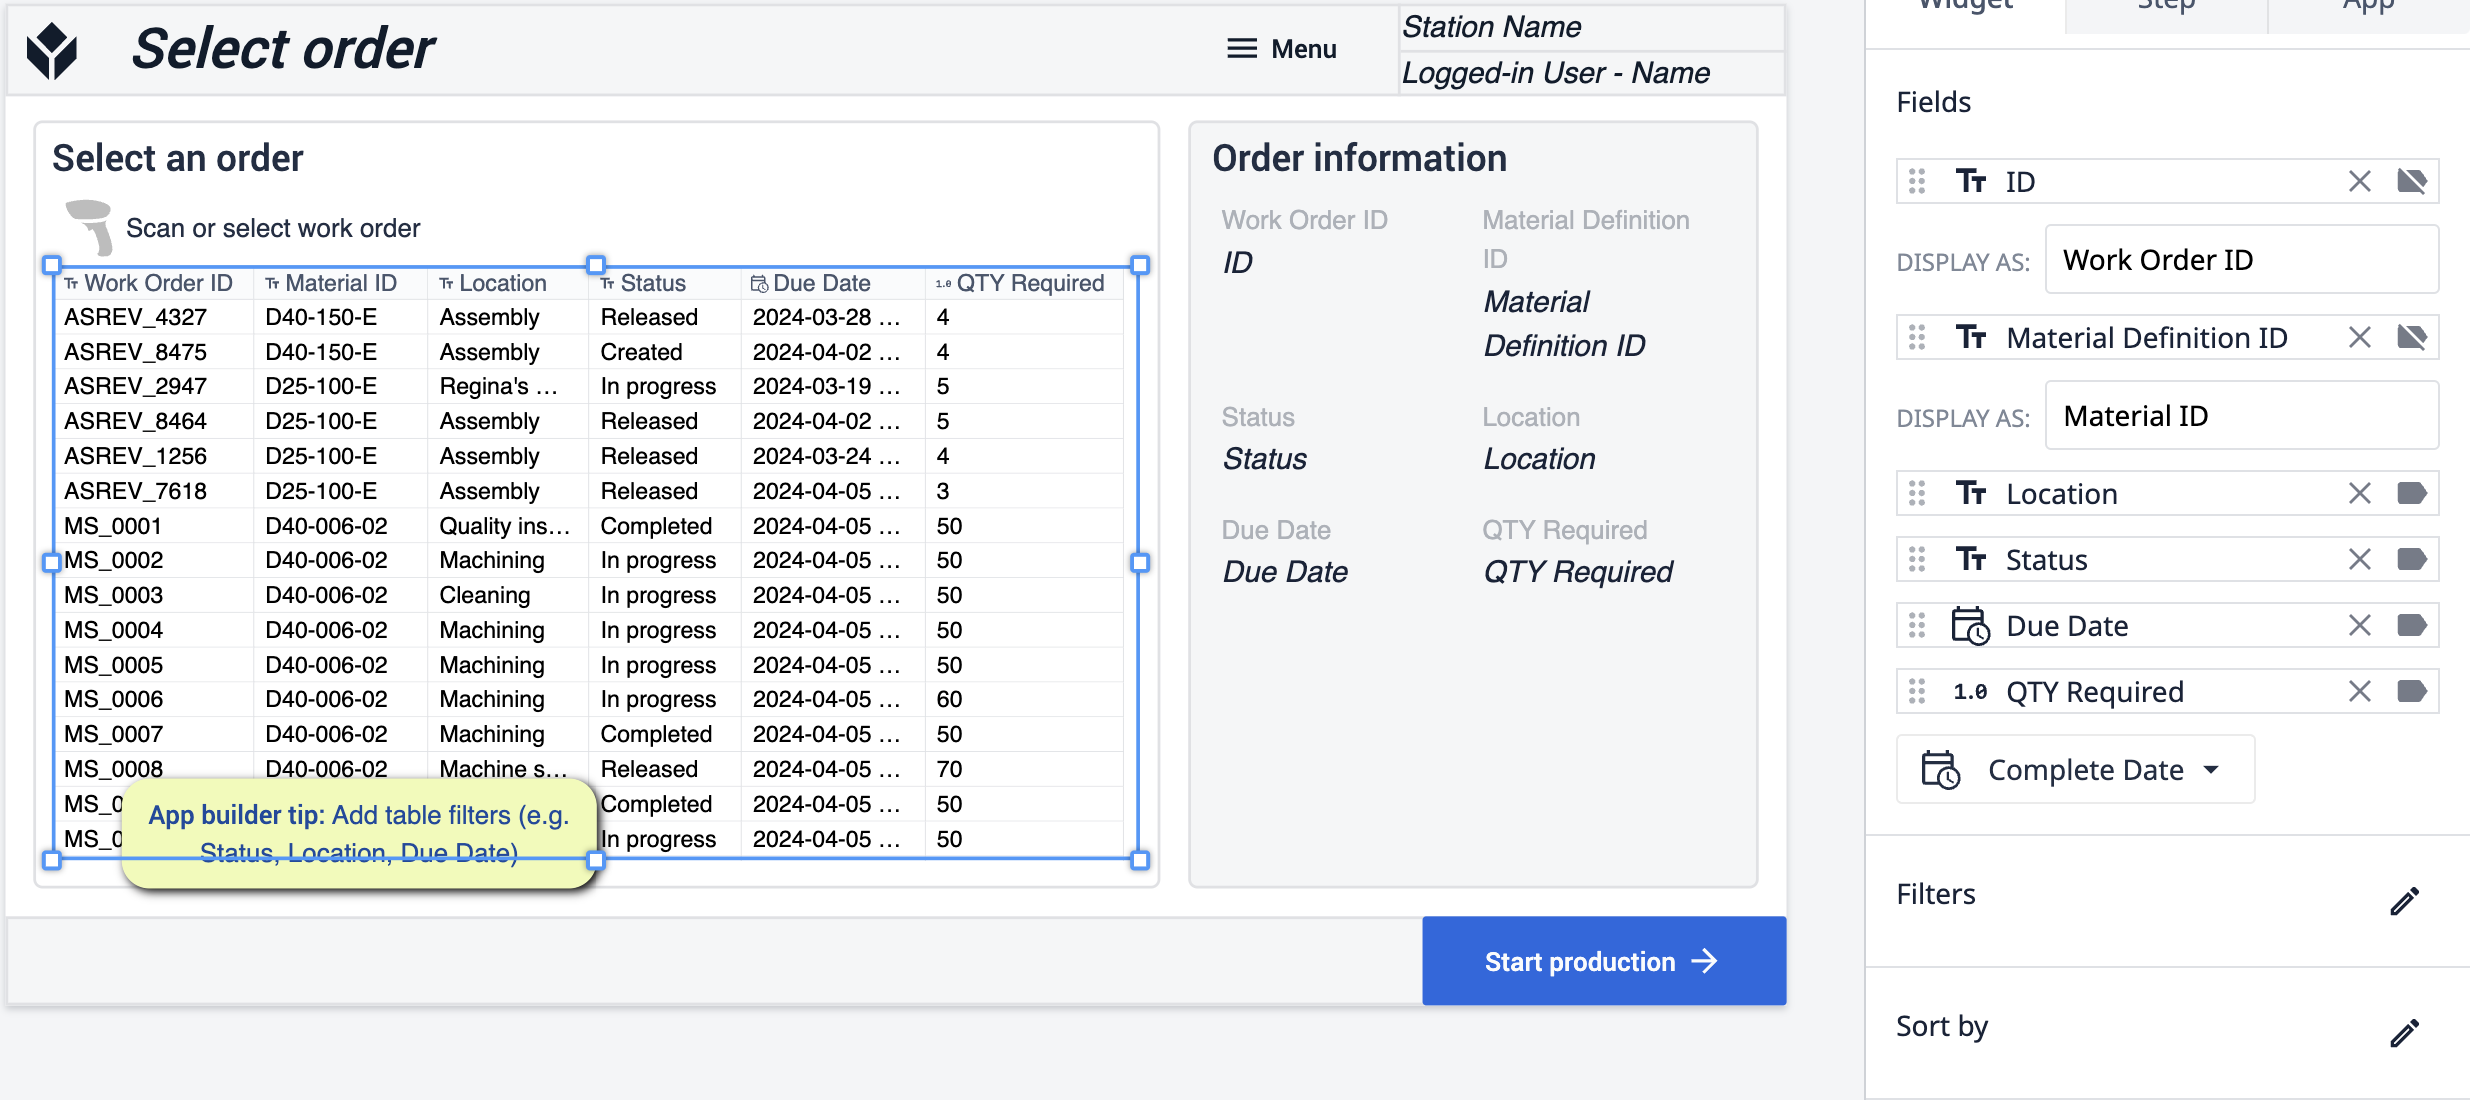 {height="300" width=""}* Nesta etapa do aplicativo, você pode fazer alterações na tabela conforme necessário. Certifique-se de clicar na tabela para ver se ela está atualizada com suas preferências
Terminal da máquina
Aqui você poderá ver o tempo de atividade e o tempo de inatividade das máquinas selecionadas. Acompanhe o desempenho por meio de peças fabricadas e defeitos que foram rastreados.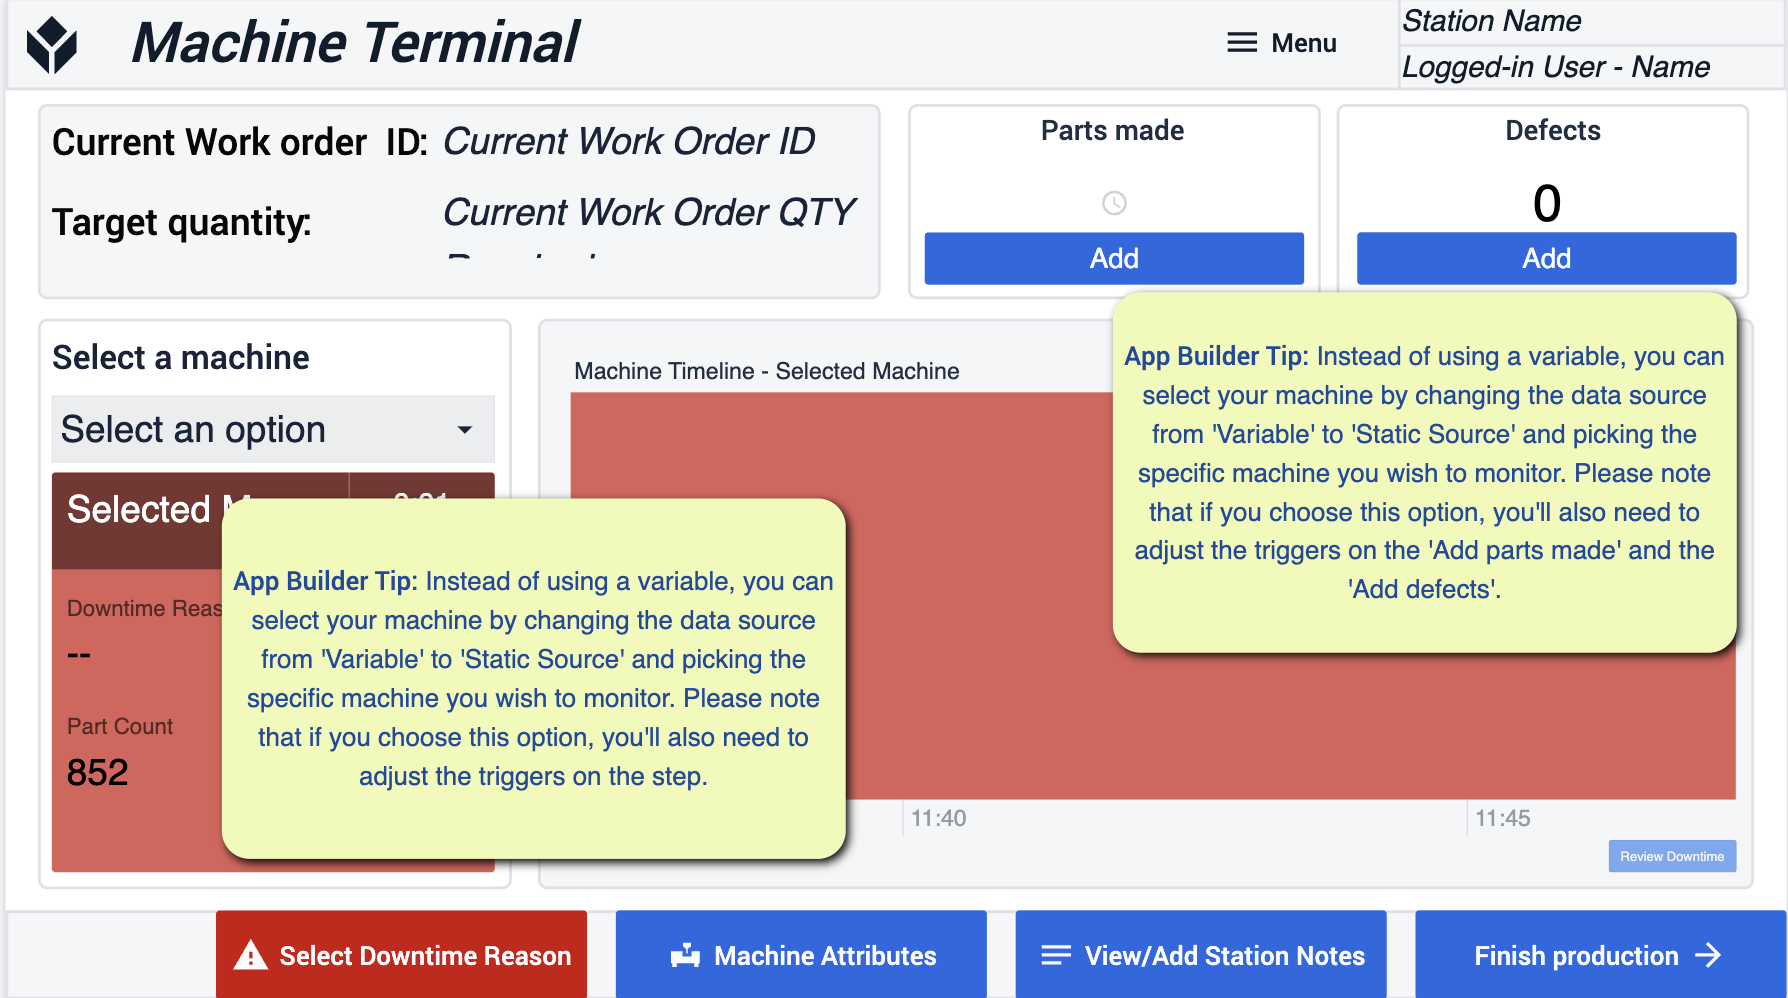 {height="300" width=""}* Siga as dicas do App Builder sobre como você gostaria de configurar suas máquinas. Concentre-se em garantir que possamos conectar as máquinas por meio de variáveis pré-criadas.
Selecione o motivo do tempo de inatividade
Quando houver uma máquina inoperante, selecione um motivo pelo qual a máquina ficou inoperante para ter uma visão melhor do desempenho e da visibilidade em outras etapas do aplicativo.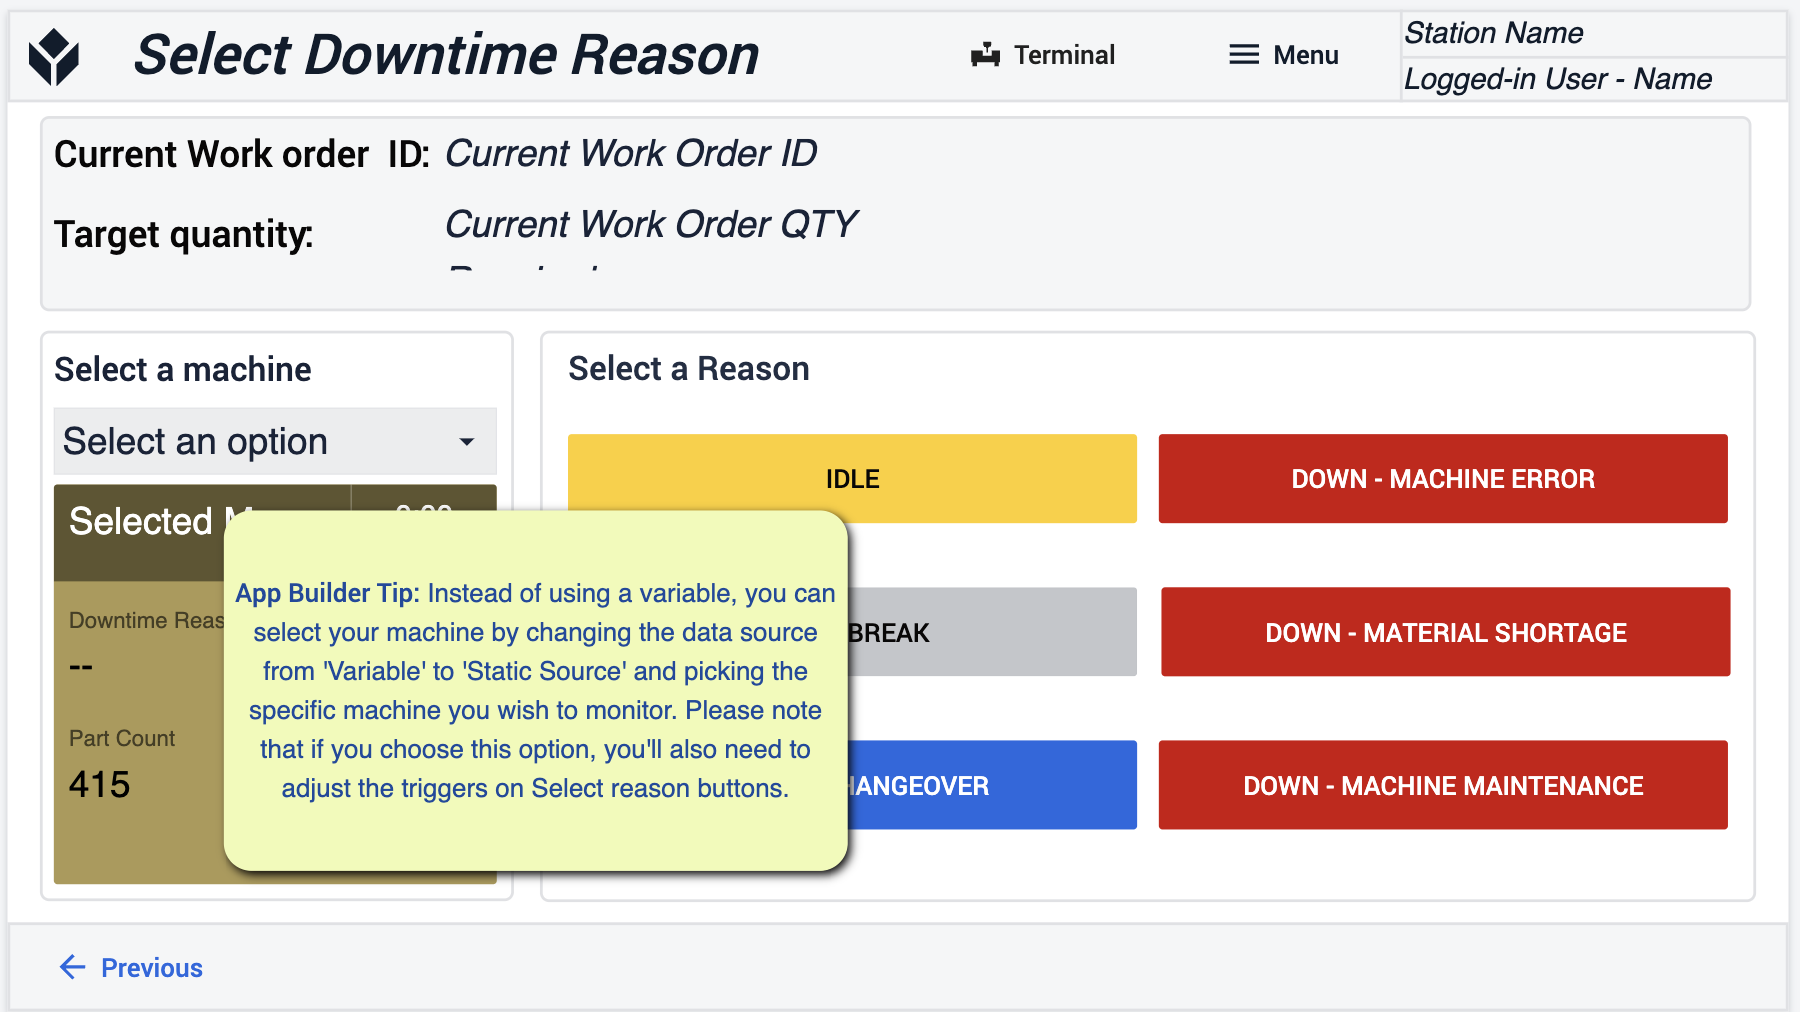 {height="300" width=""}* As alterações feitas aqui devem corresponder ao mesmo formato de outras alterações feitas na fonte de dados da máquina.
Análises
Aqui você pode ver suas métricas diárias e ter uma rápida compreensão do desempenho geral. Manter o controle dessas métricas será importante para a tomada de decisões.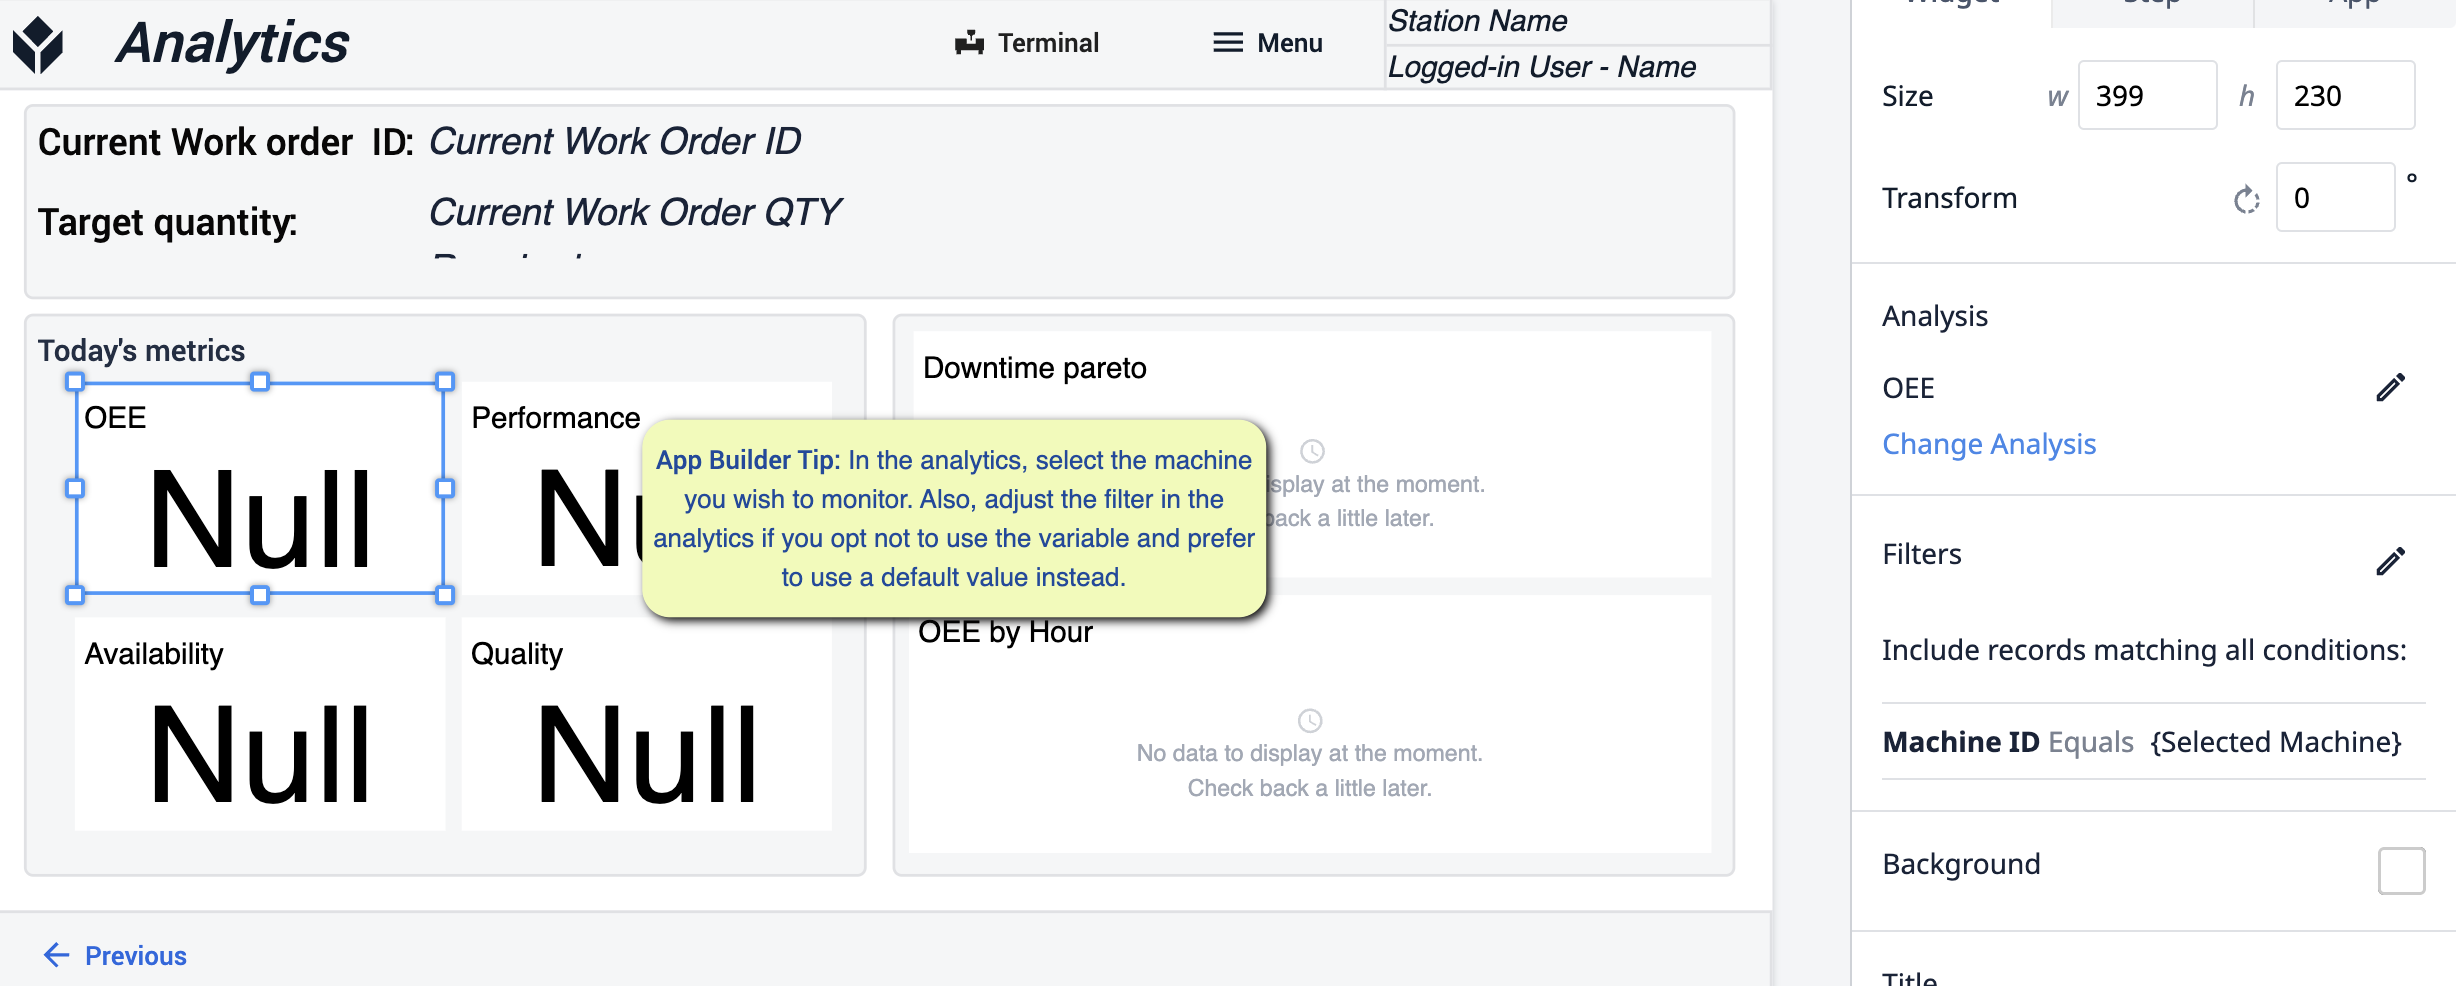 {height="300" width=""}* Nesta etapa, você obterá análises mais detalhadas sobre o desempenho da máquina em uma base máquina a máquina. . Use os filtros de análise para determinar de quais máquinas você gostaria de obter insights.
Atributos
Nesta seção, você selecionará uma máquina para entender melhor o motivo do tempo de inatividade. 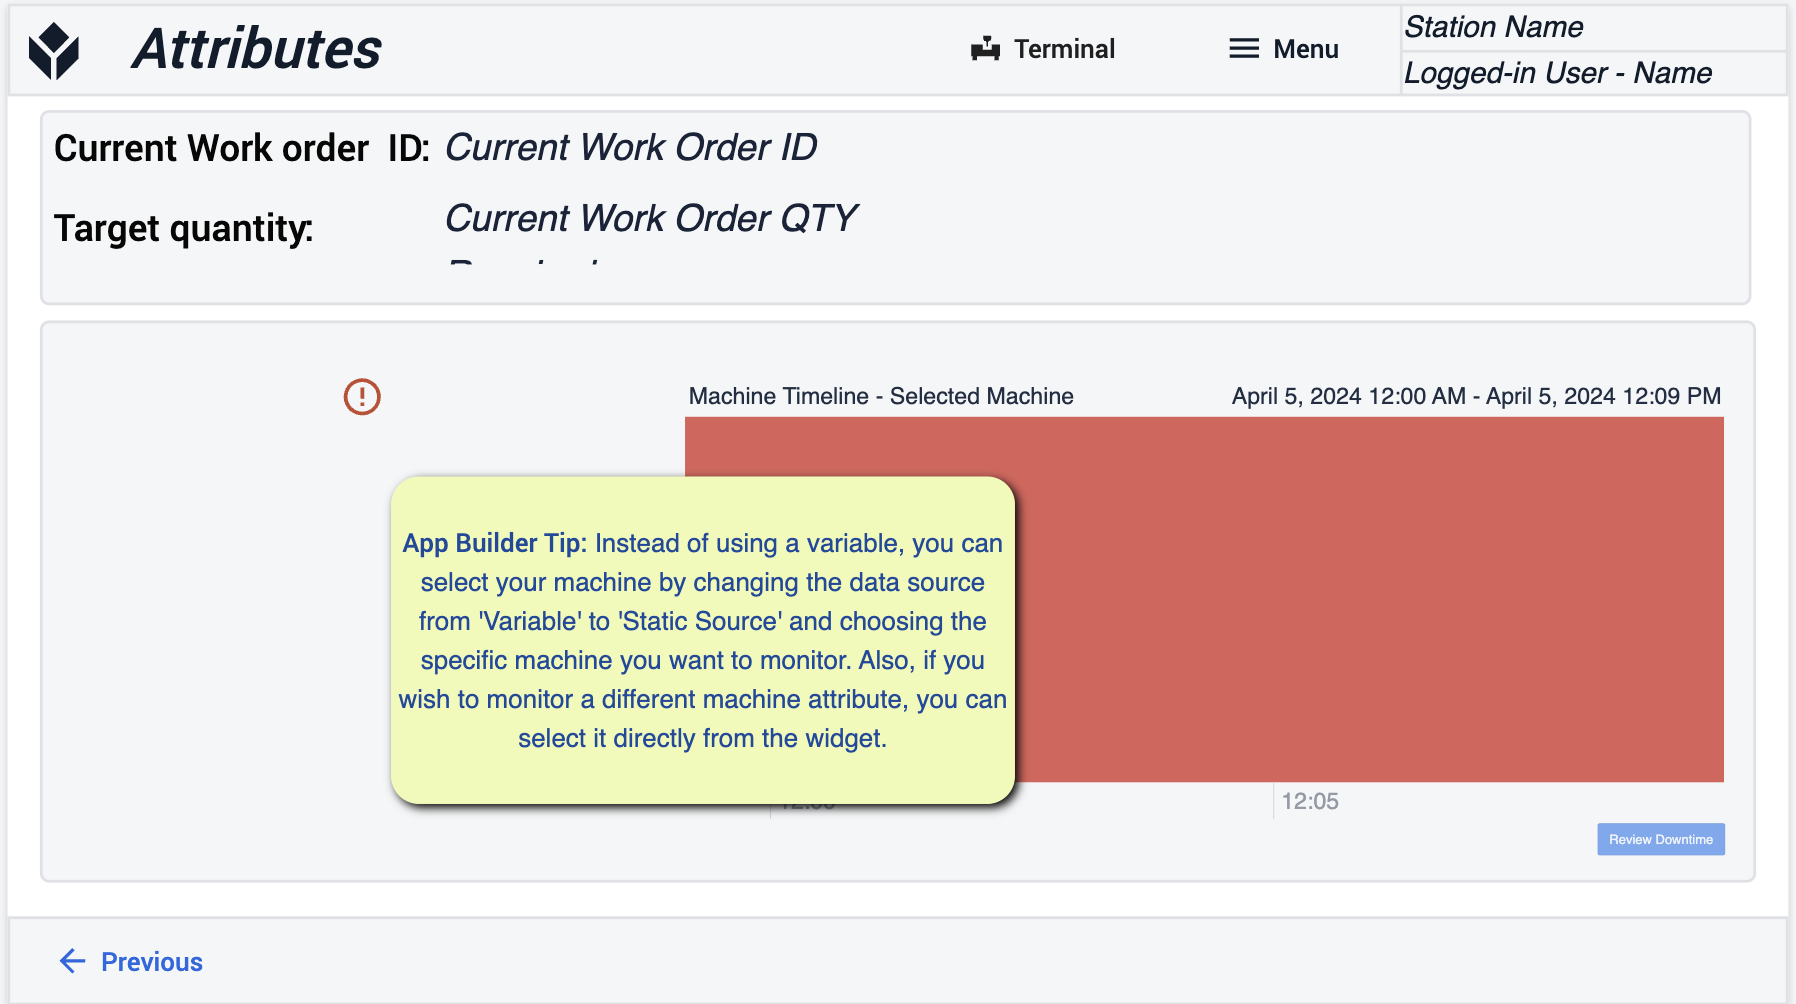 {Os motivos do tempo de inatividade serão definidos por você e, para essa etapa, você deverá seguir as mesmas dicas do criador de aplicativos para preencher a fonte de dados da máquina.
Exibir/adicionar notas da estação
Você pode ver as anotações existentes de outros operadores sobre a atividade da máquina e adicionar suas próprias anotações. Isso proporciona uma visibilidade clara do histórico de uma máquina específica.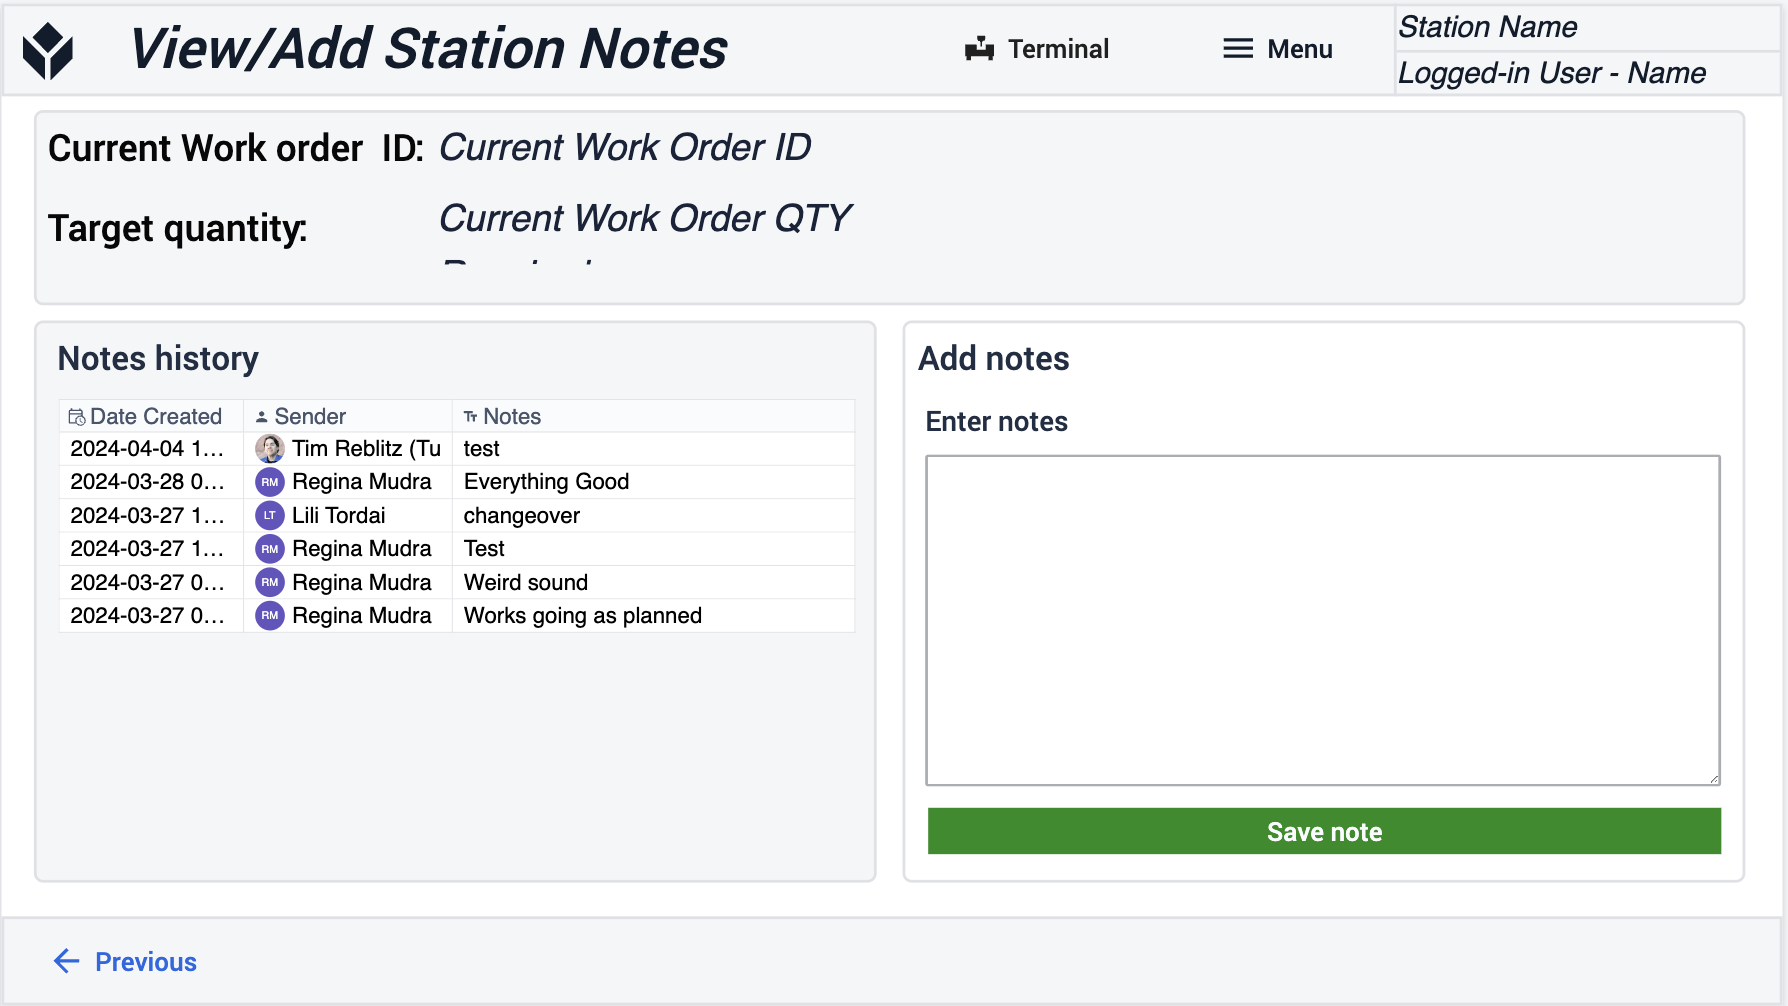
Execução de pedidos
Neste aplicativo, você terá visibilidade total do status de todas as ordens de serviço, desde Criadas, Em andamento, Concluídas e Liberadas. Veja não apenas o escopo de suas operações, mas tenha a capacidade de rastrear ordens anteriores em qualquer parte de sua vida útil.
Visualizar ordens de serviço liberadas
Nesta etapa, você verá primeiro todas as ordens de serviço que estão disponíveis para você ou que já foram concluídas.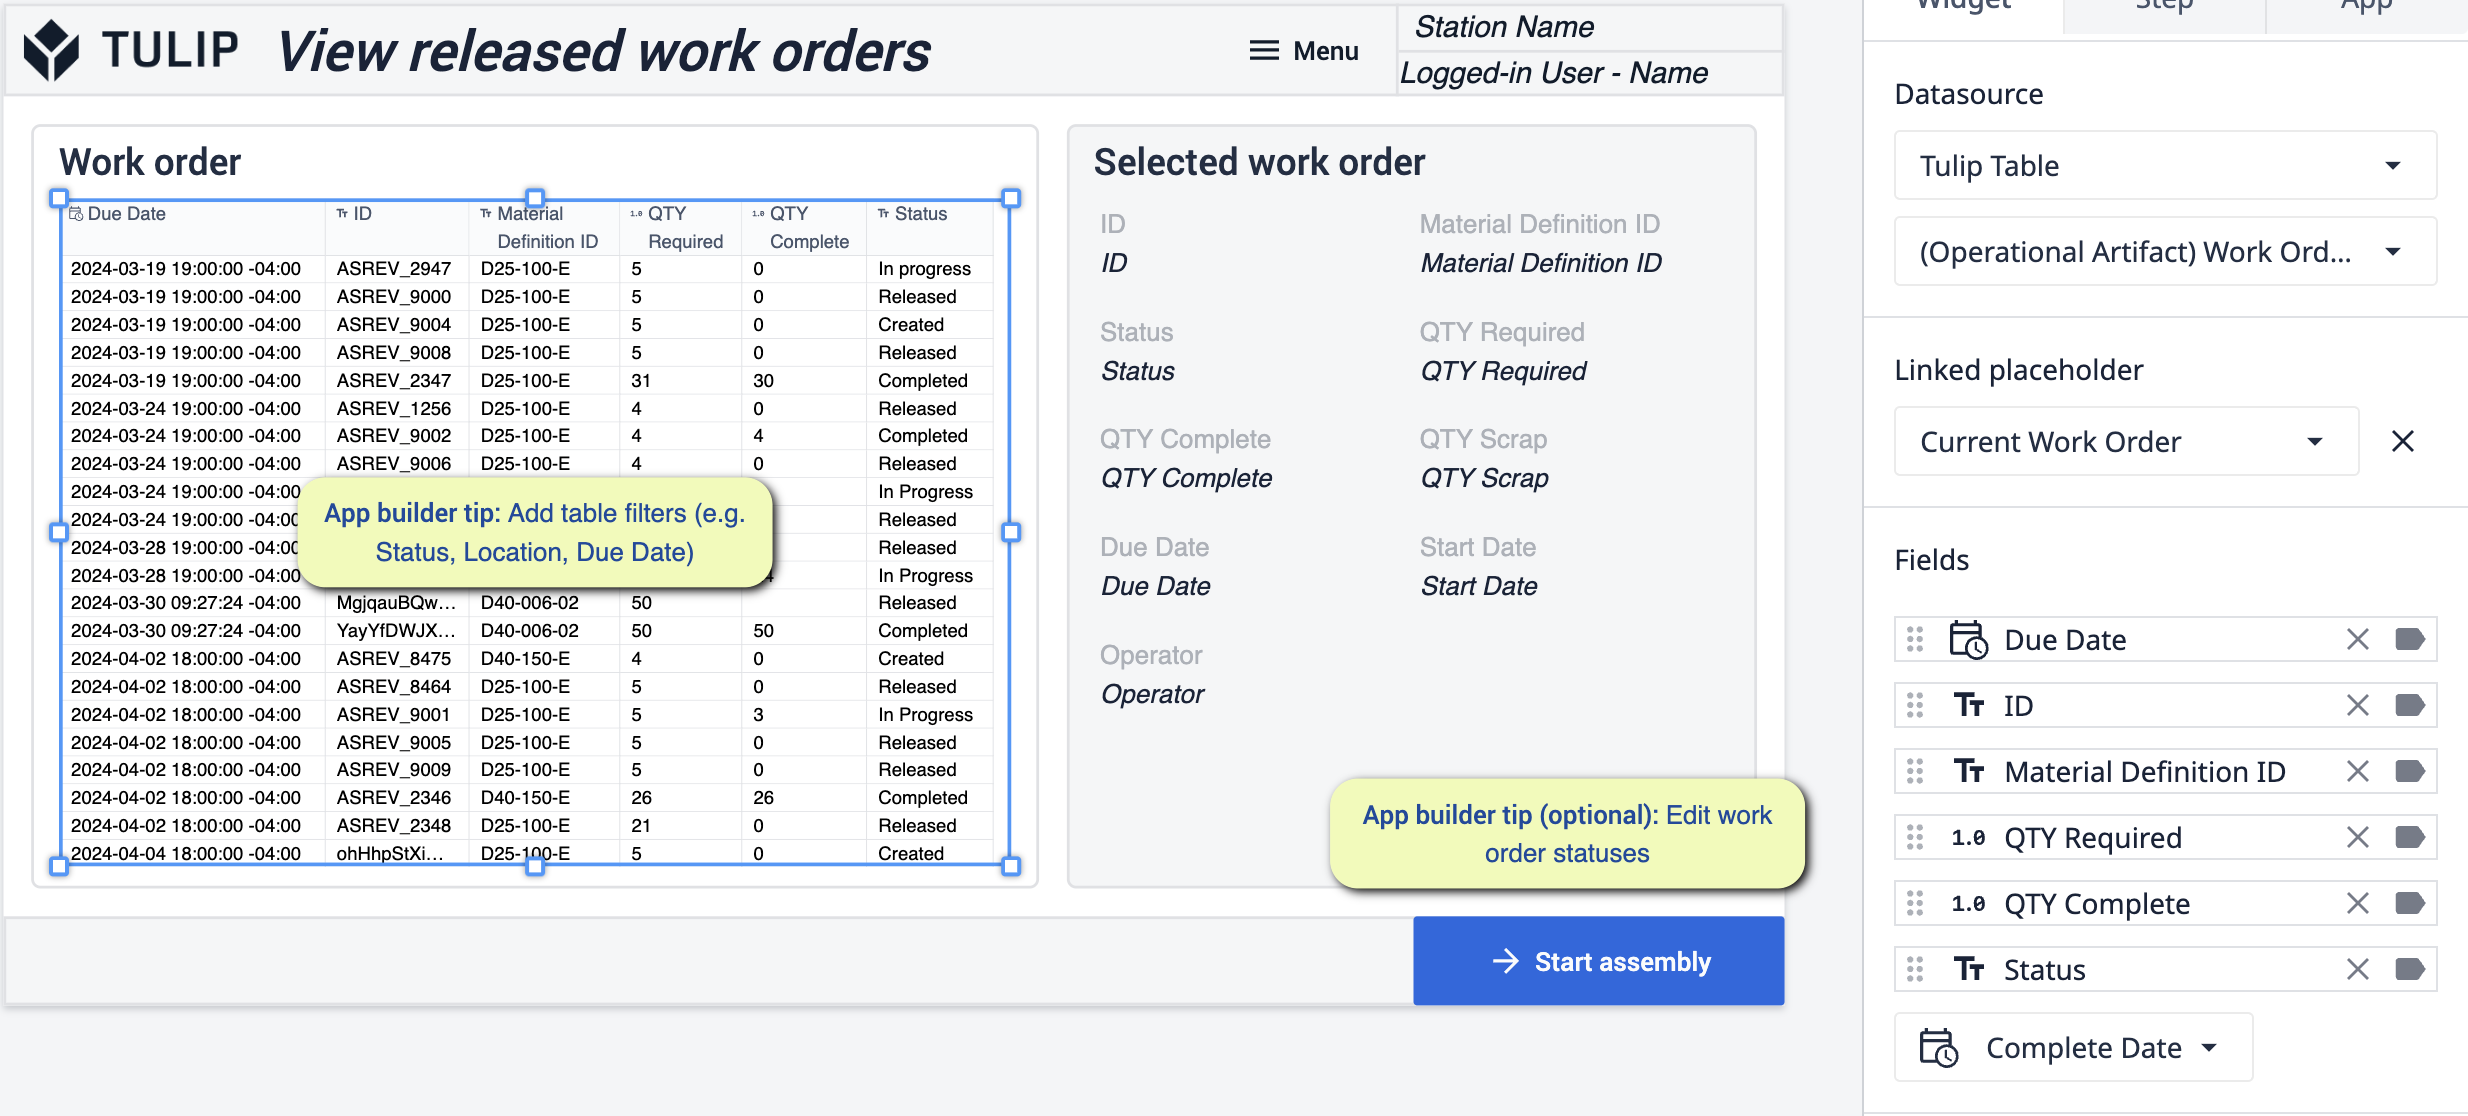 {height="300" width=""}* Nesta etapa, você poderá ver todas as ordens de serviço que estão sendo rastreadas. As alterações que podem ser feitas nessa etapa se concentram na adição de filtros à tabela e na edição de campos. Uma etapa opcional aqui seria editar os status das ordens de serviço.
Ordem de serviço em andamento
Nesta etapa, você seguirá o conjunto de instruções para concluir a ordem de serviço que foi selecionada anteriormente. Você também poderá fazer ajustes para saber quanto da ordem está sendo concluída com o passar do tempo.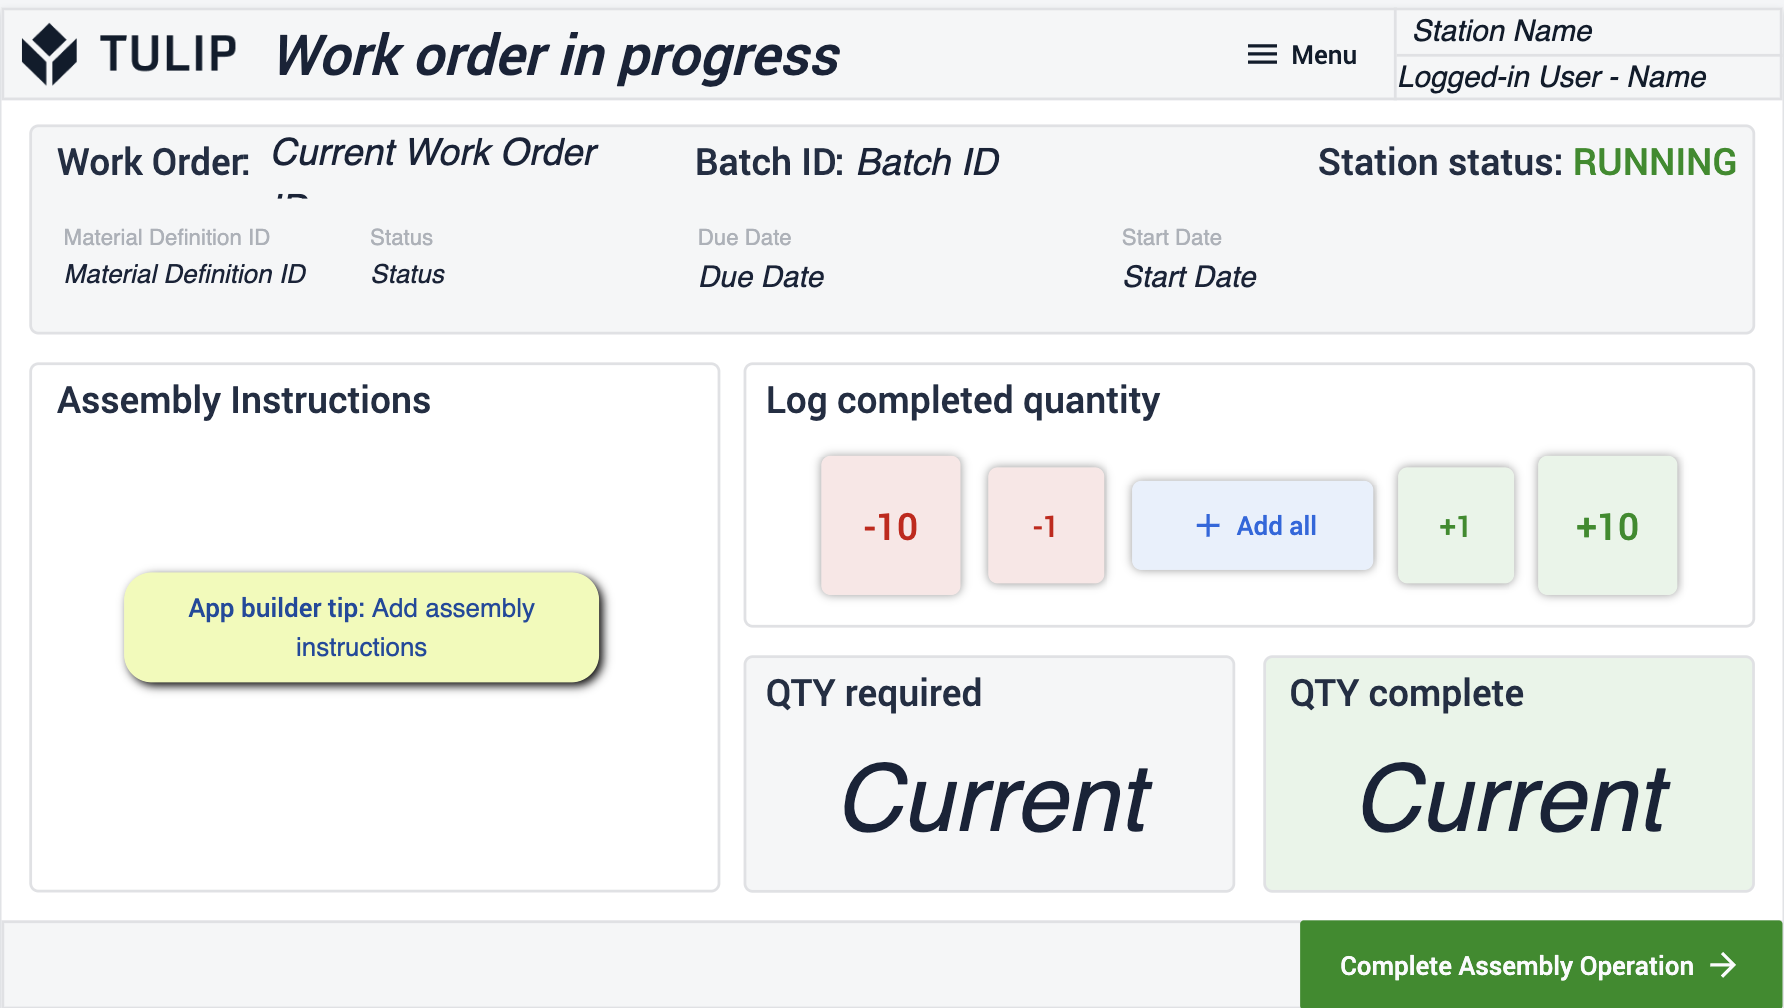 {height="300" width=""}* Aqui você poderá começar a registrar o progresso da ordem em que está trabalhando. A configuração que esta etapa precisa é a adição de instruções de montagem. Isso pode ser feito na forma de instruções de texto detalhadas, arquivos CAD, vídeos, etc
Conclusão da confirmação
Aqui você poderá imprimir a etiqueta do trabalho concluído, o que garantirá que o pedido sempre possa ser rastreado, se necessário, pois o histórico ainda está com você. 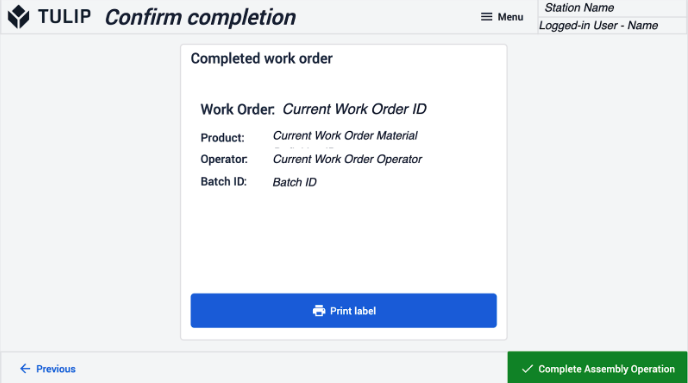
Etiqueta
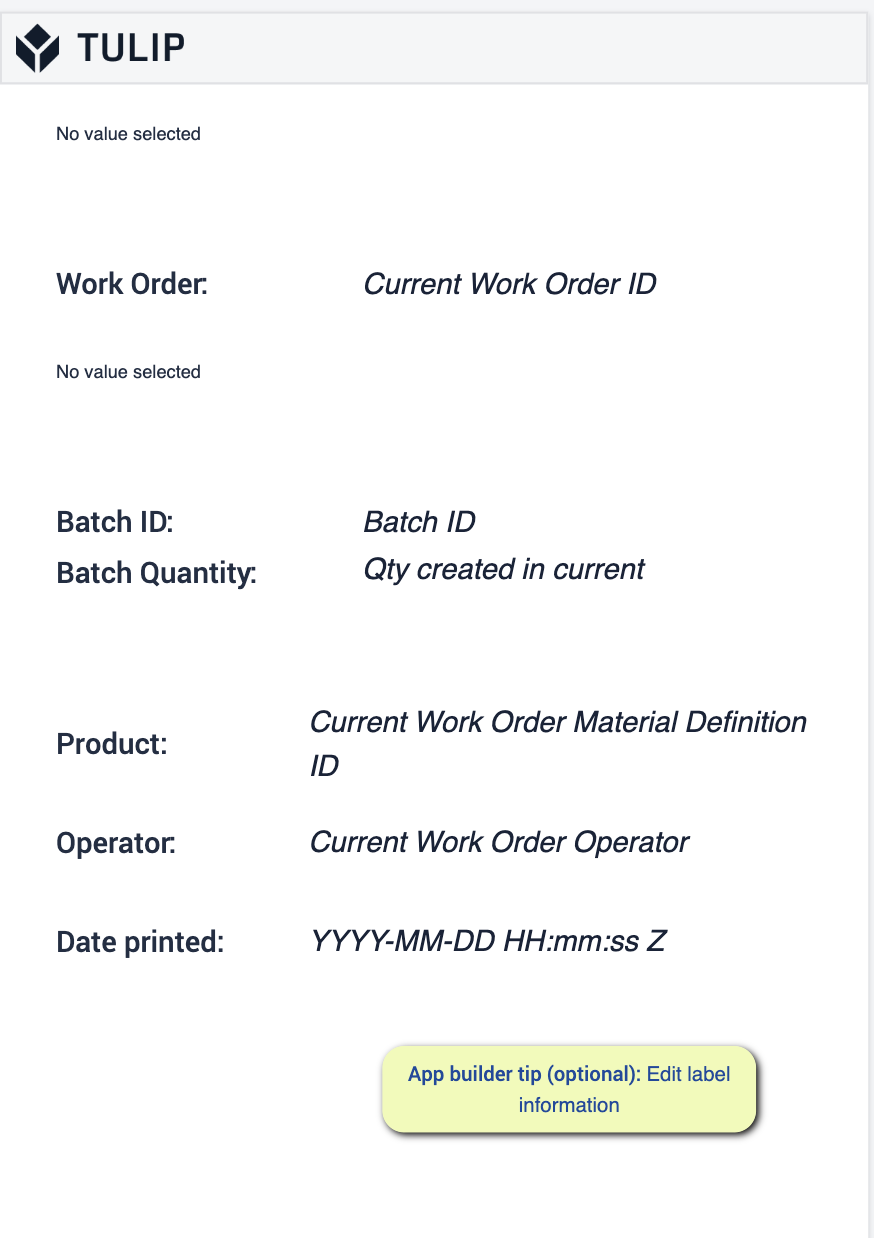 {height="250" width="200"}* Esta é a aparência de sua etiqueta e uma etapa opcional aqui é a capacidade de editar as informações exibidas na etiqueta.
Gerenciamento de pedidos
O uso desse aplicativo se concentra na criação e no rastreamento de pedidos à medida que eles passam pela produção. Tenha total visibilidade e controle sobre os trabalhos que estão sendo realizados.
Visualizar ordens de serviço
Nesta etapa, você poderá visualizar as ordens de serviço e obter mais informações selecionando as ordens que deseja ver.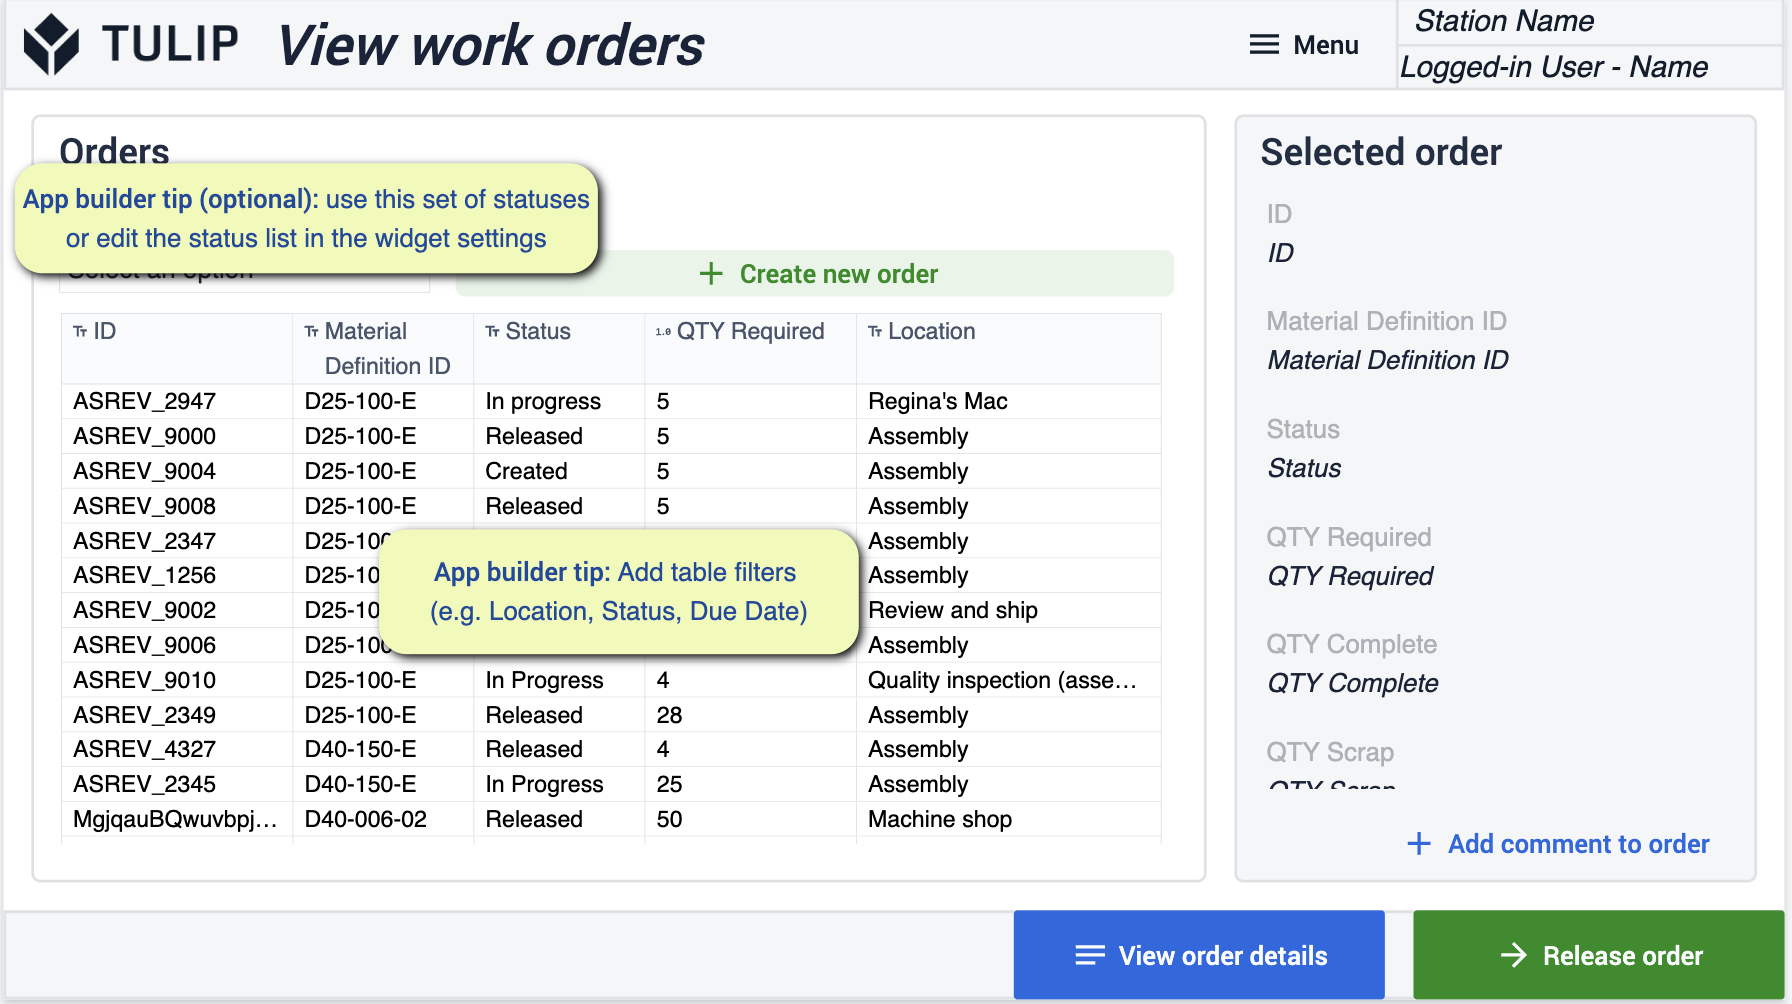 {height="" width=""}* Faça alterações filtrando a tabela e os campos para atender às suas necessidades. Como uma tarefa opcional, fique à vontade para alterar os status que estão sendo usados para atender às suas necessidades comerciais.
Criar ordens de serviço
Esta etapa lhe dá a capacidade de criar manualmente ordens de serviço conforme necessário. Adicione essas ordens diretamente à produção para que os operadores tenham acesso a elas.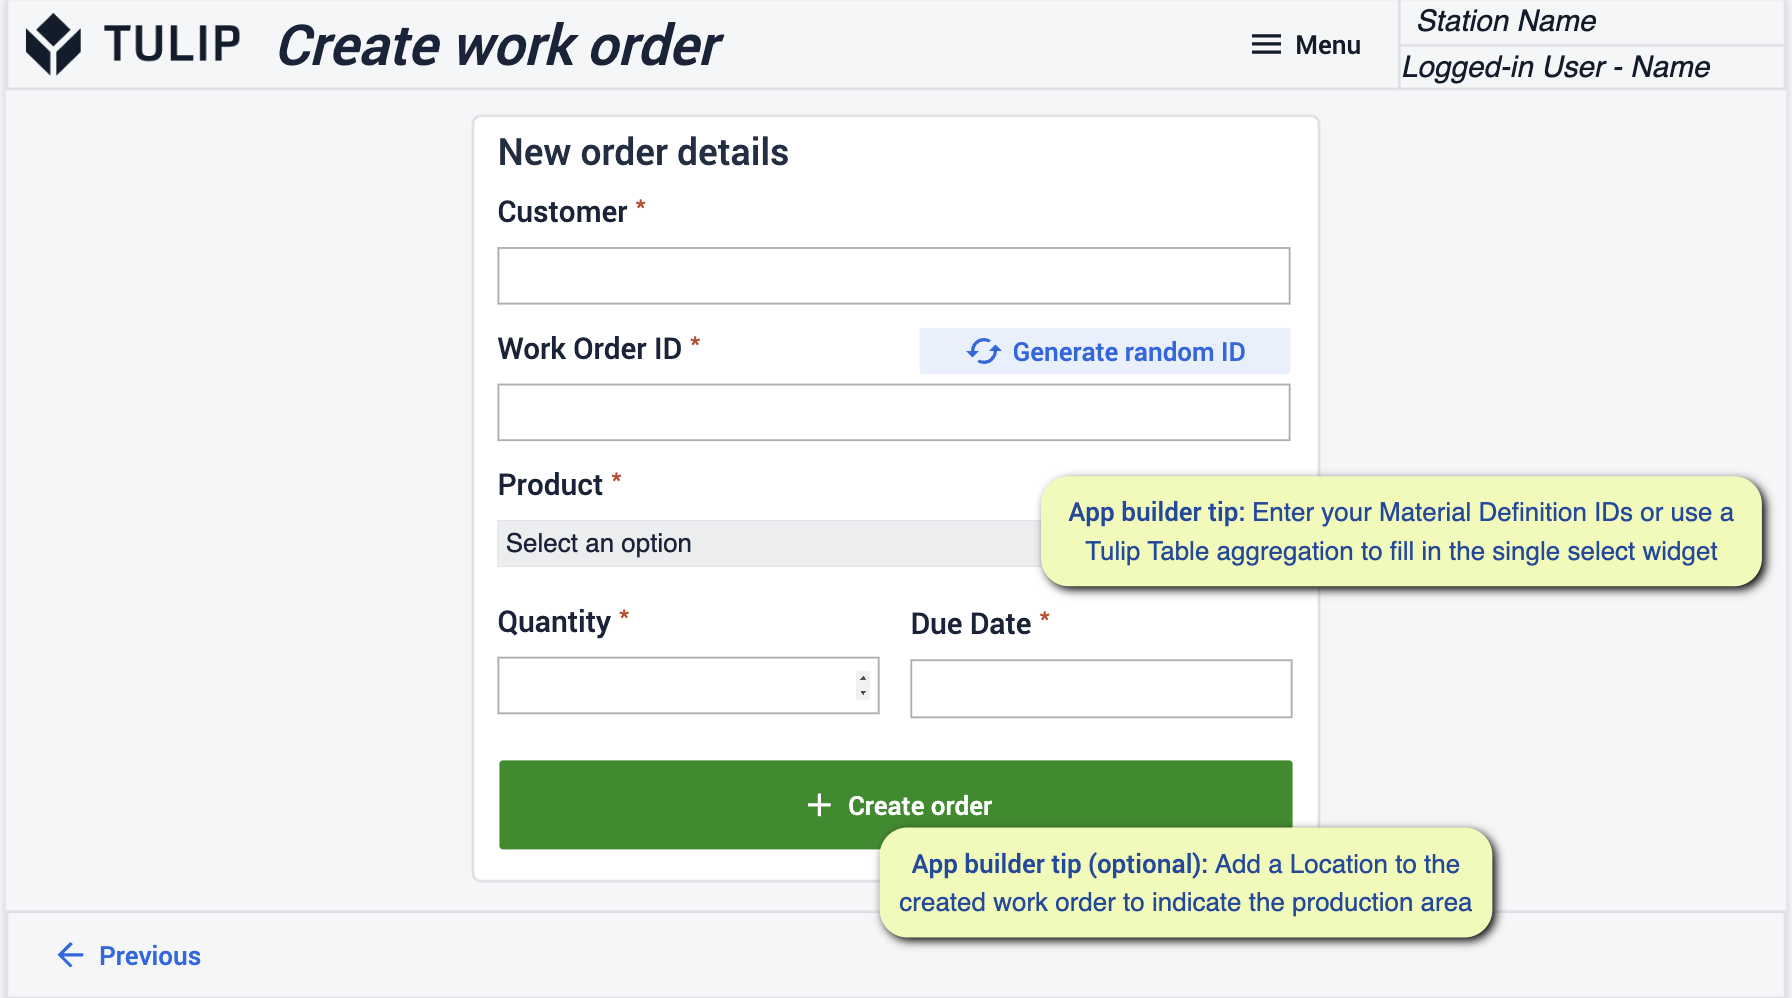 {height="300" width=""}* Certifique-se de inserir as IDs de material ou de usar Table Aggregations para preencher widgets de seleção única
Exibir detalhes da ordem de serviço
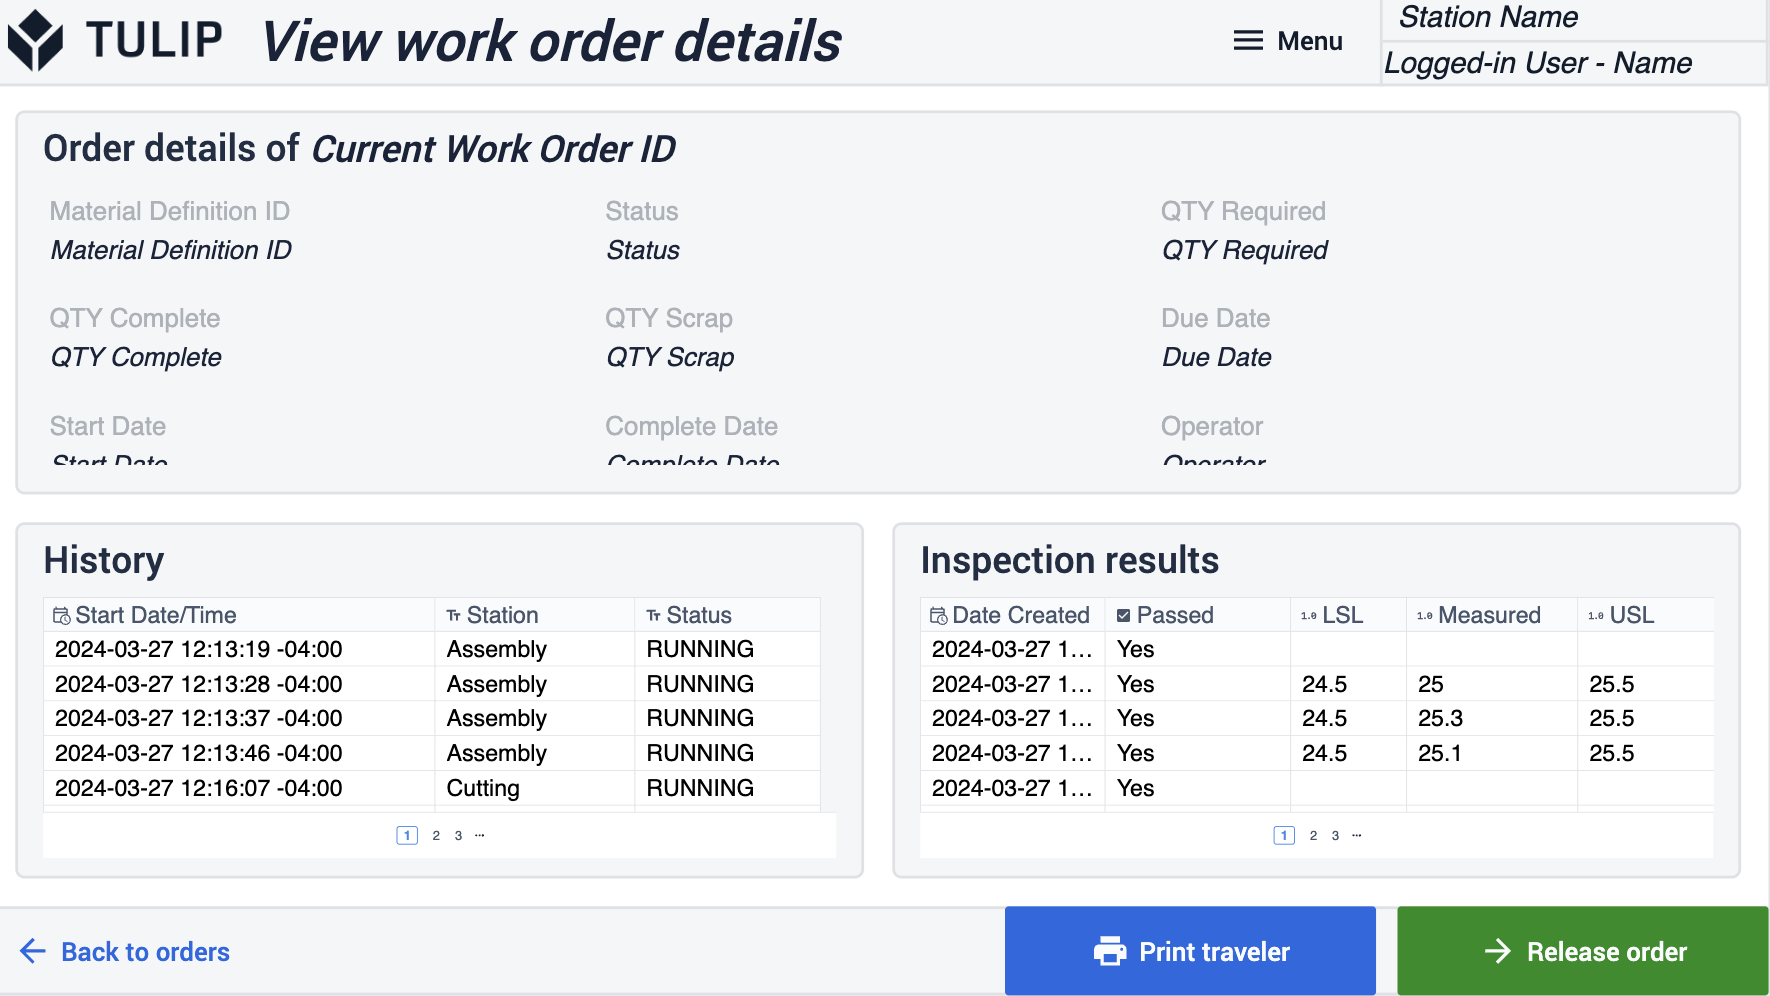 {Nesta etapa, você entrará em mais detalhes da visualização anterior da ordem de serviço. Aqui você também pode imprimir as informações, se necessário.
Confirmar liberação
Esta etapa mostra detalhes sobre o material que vem junto com os pedidos específicos e a quantidade que está sendo usada.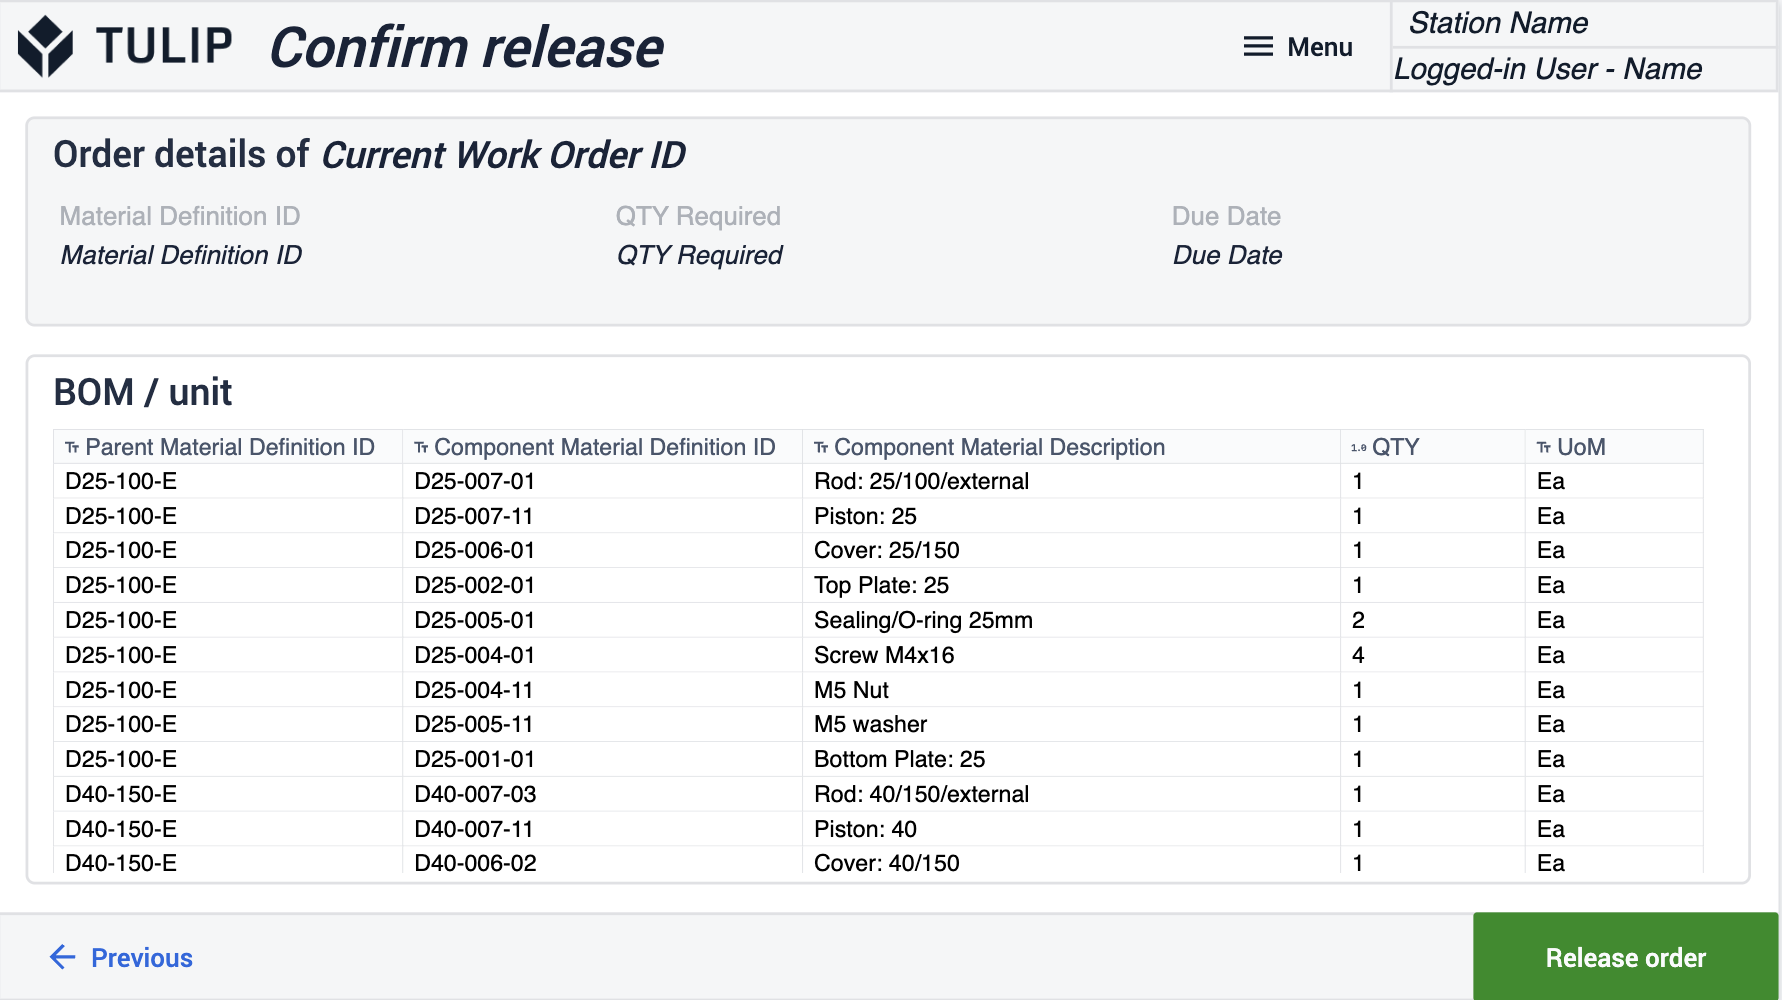
Adicionar comentário ao pedido
Adicione comentários em um pedido específico para deixar um registro do que está funcionando, por que um processo pode ter demorado e por que um processo pode ter dado certo. Permita que os operadores se comuniquem rapidamente com a gerência. 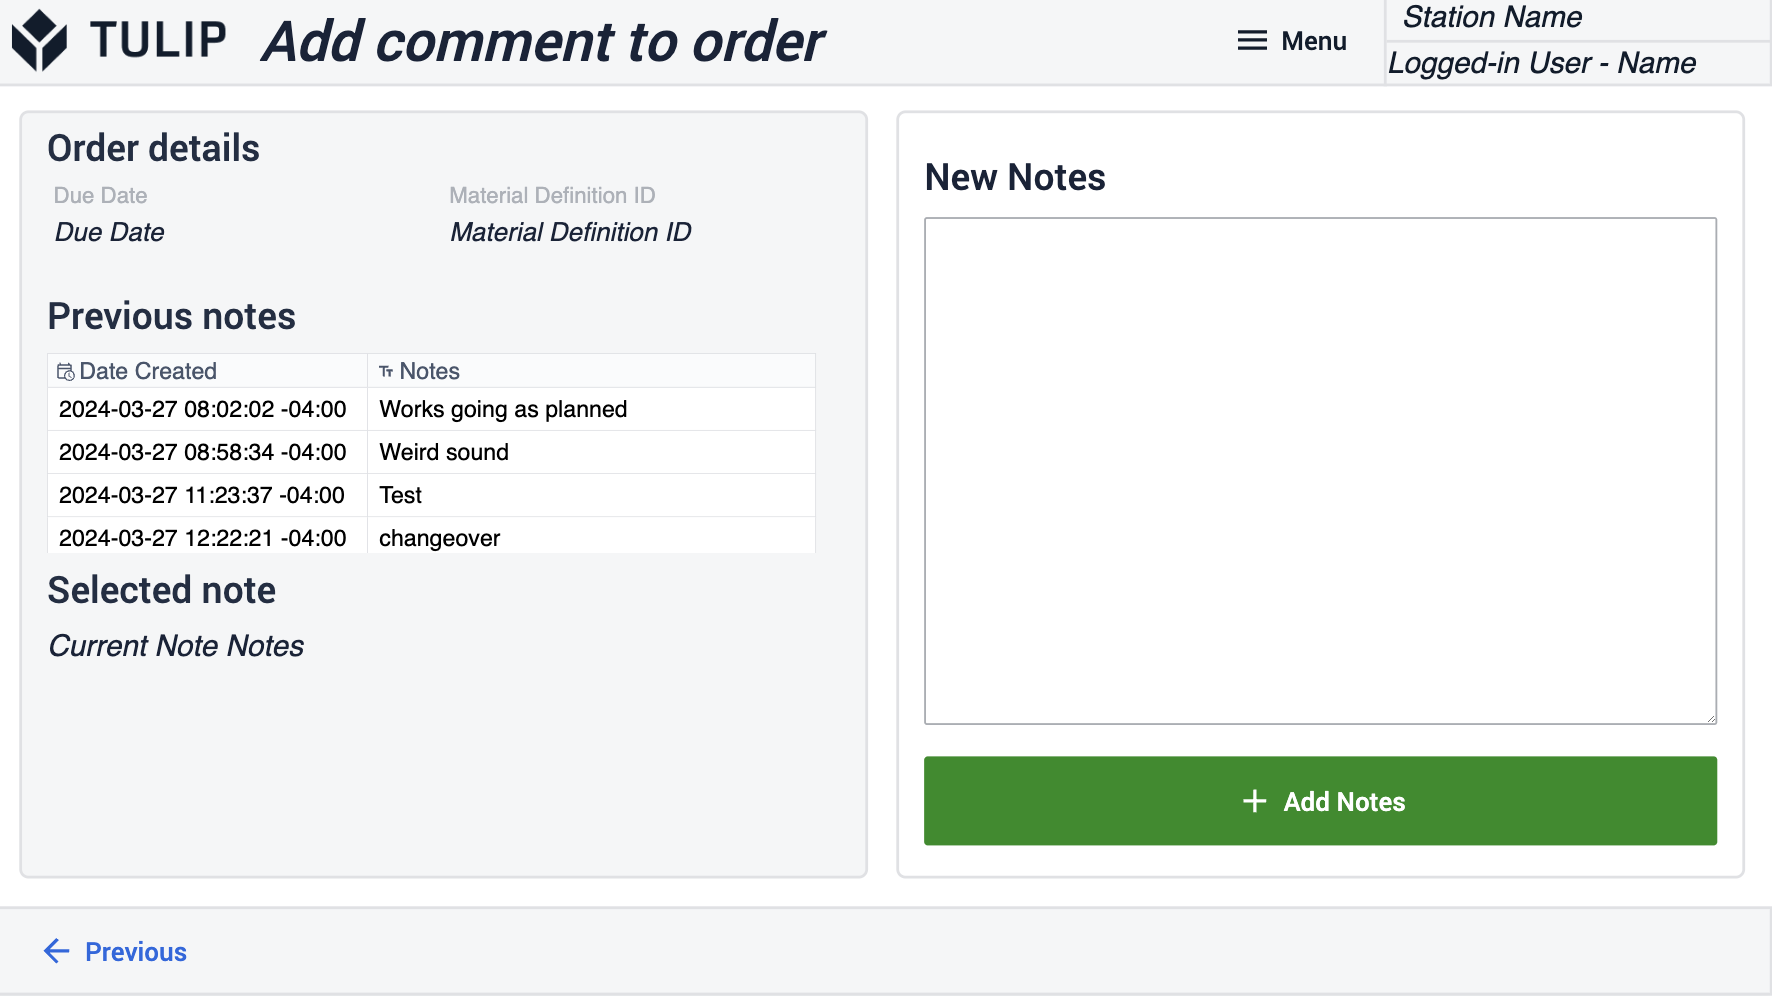
Viajante
Esta etapa serve para mostrar todo o histórico da ordem de serviço. Para quem é, o que foi feito, quando precisa ser feito etc.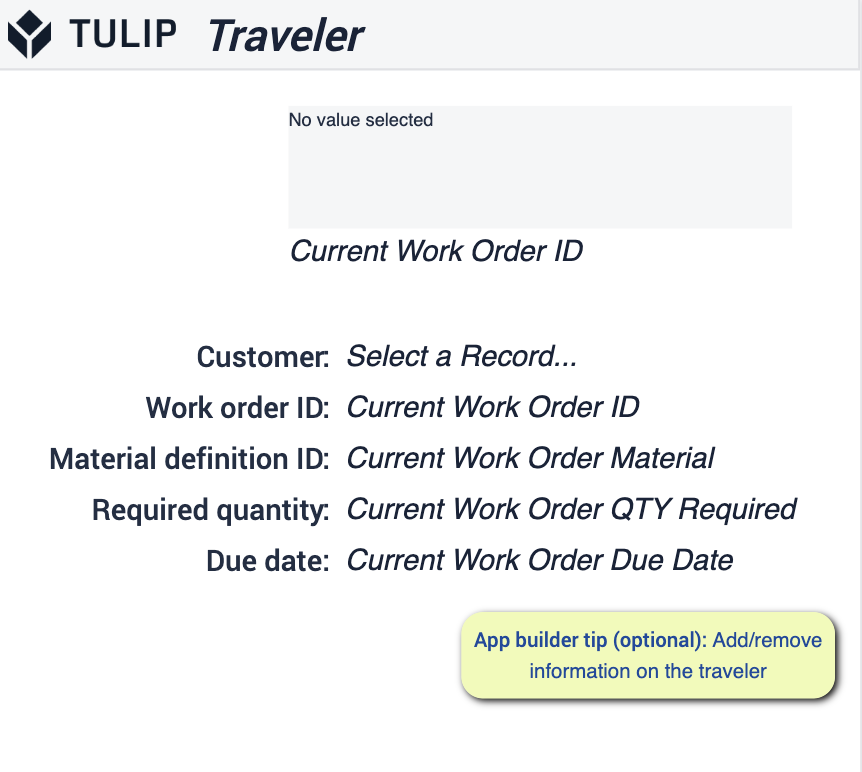 {height="300" width=""}* Você pode adicionar ou remover informações que precisam ser exibidas nessa etapa.
Saiba mais sobre o rastreamento de pedidos.
Terminalde visibilidade de desempenho{target=_blank}
Com esse aplicativo, você pode capturar dados de desempenho de alto nível à medida que as peças são produzidas por uma pessoa ou máquina. Aqui, os operadores poderão registrar dados sobre a atividade da máquina e a análise da produção.
Selecionar pedido
Esta etapa permitirá que você selecione ordens de serviço para iniciar a produção. Veja detalhes sobre os tipos de ordens que estão em produção e onde elas estão.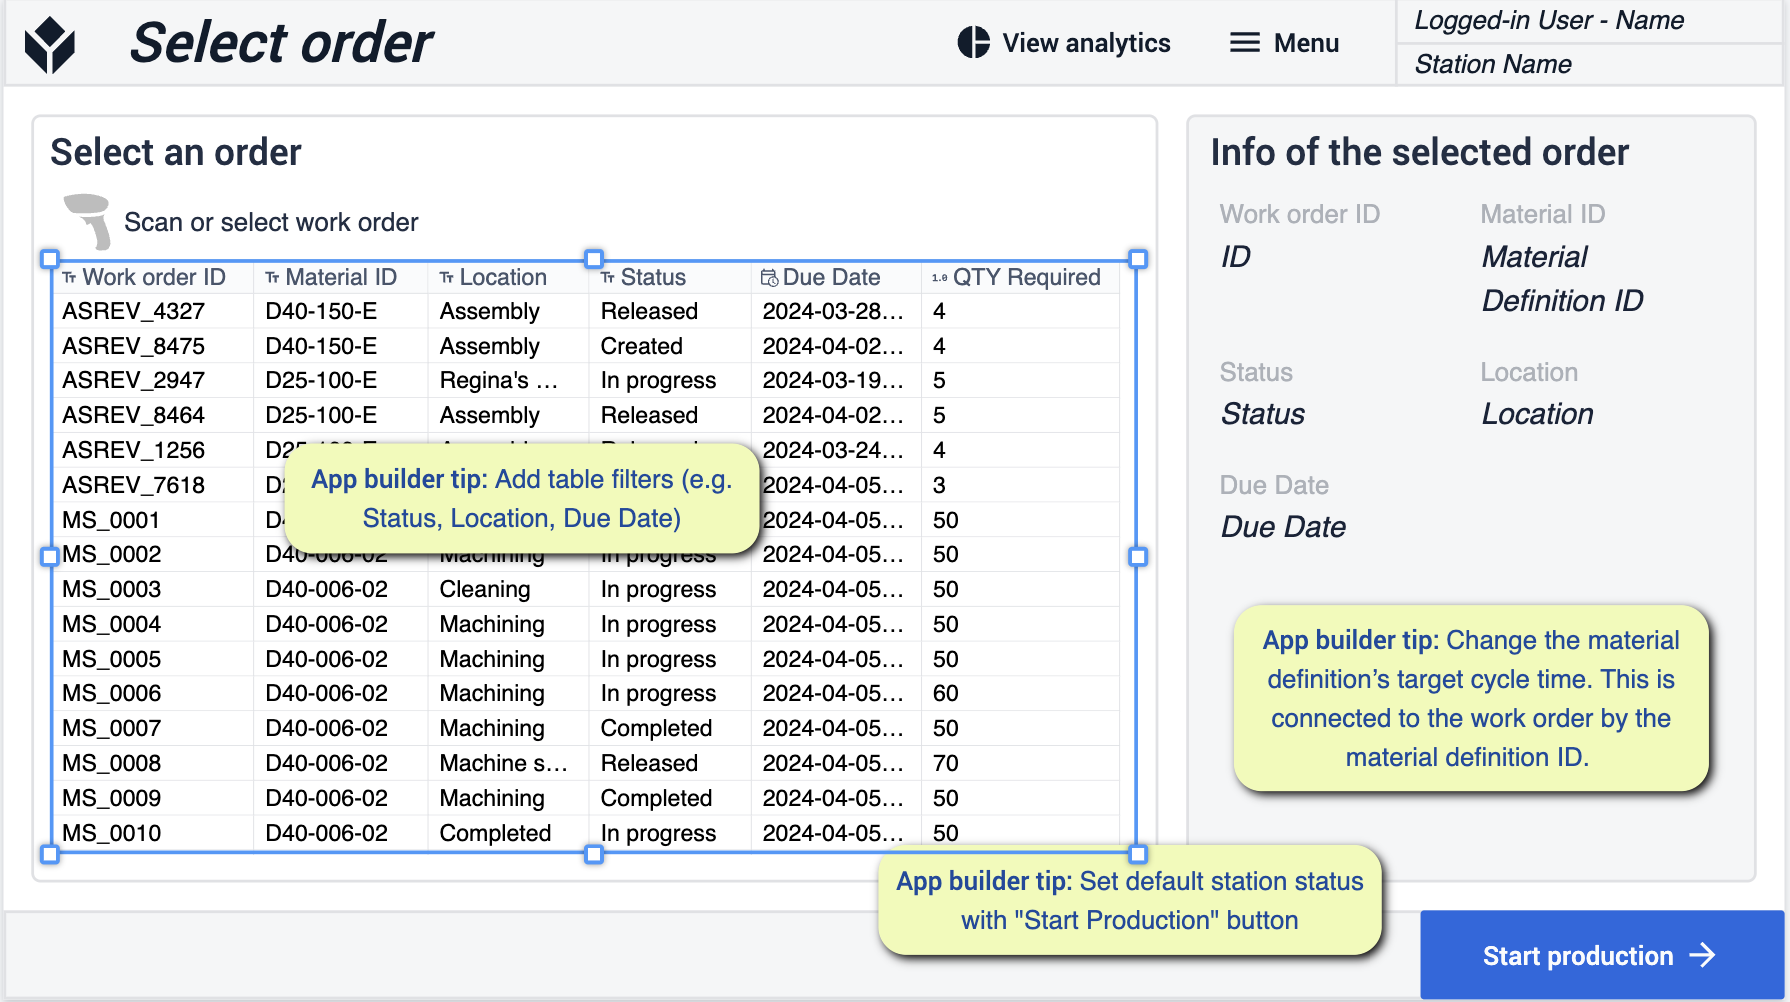 {height="300" width=""}* De forma semelhante à seleção de ordens de trabalho anterior, você fará alterações na tabela conforme necessário. Preste atenção às alterações específicas relacionadas à definição de material e ao status da estação.
Principal
Esta etapa tem o objetivo de ajudá-lo a exibir o status da estação específica em que está trabalhando. Além disso, ajuda a capturar peças boas versus defeituosas. {height="300" width=""}* Certifique-se de seguir as etapas indicadas para exibir as estátuas corretas da estação.
Alterar o status para inativo
Você poderá selecionar os motivos do tempo de inatividade com base no motivo pelo qual uma máquina estaria inativa. Defina os motivos que fazem sentido para suas operações.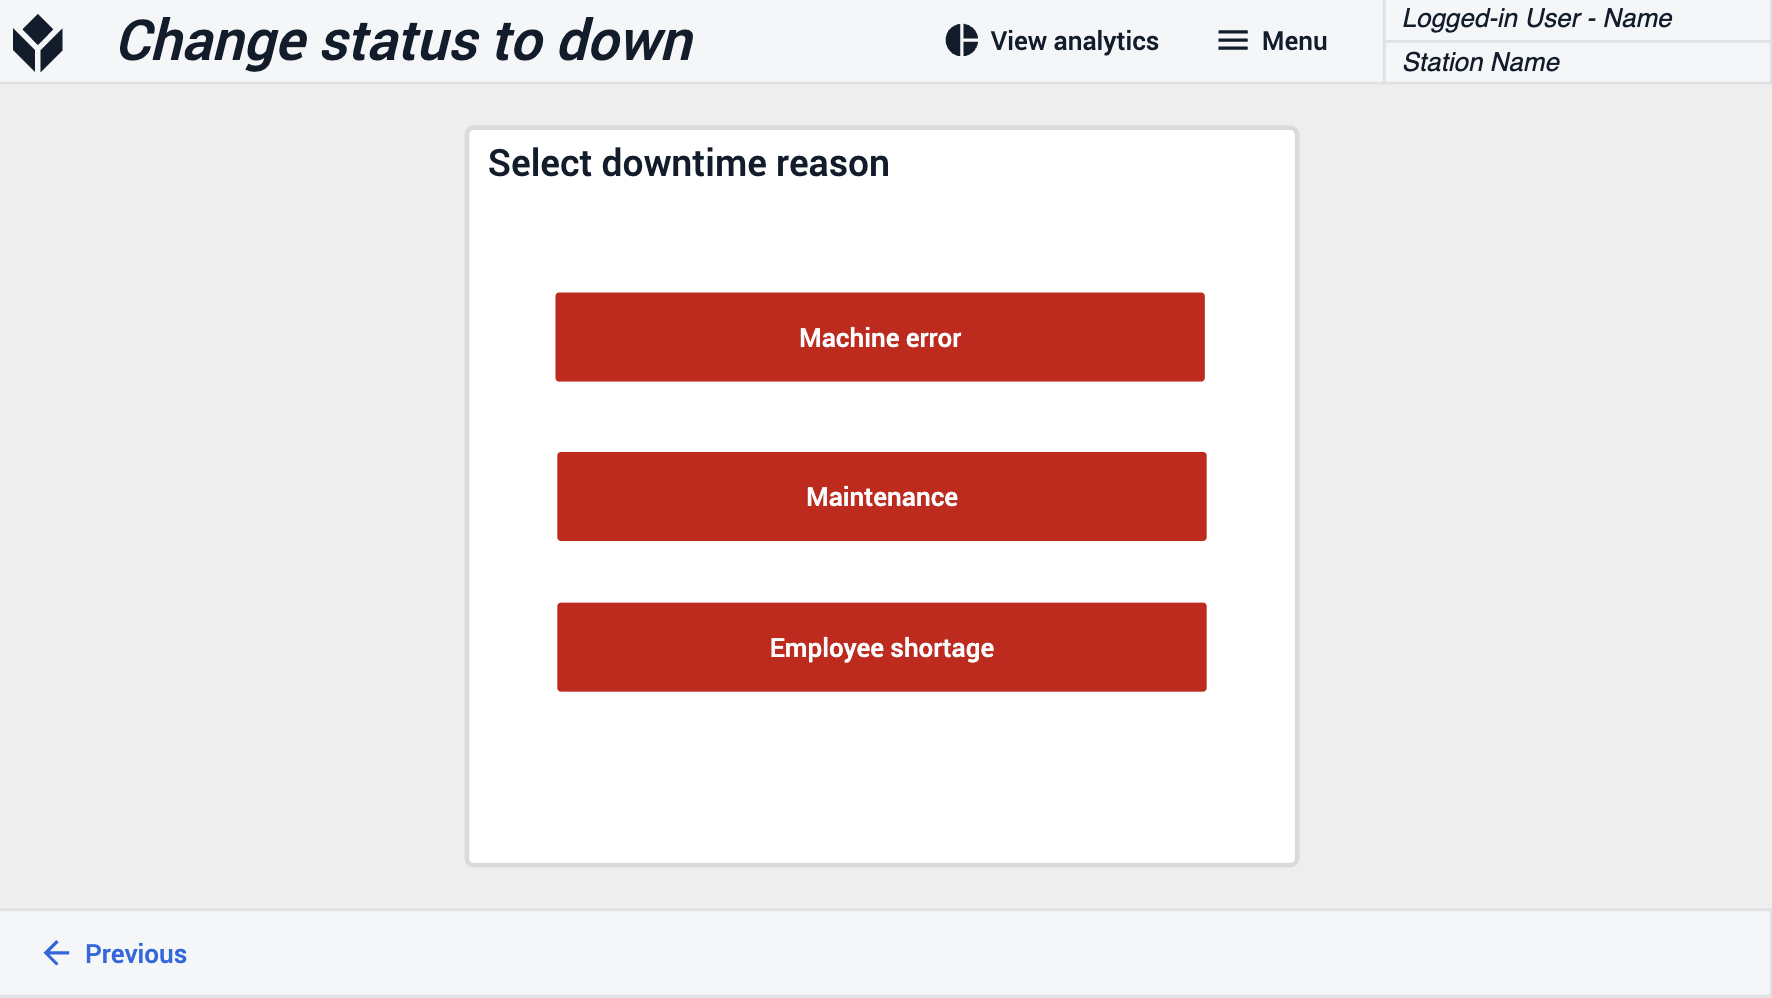
Análises
Veja informações detalhadas sobre o desempenho de suas máquinas em um dia ou semana específicos.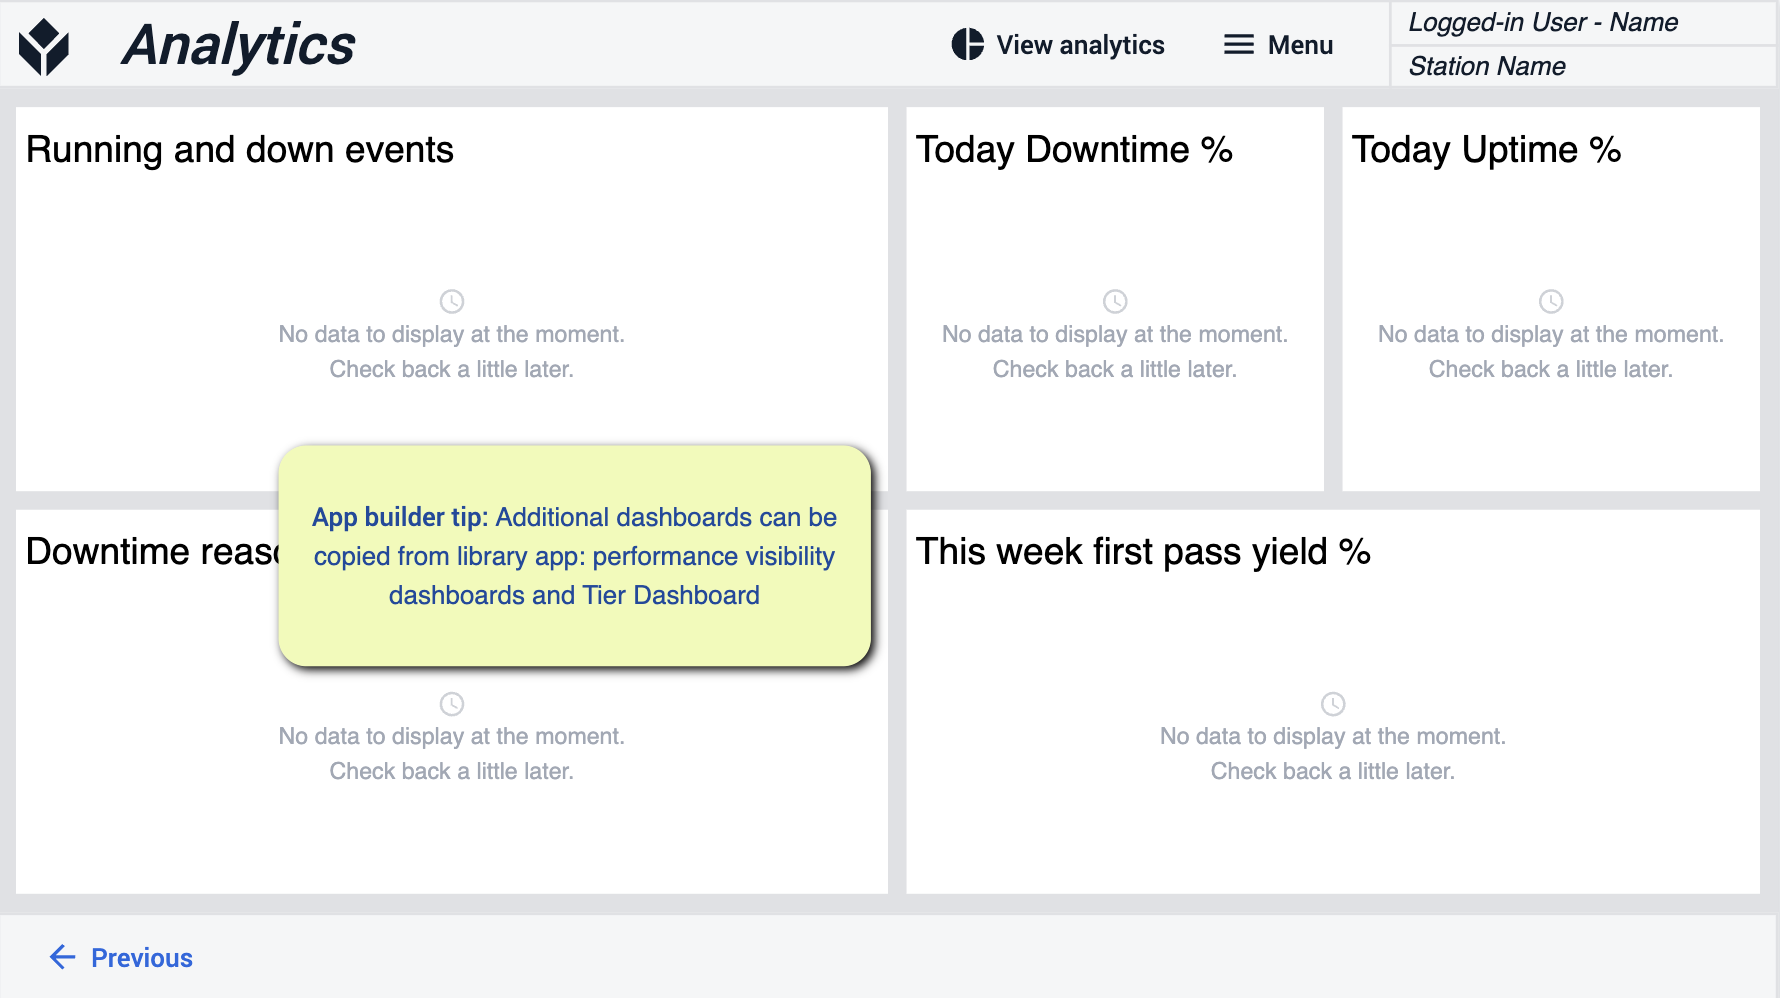 {height="300" width=""}* Se quiser ter uma variedade extra de visualizações, você sempre poderá adicionar mais da biblioteca
Terminal Andon
O aplicativo Andon permite visualizar e selecionar ordens abertas, execução de ordens e criação de eventos de tempo de inatividade, se necessário. Depois que uma ordem é executada, ela pode ser marcada como fechada.
Selecionar ordem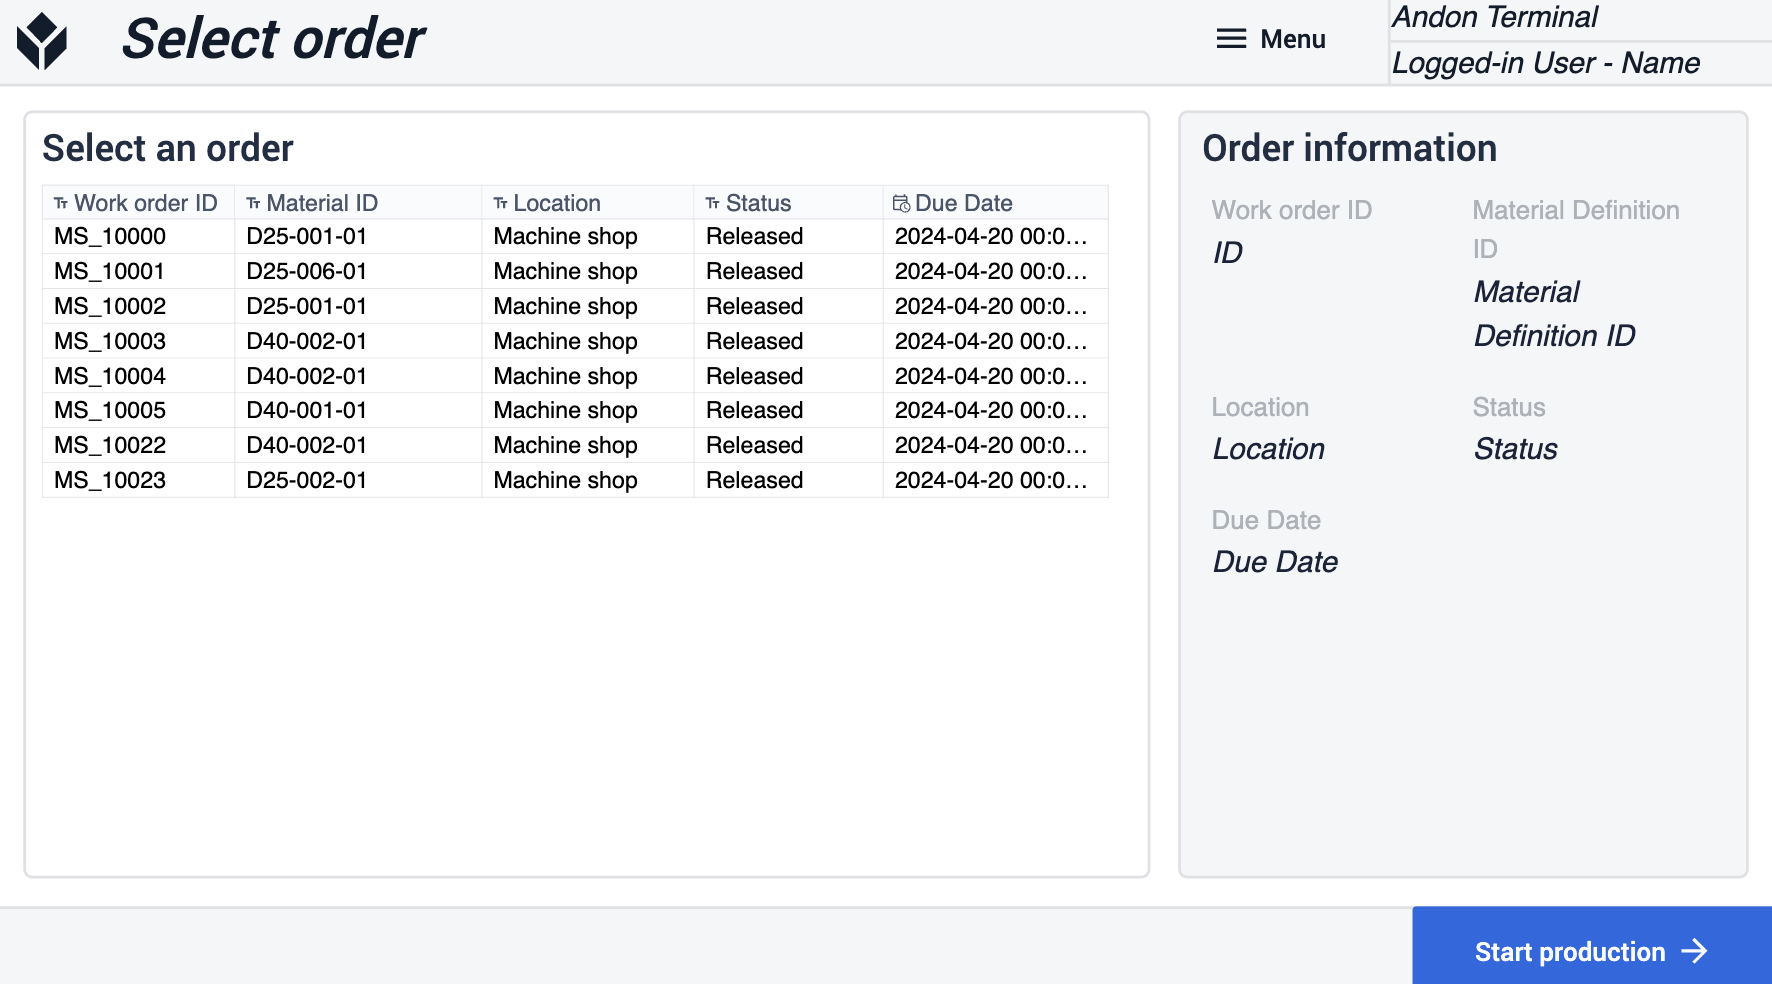
Página principal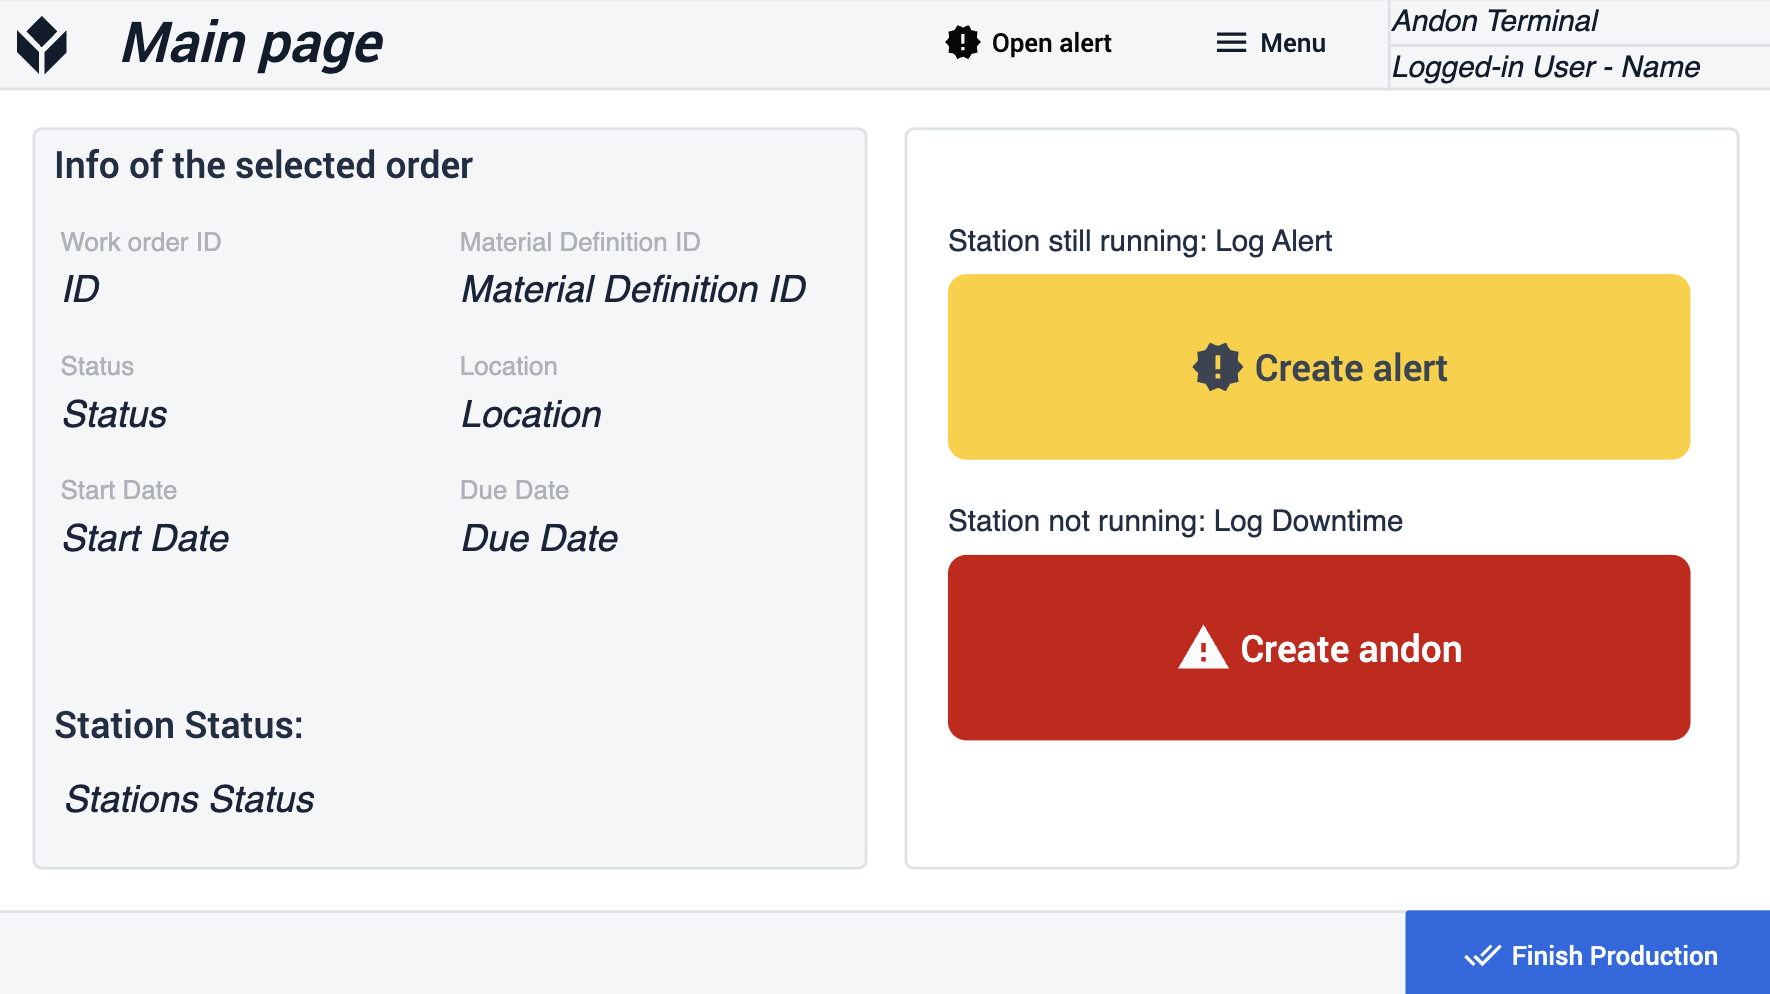
Andon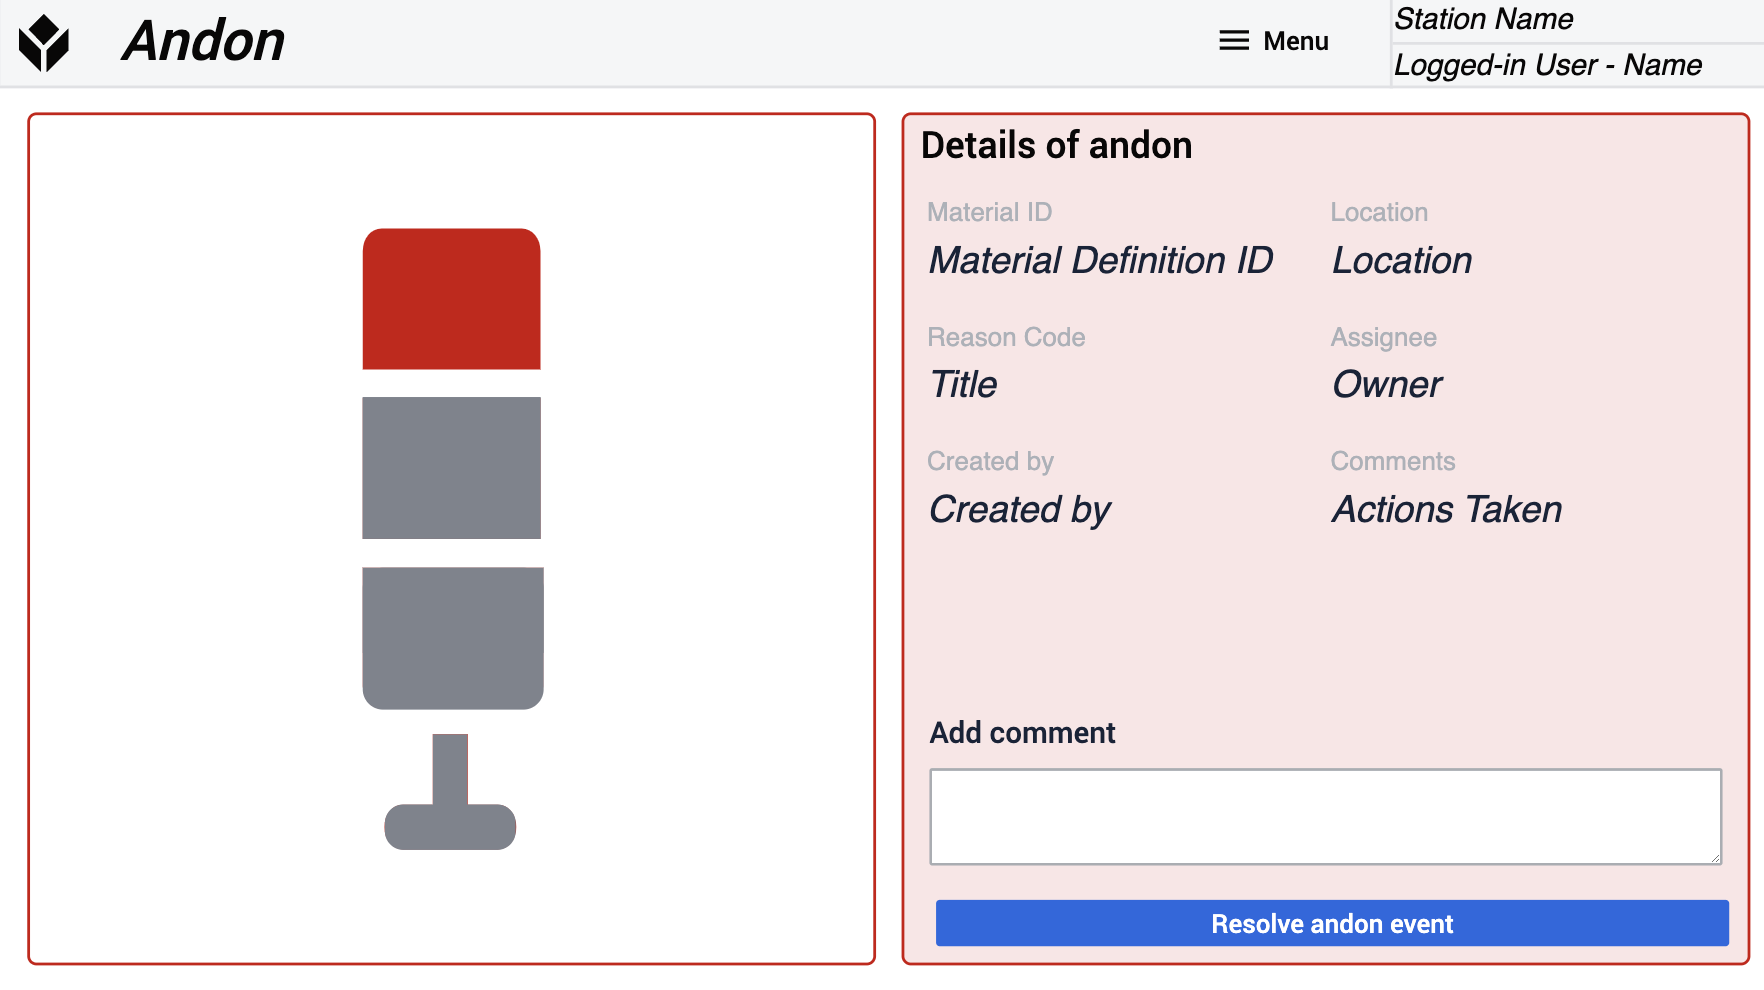
Criar andon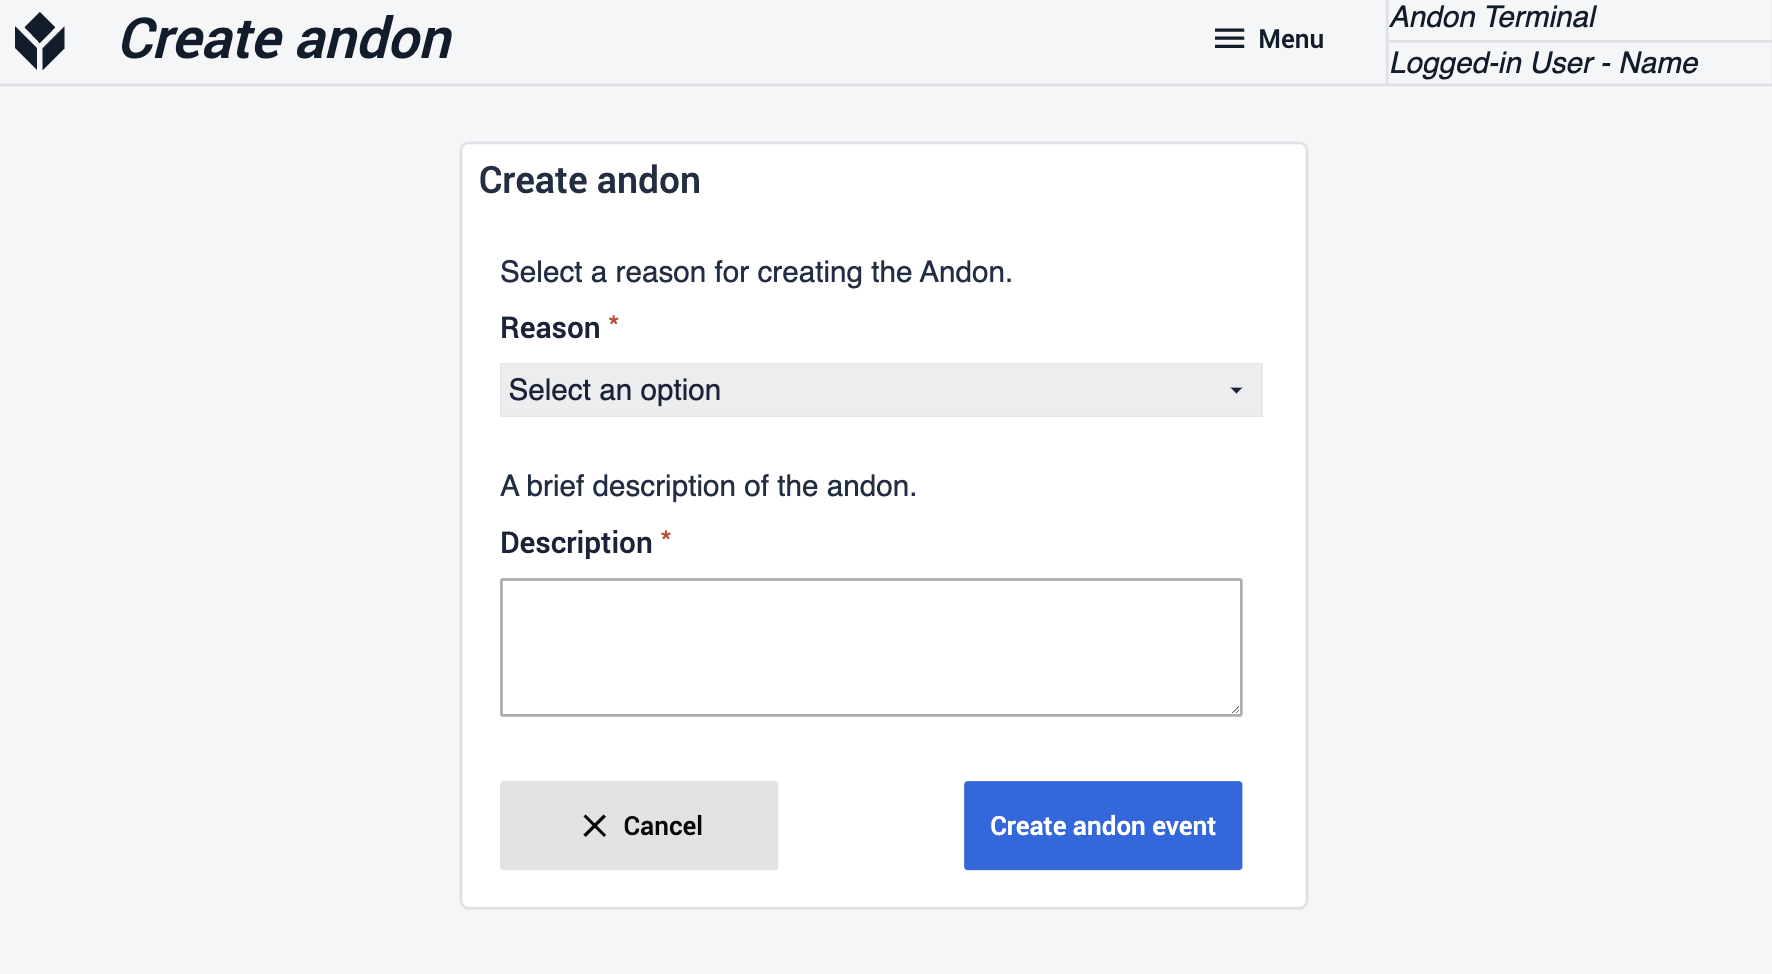
Abrir evento de alerta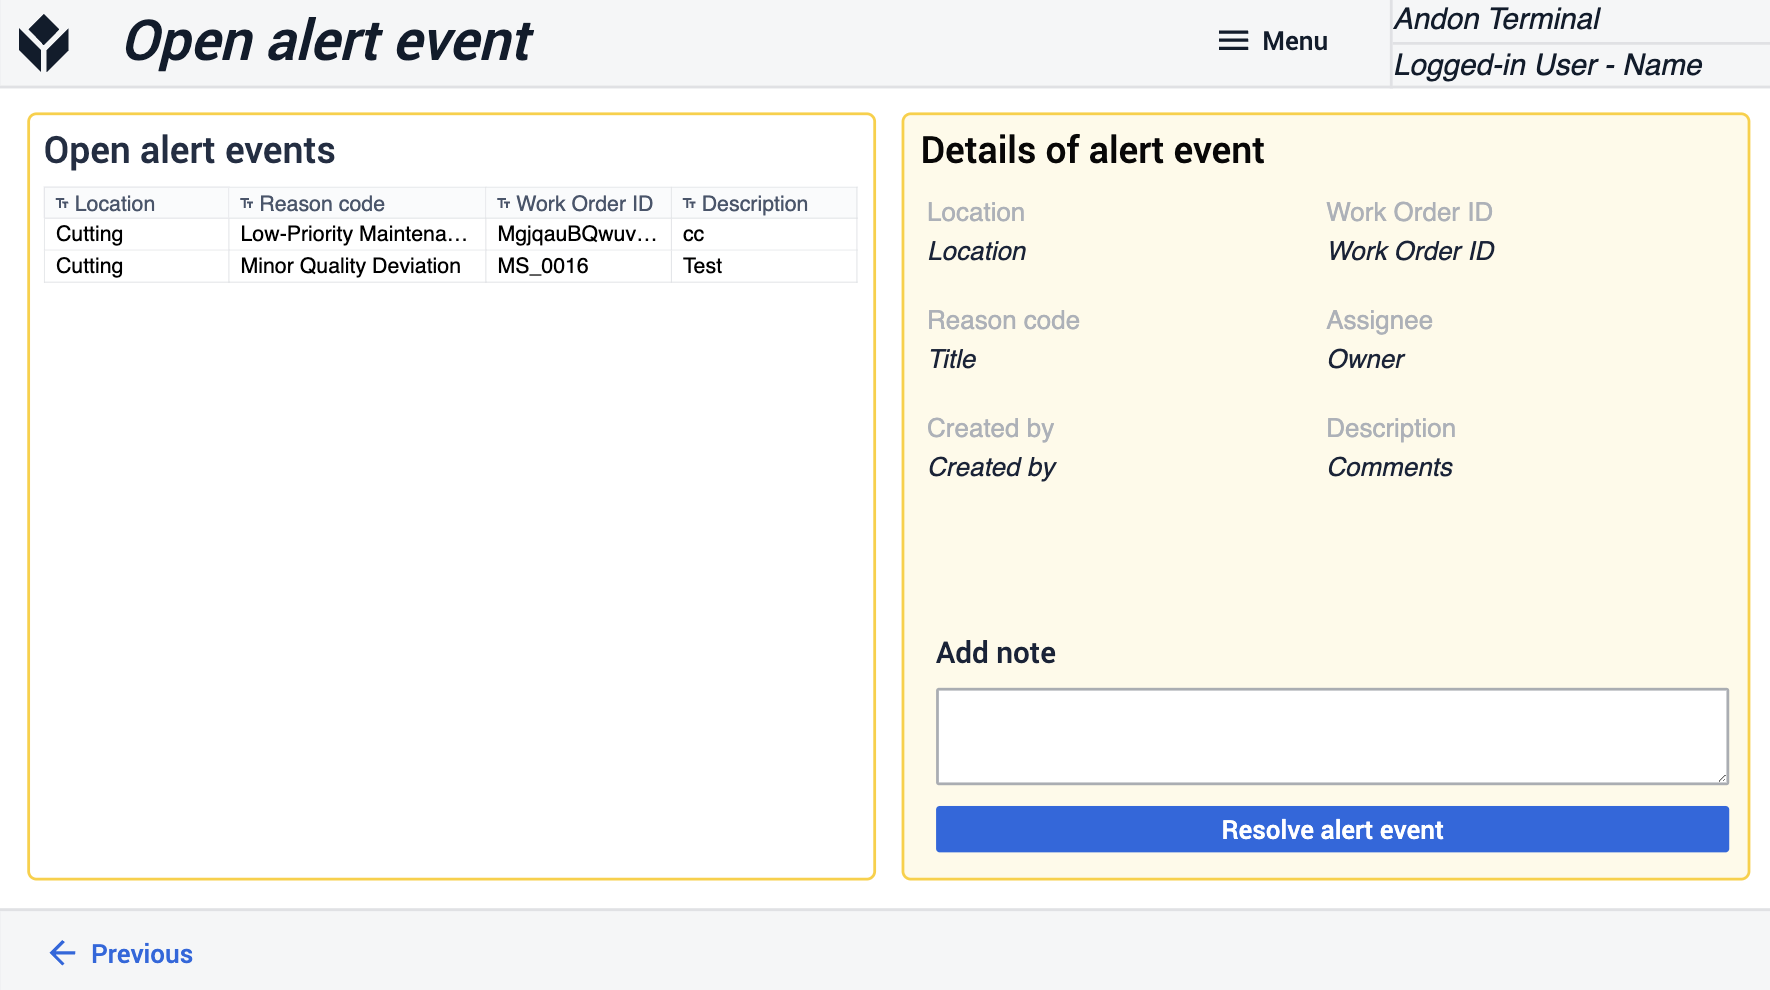
Painel de visibilidade do desempenho
Esse painel é usado para supervisionar os dados que são capturados no chão. Maximize seu tempo de atividade rastreando o rendimento da primeira passagem, o tempo de ciclo e os gráficos de Pareto.
Painel de gerenciamento de operações
O objetivo desse aplicativo é oferecer um mergulho mais profundo nas principais métricas, como desempenho, qualidade, segurança e disponibilidade. Você obterá muito mais informações sobre suas operações.
Painel de controle
Aqui você terá uma visualização de painel para algumas das principais métricas de chão de fábrica. Ter métricas sólidas permite que você se concentre em áreas que talvez precisem de mais atenção. 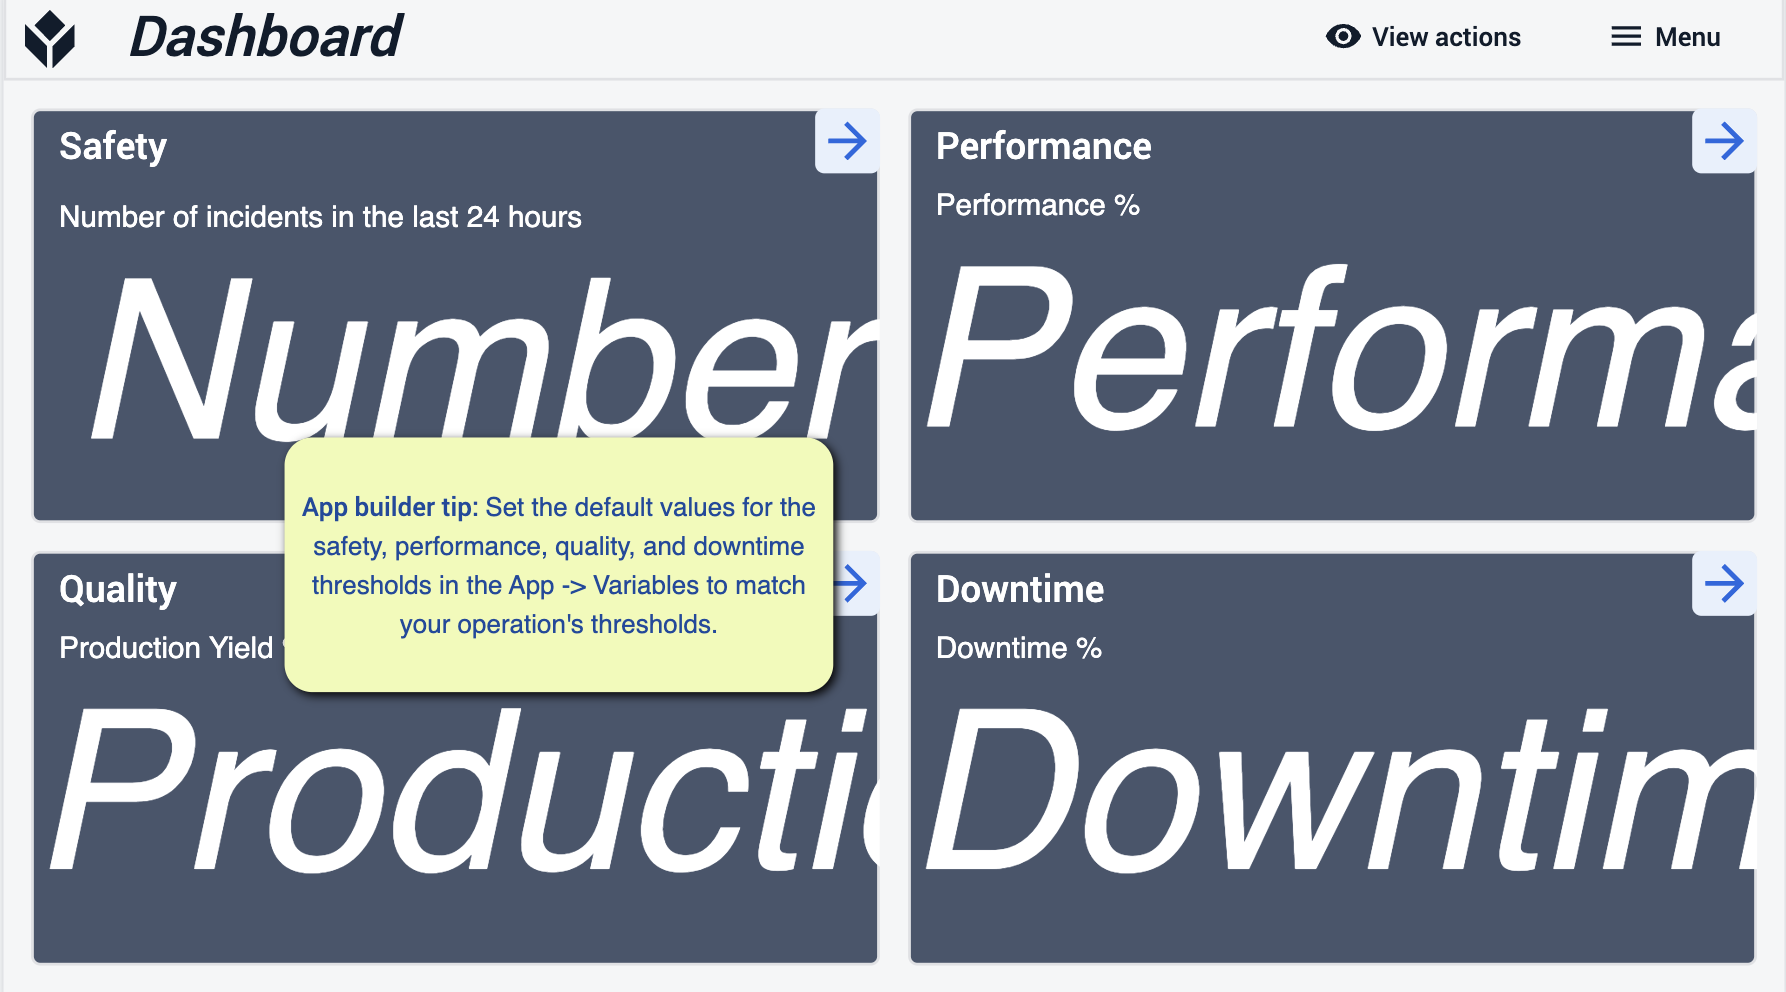
Certifique-se de definir valores padrão para todas essas métricas para que elas correspondam às suas operações.
Criar ação
Aqui, crie um novo registro para ações que envolvam motivos de tempo de inatividade para que você possa acompanhar os novos problemas à medida que eles surgirem.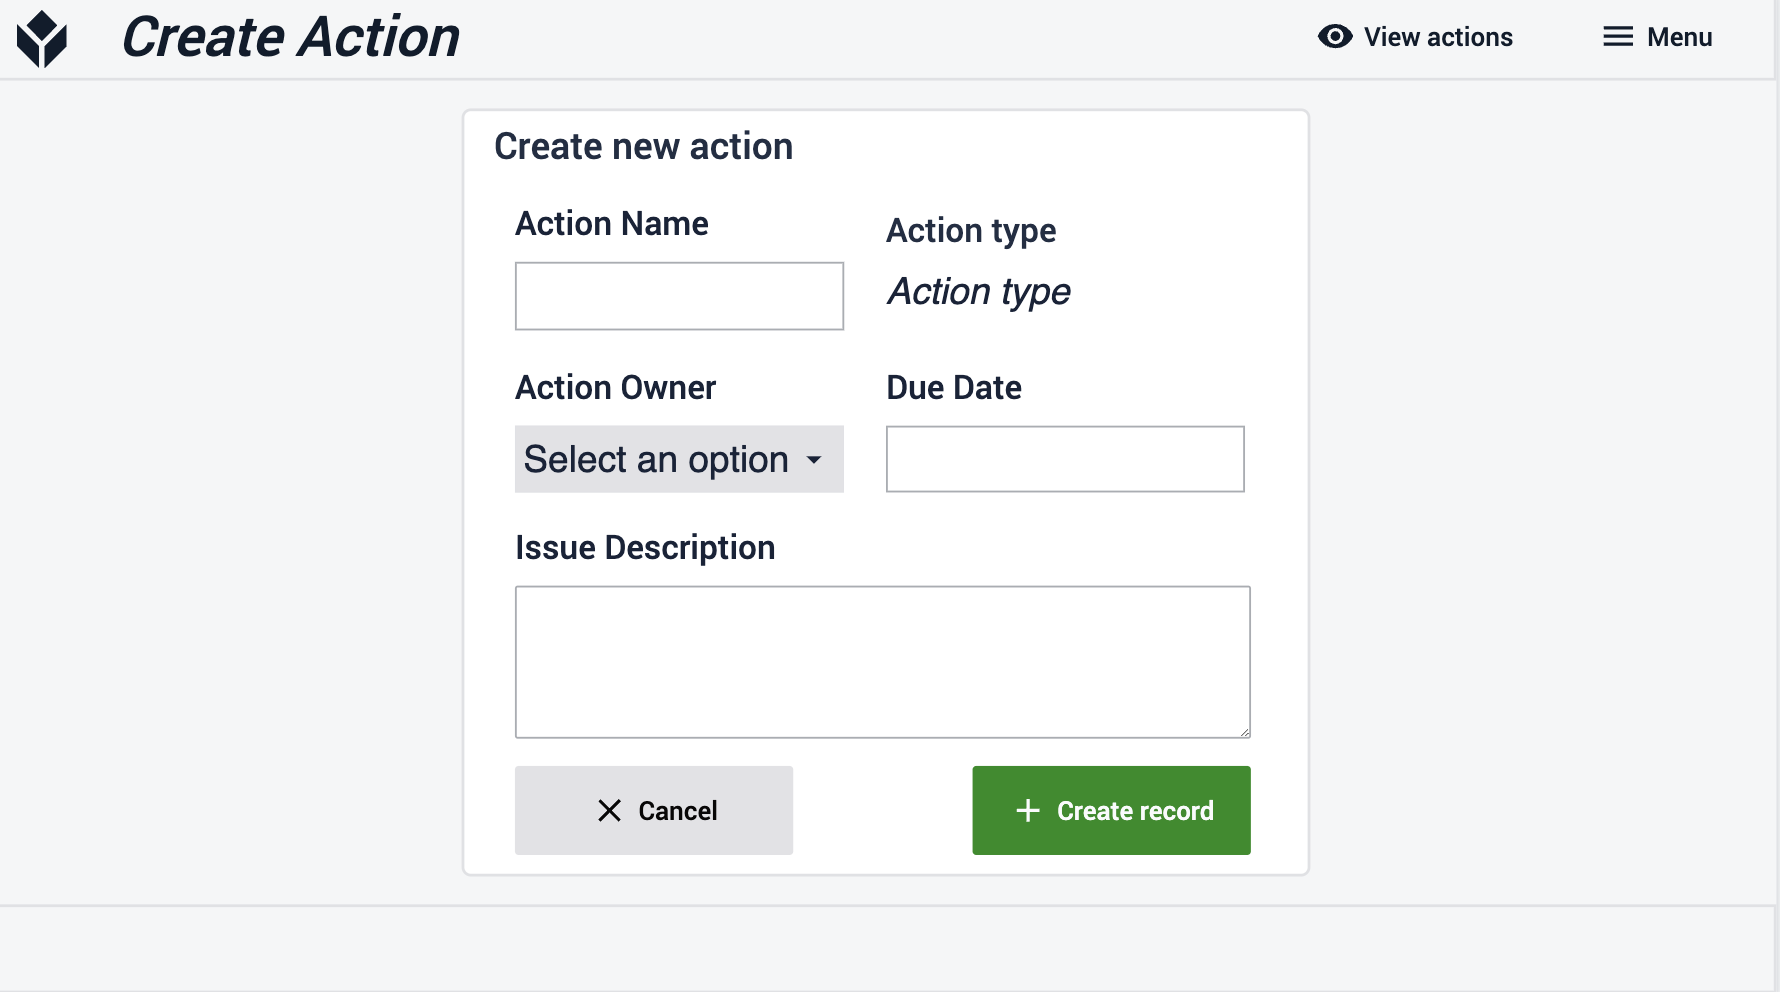
View Actions (Exibir ações)
Aqui você terá visibilidade das ações abertas e fechadas, o que permitirá que você sempre analise de onde essas tarefas estão vindo.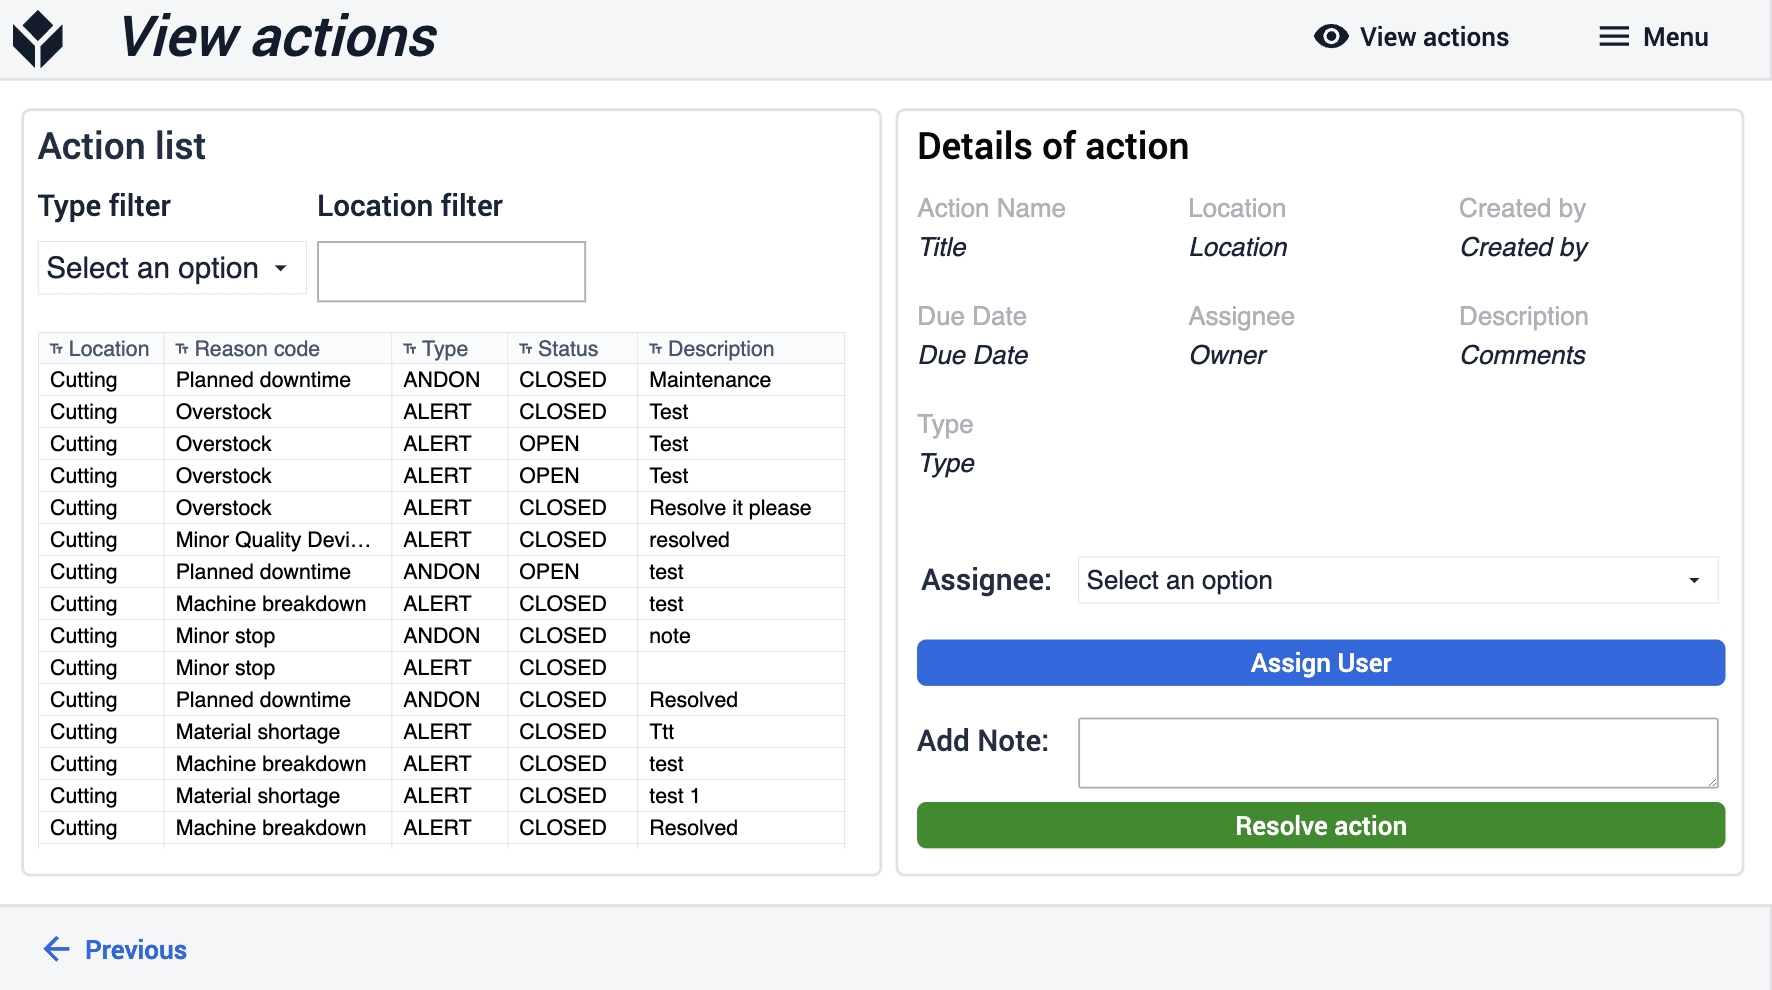
Revisar e enviar
O aplicativo Review and Ship permite que você processe a revisão e aprove a remessa dos produtos finais. Esse aplicativo oferece visibilidade dos detalhes da ordem de serviço e gerenciamento dos detalhes de envio, como revisão final e processamento de etiquetas. O aplicativo Review and Ship funciona em conjunto com os demais aplicativos do Production Management App Suite.
Visualizar ordens de serviço
Dê uma olhada nas suas ordens de serviço antes de enviá-las. Obtenha visibilidade do histórico da ordem à medida que ela passa pela produção. 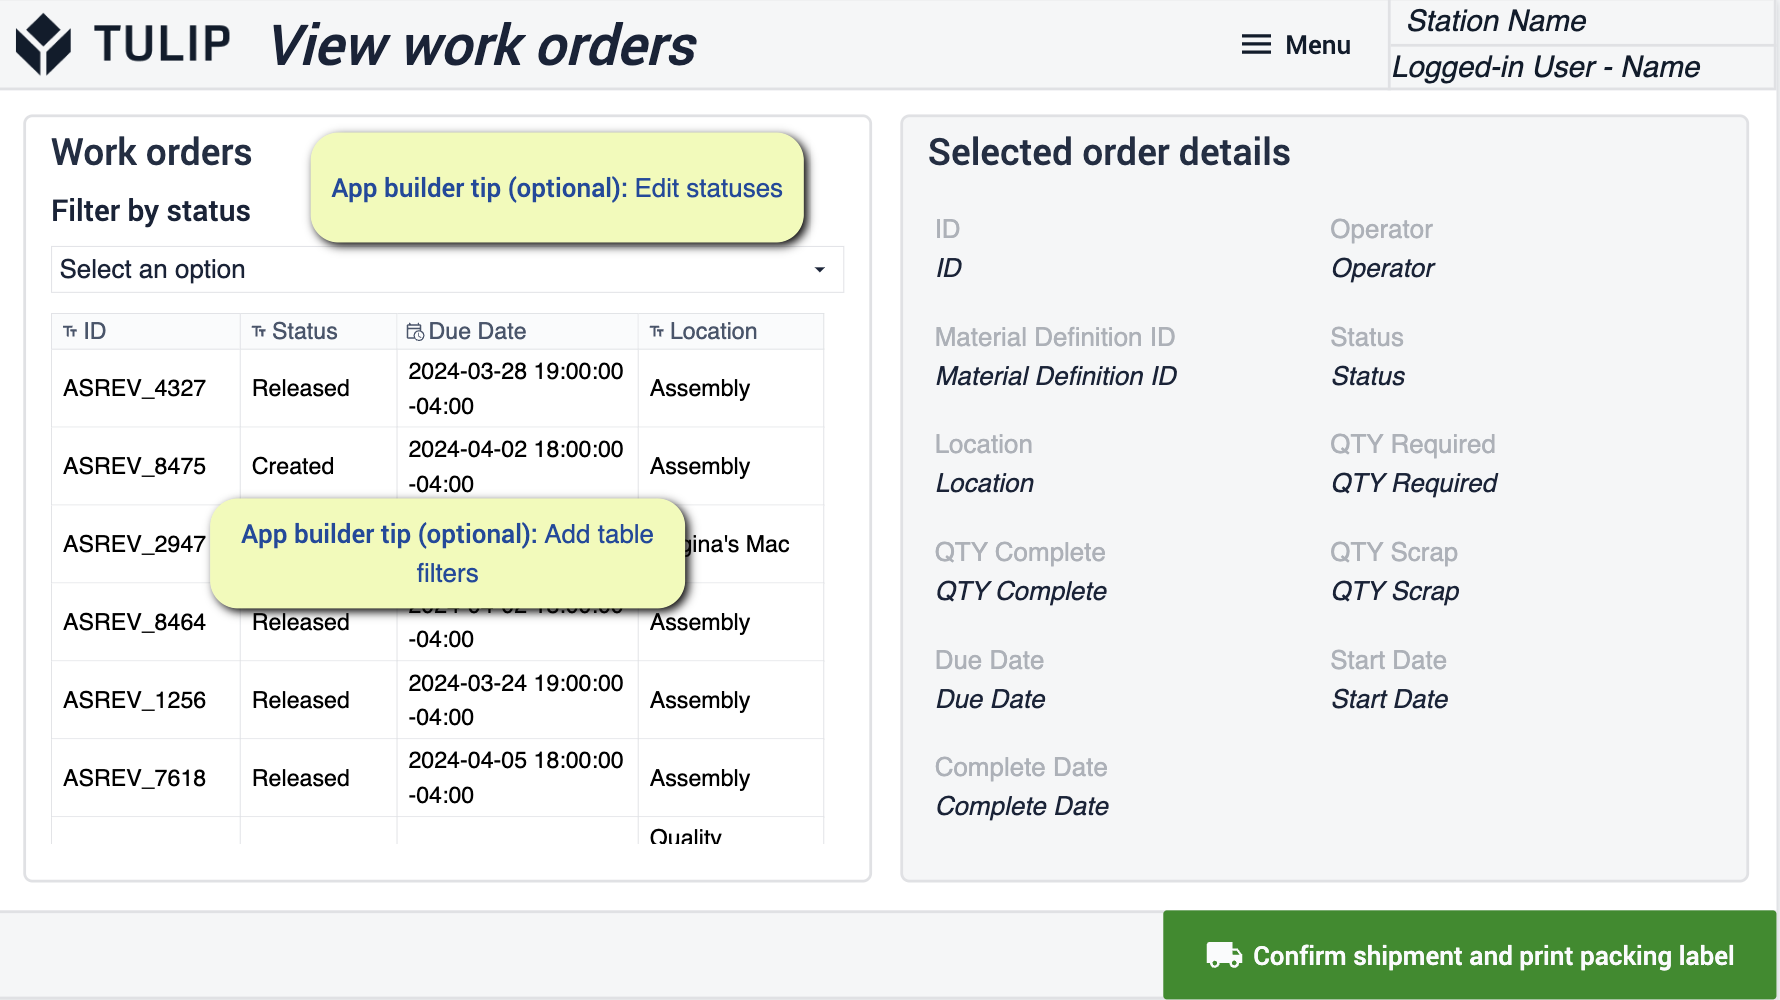
- As alterações opcionais nessa etapa concentram-se na mudança dos filtros e status da tabela.
Etiqueta de embalagem
Você poderá selecionar ordens de serviço que estão prontas para envio. Imprima as etiquetas apropriadas para manter o controle do histórico mesmo após a partida.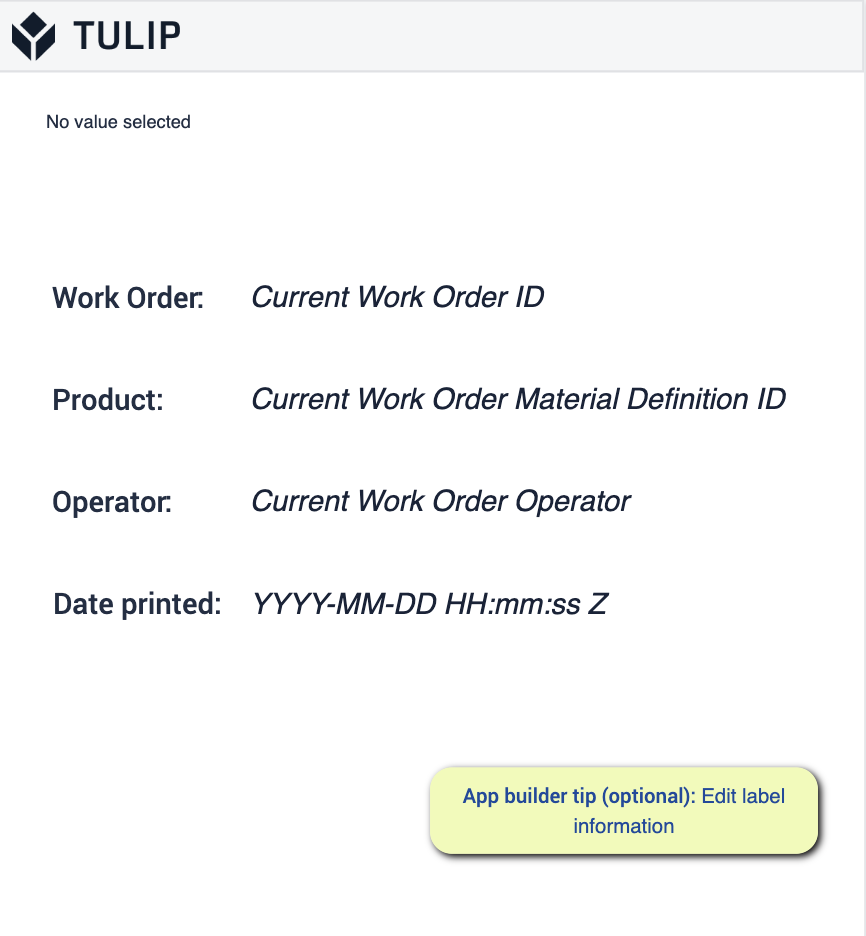
Prontidão
Ao percorrer o pacote de aplicativos, é importante certificar-se de seguir as dicas do App Builder. Essas dicas serão seu guia para preparar seus aplicativos para implantação. É importante fazer referência aos pré-requisitos e certificar-se de que você seguiu as etapas necessárias e as dicas do App Builder em cada etapa.