Introduction
Windchill from PTC is a PLM system that provides comprehensive out-of-the-box functionality and highly configurable role and task-based apps. It enables integration with other enterprise systems.
By integrating Tulip with Windchill PLM you can surface product data directly in shop floor applications. Learn how to display process plans, bills of materials, drawings and documents of products from Windchill in Tulip.
Purpose
With the help of the Windchill - Tulip connector and demo apps built by the Tulip partner CAD-IT Australia, you can display work instructions for selected products where the process instructions, images, drawings are coming from Windchill exactly for the selected product and revision.
How It Works
Work Order Generator application
The Work Order Generator app serves to create work orders for selected products in Tulip. The Refresh button starts a looper that reads parts data from Windchill and populates the table with parts information.
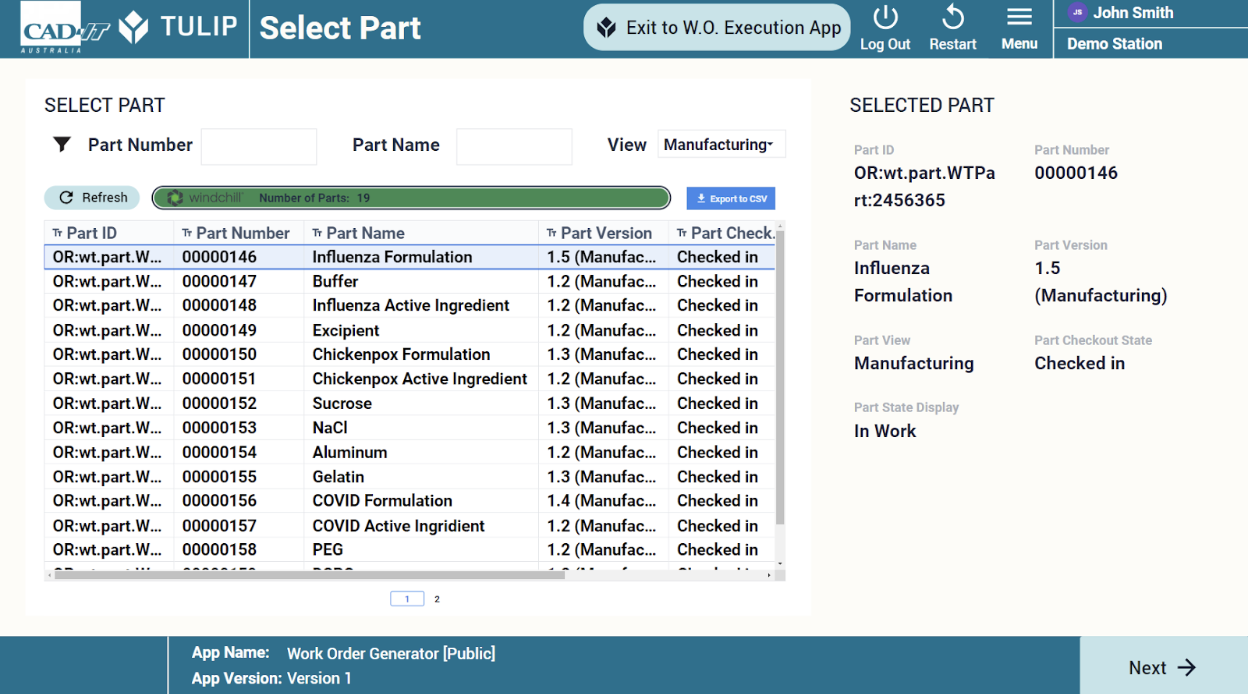
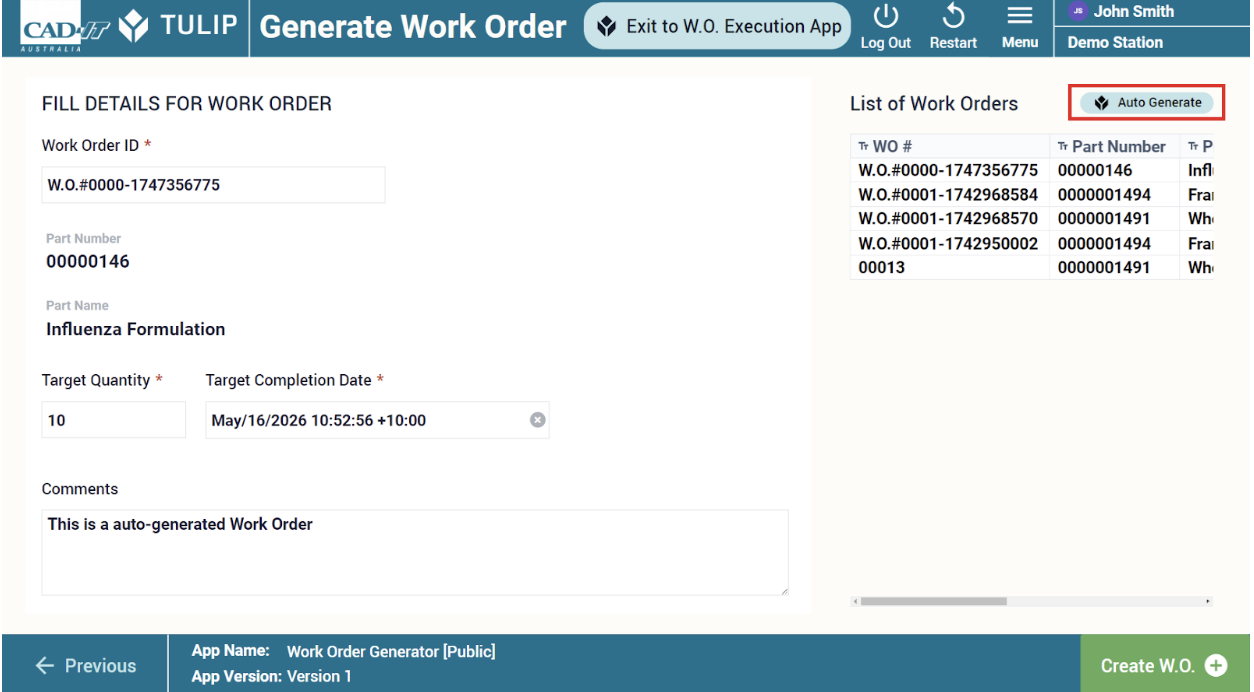
By selecting a part and clicking on next, you can generate a work order for the selected part by adding required information like work order id, target quantity and completion date. You can also auto-generate work order with the Auto-Generate button on the right. Below, you see the list of work orders.
Dynamic PLM-Driven Digital Work Instruction application
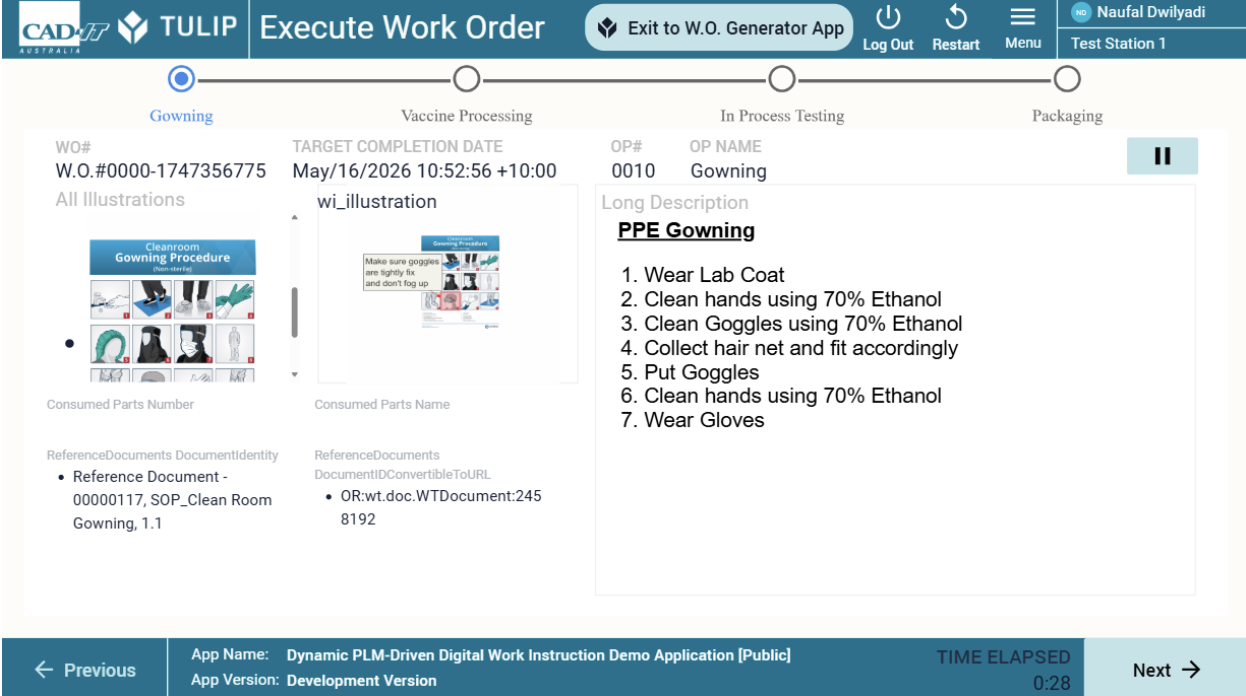
The Dynamic PLM-Driven Digital Work Instruction app is the demo app showcasing the integration with Windchill. In the first step you see the list of available work orders. If you select a work order, you will see the parts associated with that work order on the upper right table (Specify part). If you specify the part, then you can select a matching process plan in the table below (Specify process plan). By clicking on the “Execute” button, the app loads the work instruction information from Windchill and displays it in the Tulip app.

The operator can see the list of operations and texts and images as instructions as well as information about the work order, consumed parts, reference documents. By clicking on the Next button, the app goes to the next operation. Information are coming directly from Windchill using REST API calls. The current limitation is that it shows thumbnails of the operations only and that Tulip should be on the same network with Windchill. (Currently there is a limitation when loading images: it only works if in the browser where Tulip is running, Windchill is also open and authenticated. We are working on solving this problem.)
Finally, after completing all operations for the process, the app displays a production record and the operator can confirm the completion of the process.
API Doc
The following connector functions in this document have leveraged Windchill REST Services API Docs. WRS 2.4 has the endpoints for the work instructions.
Pre-Requisites
- You need a Windchill system with the necessary licenses (eg. MPMLink).
- You need to set up a Tulip on-premise connector host in the same network.
- For authorization you need a Windchill user and password first, then you need to call the endpoint “/Windchill/servlet/odata/PTC/GetCSRFToken()” on your Windchill system to get an API token for later connector function calls.
Tulip Connection Details
The following information would need to be configured on Tulip's HTTP connector.
Running On: On-Premise Connector Host
Host: your Windchill host
Port: 443
TLS: Yes
Authentication: Basic
Header: -
Authorization: username and password.
Example Prebuilt Connector Functions
GET - Get Token
This output is required when executing any endpoints in Windchill REST Services (WRS). The function returns NONCE Token required for accessing the API with the other connector calls.
NONCE Token is a server generated token which helps in preventing cross-site request forgery (CSRF) attacks. REST clients must provide the token while creating, updating, or deleting the entities in the system.
GET - Get Number of Parts in Windchill
This is used in the Work Order Generator app to browse all the parts available in Windchill.
This returns the number of parts available in windchill. It includes parts in different views (ie. Design View and Manufacturing View).
GET - Get All Part(s) Details Looper
This is used in the Work Order Generator app to browse all the parts available in Windchill.
Since Windchill could only return a maximum of 25 parts at a single time, this connector function is called in a loop through the looper custom widget until all parts are read. The value of “Skip First N Output” will increase in increments of 0-25 each iteration of the loop until all parts are read.
Windchill will return the following fields: Part ID, Number, Name, Version, View, Checkout State, State Display.
GET - Get Part(s) Details from Part Number
This is used in the Work Order Execution app to read the latest part details of the part number required in the work order.
The part number is unique and managed in Windchill. Upon selecting the work order, a web service is invoked to find the details of the required part number from the selected work order. Based on the part number, Windchill will return the following fields: Part ID, Number, Name, Version, View, Checkout State, State Display.
GET - Get Process Plan(s) Based on PartID
This is used in the Work Order Execution app to read the latest process plan after selecting the part.
Please note that a single part number can have multiple views (ie. Design View and Manufacturing View) associated with a unique Part ID. Based on the Part ID, Windchill will return the following fields: Process Plan ID, Process Plan Number, Process Plan Name, Process Plan Version, Process Plan Category, Process Plan Checkout State, Process Plan State.
The process plan ID will be used as an input to get the Bill of Process (BOP) with the details on the work instructions.
POST - Get BOP Operations, Consumed Parts, Documents
This is used in the Work Order Execution app as the primary output to display the work instructions.
The connector function returns the bill of process (BOP) for the selected process plan structure used as the input. The connector function further expands BOP's available data by expanding the following components: Operations, Consumed Parts, Document.
GET - Get All Illustration based on Operation Holder ID
This is used in the Work Order Execution app as the secondary output to display the visualizations of the work instructions.
The connector function returns all available visualizations associated with the current step of the work instruction (referred as Operation Holder ID) within the Bill of Process (BOP). For the work order execution app, we particularly selected the annotated 2D image from Creo View by displaying the visualization which contains the value “wi_illustration”.