

How To Deduct From An Inventory Table Upon Completion of An Operation
Here's how to deduct from inventory upon the completion of a specific operation.
In this article, you will learn...
- How to load your existing inventory quantities into an app
- How to write trigger logic to deduct from those quantities
Note: This topic is featured in the "Build an Advanced Work Instructions App" course in Tulip University.
In a previous article, we covered the process behind building a table for inventory management in Tulip
That tutorial showed how to dynamically add inventory using a Form Step. But, you also need to deduct inventory whenever an operation is completed, whether a part is able to move on to the next operation or if it needs to be scrapped.
This guide will show you how to deduct from inventory within a work instructions application. There are two ways to do this:
- Deduct some components upon every step in the app
- Deduct all the parts needed to build one product at the end of the operation
We will cover both approaches here. In either case, you need to first set up an inventory table Since this is an intermediate-level tutorial, you should also have some experience with Tables. Use this basic tutorial to get some practice.
Here's how you can manage your inventory. We will assume that you only need to deduct preset quantities, but you could also use a BOM table to deduct quantities based on a predetermined set of products.
Importantly, these inventory deductions are not necessarily connected to app completions. As soon as an operator presses a button that deducts from inventory in a Table, the quantity will be updated. No app completion is necessary.
Setting Up The App
First, create an app with a series of work instructions. Then, create a record placeholder for each of the inventory items that is relevant to this particular product.
In this example, we will assume that you are giving instructions for building cabinets. There are 5 components needed to build these cabinets:
- 1 1/4" screws
- 2" screws
- 2 X 4 Lumber
- 4 X 6 Lumber
- Maple Stain
So, you will need to create 5 record placeholders. Here's an example of 5 record placeholders from the same inventory table:
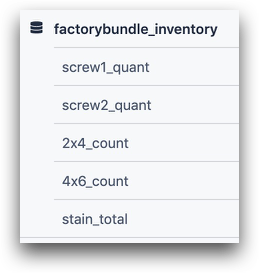
Next, you will need to load the 5 records associated with these components into the app.
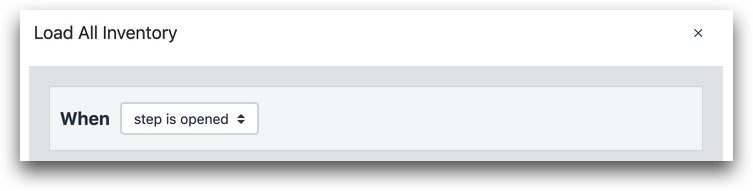
We recommend that you load these records on the opening of the first step in the app. So, navigate to the first step and create a trigger that will fire when the step is opened. You can call it "Load All Inventory".
Then, load each record based on a static text value that matches the record ID from the inventory Table. In this case, the first record has the ID "Screws_1".
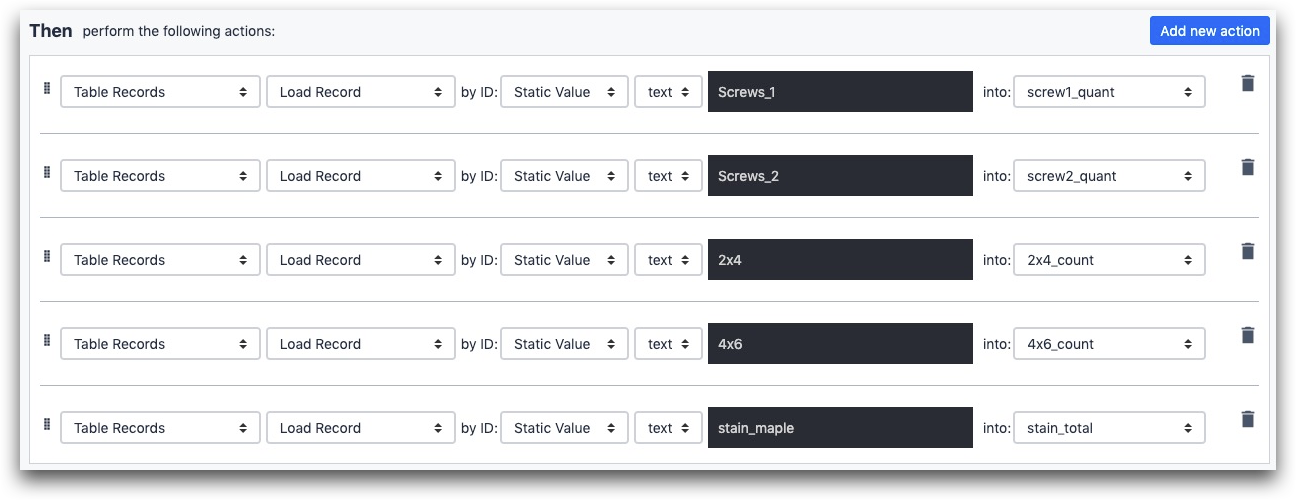
- "Table Records" "Load Record" by ID: "Static Value" "Text" "Screws_1" into: "screw1_quant"
- etc.
Now that all the appropriate inventory values are loaded, you can deduct when needed. There are 2 ways to do this.
Approach 1- Deducting on Every Step
If you want to update inventory as soon as it is consumed in a product, then you should add a trigger action to every appropriate "Next" button. When the operator advances past a step, the appropriate inventory will be immediately deducted.
So, choose an existing next button and edit the trigger. In this example, let's assume that an operator just used 6 small screws in the process, so we need to deduct those screws from "screws_1".
To deduct a static value, use the "Increment Value" trigger action and then enter a negative number. Like this:
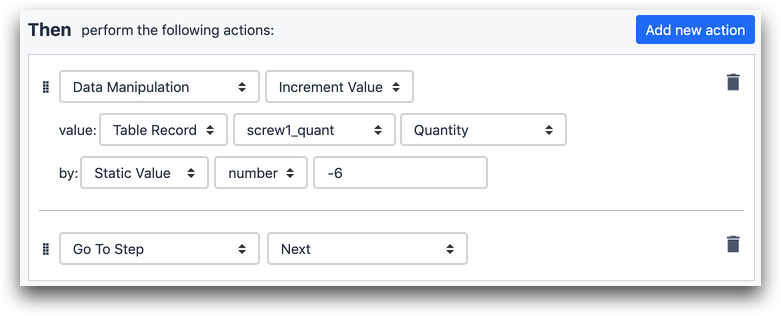
- "Data Manipulation" "Increment Value"
- value: "Table Record" "screw1_quant" "Quantity"
- by: "Static Value" "number" "-6"
- "Go To Step" "Next"
In this case, the table record has a field called "Quantity", which is a number.
Approach 2- Deducting All Inventory At Once
Instead of adding an action to every "Next" button, you can deduct all inventory at the end of the app upon pressing the "Complete" button.
The statements are the same as shown in the first approach, but they will all happen at once.
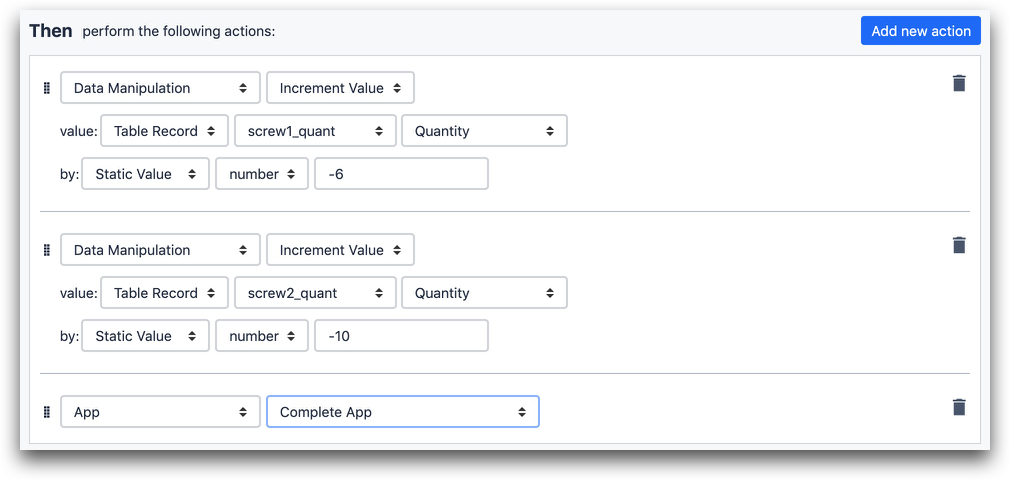
- "Data Manipulation" "Increment Value"
- value: "Table Record" "screw1_quant" "Quantity"
- by: "Static Value" "number" "-6"
- ...more statements
- "App" "Complete App"
Deducting A Dynamic Value
Let's say that you want to deduct a value based on a value that was manually input into a Form Step. To do this, you can use the "Expression" field within a trigger action.
In this example, a variable called "screw_1_quant" is tied to a Number widget in a Form Step, and captures operator input.
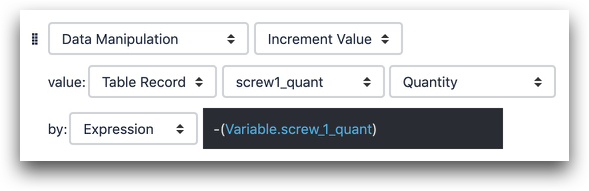
- "Data Manipulation" "Increment Value"
- value: "Table Record" "screw1_quant" "Quantity"
- by: "Expression" "-(Variable.screw_1_quant)"
Further Reading
Did you find what you were looking for?
You can also head to community.tulip.co to post your question or see if others have faced a similar question!