

Here are the steps to prepare and upload your CSV/Spreadsheet into a Tulip Table
Before importing data from a CSV to Tulip Table, you should understand Tulip Tables and Build Your First Table
Overview
Here are the recommended steps to importing your CSV into Tulip
- Prepare your Table: Create fields in your Tulip Table to match the column names of your CSV
- Upload a CSV: Confirm the mapping of the Tulip Table field types to CSV column names
- Check CSV for Errors: You have previously uploaded a CSV. You are looking to overwrite the Tulip Table with new records or add unique IDs to the table.
Network requirements for using import CSV are available here. Note, certain domains and IP addresses must be whitelisted.
Limits
- The maximum number of 10,000 records per CSV import
- If you map the wrong column to the ID field, you will not be able to reference (load record) the unique ID in the Tulip App Editor. You must go back to the Bulk Add Records screen and match the ID field with the correct column.
Use cases
Here are a couple of examples of why you might want to import your CSV to a Tulip Table:
BOM Tables: If you have a BOM, you can display it in an app (say Parts Needed), either at once or pieces on each step. Your BOM may change frequently, you will be able to use the feature to handle change management.
Product Information: If your company makes several products and each product has common fields, you can add everything to Tulip at once.
Managing Parameters of Products: If all of the build parameters of your products are stored in a database (SQL), you can store it in Tulip Tables instead.
Importing data about production orders without a connector: You can import production data from SAP without building an SAP Connector. This may help you work through several layers of IT Approvals and permissions
Prepare your table
You will need a CSV (Comma-separated values) file to import into a Tulip Table.
In this section, we will walk you through the following example of importing a CSV of Nike’s Factory Locations
Example: Nike’s Factory Location CSV
As you can see from the CSV above, each row has a unique ID in the ID field. Ideally, the CSV does not have duplicate values in the ID field. If it does, we will check for duplicate values later in this article.
First, start off with creating a Tulip Table and giving it a name and add the correct field types to the Tulip Table based on the CSV.
Note: When you are creating fields in Tulip Tables, they need to match the data types of the columns in your CSV.
* ID: ID
- Text: Factory Name
- text: State
- text: country
- integer: Total Workers
- integer: Line Workers
- number: % Female Workers
This is how your Tulip Table would look like with the correct field types for the Nike Factory Example
You can find a further breakdown of datatypes in Tulip Tables. Then click the 3 dots on the top right-hand corner to find the option to "Import data from CSV file."
Upload a CSV
You can upload files of the following formats:
- CSV
- TSV
- TXT
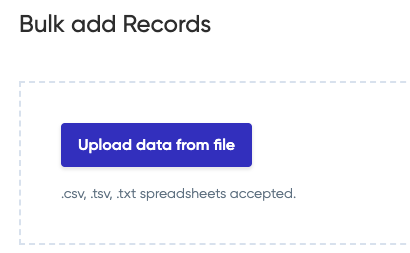
After uploading the CSV, you will see the screen titled “Bulk Add Records” where you can map each column of the CSV to a field in the Tulip Table. If you followed the above instructions correctly, “exact name match” will mostly be done for you and all you have to do is confirm the mapping. For columns you do not want to map, you can click "Ignore this Column"
If everything is right, in the following screen you should see all of the rows and columns names from your CSV
Once you are done, you will see this
When you are importing a CSV, make sure that users or apps are not updating the table at the same time because the updates from apps may not be successfully processed.
Update a table via CSV
If your BOM has been updated or product information has changed, you have to update the Tulip Table. You will overwrite the records you have in Tulip Tables from a previous CSV upload or add rows with unique IDs to the table. You would have to follow the steps above and you get this warning message.
Overwrite existing records - old records will be replaced with imported rows
Ignore duplicates - Only rows with unique IDs will be added to the table
After you hit “Next” you will see a Review Changes screen. Once you have reviewed the changes the table will be updated.
Datetime formatting
Tulip supports a variety of formats for dates and times including the ISO8601 and RFC 2822 standards.
The following general rules apply:
- Besides the two standards, the distinction between month-day-year (MDY) and day-month-year (DMY) formats is done via the separator
- MDY is using
/as a separator - DMY is using
.as a separator
- MDY is using
- Both single digit and double digit numbers are allowed for all formats. Mixing is also possible. This means the following two examples will both be valid and imported equally:
09/05/2023 08:04:03 PM9/5/2023 8:4:3 PM
- The
Aandastand forAMorPMandamorpm - For most formats there is an option with and without time zone
- The timzone should be added with double digits and a leading
+or- - Example:
+02:00
- The timzone should be added with double digits and a leading
The list of supported datetime formats is below:
| Type | Without time zone | With time zone |
|---|---|---|
| MDY, with seconds, 12h, AM/PM | M/D/YYYY h:m:s A |
M/D/YYYY h:m:s A Z |
| MDY, with seconds, 12h, am/pm | M/D/YYYY h:m:s a |
M/D/YYYY h:m:s a Z |
| MDY, with seconds, 24h | M/D/YYYY H:m:s |
M/D/YYYY H:m:s Z |
| MDY, without seconds, 12h, AM/PM | M/D/YYYY h:m A |
M/D/YYYY h:m A Z |
| MDY, without seconds, 12h, am/pm | M/D/YYYY h:m a |
M/D/YYYY h:m a Z |
| MDY, without seconds, 24h | M/D/YYYY H:m |
M/D/YYYY H:m Z |
| MDY, text month, with seconds, 24h | MMM/D/YYYY H:m:s |
MMM/D/YYYY H:m:s Z |
| DMY, with seconds, 24h | D.M.YYYY H:m:s |
D.M.YYYY H:m:s Z |
| DMY, without seconds, 24h | D.M.YYYY H:m |
D.M.YYYY H:m Z |
| MDY, date only | M/D/YYYY |
M/D/YYYY Z |
| DMY, date only | D.M.YYYY |
D.M.YYYY Z |
| L LTS (localized date and format string) | L LTS |
L LTS Z |
| ISO8601 | - | YYYY-MM-DDTHH:mm:ssZ |
| RFC 2822 | - | ddd, DD MMM YYYY HH:mm:ss ZZ |
Check CSV for errors
Check rows with problems: Duplicate IDs
You can also toggle these options at the top to show rows with problems and modifications.
If you have a duplicate id in your CSV, you will see this error.
Check if any individual values need to be edited
After matching column names to field names, you can choose to edit any of the rows. If there are any duplicates, the ID column will appear red. If there are any inconsistencies with your CSV datatypes and Tulip Table field types the column will appear red.
Did you find what you were looking for?
You can also head to community.tulip.co to post your question or see if others have faced a similar question!