Using Tables App - Guide
- 11 Apr 2024
- 4 Minutes to read
- Contributors


- Print
Using Tables App - Guide
- Updated on 11 Apr 2024
- 4 Minutes to read
- Contributors
- Print
Article Summary
Share feedback
Thanks for sharing your feedback!
Tables are the place to store your data. The Using Tables app walks through the Using Tables app pre-installed in your Tulip instance.
Purpose
Longterm storage of data is key to production visibility and root cause analysis. Tulip Tables are the perfect place to store your data.
This guide will walk you through the Using Tables app that comes prebuilt on your Tulip Instance. This app covers many of the basic operations you might need when interacting with your data, but it isn't an exhaustive list of everything that can be done. For more information about Tables, check out these articles:
- Organizing Data in Tulip
- An Overview of Tulip Tables
- Building Your First Tulip Table
- Tulip Table Queries and Aggregations
How This App Works
This app is split into six steps. Steps can be though as different views a user might see. This document will be organized by these steps. Each step hits on a different core function you might need to interact with your data.

Viewing Tables App Step
[Deep dive on the interactive table widget](https://support.tulip.co/docs/displaying-interactive-lists-of-table-records-or-connector-output-in-apps
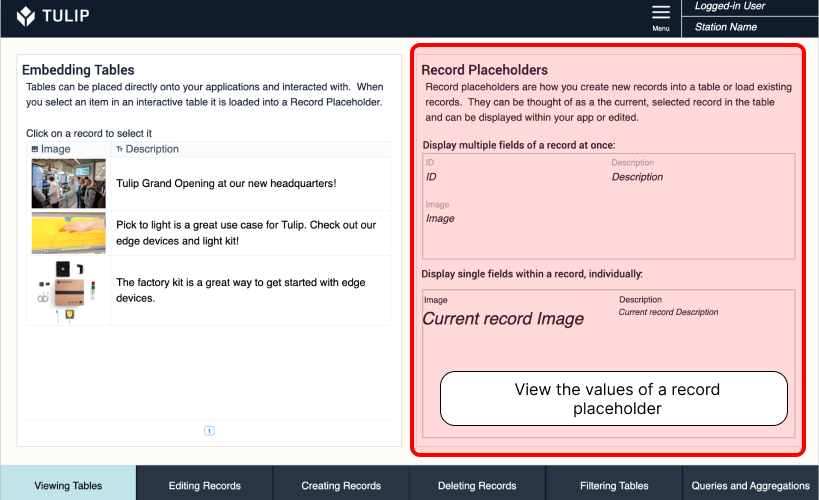
Viewing a full table within an app is often the first step for users to interact with existing data. The embedded table widget allows users to see and interact with tables directly. When users select a row within the table, that record will automatically be loaded into the table record placeholder, and can be edited in triggers.

When a record is loaded into a placeholder, seeing the data of that record is straightforward. You can display one record field, or any/all of the record fields with the table record widget.
Editing Records App Step
Editing existing table data is essential to process visibility. Editing records could be used to track the completion status of an order, or update the user responsible for an audit, or just about anything else.
Before editing a record it must be loaded into the record placeholder. Overview of record placeholders Clicking on a record in the embedded table widget will load it into the placeholder.
Individual inputs in your app can be tied directly to table fields. This saves you the work of using a trigger to write a variable value to a table, and saves the user having to click a button to run that trigger.

If you want to run additional checks on the user input before writing to the table, triggers can also write to tables.

Creating Records App Step
Creating new records is a key technique to master to build meaningful data insights. The key steps to creating records are as follows:
- Create Record with a unique id, assign it to a record placeholder.
- Write values to each table record field.
- (Optional) Clear the value of the variables being written to the table.


Deleting Records App Step
Deleting records is not a feature that you will often need, but it is one that can come in handy to remove erroneous data. Table records cannot be deleted while they are loaded into a placeholder in any running Tulip station. What this means practically is you can't have a user select a record from an interactive table, and then use a trigger to delete that record. To get around that we will:
- Check if a record is loaded, if it is...
- Store that records ID to a variable
- Clear the record placeholder
- Delete the record with the ID matching our variable.

All of these steps can also be consolidated into a single trigger.

Filtering Tables App Step
Filtering tables is a useful tool when limiting the records users can interact with. Maybe you want to sort order where the status is INCOMPLETE or hide any records assigned to another line.

Adding filters to embedded tables is simple:
Select your Table
Click the pencil sign next to filters
Select "Add filter"
Select the table field you want to sort by and the conditions you want that field to match.
- In this case we are checking that the Description field in the table matches the Search Description variable.
- The date created is after the Date Filter variable.

Table Queries and Aggregations App Step
Queries and Aggregations are slick tools to simplify app building. A deep dive into these topics is here. Queries and Aggregations are made on the Table level, not the app level. Navigate to the Table Example table.

Queries are table level filtering and sorting, incredibly useful when you want to apply a table filter uniformly across multiple apps, as opposed to needing to apply these filters in each place the table is used.
Selecting Queries will show existing queries on the table. Multiple queries can be added to the same table.

This query will filter the table to only show records where the Description field matches an app variable. Clicking into the query shows its configuration

Displaying query data is simple on the app side.
- Add your query to the table record

- Select Tulip Table Query as the datasource in your embedded table widget

Aggregations are calculations on top of queried data. These calculations can drive logic in your app. Maybe you want to send an email to a supervisor when the number of late orders goes over 5, or you want to change the app step to a defect logging step when an upstream station reports an issue with the inventory they have produced.
This table has two aggregations -
- Get the count of records with the query applied
- Get a list of each description when the query is applied
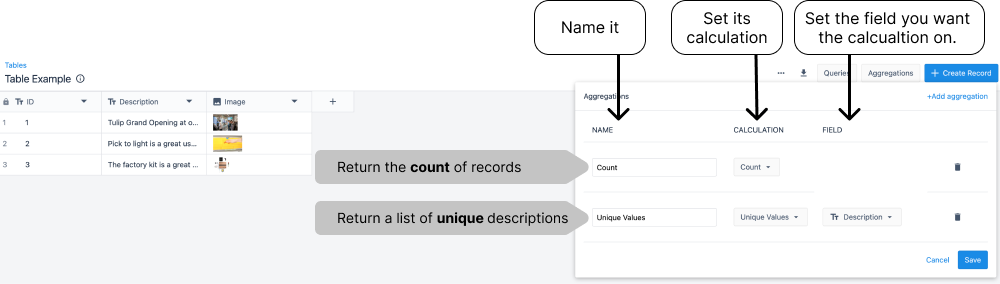
Incorporating these into your app is much like queries:

- Add the aggregation to the query on the records tab.
- Set a variable text widget to display your aggregation.

Further Reading
Was this article helpful?