Visual Classification with Custom Models
- 11 Mar 2024
- 7 Minutes to read
- Contributors


- Print
Visual Classification with Custom Models
- Updated on 11 Mar 2024
- 7 Minutes to read
- Contributors
- Print
Article Summary
Share feedback
Thanks for sharing your feedback!
Visual Classification with Custom Models
How to use Vision's Custom Models for real time visual Classification to perform inspection and verification on the edge
Automatic visual inspection is a very powerful tool on the shop floor. It can be used to maintain high quality assurance for assembly steps as well as reduce handling time and increase overall yield. Performing automatic visual inspection is possible in Tulip Vision using Custom Models. Custom Models are machine learning models that Tulip Vision executes in real-time on the edge. These models need to be trained using data captured from the line at the desired point of inspection.
Tulip Vision supports Classification models and detection models. This guide will explain how to use the classification models. Classification is the act of deciding to which class or category the visual image belongs. For example, a work piece may belong to the "fail" (NG) or "pass" (OK) category, or for defect classification it may belong to "too wide", "too narrow", "warped" or "normal" (OK) category. The categories are up to the user to determine, as long as there is enough data to train a model for them (a minimum of 50 example images for each category to ensure adequate accuracy).
Custom models are running on the edge, this means that the inference (executing the model to get a prediction) incurs no extra fees like the ones taken for running the model in the cloud. Custom models are also running in real-time on the edge computer so they may be used instantaneously to produce detections, thus reducing bandwidth for sending images to the cloud. This also allows for a more private operation in terms of data security, since no images ever leave the workstation.
Prerequisites
- Custom Models are enabled on Tulip release r229 and up
- Tulip Vision camera set up with a Camera Configuration (use our getting started guide
- Part for inspection or verification, with a repeatable capturing position in a workstation
- Dataset of categorized images on Tulip (use our data collection guide
Obtaining a Trained Model for Inference
To use Vision Custom Models you would need to obtain a trained model. Assuming the data was already collected and downloaded to your computer (by following the data collection and export guide, training a model can be done with ease on Microsoft Azure's customvision.ai online service. With just a few button clicks you can load the images with their annotations and train a custom model.
Loading data on customvision.ai
To train a new model, create a new customvision.ai project: (you will require Azure credentials which can be obtained from the Azure portal)

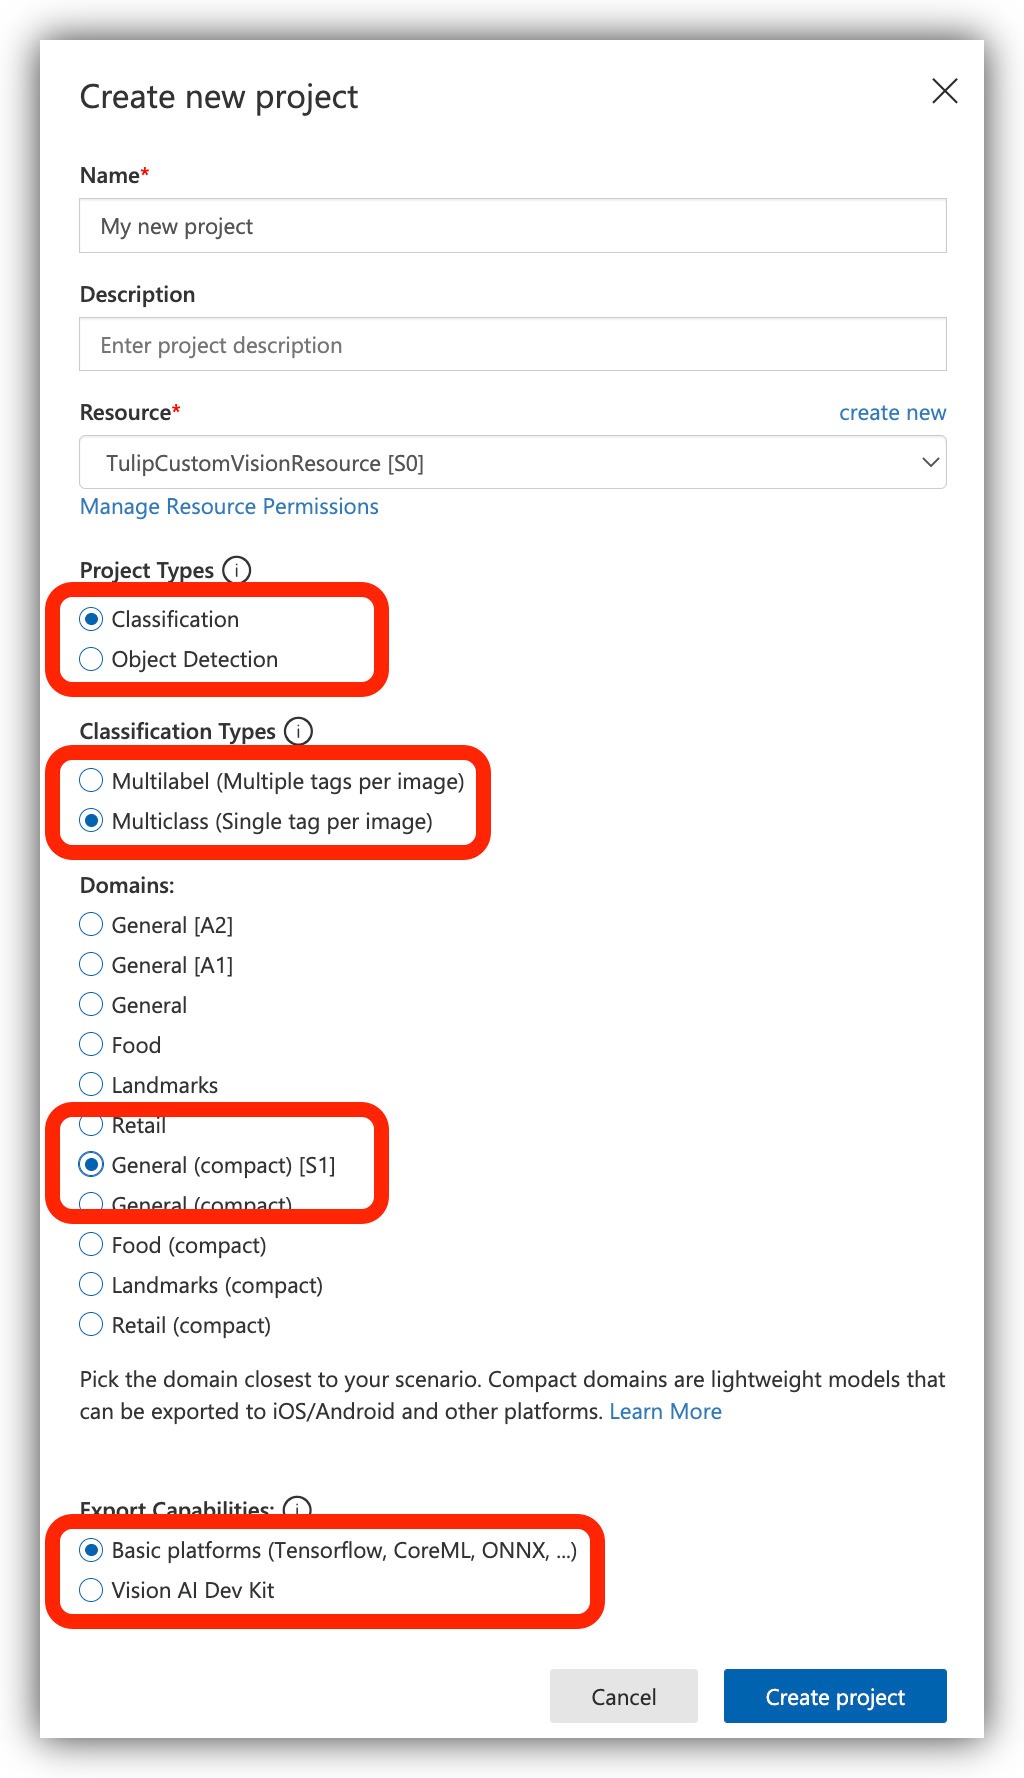
Make sure you are create a Classification model, Multiclass with General (compact) designation:
Next add images you exported from Tulip:

Upload the images in bulk to save on time and effort in tagging each one. The dataset export from Tulip will arrange the images according to their categories in a folder. Select all the images from the folder and upload to customvision.ai:

Repeat the process for the other categories of your dataset. Make sure you have at least 50 samples from each category:

Training a model on customvision.ai
To train a model once the images are in place click the "Train" button.

Select your training budget. For a quick turnaround to do a fast check of your Tulip App work run a "Quick Training", we recommend doing this to get an overall quick assessment of running visual inspection on your shop floor. However, with the "Quick Training" mode expect the detection performance results to not be very good. Train the model again at a later time with a bigger budget to get production-ready models, once all the physical set up in your stations is ready.

Exporting ONNX model from customvision.ai
Allow the model to finish training and head over to the "Performance" page. You will find the option to export the model:

Choose the "ONNX" option:

Export and Download the model:

If you are experiencing problems with your exported models - contact our support team for assistance in getting a model that performs well.
Setting Up a Custom Model on Tulip Vision
To use the downloaded Model on Tulip Vision head on to the Vision -> Models page:

Create a new custom Model:

Make sure the model type is "Classification". Select the model files from the downloaded export, you should have a model.xml, model.bin and labels.txt files.
Next, create a new "Classifier Model Detector" in the Detectors page or the camera configuration page, remember to select the custom model you just created:

Next, assign the new classifier detector to a camera configuration region. Make sure you are using the same region you used for data collection. Note that you are also able to control the detection threshold, setting it higher will only accept predictions from your model that have a high confidence score. A higher threshold will accept less cases but will ensure a confident decision (high precision) and reduce false positives (Type I error). A lower threshold will try to capture more cases but may introduce more false positives (high recall).

Note: It may take the camera up to a minute to download the model from the cloud before it will start printing results.
Once the model is in place and working you should see it produce a prediction with a confidence score on the live video:

Using Custom Models in Tulip Apps
With the custom Model running live on your Vision machine, you can now use its predictions in Tulip apps. The classifier detector will issue events whenever a detection has passed the confidence threshold.
Setup an app with a Step for visual inspection. Add the camera view to it for visual confirmation for your operators, for example:

Remember the inspection result is continuous and doesn't require a snapshot button to trigger.
Next, add Triggers for real-time detection based on the custom model detector outputs. Use the "Detection began" trigger to get an event when the detector makes a prediction that is above the threshold you set earlier:

You may also want to add an event when the detection end and clear the variable.
Your running app should now show you the results of the custom model from the trigger:

Conclusion
Custom models enable you to run ML models on the edge in real-time to perform visual inspection tasks automatically. They can be used to replace or augment a manual inspection with a properly trained model. Since the models are running in the edge they incur no extra fees, and make for a faster, more private and secure operation in terms of data.
Start using machine learning on Tulip today with Vision custom models. With a fast and simple setup these powerful models can save time and effort on your factory floor.
Further Reading
- Use Azure customvision.ai with Tulip custom widgets for visual inspection
- Use AWS Lookout for vision with Connectors for visual inspection
- Data collection for creating machine learning datasets
Was this article helpful?