To download, visit: Library.
What is the Skill Matrix Widget?
The Skill Matrix widget allows you to visualize, filter, and manage user skills and task competency levels in a matrix-style table.
You can use this widget to:
- Track operator skills and identify gaps
- View skills by user, group, task, or level
- Filter skill data dynamically
- Interact with matrix cells to view detailed records or trigger actions
This guide explains how to set up and use the Skill Matrix widget in Tulip.
Prerequisites
Before you begin, make sure you have:
- Access to your Tulip account
- Permission to view API tokens and manage tables
- Your Tulip Account URL and Workspace ID
1. Configure Mandatory Parameters
1.1 Get Your API Token
- Click your user icon in the top-right of Tulip.
- Go to Account Settings.
- Click API Tokens in the left-hand menu.
- Click Create API Token.
- Name your token (e.g.,
SkillMatrixWidget). - Assign the following scopes:
table-queries:readtables:readtables:writeusers:read
- Click Create.
- Copy the Auth Header but remove the word
Basicand the space after it. - When configuring the widget:
If prompted to select between Variable and Static value for the API token, choose Static value and paste your token (without Basic) directly into the field.
Never share your API token publicly.
1.2 Find Your Tulip Account URL
Your account URL usually looks like this:
your-account.tulip.co
1.3 Locate Your Task Table ID
- Go to the Tables section in Tulip.
- Click on the relevant Task Table.
- Copy the Table UID from the details section.
1.4 Identify Field IDs
Locate the field IDs for:
- The user (e.g., name or user ID)
- The skill/task name
- The skill level
To find a field’s ID:
- Open the table.
- Click the column header.
- View the Field ID in the properties panel.
There are no enforced default names for these fields; you must decide which of your fields will be treated as user/skill/level when configuring the widget.
2. Configure Optional Parameters
You can further customize the widget using the following optional parameters:
- Group field ID: Organizes data by team, department, etc.
- Designed status: Filters by status (e.g., Active, Completed).
- Level colors: Assign custom colors to different skill levels.
2.1 Filters
You can add optional filters to customize which data appears in the matrix.
| Filter | Description |
|---|---|
| Title | By default, the Title filter typically refers to your group, skill name, or task category field.. |
| Visible | Controls visibility of a record. Default is true. |
Filters are optional and should reflect your use case.
You can configure filters for several fields and easily turn off any you don’t need after setup. Only active filters will affect your data.
2.2 Advanced Configuration
API Query Filters
You can control what records are shown using custom API filter queries.
When you apply multiple filter conditions, they are combined using a logical AND. This means all conditions must be true for a record to be returned.
Example queries:
{"field":"-fieldID1-", "arg":"-value-", "functionType":"greaterThanOrEqual"},
{"field":"-fieldID2-", "arg":"-value-", "functionType":"lessThanOrEqual"}
API Limit: Restrict the number of rows loaded.
2.3. Set your Workspace ID
- You can find your Workspace ID in the Tulip URL after
/w/.
For example:
https://your-account.tulip.co/w/DEFAULT→ Workspace ID isDEFAULT - For the default workspace, use
DEFAULTor leave the field blank.
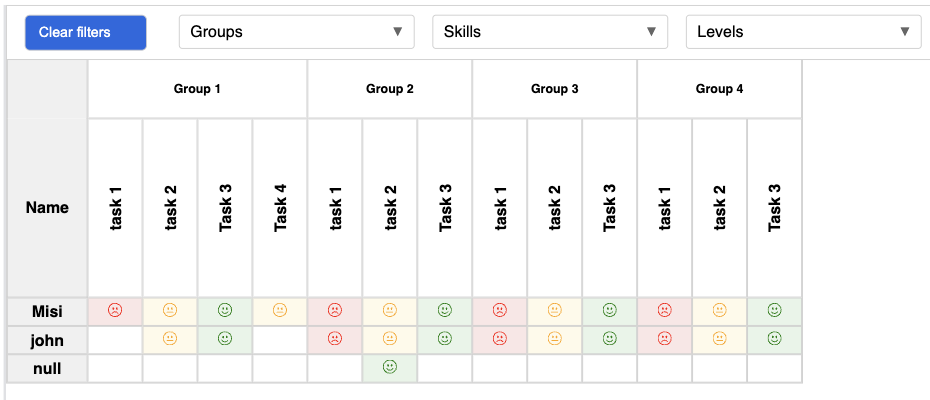
3. Use the Skill Matrix Widget
3.1. View skill data
Once configured, the widget displays a matrix of:
- Users
- Tasks or skills
- Corresponding skill levels
Use the built-in dropdown filters (Groups, Skills, Levels) to narrow your view.
3.2. Reload and filter
- Click Clear Filters to remove all filter selections.
- Click Reload to update the data.
3.3. Pre-filter
Pre-filters dynamically filter data based on:
- The currently logged-in user
- Selected team or department
- Date range or shift
Use pre-filters to personalize views for operators or supervisors.
4. Add Triggers for Interactive Actions
You can configure the widget to trigger actions when a user clicks on a cell.
- Open the Triggers panel.
- Set an action for the Record ID when a cell is clicked.
- Enable Load Record to show more details about the user or skill.
Tips
- Double-check your Table and Field IDs to avoid typos.
- Use filters to tailor dashboards for different roles.
- Test with mock data before launching to production.
Troubleshooting
| Issue | Likely Cause | Suggested Fix |
|---|---|---|
| Matrix doesn't load | Invalid API token or URL | Double-check token/URL |
| Data not appearing | Filters too restrictive | Remove or loosen filters |
| "Undefined" fields | Wrong Field ID used | Check table field IDs |
| Cells not clickable | Trigger not configured | Set up trigger in widget |