How to Create a Connector
- 30 Jul 2024
- 5 Minutes to read
- Contributors


- Print
How to Create a Connector
- Updated on 30 Jul 2024
- 5 Minutes to read
- Contributors
- Print
Article summary
Did you find this summary helpful?
Thank you for your feedback
Overview
Connectors enable integrations between external systems and databases. For more information, see “What Are Connectors?.”
How to Create a New Connector
Setting up a new connector doesn’t require extensive knowledge of APIs or databases, but familiarity with connection types is helpful.
To create a connector, navigate to the Connectors page under Apps. Click + Create Connector in the top right corner. You can either select an existing Library connector or click Create Custom Connector.
Setting Up a New Connector
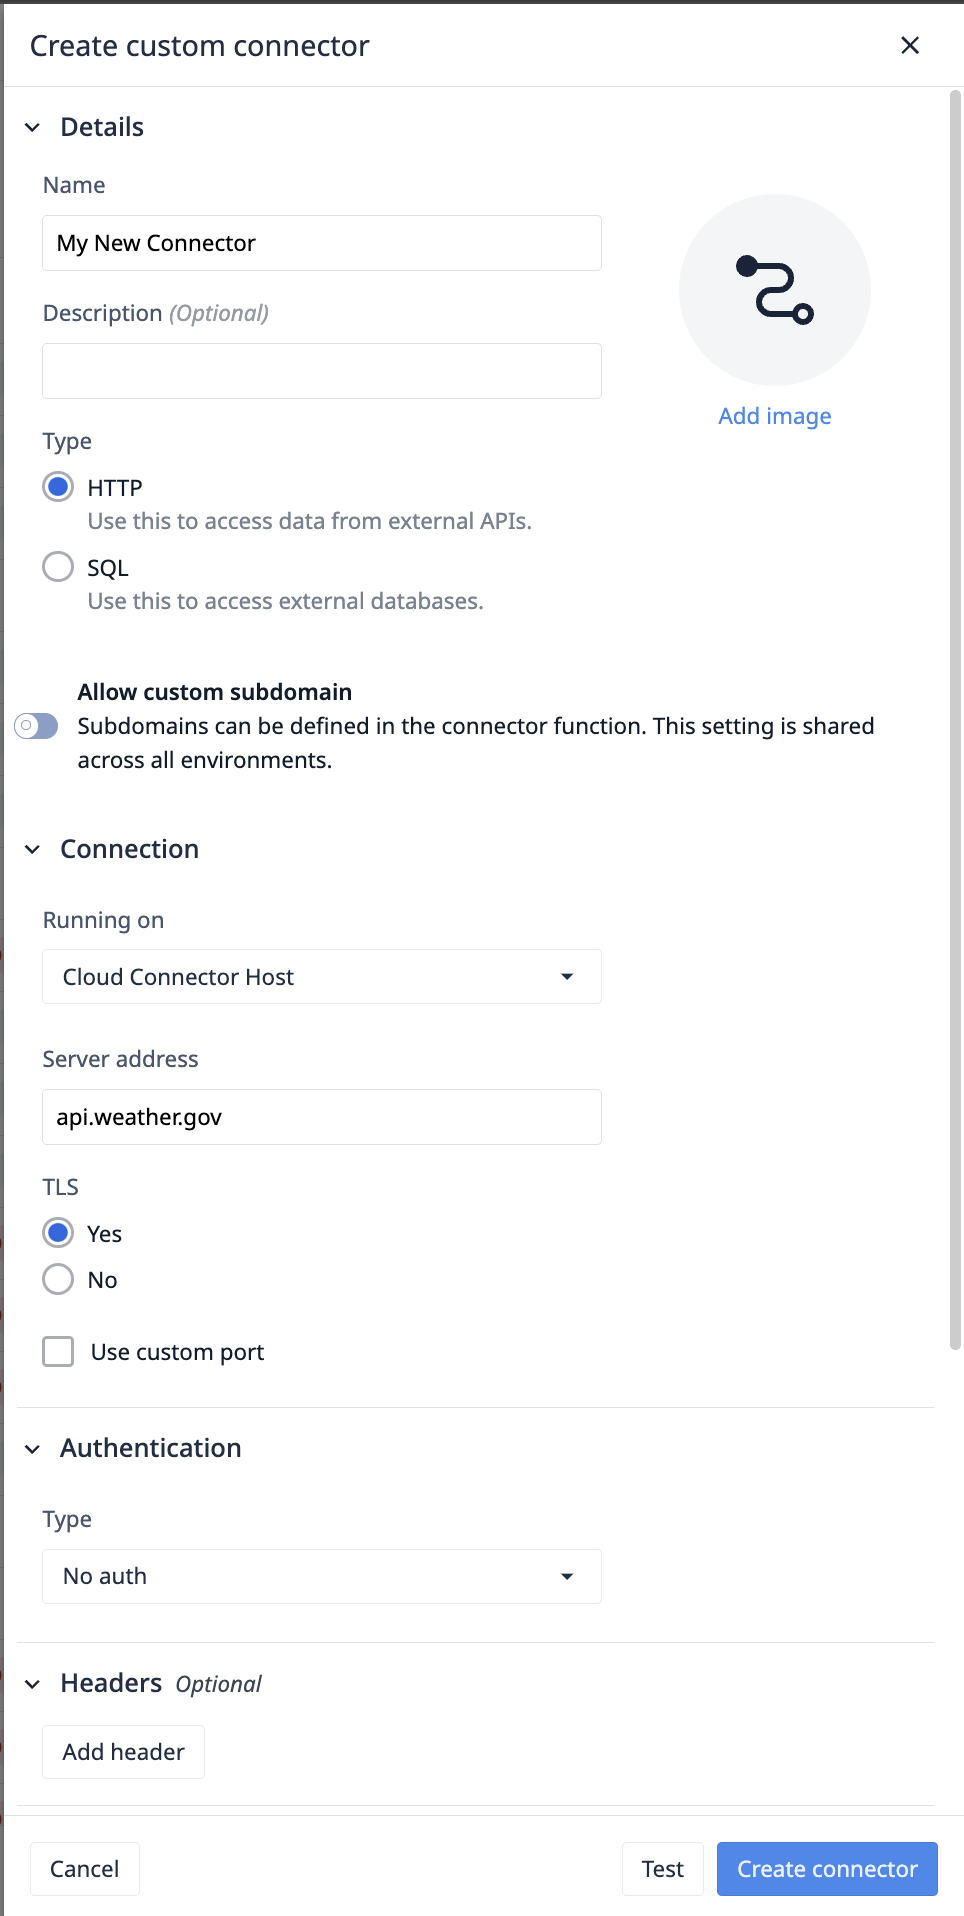
Basic Information
- Add a name and description for your connector. These can be edited at any time.
- Select a connector type. This cannot be changed after the connector has been created.
- [optionally] Enable custom subdomains allows you to configure unique subdomains for each function, facilitating integration with more complex service architectures.
For example, if the server address is
tulip.co, function one might usecommunity.tulip.coand function two might usesupport.tulip.co.
When custom subdomains are enabled, a default subdomain must be provided to check the connector status.
Running on: Connector Host
Select the Connector Host that will execute your requests. The Cloud Connector host, provided by Tulip, makes requests via the Tulip Cloud. Any on-premise connector host registered to your account will also appear. More information on Connector Hosts is available here.
Connector Host Capabilities
Some connector hosts do not support certain features. These hosts will be disabled or hidden in the connector host dropdown.
HTTP Connector Setup
Information on setting up HTTP connector functions is available here: How to Create and Configure an HTTP Connector Function
Allow custom subdomain
When enabled, subdomains can be added at the function level. When enabled, a default subdomain must be added that will be used for checking connector online status.
ex. my server is acme.co, and I have some functions querying sales.acme.co, others reaching out to shipping.acme.co, etc.
Server Address
Specify the network address, i.e., a hostname or IP address, that Tulip connects to.
TLS
Transport Layer Security (TLS) is a cryptographic protocol designed to provide secure communication over a computer network. It ensures data privacy and integrity by encrypting the data transmitted between parties. TLS is the successor to Secure Sockets Layer (SSL) and is widely used to secure internet connections.
Port
Your server listens to requests on a specific networking port provided by your server provider. Port 443 is the most common for HTTPS services, and port 80 is the most common for HTTP services.
Authentication
Connector Host Version
For the OAuth Client Credential flow, Cloud Connector Host or On Prem Connector Host of version LTS13 or newer must be used.
Type
- No Auth - No authentication needed, or the authentication is within other request headers like x-auth-token.
- Basic Auth - Basic authentication, which implements username and password.
- OAuth 2.0 (Bearer token) - Bearer tokens are the predominant type of access token used. They consist of an opaque string, not meant to have meaning to clients using it.
- OAuth 2.0 (User Credentials) - Typically used for clients that require access to a limited set of resources on behalf of a user, such as a mobile app needing access to a user's contacts or calendar events. The user must explicitly grant permission.
- OAuth 2.0 (Client Credentials) - client credentials is a grant type used by Tulip to obtain an access token by authenticating with the authorization server using the client’s credentials (client ID and client secret), typically for accessing resources on behalf of themselves rather than on behalf of a user.
- OAuth 2.0 (Service Account) - Used for clients that require access to a wider range of resources or administrative functions. This role grants extensive access to the user's account and resources, such as managing account settings, creating or deleting resources, or performing administrative tasks.
- OAuth 1.0 - An earlier version of OAuth that mainly handles web workflows.
More information on OAuth is available here.
Headers (Optional)
Headers provide data origin authentication, data integrity, and replay protection. These headers will be added to every connector function on the connector.
Extending Certificate Authorities
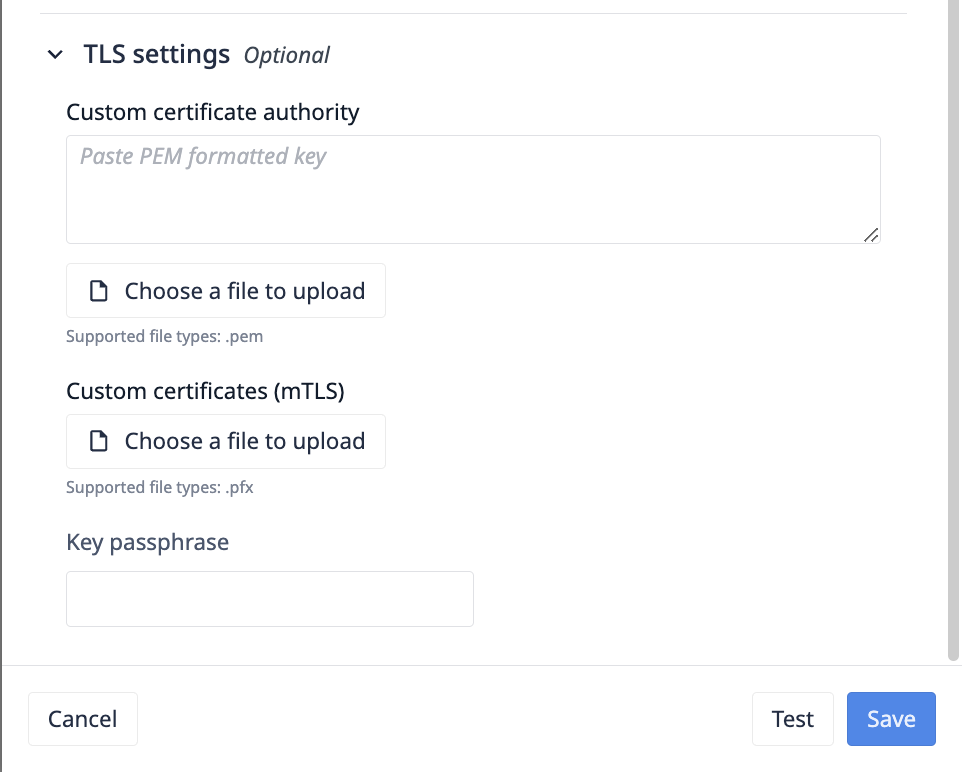
.pem formatted files can be uploaded to extend the default Node.js TLS Certificate authorities. This field updates the ca field in the Node.js TLS library.
"Optionally override the trusted CA certificates. Default is to trust the well-known CAs curated by Mozilla. Mozilla's CAs are completely replaced when CAs are explicitly specified using this option. The value can be a string or Buffer, or an array of strings and/or Buffers. Any string or Buffer can contain multiple PEM CAs concatenated together. The peer's certificate must be chainable to a CA trusted by the server for the connection to be authenticated. When using certificates that are not chainable to a well-known CA, the certificate's CA must be explicitly specified as a trusted or the connection will fail to authenticate. If the peer uses a certificate that doesn't match or chain to one of the default CAs, use the ca option to provide a CA certificate that the peer's certificate can match or chain to. For self-signed certificates, the certificate is its own CA and must be provided. For PEM encoded certificates, supported types are "TRUSTED CERTIFICATE", "X509 CERTIFICATE", and "CERTIFICATE". See also tls.rootCertificates."
An example valid CA should look something like this:
-----BEGIN CERTIFICATE-----
MIIDXTCCAkWgAwIBAgIJALaEfh0WW6ZcMA0GCSqGSIb3DQEBCwUAMEUxCzAJBgNV
BAYTAlVTMRYwFAYDVQQIDA1TYW4gRnJhbmNpc2NvMRIwEAYDVQQHDAlTYW4gSm9z
ZTEPMA0GA1UECgwGQ29tcGFueTAeFw0xNzA1MjUyMDE2NDRaFw0xNzA2MjQyMDE2
NDRaMEUxCzAJBgNVBAYTAlVTMRYwFAYDVQQIDA1TYW4gRnJhbmNpc2NvMRIwEAYD
VQQHDAlTYW4gSm9zZTEPMA0GA1UECgwGQ29tcGFueTCCASIwDQYJKoZIhvcNAQEB
BQADggEPADCCAQoCggEBAK9b+GVsTsmP7z9T2sh79uI/57pI1DBYNyOlwC0lfn8S
ebVKRg0qAsaF3V4rQ/RPZFGkTb2G7IKnWQZ6VB8AFLF6A9xuGe7vSG9ZcJ1AKM2u
OwYXzWQNWRFiW1XPOEIOXB+N7kMFTF6ZzE6RkV68hVqVn7Kx4s0RYAKM4ESJIMyF
64IHo5Rf6k3UtrOzy6M3LXM3axgUPHkHZh6/Pi3hecaF7w0qDhlS8UJLA4Gn1I6n
rFt1URVd7aSIEiOQhs7wAGDzCjNYMEQK9ih0GLd9ybCm0flYo5fJqfOhWiCFm2z3
SuGH9MSnVdrzxY6x23J/gE3spPvBopF6bRjQl0qiw1ZAgMBAAGjUDBOMB0GA1Ud
DgQWBBRZtdl2jSWpITThx8JZL4Jx0zCBdTAfBgNVHSMEGDAWgBRZtdl2jSWpITTh
x8JZL4Jx0zCBdTAMBgNVHRMEBTADAQH/MA0GCSqGSIb3DQEBCwUAA4IBAQARzA8y
dRMOfbU0QLOEp9V4B6nO8XBpe9uvtYwQjmb5ZX1bR2/P71bzeJwHK6v4RZl6V5fw
GzFdsMFI8JAlLJChM1BpsU7a5R+U/X6XJpCzjErhZ68Z3G+TQ4Bk9LhRlQTH5ld9
lR8aWpVPvPIqMtkJhbvWn9P4ysc8q3WYfILy9m9J8Hz3i3AaAEjS5WWm4BjKUMvO
FOxaxHHh+ZjNTVrpePyPDrWBkMKn9CF1lwVItJf2JdSYvX1kH5P/M5bsKdwZ95O6
d5xUl5Q09gxz/P0j4/QU+fTYhh8RUjKo4vvear9kKxQ2b/8IoQ6A54WHeFzG+h
SQL Connector Setup
| Field | Description |
|---|---|
| Server Address | The IP address or hostname of the database server. This is where the database is hosted and can be accessed. |
| Port | The port number on which the database server is listening. Common port numbers include 3306 for MySQL, 5432 for PostgreSQL, and 1433 for SQL Server. |
| SSL | Specifies whether SSL (Secure Sockets Layer) is used for encrypting the connection to the database server. It typically includes settings for SSL mode and certificates. |
| Database | The name of the specific database on the server that you want to connect to. This is where your data resides. |
| Username | The username required to authenticate and gain access to the database. This user should have the necessary permissions to perform operations on the database. |
| Password | The password associated with the username, used to authenticate the user to the database. This ensures secure access control. |
MQTT Connector Setup
Information on the creation of MQTT connectors is available here: How To Build Your First MQTT Connector
Was this article helpful?