Authorization and Access Control Using SAML
- 15 Aug 2024
- 4 Minutes to read
- Contributors


- Print
Authorization and Access Control Using SAML
- Updated on 15 Aug 2024
- 4 Minutes to read
- Contributors
- Print
Article summary
Did you find this summary helpful?
Thank you for your feedback
Instruction and methodology for defining your access policy and managing SAML for your organization.
SAML allows organizations to manage authentication and access rights of Tulip users using their existing identity provider (IdP). This guide will detail the available options for implementation of enterprise-level IdP integration via the SAML protocol.
Note
This article focuses on all the options for configuring your SAML + Tulip integration. For the guide on how to set this up within Tulip, see this guide.
Prework
- Understand Tulip user roles
- Bucket employees into role-based groups
- Identify who within your organization will configure your IdP and Tulip account
SAML + Tulip Configuration Options
Control Modes
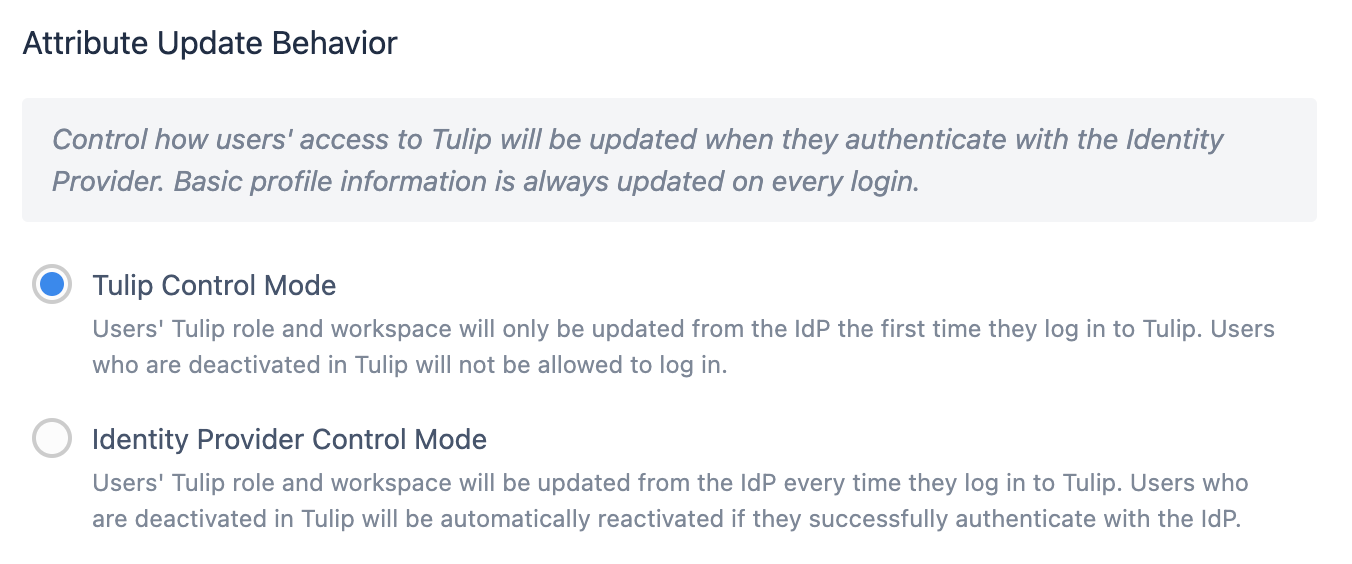
Tulip Control Mode indicates that a user's Tulip role and workspace are taken from the SAML attribute mapping **only the first time they log into Tulip. **
Users deactivated in Tulip are prevented from logging in.
IdP Control Mode means that a user's Tulip role and workspace will update from the IdP every time they log in.
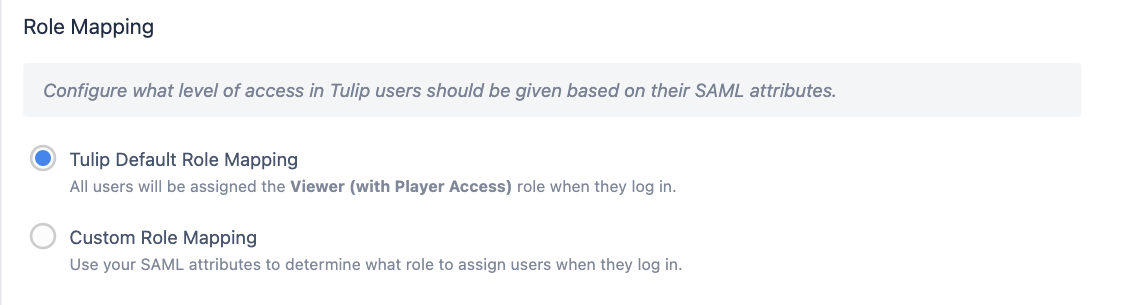
Default Role Mapping (Tulip Control Mode Only)
On the first login, all users are given a default level of access (Viewer with Player access). The account owner will then need to adjust the role to the appropriate level manually within Tulip.
Access Control
You can choose to add an access control attribute, where the user needs to have a specific value in order to access Tulip. This is especially relevant for default mapping scenarios, where you still want to dictate who should be able to access Tulip, regardless of role or workspace.
For example:
- A user must have an attribute TulipAccessControl set to True
- A user must belong to a group TulipUsers, which is exposed through an attribute TulipAccessControl (see example below)
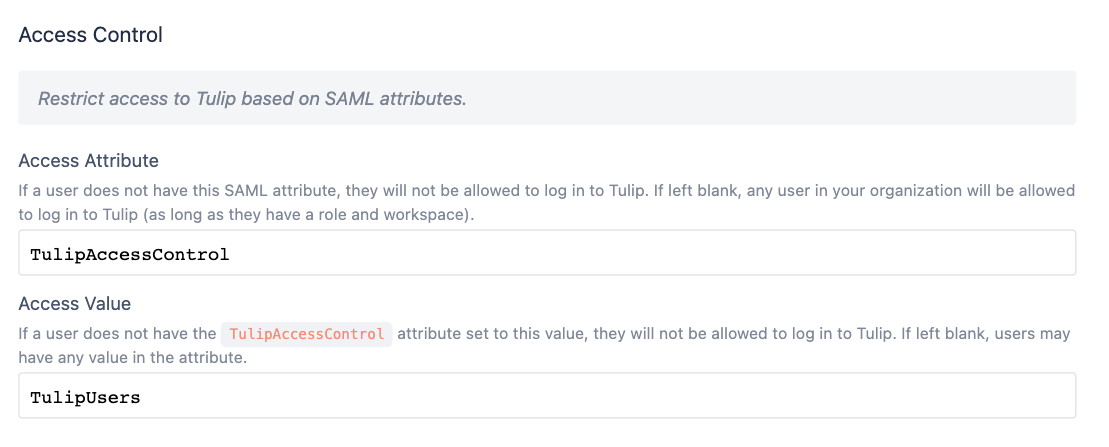
If you choose to use Access Control, you will need to request that your IdP team adds the defined attribute and value to all users who should have any access to Tulip.
Workspaces
You can read about workspaces in detail here
Like the role attribute, you will now be given the option to map users to a specific workspace automatically when the user is initially created. After user creation, account owners can flexibly move users between workspaces.
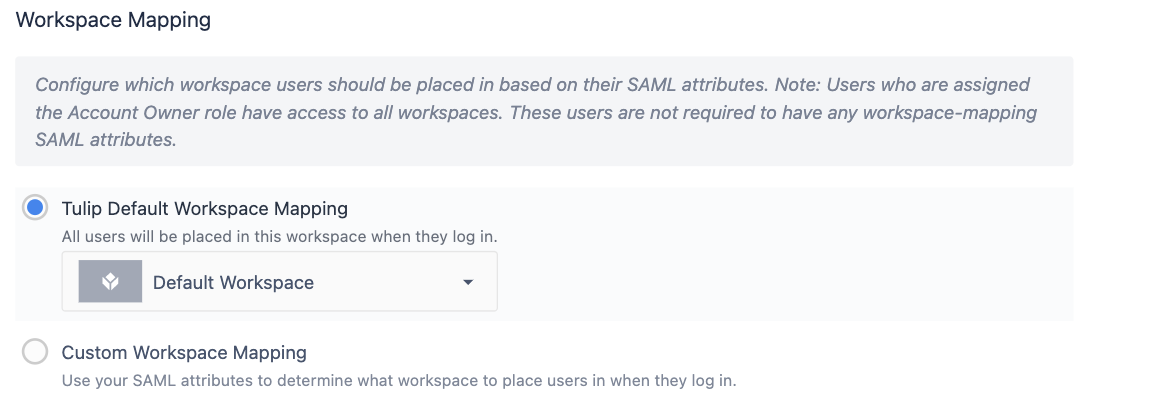
SAML Custom Workspace Mapping
Multiple Workspaces
Please note that you can only map users into multiple workspaces in Tulip Control Mode.
In IdP Control Mode, each user can only be a member of a single workspace.
On the first login, a user is assigned workspace access based on the group presented in their workspace attribute. After that point, Tulip will no longer read the workspace attribute of that user, and any workspace changes must be done in the platform by an account owner.
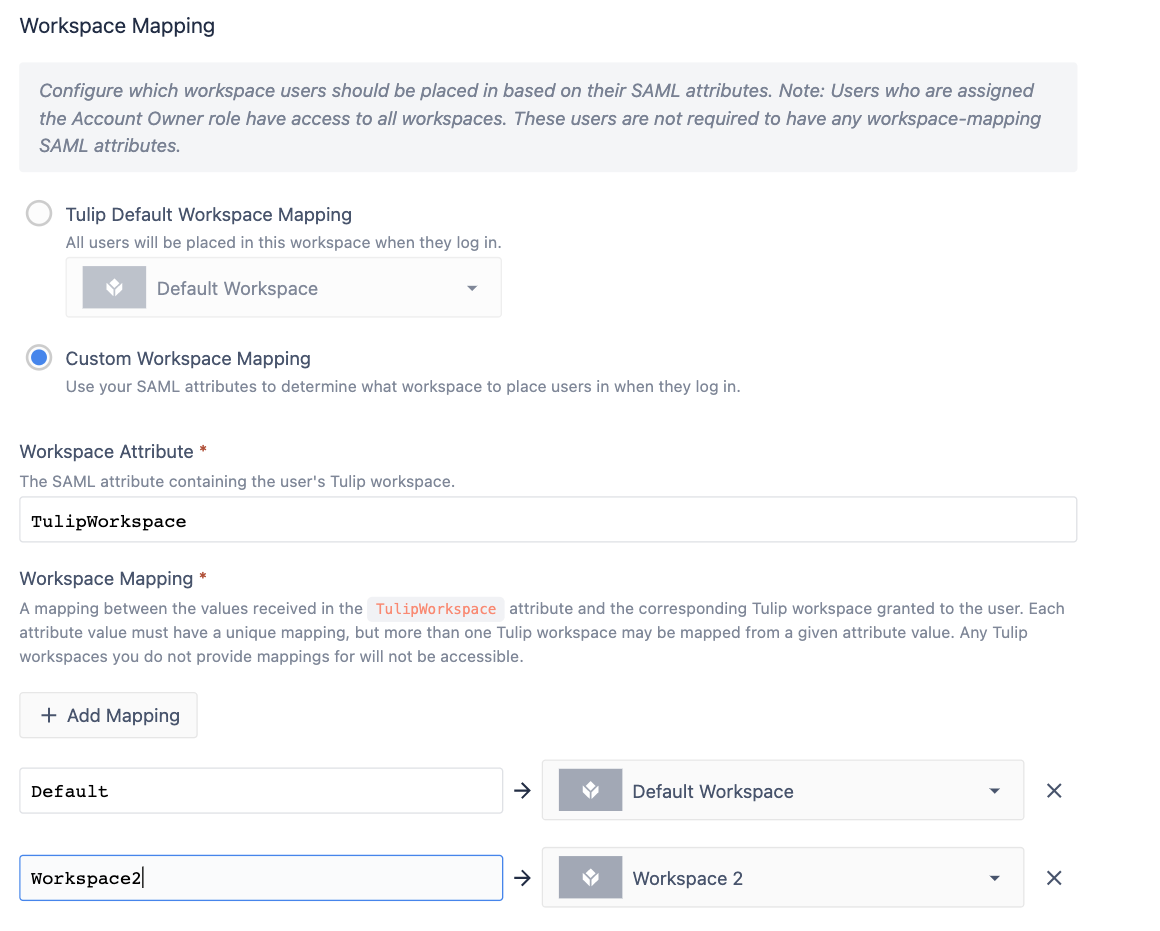
Default Workspace Mapping
On the first login, all users are given access to a default workspace of your choosing. An account owner can then adjust workspace access.
Example- Creating Access Groups within Your IdP
Creating standardized Tulip access groups
Every user will need a role attribute specified in your IdP so that Tulip can determine their privileges once they’ve authenticated with their IdP username and password.
You can also use this Role field to determine what sites they have access to using a standard naming convention. While a role field can just be a set variable, it is recommended that you assign the user to Tulip specific groups and map those to an attribute.
Role
Review the Tulip user roles here. Every user will need at least one role. If a user has multiple roles, Tulip will select the one with the highest access.
An example role is Account Owner.
NOTE:
There needs to be at least one Account Owner per site.
Site
Let’s say your organization has two sites, with a Tulip Instance for each.
We can denote each site by its location (Texas and London, respectively).
Combining Site and Role
We can combine these two properties to create a group matrix for users to be assigned. We recommend that organizations append or prepend the value with Tulip, so it’s easier to filter by.
Convention: tulip-siteRole
| acme-texas.tulip.co | acme-london.tulip.co | |
| Account Owner | tulip-texasAccountOwner | tulip-londonAccountOwner |
| Application Supervisor | tulip-texasApplicationSupervisor | tulip-londonApplicationSupervisor |
| Viewer | tulip-texasViewer | tulip-londonViewer |
| Operator | tulip-texasOperator | tulip-londonOperator |
| ... |
If Jane Smith is the site lead at the Texas site, you would assign her to the group tulip-texasAccountOwner. If Jane Smith also needs view access into the London site, she could be added to the group tulip-londonViewer.
Exposing These Groups as an Attribute for Tulip
In your IdP, Jane should have an attribute, tulip-role, where any groups she is a member of that contain the prefix “tulip-” will be mapped.
When she signs into Tulip, the attribute tulip-role has two values: tulip-texasAccountOwner, tulip-londonViewer. You can configure the role mapping for each Tulip instance individually so that she receives the correct permissions in each instance.
Global Roles
You may also want to create global access roles, as a "Viewer" role for example. These users will be able to log into every Tulip instance with the same permissions. The recommended format for that is:
tulip-globalViewer
You would need to set up this role mapping on each individual instance within the SAML configuration page in Account Settings to enable this user to access each instance.
Did you find what you were looking for?
You can also head to community.tulip.co to post your question or see if others have faced a similar question!
Was this article helpful?