How To Create A Bill of Materials (BOM) Table
- 30 Sep 2022
- 4 Minutes to read
- Contributors


- Print
How To Create A Bill of Materials (BOM) Table
- Updated on 30 Sep 2022
- 4 Minutes to read
- Contributors
- Print
Article Summary
Share feedback
Thanks for sharing your feedback!
How To Create A Bill of Materials (BOM) Table
Learn how to build a BOM table and dynamically deduct inventory in Tulip.
In this article you will learn...
- How to create a list of products and their associated materials in a Table
- How to use these values to dynamically deduct from an inventory Table
Note: This topic is featured in the "Build an Advanced Work Instructions App" course in Tulip University.
In Tulip, you can create an inventory table, and then deduct from that inventory table every time an operator completes an operation.
However, you might also want to set up a BOM table within Tulip so that you can deduct from inventory based on a preset list of products and their raw materials.
This guide will help you set up that BOM table and then use it within apps. In this example, an operator will enter a work order number as well as a product name. Based on the product name, you will be able to access the correct entry in the BOM table.
Here is what we will cover:
- Creating the BOM table
- Creating the Form Step to retrieve the correct record from the table
- Upon completion of the app, deducting from the inventory table
This is an advanced Tables tutorial. Before continuing, you should be able to build an inventory table and a "work orders" table in Tulip.
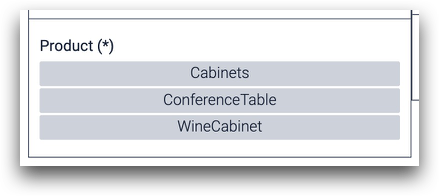
In this example, imagine that you are in charge of manufacturing furniture. You make three products:
- Cabinets
- Conference Tables
- Wine Cabinets
This tutorial will also be helpful if you need to create an ingredient list for chemicals or pharmaceutical products.
Creating the BOM Table
Note: You can include up to 100 fields in a table.
Before you set up your BOM table, you must decide on a unique identifier for each record. Two common options are:
- A product name
- A SKU number
We will use a product name in this example. Each product requires the following parts:
- Small screws
- Large screws
- 2 x 4 lumber
- 4 x 6 lumber
- Maple Stain
So, create a number field for each of these 5 parts, because we want to track the quantity needed for each product.
Here's an example of the table with one record called "Cabinets":

The fields are called:
- screws1_quantity
- screws2_quantity
- 2x4Quantity
- 4x6Quantity
- stain_maple_quantity
You can present all of these values to an operator using the Table Record widget Or, you can just load the values into an app and use them within Triggers logic.
Here are all three products in this furniture factory:

- Cabinets
- ConferenceTable
- WineCabinet
After building the Table, you are now ready to load each product into an app.
Loading Products Via A Form Step
Now, we need an easy way for an operator to load product details into the app. We can do this with a Dropdown widget in a Form Step.
Create a new app (or step) that allows operators to enter a new work order. This Form Step can allow operators to enter many details, like:
- Work Order ID (text)
- Create Date (text)
- Product (dropdown)
- Customer (dropdown)
- Intended ship date (text)
- Quantity (number)
It might look like this:

You could use this Form Step to create a new work order in a table. For now, we will focus on loading information based on the Product dropdown.
Add a variable to the Product dropdown and name it prod_type.
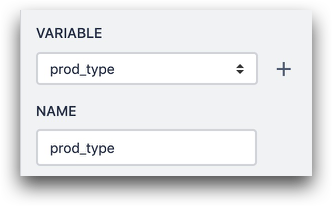
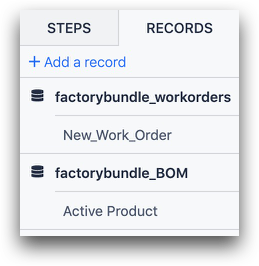
Then, create a record placeholder called "Active Product" using the BOM table.
Now we need to load the correct product into the app. Each dropdown option should exactly match the ID of a record in the table.
Next, create a custom action that fires when the "Submit" button is pressed. You can name the trigger "Load Product".
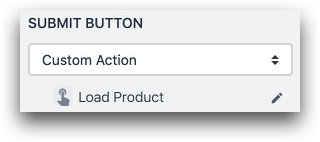
It should load a record based on the value of the Product dropdown widget.
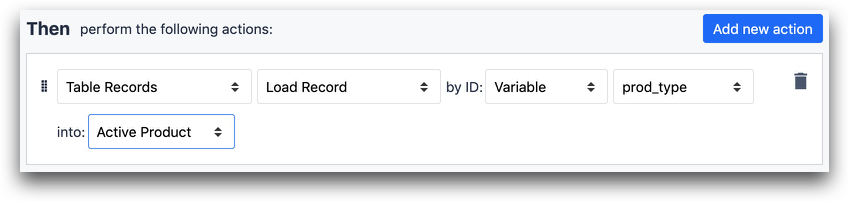
- "Table Records" "Load Record" by ID: "Variable" "prod_type" into "Active Product"
Now you can access the BOM within the app.
Deducting From Inventory Upon Completion
When an operator presses the "Complete" button, you can now deduct from inventory based on the quantities in the BOM.
First, you will need to load all relevant inventory records into the app. Follow this guide to learn how to do that. In this case, there are 5 inventory records that need to be loaded.

Then, edit the trigger that fires when the Complete button is pressed. Add an action for each inventory item that you would like to deduct. You will need to use the "Expression" data type, and add a negative sign in front of the value that you would like to deduct.
We are deducting based on a field from the BOM table. Here's what that looks like:
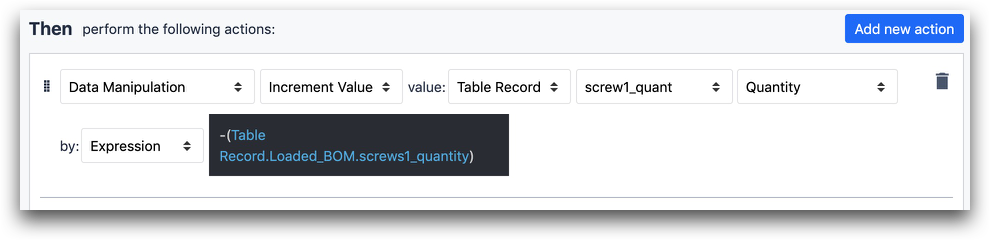
- "Data Manipulation" "Increment Value" value: "Table Record" "screw1_quant" "Quantity" by: "Expression" "-Table Record.Loaded_BOM.screws1_quantity"
Here's what the Expression Editor looks like for this action:
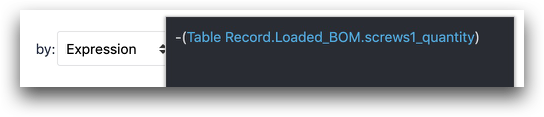
Replicate this statement for each item in inventory that you would like to reduce.
Further Reading
Did you find what you were looking for?
You can also head to community.tulip.co to post your question or see if others have faced a similar question!
Was this article helpful?